How to Control Your Application's Network Bandwidth
by Duncan Hardie
Published October 2012 (Updated February 2020)
Using Oracle Solaris 11
How to use Oracle Solaris 11 network resource management to apply bandwidth limits directly to a data link (such as a VNIC) or to a user-defined flow. Bandwidth limits applied to a data link affect all network traffic and let you control how bandwidth is shared among applications, while defining a flow lets you limit certain types of traffic based on packet attributes, such as the IP address or transport protocol.
Introduction
This article describes how to use the network resource management in Oracle Solaris 11 to control your network traffic infrastructure. You will learn how to use bandwidth control on data links to share network bandwidth among your applications while preventing misbehaving applications from taking all the network bandwidth. You will also learn about flows, which control specific network traffic bandwidth, for example, to limit the impact of a weekly backup on the system.
The network continues to be at the core of the data center. Being able to monitor, control, guarantee, and reconfigure network infrastructure with ease is key to providing applications with the data connections they require. Oracle Solaris 11 provides a reliable, secure, and scalable infrastructure to meet the growing needs of data center implementations.
In particular, with the introduction of network virtualization, Oracle Solaris 11 provides innovative network resource management capabilities that provide a level of control that was not possible before, from slicing up large network pipes or controlling the impact of certain network traffic on your system to running applications in the cloud or in the data center.
Overview of the Environment We Will Implement
The Oracle Solaris 11 network architecture (also known as project Crossbow) introduces the idea of network virtualization and network resource control to the OS. This network architecture is built-in to Oracle Solaris 11 and ready to run in your Oracle Solaris 11 environment.
In this how-to guide, we will investigate an example scenario where there is a single system with a single network connection that we want to distribute among three distinct virtual application environments. By combining network virtualization with Oracle Solaris Zones (built-in OS virtualization), we will configure the system to ensure that key applications receive the network bandwidth they require while restricting lower-priority traffic.
We will create two Oracle Solaris Zones for Web-facing applications (webzone-1 and webzone-2), which will do the majority of the work running Web server application stacks to support an online purchasing tool. Obviously, webzone-1 and webzone-2 are key to the business and need to get the majority of the shared network bandwidth.
In addition, there is a single Oracle Solaris Zone, backupzone, whose role is to contain the backup software and run it on a weekly basis. While this is a necessary function, it is important to ensure that the backup operation does not impact the webzone-2 network traffic. All this will be achieved by using a combination of Oracle Solaris Zones, virtual NICs (VNICs), and network bandwidth control.
Network bandwidth control involves implementing a limit on how much bandwidth can be consumed. This bandwidth limit can be applied in two ways:
- Directly to a data link (such as a VNIC)
- To a user-defined flow
A bandwidth control limit on a data link is usually applied to a VNIC and reduces the maximum bandwidth of that VNIC. The applied bandwidth limit also defines the virtual link speed of the VNIC. For example, you could use this method to make a VNIC on a 10 GB network connection perform like a 1 GB connection by allowing it to take only 10% of the bandwidth, and then you could share the remaining bandwidth among other VNICs (and the applications they connect to). This is generally done to split up large aggregated network pipes or to prevent a specific application or zone from taking all the network bandwidth, usually to the detriment of applications on the rest of the system.
In contrast to virtualizing a data link into multiple VNICs with configured virtual link speeds, flows provide a way of categorizing packets based on an attribute and then controlling how resources are used to process the packets. The attribute is based on information in the packet's header and can be one of the following:
- IP address
- Transport protocol name (UDP, TCP, or SCTP)
- Application port number, for example, port 21 for FTP
- DS field attribute (IPv6 packets only)
What this means is that, unlike a limit on a data link (which effects all traffic), you can choose to limit only certain types of traffic. For example, you might want to limit FTP traffic on your systems to protect other network traffic, or you might want to limit traffic to your backup server. Figure 1 illustrates this concept using the IP address attribute to limit the network bandwidth to the backup server.
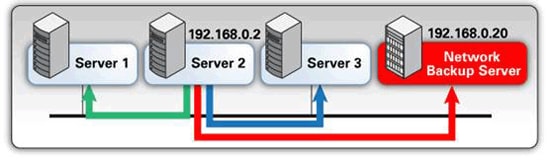
Figure 1. A Flow Control Limiting Traffic to a Backup Server
The configuration shown in Figure 1 still allows your backups to be completed, but it prevents the backup operation from significantly impacting the other traffic on your network.
After following the procedures in this article, you will have three Oracle Solaris Zones configured with network resource management, as shown in Figure 2.
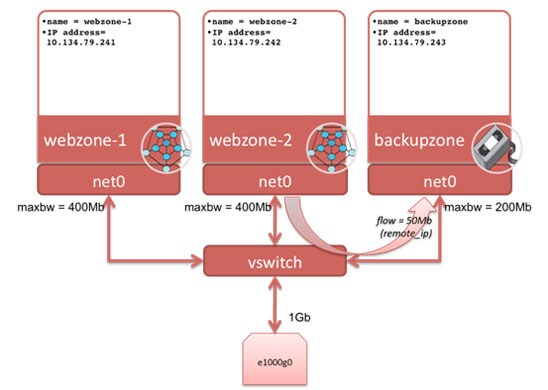
Figure 2. Three Zones with Their Associated VNICs and Network Resource Control
For webzone-1, we will use bandwidth control on its VNIC to ensure the maximum bandwidth (maxbw) it can access is 400 Mb, effectively giving it a portion of the physical data link (network port e1000g0) connection. We will do the same for webzone-2. For backupzone, we will set a limit of 200 Mb on its VNIC because backup data is less important than the Web traffic. In addition, we will restrict the flow of traffic from webzone-2 to backupzone to 50 Mb because we do not want webzone-2 to be significantly affected by the weekly backup.
Note: For a deeper explanation about virtual networking, its configuration, and its administration, refer to Managing Network Virtualization and Network Resources in Oracle Solaris 11.4. For a full discussion on Oracle Solaris Zones, refer to Introduction to Oracle Solaris 11.4 Virtual Environments .
Before We Start
Let's check the status of both the network and the Oracle Solaris Zones configuration, as shown in Listing 1, so we can understand the changes that we will make later.
root@global:~# dladm show-phys
LINK              MEDIA                STATE      SPEED  DUPLEX    DEVICE
net0              Ethernet             up         1000   full      e1000g0
net1              Ethernet             unknown    0      unknown   e1000g1
root@global:~# dladm show-link
LINK                CLASS     MTU    STATE    OVER
net0                phys      1500   up       --
net1                phys      1500   unknown  --
root@global:~# ipadm show-addr
ADDROBJ           TYPE     STATE        ADDR
lo0/v4            static   ok           127.0.0.1/8
net0/_a           static   ok           10.134.79.168/24
lo0/v6            static   ok           ::1/128
root@global:~# zoneadm list -cv
  ID NAME             STATUS     PATH                           BRAND    IP
   0 global           running    /                              solaris  shared
Listing 1: Checking the Current Configuration
We have used three different commands to gather some basic information. The ipadm command is new to Oracle Solaris 11, and dladm has been significantly improved.
The dladm command allows us to examine and manage the data link layer. In this case, by using the show-phys option, we can see that there are two physical network devices (e1000g0 and e1000g1), with link names of net0 and net1. Only net0 is up and configured, and it has link speed of 1 Gb. We also use the show-link option to check that there are no additional links.
By way of contrast, the ipadm command lets us look at and manage the IP layer. In Listing 1, we can see that our net0 device is up and it is configured with the static IP address of 10.134.79.168. There are also two network loopback devices, one each for IPv4 and IPv6, respectively.
Finally the zoneadm command lets us look at Oracle Solaris Zone information. In Listing 1, we can see there is only one zone instance configured, the global zone. The global zone is a special Oracle Solaris Zone. It is both the default zone for the system and the zone used for system-wide administrative control.
Creating the First Zone (webzone-1)
Oracle Solaris Zones are built-in virtualization technology available in Oracle Solaris. In this scenario, we will use them to contain our different environments. This article will not discuss the details of creating Oracle Solaris Zones. For information about creating Oracle Solaris Zones, refer to " How to Get Started Creating Oracle Solaris Zones in Oracle Solaris 11."
We start by using zonecfg to create our first zone, webzone-1. The minimum information required to create a zone is its name and its zonepath.
root@global:~# zonecfg -z webzone-1
webzone-1: No such zone configured
Use 'create' to begin configuring a new zone.
zonecfg:webzone-1> create
create: Using system default template 'SYSdefault'
zonecfg:webzone-1> set zonepath=/zones/webzone-1
By default, Oracle Solaris Zones come configured with an automatic VNIC called anet. We can see that by using the info option in the zonecfg environment, as shown in Listing 2. We will set bandwidth controls on this VNIC later.
zonecfg:webzone-1> info
zonename: webzone-1
zonepath: /zones/webzone-1
brand: solaris
autoboot: false
bootargs:
file-mac-profile:
pool:
limitpriv:
scheduling-class:
ip-type: exclusive
hostid:
fs-allowed:
anet:
	linkname: net0
	lower-link: auto
	allowed-address not specified
	configure-allowed-address: true
	defrouter not specified
	allowed-dhcp-cids not specified
	link-protection: mac-nospoof
	mac-address: random
	mac-prefix not specified
	mac-slot not specified
	vlan-id not specified
	priority not specified
	rxrings not specified
	txrings not specified
	mtu not specified
	maxbw not specified
	rxfanout not specified
Listing 2: Checking for the Default VNIC
We can see that the link will be called net0, and its lower physical data link will automatically be used.
Finally, we verify that the zone configuration is correct and commit the configuration before exiting the zone:
zonecfg:webzone-1> verify
zonecfg:webzone-1> commit
zonecfg:webzone-1> exit
The next step is to install our zone, as shown in Listing 3. You will need access to your Image Packaging System (IPS) repository to install a zone.
root@global:~# zoneadm -z webzone-1 install
A ZFS file system has been created for this zone.
Progress being logged to /var/log/zones/zoneadm.20111020T102419Z.webzone-1.install
       Image: Preparing at /zones/webzone-1/root.

 Install Log: /system/volatile/install.8658/install_log
 AI Manifest: /tmp/manifest.xml.XSaa5q
  SC Profile: /usr/share/auto_install/sc_profiles/enable_sci.xml
    Zonename: webzone-1
Installation: Starting ...

              Creating IPS image
              Installing packages from:
                  solaris
                      origin:  http://ipkg.us.oracle.com/solaris11/dev/
DOWNLOAD                                  PKGS       FILES    XFER (MB)
Completed                              167/167 32062/32062  175.8/175.8

PHASE                                        ACTIONS
Install Phase                            44311/44311

PHASE                                          ITEMS
Package State Update Phase                   167/167
Image State Update Phase                         2/2
Installation: Succeeded

        Note: Man pages can be obtained by installing pkg:/system/manual

 done.

        Done: Installation completed in 108.653 seconds.

  Next Steps: Boot the zone, then log into the zone console (zlogin -C)

              to complete the configuration process.

Log saved in non-global zone as /zones/webzone-1/root/var/log/zones/zoneadm.20111020T102419Z.webzone-1.install
Listing 3: Installing the Zone
Finally we boot the zone and specify its system configuration using the System Configuration Tool. For more details on how to do this, see either "How to Configure Oracle Solaris 11 Using the sysconfig Command" or "How to Get Started Creating Oracle Solaris Zones in Oracle Solaris 11."
root@global:~# zoneadm -z webzone-1 boot; zlogin -C webzone-1
Specify the following information as you go through the set of interactive screens in the System Configuration Tool:
- Computer Name: webzone-1
- Network connection configured: Manually
- IP address: 10.134.79.241
- Default router: 10.134.79.1
- DNS Name Service: Do not configure DNS
- Alternative Name Service: None
- Time zone Region: Europe
- Time Zone Location: Britain (UK)
- Time Zone: GB
Also specify a root password and create a user account by specifying a user name and user password.
When you are finished, you should see the zone continue to boot. When you find yourself at the zone console login prompt, exit the console using the "~." escape sequence to leave the zone console environment, as shown in Listing 4.
Exiting System Configuration Tool. Log is available at:
/var/tmp/install/sysconfig.log
Hostname: webzone-1
Oct 20 11:38:49 webzone-1 sendmail[10870]: My unqualified host name (webzone-1) unknown; sleeping for retry
Oct 20 11:38:49 webzone-1 sendmail[10874]: My unqualified host name (webzone-1) unknown; sleeping for retry

webzone-1 console login:
webzone-1 console login: ~.
[Connection to zone 'webzone-1' console closed]
Listing 4: Exiting the Zone
You can see the status of the newly created webzone-1 by using the zoneadm command:
root@global:~# zoneadm list -v
  ID NAME             STATUS     PATH                           BRAND    IP
   0 global           running    /                              solaris  shared
  11 webzone-1        running    /zones/webzone-1               solaris  excl
A First Look at the Network
Now that webzone-1 is running, let's look at what that means for the network and the automatic VNIC that was created:
root@global:~# dladm show-link
LINK                CLASS     MTU    STATE    OVER
net0                phys      1500   up       --
net1                phys      1500   unknown  --
webzone-1/net0      vnic      1500   up       net0
root@global:~# dladm show-vnic
LINK                OVER         SPEED  MACADDRESS        MACADDRTYPE       VID
webzone-1/net0      net0         1000   2:8:20:7a:7b:f    random            0
Both the show-link and show-vnic options show VNIC net0 for webzone-1 has been automatically created, and both commands show that the name of the zone that the VNIC is associated with has been appended to the link name.
Next let's log in to webzone-1 using the zlogin command to see what we have there, as shown in Listing 5.
root@global:~# zlogin webzone-1
[Connected to zone 'webzone-1' pts/3]
Oracle Corporation	SunOS 5.11	11.0	November 2011
root@webzone-1:~# ipadm show-addr
ADDROBJ           TYPE     STATE        ADDR
lo0/v4            static   ok           127.0.0.1/8
net0/v4           static   ok           10.134.79.241/24
lo0/v6            static   ok           ::1/128
net0/v6           addrconf ok           fe80::8:20ff:fe7a:7b0f/10
root@webzone-1:~# dladm show-link
LINK                CLASS     MTU    STATE    OVER
net0                vnic      1500   up       ?
root@webzone-1:~# dladm show-vnic
LINK                OVER         SPEED  MACADDRESS        MACADDRTYPE       VID
net0                ?            1000   2:8:20:7a:7b:f    random            0
root@webzone-1:~# ping 10.134.79.1
10.134.79.1 is alive
root@webzone-1:~# exit
logout

[Connection to zone 'webzone-1' pts/3 closed]
Listing 5: Logging In to the Zone
As Listing 5 shows, our IP address has been configured against our zone's automatic VNIC. While we can see the VNIC information using the dladm command, note that the rest of the global zone network information is not available to us from inside the zone. Finally, we ping our default router to make sure that the network is working and then we exit the zone.
Setting Up the Other Two Oracle Solaris Zones
Now let's set up webzone-2 and backupzone. Because zones are so easy to set up and an automatic VNIC is created by default for each zone, we can do this in just a few commands. This time, we pass the required arguments straight into zonecfg instead of using the interactive method:
root@global:~# zonecfg -z webzone-2 "create; set zonepath=/zones/webzone-2"
root@global:~# zonecfg -z backupzone "create; set zonepath=/zones/backupzone"

root@global:~# zoneadm -z webzone-2 install
(output omitted)

root@global:~# zoneadm -z backupzone install
(output omitted)
Remember to set the correct IP addresses when going through the System Configuration Tool process. (Refer to Creating the First Zone (webzone-1) if you want to see the other details to add.)
- For
webzone-2, use IP address 10.134.79.242. - For
backupzone, use IP address 10.134.79.243.
From the global zone, check that the appropriate automatic VNICs have been added to your newly created zones:
root@global:~# dladm show-vnic
LINK                OVER         SPEED  MACADDRESS        MACADDRTYPE       VID
webzone-1/net0      net0         1000   2:8:20:7a:7b:f    random            0
webzone-2/net0      net0         1000   2:8:20:5e:ed:38   random            0
backupzone/net0     net0         1000   2:8:20:45:47:17   random            0
You can see that each of the zones now has a VNIC associated with it.
Adding Bandwidth Control to a Data Link
So far, we have not added any bandwidth control to our VNICs. Let's see how we can control the network traffic quickly and easily.
Note: In this section, we will use the netperf tool to simulate network load. For information on how to get netperf, see The Solaris blog.
No Bandwidth Control
Before we start, let's investigate the system in its current state, so we can see the effects of the bandwidth limits when we apply them later. Let's start by sending network traffic between webzone-1 and webzone-2.
Note: Because the VNICs of both webzone-1 and webzone-2 are on the same virtual switch (see Figure 2), the network traffic between these two zones flows though the virtual switch and never leaves the system. This provides good performance.
We need netserver running on the target system to get netperf working, so access webzone-2 first, check the IP address, and start netserver, as shown in Listing 6.
root@global:~# zlogin webzone-2
[Connected to zone 'webzone-2' pts/5]
Oracle Corporation      SunOS 5.11      11.0    November 2011
root@webzone-2:~# cd /shared/Netperf
root@webzone-2:/shared/Netperf# ipadm show-addr
ADDROBJ           TYPE     STATE        ADDR
lo0/v4            static   ok           127.0.0.1/8
wz2_vnic0/v4      static   ok           10.134.79.242/24
lo0/v6            static   ok           ::1/128
wz2_vnic0/v6      addrconf ok           fe80::8:20ff:feb1:e2f5/10
root@webzone-2:/shared/Netperf# ./netserver
Starting netserver with host 'IN(6)ADDR_ANY' port '12865' and family AF_UNSPEC
root@webzone-2:/shared/Netperf# exit
logout

[Connection to zone 'webzone-2' pts/5 closed]
Listing 6: Starting netserver
Now, in webzone-1, check that we can ping webzone-2 and start the netperf test, as shown in Listing 7.
root@global:~# zlogin webzone-1
[Connected to zone 'webzone-1' pts/3]
Oracle Corporation  SunOS 5.11  11.0    November 2011
root@webzone-1:~# cd /shared/Netperf/
root@webzone-1:/shared/Netperf# ping 10.134.79.242
10.134.79.242 is alive
root@webzone-1:/shared/Netperf# ./netperf -H 10.134.79.242
MIGRATED TCP STREAM TEST from ::ffff:0.0.0.0 (0.0.0.0) port 0 AF_INET to 10.134.79.242 (10.134.79.242) port 0 AF_INET
Recv   Send    Send
Socket Socket  Message  Elapsed
Size   Size    Size     Time     Throughput
bytes  bytes   bytes    secs.    10^6bits/sec

128000  49152  49152    9.99     3950.60
root@webzone-1:/shared/Netperf# exit
logout

[Connection to zone 'webzone-1' pts/5 closed]
Listing 7: Starting netperf
We can see the throughput is 3950 Mb/sec. An interesting side point is that this value demonstrates one of the big benefits of applications being side by side in Oracle Solaris Zones on a single system (rather than having the applications on separate systems). There is no need for the network traffic to go off-system into the network, meaning you can achieve very high throughput with very low latency compared to systems with, say, 1 Gb physical network connections.
Adding Bandwidth Control and Retesting
Now let's add the first of our bandwidth controls. We will do this to the VNIC net0 associated with webzone-1. Looking at the current status from the global zone, we can see that no bandwidth limits have been applied:
root@global:~# dladm show-vnic
LINK                OVER      SPEED  MACADDRESS        MACADDRTYPE       VID
webzone-1/net0      net0      1000   2:8:20:7a:7b:f    random            0
webzone-2/net0      net0      1000   2:8:20:5e:ed:38   random            0
backupzone/net0     net0      1000   2:8:20:45:47:17   random            0
We can also look at the maxbw (maximum bandwidth) property for net0 on webzone-1 in isolation:
root@global:~# dladm show-linkprop -p maxbw webzone-1/net0
LINK     PROPERTY        PERM VALUE          DEFAULT  POSSIBLE
webzone-1/net0 maxbw     rw   --             --             --
Let's set a bandwidth of 400 Mb/sec, per Figure 2. We will use zonecfg to do this, as shown in Listing 8, so the bandwidth limit is persistent between webzone-1 reboots.
root@global:~# zonecfg -z webzone-1
zonecfg:webzone-1> select anet linkname=net0
zonecfg:webzone-1:anet> set maxbw=400M
zonecfg:webzone-1:anet> end
zonecfg:webzone-1> verify
zonecfg:webzone-1> commit
zonecfg:webzone-1> exit
root@global:~# dladm show-vnic
LINK                OVER         SPEED  MACADDRESS        MACADDRTYPE       VID
webzone-1/net0      net0         1000   2:8:20:7a:7b:f    random            0
webzone-2/net0      net0         1000   2:8:20:5e:ed:38   random            0
backupzone/net0     net0         1000   2:8:20:45:47:17   random            0
Listing 8: Setting the Bandwidth for webzone-1
We can see that the bandwidth limit has not been applied dynamically, so we need to reboot webzone-1:
root@global:~# zoneadm -z webzone-1 shutdown
root@global:~# zoneadm -z webzone-1 boot
root@global:~# dladm show-vnic
LINK                OVER         SPEED  MACADDRESS        MACADDRTYPE       VID
webzone-2/net0      net0         1000   2:8:20:5e:ed:38   random            0
backupzone/net0     net0         1000   2:8:20:45:47:17   random            0
webzone-1/net0      net0         400    2:8:20:7a:7b:f    random            0
Note: It is also possible to set the limit on the webzone-1 VNIC without requiring a zone reboot by setting the maxbw property on webzone-1/net0 using dladm from the global zone. The setting would be valid until webzone-1 reboots, at which point, the webzone-1 configuration would again take effect.
Now we can see that webzone-1/net0 has a virtual link speed of 400 Mb because of the applied bandwidth limit.
Let's repeat the netperf tests again and see the results. We didn't stop the netserver in webzone-2, so we can simply run the client side of the test in webzone-1 again, as shown in Listing 9.
root@global:~# zlogin webzone-1
[Connected to zone 'webzone-1' pts/3]
Oracle Corporation  SunOS 5.11  11.0    November 2011
root@webzone-1:~# cd /shared/Netperf/
root@webzone-1:/shared/Netperf# ./netperf -H 10.134.79.242
MIGRATED TCP STREAM TEST from ::ffff:0.0.0.0 (0.0.0.0) port 0 AF_INET to 10.134.79.242 (10.134.79.242) port 0 AF_INET
Recv   Send    Send
Socket Socket  Message  Elapsed
Size   Size    Size     Time     Throughput
bytes  bytes   bytes    secs.    10^6bits/sec

128000  49152  49152    10.03     425.17
root@webzone-1:/shared/Netperf# exit
logout

[Connection to zone 'webzone-1' pts/3 closed]
Listing 9: Repeating the netperf Test
We have successfully limited all traffic into webzone-1 to a throughput of 400 Mb/sec.
Note: We have checked the bandwidth limit within the system, zone to zone, but this limit also applies to all traffic to and from webzone-1, including traffic from outside the system.
Adding Bandwidth Limits to the Other VNICs
Let's complete our bandwidth tasks by adding the maxbw limits to the other VNICs on the systems. As you saw in Figure 2, we need to set maxbw for webzone-2 to 400 Mb and maxbw for backupzone to 200 Mb. This simulates splitting up our 1 Gb physical link into smaller virtual links. Again, we use zonecfg to do this from the global zone and reboot each zone for the changes to take effect, as shown in Listing 10.
root@dcsw-79-168:~# zonecfg -z webzone-2
zonecfg:webzone-2> select anet linkname=net0
zonecfg:webzone-2:anet> set maxbw=400M
zonecfg:webzone-2:anet> end
zonecfg:webzone-2> verify
zonecfg:webzone-2> commit
zonecfg:webzone-2> exit
root@dcsw-79-168:~# zoneadm -z webzone-2 shutdown
root@dcsw-79-168:~# zoneadm -z webzone-2 boot

root@dcsw-79-168:~# zonecfg -z backupzone
zonecfg:backupzone> select anet linkname=net0
zonecfg:backupzone:anet> set maxbw=200M
zonecfg:backupzone:anet> end
zonecfg:backupzone> verify
zonecfg:backupzone> commit
zonecfg:backupzone> exit
root@dcsw-79-168:~# zoneadm -z backupzone shutdown
root@dcsw-79-168:~# zoneadm -z backupzone boot
Listing 10: Setting Bandwidth Limits on the Other Zones
We can check that our changes have been implemented using the dladm command.
root@dcsw-79-168:~# dladm show-vnic
LINK                OVER         SPEED  MACADDRESS        MACADDRTYPE       VID
webzone-1/net0      net0         400    2:8:20:96:dc:ef   random            0
webzone-2/net0      net0         400    2:8:20:59:e8:e5   random            0
backupzone/net0     net0         200    2:8:20:8:a6:71    random            0
Let's check what happens when we have two bandwidth limits in place. We can do this by observing the throughput between webzone-2 and backupzone. Because we rebooted the zones, we need to restart netserver in webzone-2 again first. We can then log in to backupzone and run the test from there, as shown in Listing 11.
root@dcsw-79-168:~# zlogin webzone-2
[Connected to zone 'webzone-2' pts/5]
Oracle Corporation      SunOS 5.11      11.0    November 2011
root@webzone-2:~# cd /shared/Netperf/
root@webzone-2:/shared/Netperf# ./netserver
Starting netserver with host 'IN(6)ADDR_ANY' port '12865' and family AF_UNSPEC
root@webzone-2:/shared/Netperf# exit
logout

[Connection to zone 'webzone-2' pts/5 closed]
root@dcsw-79-168:~# zlogin backupzone
[Connected to zone 'backupzone' pts/5]
Oracle Corporation  SunOS 5.11  11.0    November 2011
root@backupzone:~# cd /shared/Netperf/
root@backupzone:/shared/Netperf# ./netperf -H 10.134.79.242
MIGRATED TCP STREAM TEST from ::ffff:0.0.0.0 (0.0.0.0) port 0 AF_INET to 10.134.79.242 (10.134.79.242) port 0 AF_INET
Recv   Send    Send
Socket Socket  Message  Elapsed
Size   Size    Size     Time     Throughput
bytes  bytes   bytes    secs.    10^6bits/sec

128000  49152  49152    10.02     209.85
root@backupzone:/shared/Netperf# exit
logout

[Connection to zone 'backupzone' pts/5 closed]
Listing 11: Checking the Bandwidth Limits
Not surprisingly, we can see that the lower of the two bandwidth limits of webzone-2 and backupzone is applied and we get a throughput of 200 Mb/sec.
Now stop netserver in webzone-2, as shown in Listing 12.
root@global:~# zlogin webzone-2
[Connected to zone 'webzone-2' pts/5]
Oracle Corporation      SunOS 5.11      11.0    November 2011
root@webzone-2:/shared/Netperf# ps -ef | grep netserver
    root 24119 24005   0 15:11:52 pts/5       0:00 grep netserver
    root 24013 21495   0 13:12:24 ?           0:00 ./netserver
root@webzone-2:/shared/Netperf# kill 24013
root@webzone-2:/shared/Netperf# ps -ef | grep netserver
    root 24126 24005   0 15:12:58 pts/5       0:00 grep netserver
root@webzone-2:/shared/Netperf# exit
logout

[Connection to zone 'webzone-2' pts/5 closed]
Listing 12: Stopping netserver
Adding Flow Control
While bandwidth limits on data links affect all traffic going through, say, a VNIC, bandwidth limits applied to flows allow us to limit traffic based on network packet attributes. In this case, let's examine limiting the traffic between webzone-2 and backupzone by using the IP address attribute.
In contrast to the setup used earlier in this article where resource control was applied from the global zone, this time, we will apply resource control from within an Oracle Solaris Zone. This shows the flexibility of network resource control. You can apply control both at the global zone and non-global zone level, that is, administrators have full control of the system while the zone users have full control of their own zones.
No Flow Control
Let's start by quickly checking the performance between webzone-2 and backupzone. This time, let's start the netserver in backupzone, as shown in Listing 13.
root@global:~# zlogin backupzone
[Connected to zone 'backupzone' pts/5]
Oracle Corporation      SunOS 5.11      11.0    November 2011
root@backupzone:~# cd /shared/Netperf/
root@backupzone:/shared/Netperf# ./netserver
Starting netserver with host 'IN(6)ADDR_ANY' port '12865' and family AF_UNSPEC
root@backupzone:/shared/Netperf# exit
logout

[Connection to zone 'backupzone' pts/5 closed]
Listing 13: Starting netserver in backupzone
Run the netperf test in webzone-2, as shown in Listing 14.
root@dcsw-79-168:~# zlogin webzone-2
[Connected to zone 'webzone-2' pts/5]
Oracle Corporation      SunOS 5.11      11.0    November 2011
root@webzone-2:~# cd /shared/Netperf/
root@webzone-2:/shared/Netperf# ./netperf -H 10.134.79.243
MIGRATED TCP STREAM TEST from ::ffff:0.0.0.0 (0.0.0.0) port 0 AF_INET to 10.134.79.243 (10.134.79.243) port 0 AF_INET
Recv   Send    Send
Socket Socket  Message  Elapsed
Size   Size    Size     Time     Throughput
bytes  bytes   bytes    secs.    10^6bits/sec

128000  49152  49152    10.16     199.33
root@webzone-2:/shared/Netperf# exit
logout

[Connection to zone 'webzone-2' pts/5 closed]
Listing 14: Starting netperf in webzone-2
We can see that our bandwidth limits on the VNICs are still in place and we get a throughput of 200 Mb/sec.
Adding Flow Control Within backupzone and Retesting
Now let's apply the flow control, as described above. Rather than applying bandwidth limits to all traffic, we just want to limit the traffic flow between webserver-2 and backupzone. We will use flowadm and the IP address attribute remote_ip, which allows us to enter a remote IP address as the attribute to switch on. This will create a flow in backupzone around traffic from and to webzone-2.
root@dcsw-79-168:~# zlogin backupzone
[Connected to zone 'backupzone' pts/5]
Oracle Corporation  SunOS 5.11  11.0    November 2011
root@backupzone:~# flowadm show-flow
root@backupzone:~# flowadm add-flow -l net0 -a remote_ip=10.134.79.242 webzone-2-flow
root@backupzone:~# flowadm show-flow
FLOW        LINK                IPADDR                   PROTO  LPORT   RPORT   DSFLD
webzone-2-flow net0             RMT:10.134.79.242/32     --     --      --      --
The key command is flowadm add-flow. We tell the command which link to apply itself against (net0), the attribute we want to switch on (remote_ip), the value of that attribute (the IP address of webzone-2), and, finally, the name of the flow itself (webzone-2-flow).
We have created our flow, but we have no limits on it. Let's set maxbw (the maximum bandwidth) to 50 Mb. We will use the show-flowprop option to examine what properties we can set, and we will use set-flowprop to actually set maxbw:
root@backupzone:~# flowadm show-flowprop
FLOW         PROPERTY        VALUE          DEFAULT        POSSIBLE
webzone-2-flow maxbw         --             --             --
root@backupzone:~# flowadm set-flowprop -p maxbw=50 webzone-2-flow
root@backupzone:~# flowadm show-flowprop
FLOW         PROPERTY        VALUE          DEFAULT        POSSIBLE
webzone-2-flow maxbw            50          --             --
root@backupzone:~# exit
logout

[Connection to zone 'backupzone' pts/5 closed]
You can also look at the newly created flow properties from the global zone. Note how the name of the zone to which the flow is applied is prepended to the flow name:
root@dcsw-79-168:~# flowadm show-flow
FLOW        LINK                IPADDR                   PROTO  LPORT   RPORT   DSFLD
backupzone/webzone-2-flow backupzone/net0 RMT:10.134.79.242/32   -- --  --      --
root@dcsw-79-168:~# flowadm show-flowprop backupzone/webzone-2-flow
FLOW         PROPERTY        VALUE          DEFAULT        POSSIBLE
backupzone/webzone-2-flow maxbw    50       --             --
Now let's run the netperf test from webzone-2 again, as shown in Listing 15. (Remember netserver is still running in backupzone.)
root@dcsw-79-168:~# zlogin webzone-2
[Connected to zone 'webzone-2' pts/5]
Oracle Corporation      SunOS 5.11      11.0    November 2011
root@webzone-2:~# cd /shared/Netperf/
root@webzone-2:/shared/Netperf# ./netperf -H 10.134.79.243
MIGRATED TCP STREAM TEST from ::ffff:0.0.0.0 (0.0.0.0) port 0 AF_INET to 10.134.79.243 (10.134.79.243) port 0 AF_INET
Recv   Send    Send
Socket Socket  Message  Elapsed
Size   Size    Size     Time     Throughput
bytes  bytes   bytes    secs.    10^6bits/sec

128000  49152  49152    10.18      51.39
root@webzone-2:/shared/Netperf# exit
logout

[Connection to zone 'webzone-2' pts/5 closed]
Listing 15: Running netperf from webzone-2 Again
You can see that we have limited the throughput to 50 Mb/sec, as set in the flow properties.
Verifying Flow Control Does Not Affect webzone-1
As a last test, let's check what happens when we perform the same test from webzone-1, as shown in Listing 16. (Remember that netserver is still running in backupzone.)
root@dcsw-79-168:~# zlogin webzone-1
[Connected to zone 'webzone-1' pts/5]
Oracle Corporation      SunOS 5.11      11.0    November 2011
root@webzone-1:~# cd /shared/Netperf/
root@webzone-1:/shared/Netperf# ./netperf -H 10.134.79.243 MIGRATED TCP
 STREAM TEST from ::ffff:0.0.0.0 (0.0.0.0) port 0 AF_INET to 10.134.79.243 (10.134.79.243) port 0 AF_INET
Recv   Send    Send
Socket Socket  Message  Elapsed
Size   Size    Size     Time     Throughput
bytes  bytes   bytes    secs.    10^6bits/sec

128000  49152  49152    10.06     202.61
root@webzone-1:/shared/Netperf# exit
logout

[Connection to zone 'webzone-1' pts/5 closed]
Listing 16: Running netperf from webzone-1
This time, we get a result of 200 Mb/sec. The throughput from webzone-1 to backupzone is unaffected by the bandwidth limit we applied to our flow in backupzone. This is because the remote IP address does not match the value we entered, and so it does not fit the flow's rule.
Complete this section by stopping the netserver in backupzone, as shown in Listing 17.
root@dcsw-79-168:~# zlogin backupzone
[Connected to zone 'backupzone' pts/5]
Oracle Corporation  SunOS 5.11  11.0    November 2011
root@backupzone:~# ps -ef | grep netserver
    root 20562 19383   0 09:53:49 ?           0:00 ./netserver
    root 20641 20636   0 10:10:53 pts/5       0:00 grep netserver
root@backupzone:~# kill 20562
root@backupzone:~# exit
logout

[Connection to zone 'backupzone' pts/5 closed]
Listing 17: Stopping netserver
Conclusion
In this article, we saw how to apply bandwidth limits to both data links and user-defined flows as a way to manage network traffic. We also saw how data link bandwidth limits all traffic through that data link, whereas bandwidth limits applied to flows can be based on network packet characteristics. In isolation or in combination, these technologies allow you to create a flexible and controlled environment to meet all your network resource management needs.
See Also
Here are some additional resources:
- Download Oracle Solaris 11
- Access Oracle Solaris 11 product documentation
- Access all Oracle Solaris 11 how-to guides
- Learn more with Oracle Solaris 11 training and support
- See Managing Network Virtualization and Network Resources in Oracle® Solaris 11.4
- See Introduction to Oracle Solaris 11.4 Virtual Environments
- See "How to Script Oracle Solaris 11 Zones Creation for a Network-In-a-Box Configuration"
- See "How to Get Started Creating Oracle Solaris Zones in Oracle Solaris 11"
- See "How to Configure Oracle Solaris 11 using the
sysconfigcommand" - See the official Oracle Solaris blog
About the Author
Duncan Hardie is an Oracle Solaris Product Manager with responsibility for Oracle Solaris cloud, virtualization, and networking technologies. Joining Oracle as part of the Sun acquisition, he started in engineering working on device drivers for fault-tolerant products and moved into customer-facing roles related to monitoring, high-performance computing, and virtualization. In his current role as an Oracle Solaris Product Manager, Duncan works to help define, deliver, and position Oracle Solaris offerings.
Revision 1.2, 02/20/2020