 Create
Your First Process Application from Scratch in Oracle Integration
Create
Your First Process Application from Scratch in Oracle Integration Before You Begin
This tutorial shows you how to create a simple process application from scratch, test it, and then activate it for end users. It takes approximately 30 minutes to complete.
Background
With Oracle Integration, you have the power to connect your cloud and on-premises applications, automate processes, build web and mobile applications, and analyze your business results—all in one place.
Let's focus on process automation. In this tutorial, you'll create a simple Travel Request Application using a pre-defined business process. A business process contains a start event, an end event, and other flow elements. A pre-defined process pattern provides you with a simplified version of the most commonly created business processes. You'll use the Start with a form business process, and edit it to build an application that is best-suited for your organizational needs. You'll then test the application and activate it to a production environment.
After you successfully activate the application to the production environment, an administrator must assign end users to the roles defined in the application process. Users can't access the application until their role is assigned.
What Do You Need?
- Access to an instance of Oracle Integration.
- Sign-in credentials (user name and password) assigned to the developer role. See Oracle Integration Roles and Privileges in Administering Oracle Integration.
 Create
a Process Application
Create
a Process Application
Let’s begin by creating a framework for your process application. You enter a name, description, and location for your new application.
- Sign in to Oracle Integration. The Welcome page opens.
- In the Oracle Integration navigation pane, click Processes.
- On the Process Applications page, click Create, and then select Create an Application.
- In the Create Process Applications page,
enter the following values:
- Name:
Travel Request Application - Space: [New Space]
- Space name:
HR - Description:
Application for
                        users to request business travel
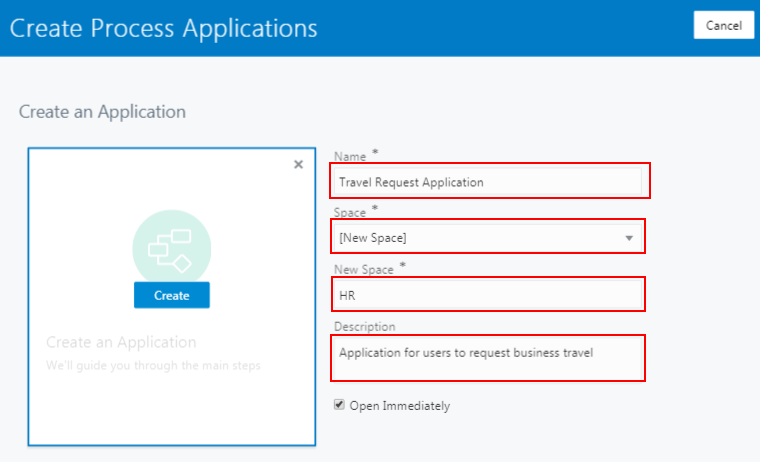
Description of the illustration createApp.png - Name:
- Click Create. Your Travel Request Application opens. Notice that the Application Home tab is currently displayed.
 Add a
Business Process
Add a
Business Process
You'll start your process with a form, and add swimlanes and flow elements to create a business process for requesting travel. Swimlanes are marked by horizontal lines that run across the process editor canvas. You must add all elements within the swimlanes. Roles are assigned to swimlanes to determine which members of your business organization are responsible for performing the work of your process-based application.
- On the Application Home tab, click Start
with a form. Users will start your Travel Request
Application by filling out a form.

Description of the illustration createProcess.png - In the Create Process dialog, enter the
following values:
- Name:
Travel Request Process - Description:
Business process
                        for the Travel Request Application
Notice that the Form pattern is already selected.
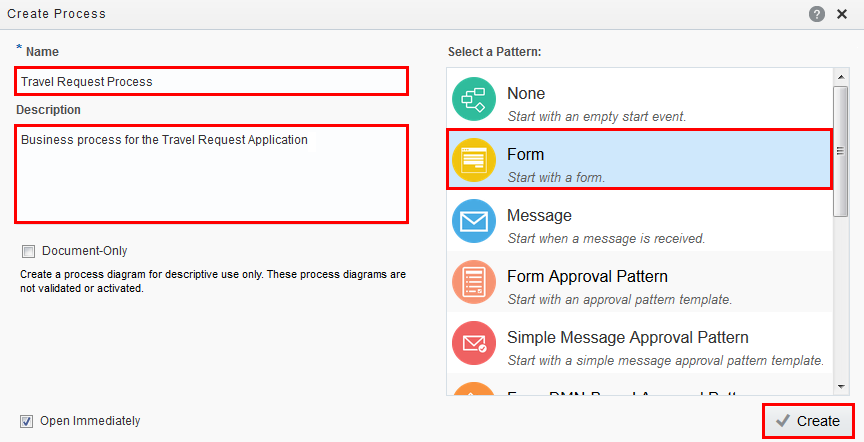
Description of the illustration startForm.png - Name:
- Click Create.
- On the Travel Request Process tab,
double-click the gray vertical bar on the left, enter
Employeeas the role, and press Enter.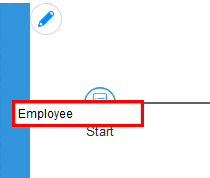
Description of the illustration swimlane.png - Below the Employee swimlane, click Create
New Lane to add another lane.
Description of the illustration addLane.png - Double-click Process Owner, enter
Manageras the role, and press Enter.
 Design
the Travel Request Process
Design
the Travel Request Process
Next, start designing the business process by renaming the flow elements and adding flow elements from the Elements Palette.
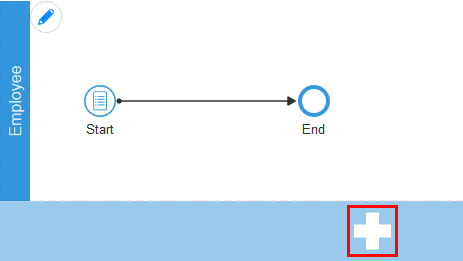
- In the Employee swimlane, double-click the
label for the Start event, and rename it
Submit
                    Travel Request
. Drag and drop the End event to the Manager swimlane and rename itTravel Request Complete.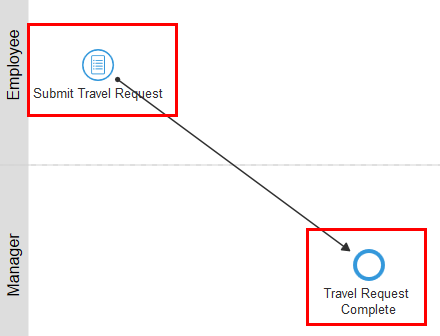
Description of the illustration processEditor.png - Expand Human in the Elements
Palette, and drag and drop the Approve
task to the Manager swimlane in the process
flow diagram.
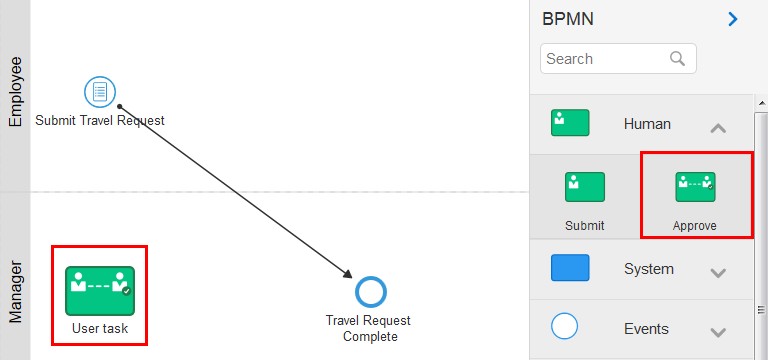
Description of the illustration elementsPalette.png - Rename User task to
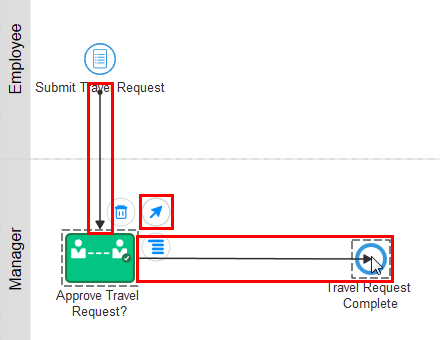
Approve Travel Request? - Click the tip of the sequence flow between the Submit Travel Request event and the Travel Request Complete event. Drag and drop it onto the Approve Travel Request? human task.
- Click the Approve Travel Request? human
task, click Add Sequence Flow
 , and drag the sequence flow
onto the Travel Request Complete event.
, and drag the sequence flow
onto the Travel Request Complete event.
Description of the illustration sequenceFlows.png - In the application toolbar, click Save to
save your changes and then click Publish.
Publishing makes the current version of the application
available to other team members responsible for developing the
application.

Description of the illustration savePublish.png - In the Publish Application dialog, select
Make snapshot, and enter the following
values:
- Snapshot name:
Initial Travel Request Application - Comment:
Created Travel Request
                        Application and Travel Request Process
When you make a snapshot, a copy of the application is created at its current state. You can revert to the snapshot at any time.

Description of the illustration publishApp.png - Snapshot name:
- Click Publish.
 Add a
Web Form
Add a
Web Form
Let’s add a web form to the business process with travel request details.
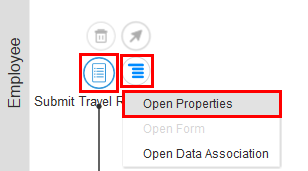
- On the Travel Request Process tab, click Submit
Travel Request, click Menu, and
select Open Properties.
Description of the illustration openProperties.png - On the General tab, enter the following
values:
- Title:
Travel Request Application - Description:
Use web form to
                        request travel
The title becomes the application name that your users see in the runtime environment.
- Title:
- Next to the Form field, click Create
New Web Form. Enter
TravelRequestFormfor the Name, select Open Immediately, and click Create.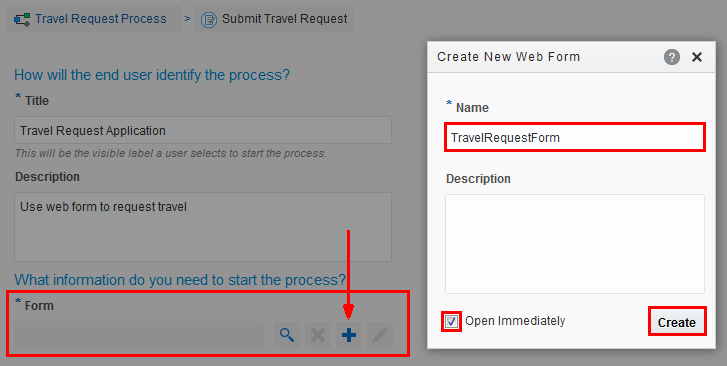
Description of the illustration createForm.png - In the Web Form editor, drag and drop the Input
text control from the Basic Palette to
the form’s canvas.

Description of the illustration webformDesigner.png - Select the control you added to the canvas. Notice how the
tabs in the Properties pane change to
General and Styling. The General
tab is selected by default. Click Name and
enter
Name, and then click Label and enterName. The Name field applies to the control itself and the Label field determines its display name.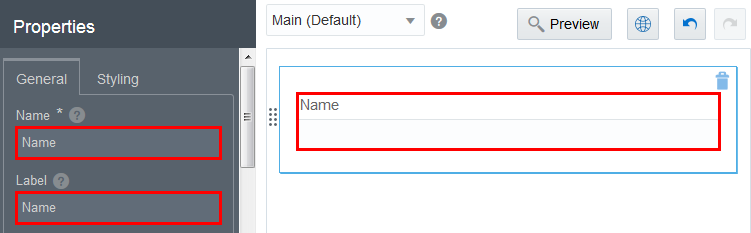
Description of the illustration addControl.png - Drag and drop the following controls from the Basic
Palette and the Advanced Palette
onto the canvas and configure them as follows:
Control Name Name Label Email Email Email Date StartDateofTravel Start Date of Travel Date1 EndDateofTravel End Date of Travel Money TravelAmount Travel Amount TextArea Justification Justification 
Description of the illustration webformComplete.png To reposition a control, drag its dotted handle and drop it in a new location. The controls around it adjust accordingly. As you edit, click Undo and Redo as needed.
- Click Save.
 Edit
Properties for the Manager Task
Edit
Properties for the Manager Task
You use human tasks to model how the user interacts with the application. You can configure the assignment of the human task, the form to use to display its information, the title and summary to identify it, the due date and priority, the number of reminders to send to its assignees, and the action to take when it reaches a certain deadline.
- On the Travel Request Process tab, click Approve
Travel Request?, click Menu
 , and then
click Open Properties.
, and then
click Open Properties. - On the General tab, enter the following
values:
- Form: TravelRequestForm (Click Browse to search for and select the form)
- Presentation: Main (Default)
- Title: Select Expression
Editor. In the Expression Mode
box, enter
 "Travel for " + TravelRequestForm.name +
                        ", " + TravelRequestForm.justification + ", $" +
                        TravelRequestForm.travelAmount
. Click OK. - Task Summary: Select Expression
Editor. In the Expression Mode
box, enter
"TravelRequestForm.justification + " " +
                        TravelRequestForm.startDateofTravel"
. Click OK. - Due Date:
0M7d0h0m - Priority: High
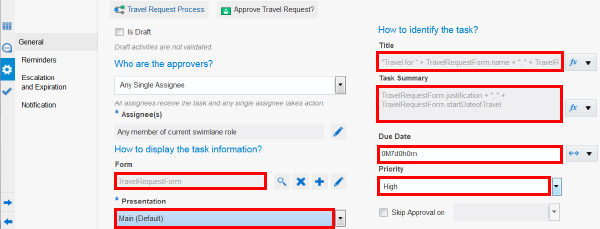
Description of the illustration humantaskProperties.png - Click Save.
Data associations define the information passed between flow elements. When you add human tasks and start events to a business process, the data associations are automatically created. Therefore, you don't need to create any data associations for this Travel Request application. Now you can test your application and activate the application to a runtime environment, which lets you play with and refine it if needed.
 Activate Your Application to a Test Environment
You can now test your Travel Request Application and step through each part of the process, fix any errors, and make sure everything functions as expected.
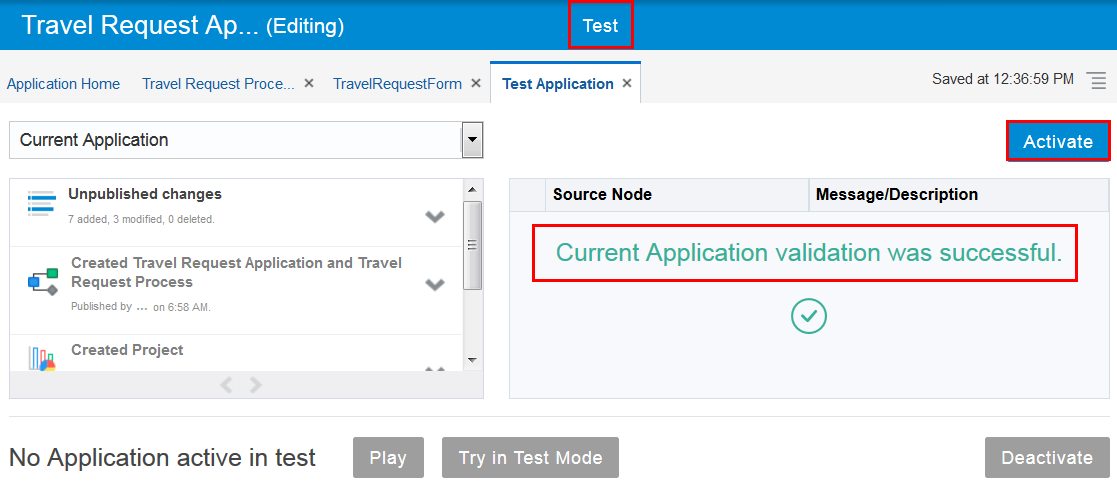
- In the application toolbar, click Test,
confirm that your application is valid, and then click Activate.
Description of the illustration testApp.png - In the Activate to Test dialog, ensure Add
Me to All Roles is selected. This option enables
you to test the process without having to map users to each
role.

Description of the illustration testActivate.png - Click Activate.
- Click OK to close the information box confirming that the application was activated successfully.
 Try
Your Application in Test Mode
Try
Your Application in Test Mode
You can now try your entire Travel Request Application in test mode. Because you added yourself to all roles when you activated the application, you can submit requests as an employee, and then you can also approve or reject requests as the manager.
- On the Test Application tab, click
Try in Test Mode to open the runtime environment in
testing mode to test the application version you previously
activated.
A new browser tab opens displaying the runtime environment, where end users start applications and complete assigned tasks. Notice the Testing Mode option in the toolbar, indicating test activation.
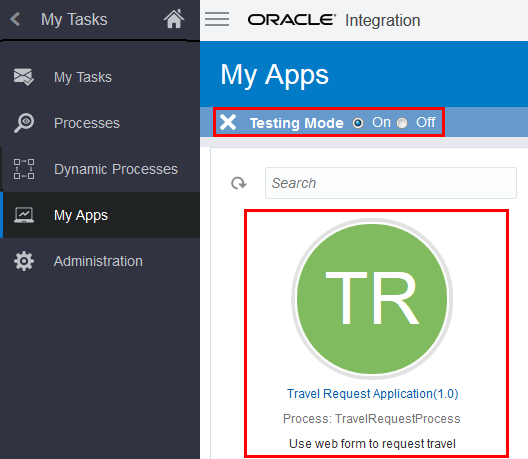
Description of the illustration testMode.png - Click Travel Request Application to start the application.
- Complete the travel form, and click Submit.
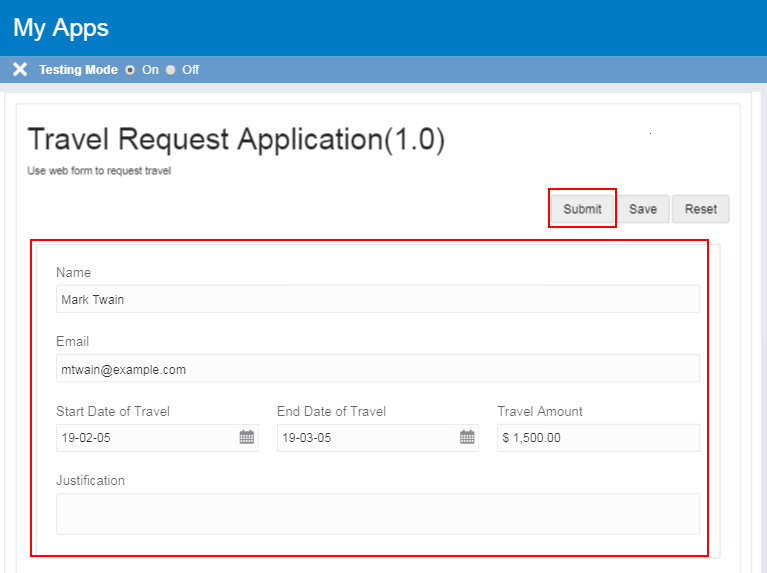
Description of the illustration travelform.png - Start the application again and submit a second travel request.
- Click My Tasks. Two tasks that begin with
Travel for... are now listed on the My
Tasks page.
As a user assigned the Approver role, you have two choices to process a travel request. You can approve it or you can reject it. Let's test each option.
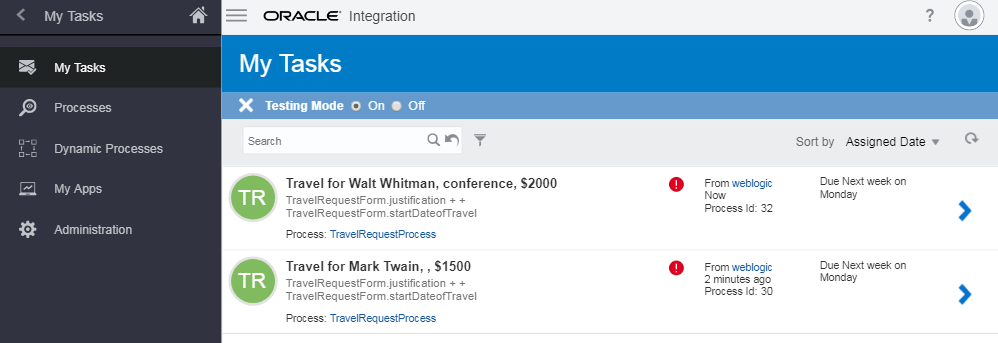
Description of the illustration tasks.png - Select the first task and click Approve.
You completed the task so it gets removed from your list of
tasks.
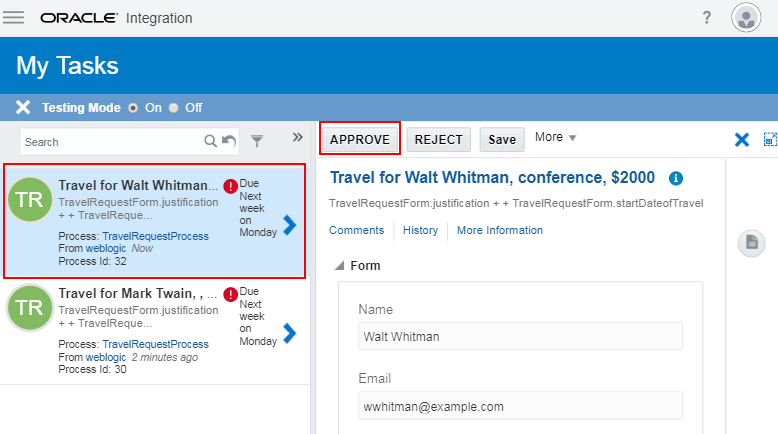
Description of the illustration approvetask.png - Select the next task and this time click Reject. You don't approve of this travel. You completed the task so it's removed from your list.
- Click Finish Testing
 , and click Home
 .
.

Description of the illustration testMode.png - In the Oracle Integration navigation pane, click Processes.
- On the Process Applications page, click Travel
Request Application to open your customized
application again.

Description of the illustration travelApp.png - Click Publish.
- In the Publish Application dialog, select
Make snapshot, and enter the following
values:
- Snapshot name:
Completed Travel Request Application - Comment:
Completed Travel
                        Request Application
- Snapshot name:
- Click Publish.
 Activate
Your Process Application
Activate
Your Process Application
Now that the application is good to go, you can activate the application and make it available to the end users.
- Click Activate.

Description of the illustration deployApp.png - On the Activation tab, click Activate new version.
- In the Activate Application to My Server
dialog, click Validate.

Description of the illustration selectApp.png - For the Validation Result step, ensure that the application validated successfully, and click Options.
- For the Activation Options step, enter
1.1for the Revision id, select Make Default, leave the other fields as is, and click Activate.
Description of the illustration deployment.png - Ensure that the application is activated successfully, and then click Finish.
 What's
Next?
What's
Next?
Congratulations! You completed all the tasks and successfully created and activated your first process application from scratch. However, for the application to be available to your end users, roles need to be assigned to the users. Roles define what end users can do, such as whether they can start the application and what tasks they’re assigned. After your application has been activated to a production server and is ready for use, contact your administrator to assign roles for the application.
 Want
to Learn More?
Want
to Learn More?
- Assigning and Managing Roles in Using Processes in Oracle Integration.
- What is Process? in Using Processes in Oracle Integration.