Before You Begin
Purpose
In this tutorial, you create and build a Java Platform, Enterprise Edition (Java EE) application using Maven. You learn how to apply JavaServer Faces 2.1 (JSF 2.1) to support a web application by using the NetBeans integrated development environment (IDE). You install, configure, build, and create an executable Web Archive (WAR) file using Maven.
Time to Complete
Approximately 90 minutes
Background
Maven is a build management tool that's central to project build tasks such as compilation, packaging, and artifact management. Maven uses a strict Extensible Markup Language (XML) rule set to promote consistency while maintaining flexibility. Because most Java-centric continuous integration systems integrate well with Maven, it's a good choice for an underlying build system.
The primary goals of Maven are to provide:
- A project model that's reusable, maintainable, and easier to comprehend
- Plug-ins or tools that interact with the declarative model
The Maven project structure and contents are
declared in the pom.xml file. The
Project Object Model (POM) is the fundamental unit
of the entire Maven system.
JSF is the user interface (UI) framework for Java web applications. It's designed to significantly ease the burden of writing and maintaining applications that run on a Java application server and render their UIs back to a target client. JSF provides ease-of-use:
- Makes it easy to construct a UI from a set of reusable UI components
- Simplifies the migration of application data to and from the UI
- Helps manage the UI state across server requests
- Provides a simple model for wiring client-generated events to server-side application code
Scenario
In this tutorial, you create an application that calculates simple interest.
What Do You Need?
Setting Up the Maven Environment
In this section, you verify the Java installation, extract the Maven archive and install it in a directory of your choice, set the Maven environment, and verify the Maven installation.
- Verify the Java installation:
java -version
Description of this image The output displays the Java version that you installed.
-
Extract the downloaded Maven x.x.x archive to a local directory.
The operating system archive names are:
-
Windows: apache-maven-3.x.x-bin.zip
-
Linux: apache-maven-3.x.x-bin.tar.gz
-
Mac: apache-maven-3.x.x-bin.tar.gz
Note: This OBE shows you how to install and create a Java EE application by using Maven in a Windows operating system.
-
-
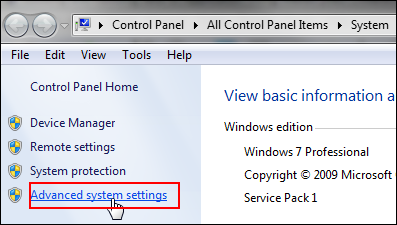
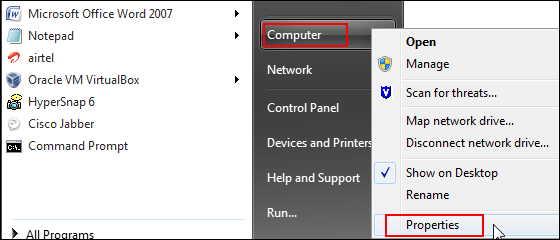
Click Start, right-click Computer, and select Properties.
-
On the Control Panel home page, click Advanced system settings.
Description of this image -
In the System Properties dialog box, click the Advanced tab, and then click Environment Variables.
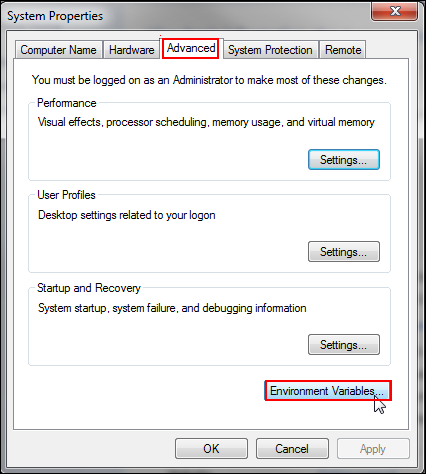
Description of this image The Environment Variables dialog box is displayed.
-
Under System variables, click New, add
M2, M2_HOME,andMAVEN_OPTSto environment variables, and click OK.
Description of this image -
Under System variables, click New, enter the following values in the Edit System Variable dialog box, and click OK. In the Environment Variables dialog box, click OK.
-
Variable Name:
Path -
Variable value:
%M2%(Enter the value afterbinin the system path.)

Description of this image -
-
Verify the Maven installation:
mvn -version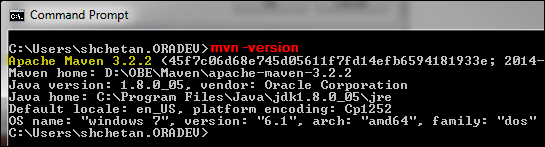
Description of this image The output displays the installed Maven version, the Java version, the Java home, the Default locale, and the name of the operating system.
Creating the Maven Enterprise Application Project
In this section, you create a web application project by using the Maven web application archetype bundled with the IDE.
| Archetype | Project Created |
|---|---|
| Enterprise application | Enterprise application (EAR) |
| Web application | Web application (WAR) |
| Enterprise JavaBeans (EJB) module projects | EJB project (JAR) |
Creating the Project
-
In NetBeans IDE 8.0, select New Project from the File menu.

Description of this image -
On the Choose Project page, select Maven from Categories, select Web Application from Projects, and click Next.

Description of this image -
On the Name and Location page, enter MavenWebapp as the project name, enter com.example as the package name, and then click Next.
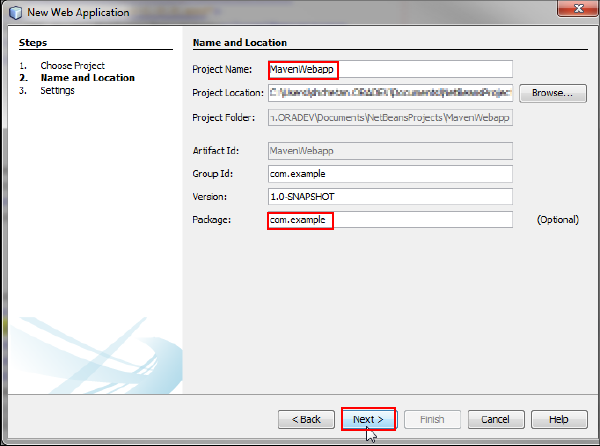
Description of this image -
On the Settings page, perform one of the following steps:
-
If GlassFish Server appears in the Server list: Select GlassFish Server, and proceed to step 5.
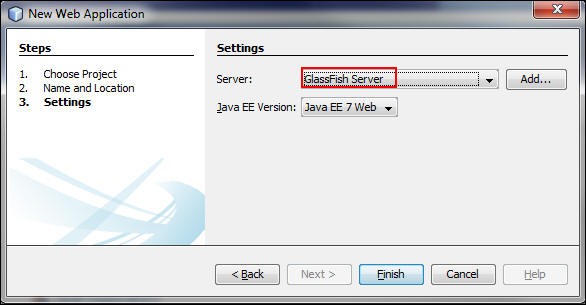
Description of this image -
If GlassFish Server doesn’t appear in the Server list: Perform the steps in Adding the GlassFish Server, and then proceed to step 5.
-
-
On the Settings page, select Java EE 7 Web as the Java EE version and click Finish.
You successfully created a Maven web application named MavenWebapp.
Adding the GlassFish Server
-
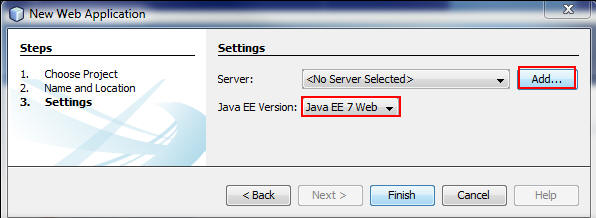
On the Settings page, select Java EE 7 Web, and click Add to display the Add Server Instance wizard.
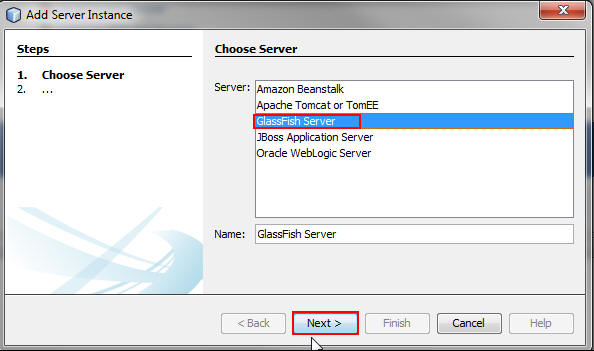
Description of this image - On the Choose Server page,
select GlassFish Server, and
click Next.
Description of this image -
On the Server Location page, browse for and select the location where you want to install the server. Accept the license agreement and click Download Now. In the Select dialog box, select the latest version of GlassFish Server and click OK.

Description of this image -
After the download is completed, click Next.
-
On the Domain Name/Location page, verify the details, and click Finish.

Description of this image -
Return to step 5 in Creating the Project to complete the tasks for creating the Maven project.
Creating a Managed Bean
-
In the Projects window, right-click
MavenWebapp,select New, and then select JSF Managed Bean. (If JSF Managed Bean isn't listed, select Other, and then select JSF Managed Bean from the JavaServer Faces category.)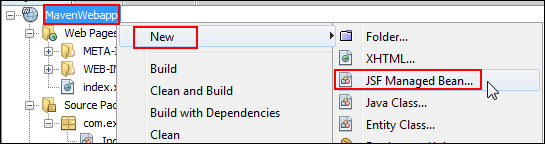
Description of this image - On the Name and Location page,
enter the following values and click Finish:
- Class Name: IndexBean
- Package:
com.example - Scope:
request

Description of this image -
Edit
IndexBean.java:public class IndexBean { private double simpleInterest; public double getSimpleInterest() { return simpleInterest; } public void setSimpleInterest(double simpleInterest) { this.simpleInterest = simpleInterest; } private String message = "Hello Welcome to JSF!"; private double principle; public double getPrinciple() { return principle; } public void setPrinciple(double principle) { this.principle = principle; } public int getYears() { return years; } public void setYears(int years) { this.years = years; } public double getInterest() { return interest; } public void setInterest(double interest) { this.interest = interest; } private int years; private double interest; public String getMessage() { return message; } public void setMessage(String message) { this.message = message; } public String calculateSI() { simpleInterest = principle * interest * years; return "index"; } } -
Review the code. Your code should look like the following:
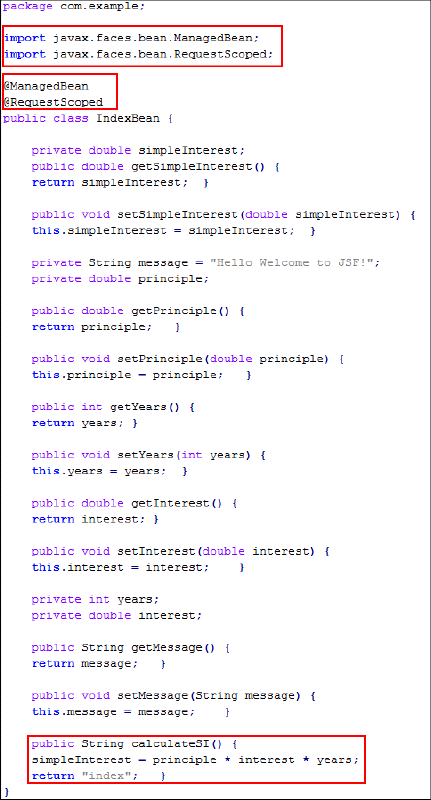
Description of this image In JSF2.1, you declare all JSF-specific components by using annotations. The import statements are updated automatically.
-
@ManagedBeanis a regular Java bean that's registered with JSF and is managed by the JSF framework. -
@RequestScopedindicates that the MBean lives as long as the HTTP request-response lives. -
The
calculateSI()method calculates the interest rate on the loan amount, the tenure of the loan, and the rate of interest per year.
-
You successfully created an MBean named IndexBean.java.
Creating a JSF Page
In JSF 2.1, Oracle recommends that you create a JSF
page in Extensible HyperText Markup Language
(XHTML). In this section, you create the index.xhtml
page to accept user input and render the calculated
simple interest.
- In the Projects window,
right-click
MavenWebapp,select New, and then select XHTML. (If XHTML isn’t listed, select Other, and then select XHTML from the Web category.)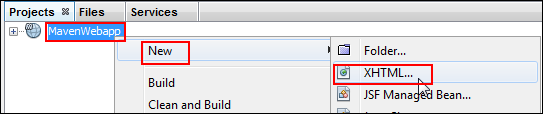
Description of this image - On the Name and Location page,
enter
indexas the XHTML file name, selectWeb Pagesfor the location, browse for and select the Web Pages folder, and click Finish.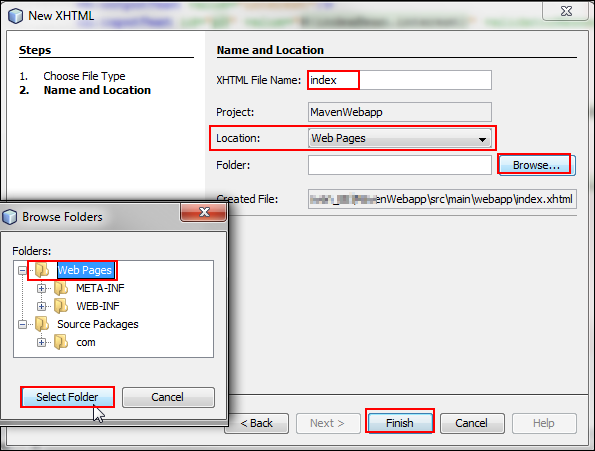
Description of this image
You successfully created a JSF page named index.xhtml.
Wiring MBeans to Pages
In this section, you modify index.xhtml.
You use the bean class, its properties, the JSF
expression language, and the JSF 2.x implicit
navigation feature on your application's web pages.
The JSF expression language binds property values to
the JSF UI components on the web pages.
- Declare the JSF namespace to use the JSF 2.1
components:
xmlns:f="http://java.sun.com/jsf/core"
xmlns:h="http://java.sun.com/jsf/html"
The JSF HTML form components that start with
h:belong to the JSF HTML tag library. Similarly, JSF core tags that start withf:belong to the JSF core tag library. - Add JSF 2.1 components to the
index.xhtmlpage:<h:head> <title>#{indexBean.message}</title> </h:head> <h:body> <f:view> <h:form> <h:panelGrid columns="2"> <h:outputText value="Principle" /> <h:inputText id="p1" value="#{indexBean.principle}" validatorMessage="Input value must be greater than 0"> <f:validateDoubleRange minimum="1"/> </h:inputText> <h:outputText value="no. of Years"/> <h:inputText id="p2" value="#{indexBean.years}" validatorMessage="Input value must be greater than 0"> <f:validateDoubleRange minimum="1"/> </h:inputText> <h:outputText value="interest"/> <h:inputText id="p3" value="#{indexBean.interest}" validatorMessage="Input value must be greater than 0"> <f:validateDoubleRange minimum="1"/> </h:inputText> <h:outputText value=""/> <h:commandButton value="Calculate" type="submit" action="#{indexBean.calculateSI}" /> </h:panelGrid> <br/><br/> <h:outputText value="The calculated Simple Interest is : #{indexBean.simpleInterest}"/> <br/><br/> <h:messages/> </h:form> </f:view> </h:body>JSF tags used on the
index.xhtmlpage:JSF Tags Description <h:head>Represents the head element of the HTML page. <h:body>Represents the body element of the HTML page. <h:form>Renders an HTML form element. Holds all components of the page. <h:panelGrid>Renders an HTML table in a grid. <h:inputText>Renders an HTML input of type="text" text box. <h:outputText>Renders an HTML text. <h:messages>Renders all messages for JSF UI components. <f:view>Renders as a container on the JSF page. <f:validateDoubleRange>Validates the range of the float value. -
Review the code. Your code should look like the following:
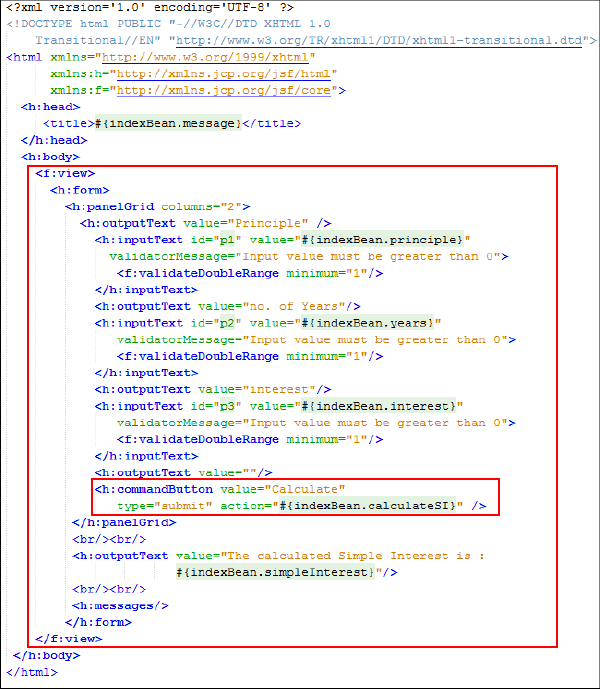
Description of this image The JSF expression language is represented by
#{...}.When the page is submitted, JSF finds the MBean namedindexBeanand sets the submitted value by using the setter method. When theindex.xhtmlpage is displayed, the JSF with the same MBean accesses the bean values and displays the value by using the getter method.When you click the command button, the request is submitted to the destination provided in the
actionattribute. The JSF runtime calls thecalculateSI()method inIndexBean.java.The method calculates the simple interest and returns"index".The JSF runtime searches for the file namedindex,performs implicit navigation to the same page, and updates the page with the calculated simple interest.
Configuring the Application with Maven
In this section, you configure the enterprise application with the project dependencies. The external libraries that are required by the project are listed as dependencies in the POM. You modify the POM to specify the dependencies that need to be included in the project so that you can build the application.
Specifying Project Dependencies
In this section, you modify the POM file(pom.xml)
of the web project to specify the dependencies
that need to be included when you package the
WAR archive.
-
Add the JSF API dependencies to
pom.xml:<dependencies> <dependency> <groupId>com.sun.faces</groupId> <artifactId>jsf-api</artifactId> <version>2.1.19</version> <scope>provided</scope> </dependency> <dependency> <groupId>com.sun.faces</groupId> <artifactId>jsf-impl</artifactId> <version>2.1.19</version> <scope>provided</scope> </dependency> </dependencies>Because you declare the dependency as
provided,Maven won't package the artifact when it builds the WAR file. -
Review the code. It should look like the following:

Description of this image -
Add the GlassFish plug-in to
pom.xml.<plugin> <groupId>org.glassfish.maven.plugin</groupId> <artifactId>maven-glassfish-plugin</artifactId> <version>2.1</version> <configuration> <glassfishDirectory>** Location of GlassFish Server**</glassfishDirectory> <user>admin</user> <passwordFile>"**Location of GlassFish server**GlassFish_Server\glassfish\domains\domain1\config\domain-passwords"</passwordFile><domain> <name>domain1</name> <httpPort>8080</httpPort> <adminPort>4848</adminPort> </domain> <components> <component> <name>${project.artifactId}</name> <artifact>target/${project.build.finalName}.war</artifact> </component> </components> <debug>true</debug> <terse>false</terse> <echo>true</echo> </configuration> </plugin> </plugins> <finalName>Hello_Glassfish</finalName> -
Review the code. It should look like the following:
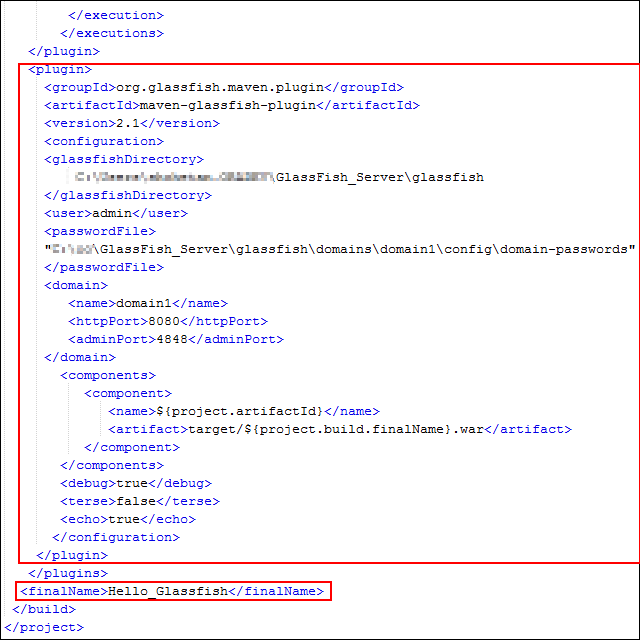
Description of this image -
Press Ctrl+S and close the file.
You successfully updated your pom.xml
file.
Updating the settings.xml
File
In this section, you create and update the settings.xml
file, which helps you to deploy your application
by using Maven.
-
In Windows, go to the
C:\Users\username.ORADEV\.m2directory: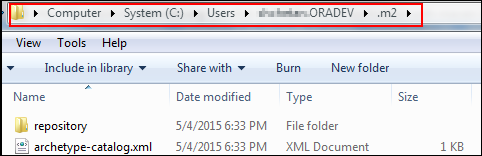
Description of this image -
Right-click, select New and then Text Document, and enter
settings.xmlfor the file name.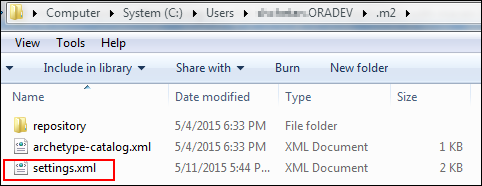
Description of this image -
In the
settings.xmlfile, enter the location of the local repository, the proxy server details, and the GlassFish profile credentials:<settings xmlns="http://maven.apache.org/SETTINGS/1.0.0" xmlns:xsi="http://www.w3.org/2001/XMLSchema-instance" xsi:schemaLocation="http://maven.apache.org/SETTINGS/1.0.0 http://maven.apache.org/xsd/settings-1.0.0.xsd"> <localRepository>** Location of your Local Repository**</localRepository> <interactiveMode/> <usePluginRegistry/> <offline/> <pluginGroups/> <servers/> <mirrors/> <proxies> <proxy> <id>myproxy</id> <active>true</active> <protocol>http</protocol> <host>** Proxy Server Details**</host> <port>80</port> </proxy> <activeProfiles> <activeProfile>glassfish-context</activeProfile> </activeProfiles> </proxies> </settings>The updated settings are automatically imported in into the
pom.xmlfile. -
Press Ctrl+S and close the file.
You successfully updated your settings.xml
file.
Building and Running the Application
Building and Running the Application: Maven Command-Line Interface
-
Go to the project's location, enter
mvn
                                      package glassfish:deploy,
and review the output: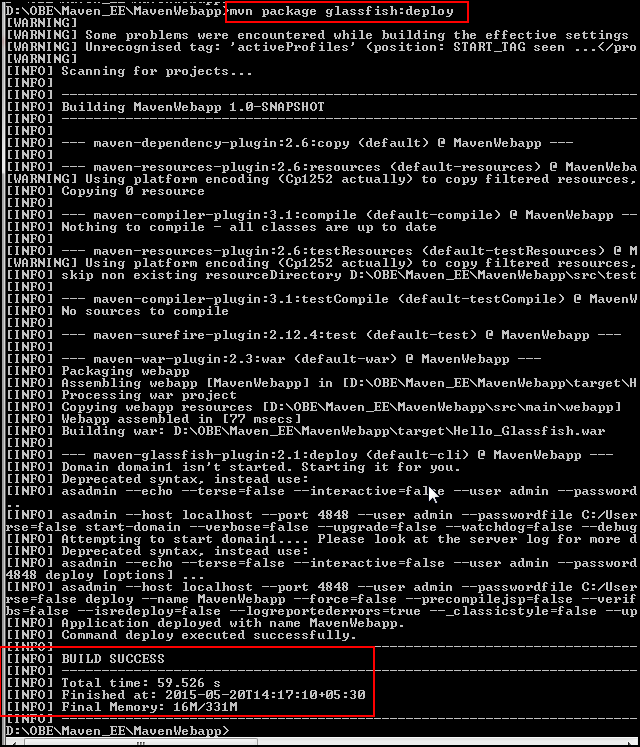
Description of this image -
Go to the directory where you installed the GlassFish Server, and open your application.
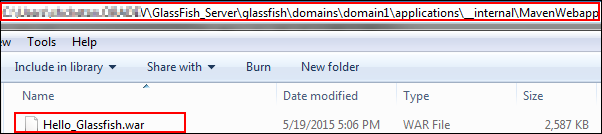
Description of this image The
Hello_Glassfish.warfile is created. With thepom.xmldetails, the application will be deployed on the GlassFish Server\glassfish\domains\domain1\applications\__internal\MavenWebappdirectory. -
In your browser, run the application at
http://localhost:8080/Hello_Glassfish/.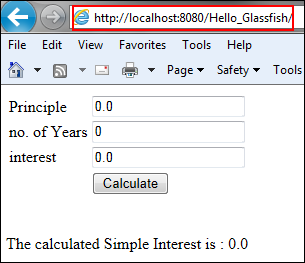
Description of this image -
Verify the output.

Description of this image
You successfully built the MavenWebapp
Java EE application and deployed the WAR file
on the GlassFish Server.
You successfully deployed MavenWebapp
from the Maven command-line interface.
Building and Running the Application: NetBeans IDE
-
In the Projects window, right-click the
MavenWebappproject node, and select Clean and Build.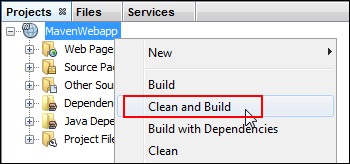
Description of this image -
Verify the build information.
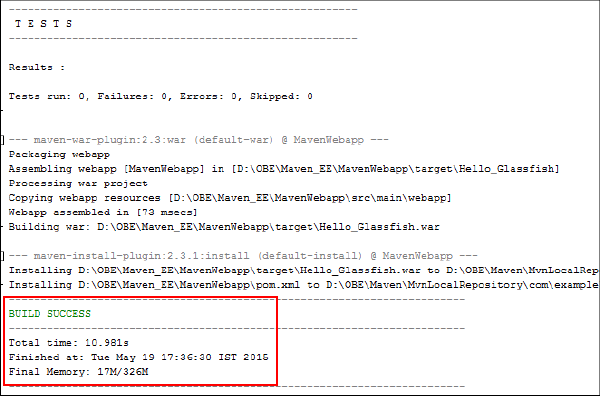
Description of this image You successfully build the
MavenWebappJava EE application by using Maven in the NetBeans IDE. -
In the Projects window, expand Project Files, right-click
pom.xml,and select Run Maven and then Goals.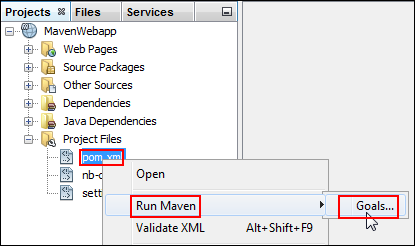
Description of this image -
In the Run Maven dialog box, enter
glassfish:deployas the goal name, and click OK.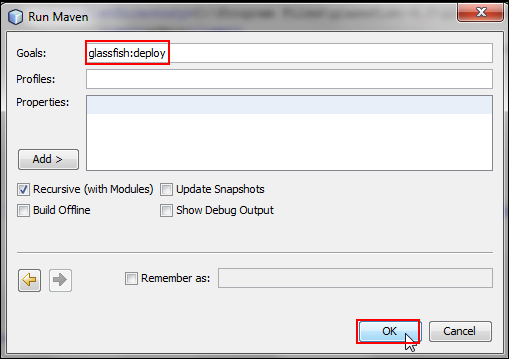
Description of this image -
Verify the build console.
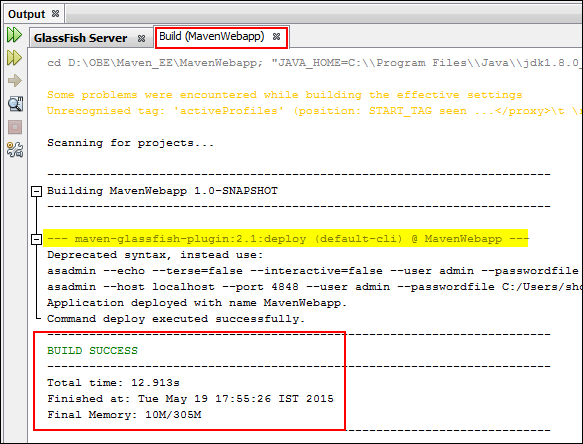
Description of this image You successfully deployed the WAR file on the GlassFish Server.
- If you deployed the application from the command-line interface, undeploy it so that you can deploy it on the NetBeans IDE.
-
In the Services window, expand Servers, GlassFish Server, and Applications.

Description of this image The
MavenWebappapplication is deployed on the GlassFish Server. -
Right-click
MavenWebapp,and select Open in Browser.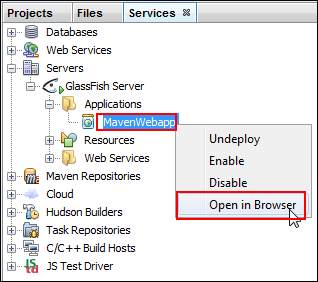
Description of this image The application runs in the browser.
-
Verify the URL.
Description of this image -
Verify the output.
Description of this image
You successfully tested MavenWebapp
deployed by Maven from the NetBeans IDE.
Want to Learn More?
Credits
To navigate this Oracle by Example tutorial, note
the following:
- Topic List:
- Click a topic to navigate to that section.
- Expand All Topics:
- Click the button to show or hide the details for
the sections. By default, all topics are
collapsed.
- Hide All Images:
- Click the button to show or hide the
screenshots. By default, all images are displayed.
- Print:
- Click the button to print the content. The
content that is currently displayed or hidden is
printed.
To navigate to a particular section in this
tutorial, select the topic from the list.