 文章
服务器与存储管理
文章
服务器与存储管理
如何在 Oracle Solaris 11 区域集群上部署 Oracle RAC
作者:Vinh Tran
如何创建 Oracle Solaris 区域集群、在区域集群中安装和配置 Oracle Grid Infrastructure 11.2.0.3 和 Oracle Real Application Clusters (Oracle RAC) 11.2.0.3,以及为 Oracle RAC 实例创建 Oracle Solaris Cluster 4.0 资源。
2012 年 7 月发布
|
简介
过程概述
前提条件
创建区域集群
为区域集群创建 Oracle RAC 框架资源
在本地区域集群
z11gr2A 中设置根环境为 Oracle 软件创建用户和组
在 Oracle Solaris 区域集群节点中安装 Oracle Grid Infrastructure 11.2.0.3
安装 Oracle Database 11.2.0.3 并创建数据库
创建 Oracle Solaris Cluster 资源
另请参见
关于作者
本文介绍如何在 Oracle Solaris 11 上的 Oracle Solaris 集群环境中创建 Oracle Solaris 区域集群、在区域集群中安装和配置 Oracle Grid Infrastructure 11.2.0.3 和 Oracle Real Application Clusters (Oracle RAC) 11.2.0.3 以及为 Oracle RAC 实例创建 Oracle Solaris Cluster 4.0 资源。
与本文类似的文章还有两篇,这三篇文章介绍了同样的操作,只是所述软件版本不同。下表进行了汇总:
| 文章 | RAC 版本 | Solaris 版本 | 集群版本 |
|---|---|---|---|
| 如何在 Oracle Solaris 区域集群上部署 Oracle RAC 11.2.0.2 | 11.2.0.2 | 10 | 3.3 |
| 如何在 Oracle Solaris 区域集群上部署 Oracle RAC 11.2.0.3 | 11.2.0.3 | 10 | 3.3 |
| 如何在 Oracle Solaris 11 区域集群上部署 Oracle RAC 11.2.0.3 | 11.2.0.3 | 11 | 4.0 |
简介
Oracle Solaris Cluster 提供创建高可用性区域集群的功能。一个区域集群包含多个 Oracle Solaris 区域,每个区域分别驻留在其各自独立的服务器上;组成集群的各个区域链接到单个虚拟集群。因为区域集群之间是相互隔离的,所以各区域集群的安全性将得到加强。此外,由于区域是聚集在一起的,所以各区域所承载应用程序的可用性得到了提高。由于一个物理集群上可存在多个区域集群,提供了在一个集群上整合多集群应用程序的方法。
在区域集群中安装 Oracle RAC,您就可以为同一数据库创建不同的数据库版本或进行不同的部署(例如,一个用于生产,一个用于开发)。使用此架构,您还可以将多层解决方案的不同部分部署到不同的虚拟区域集群中。例如,您可以将 Oracle RAC 和应用程序服务器部署在同一集群的不同区域中。使用该方法可以在充分利用 Oracle Solaris Cluster 简化管理的同时将层和管理域相互隔离开来。
有关在区域集群内部署 Oracle RAC 时各种可用配置的信息,请参见“在 Oracle Solaris 区域集群上运行 Oracle Real Application Clusters”白皮书。
本文档介绍下列过程:
- 创建 Oracle Solaris 区域集群
- 在区域集群中安装并配置 Oracle Grid Infrastructure 和 Oracle RAC 11.2.0.3 数据库
- 在区域集群中为 Oracle RAC 创建 Oracle Solaris 集群资源
注:本文档并非 一本指导如何获得最佳性能的操作指南,不涉及下列主题:
- Oracle Solaris 操作系统安装
- 存储配置
- 网络配置
- Oracle Solaris Cluster 安装
注:有关安装 Oracle Solaris Cluster 4.0 的信息,请参见“如何在 Oracle Solaris 11 上使用 Oracle Solaris Cluster 4.0 安装和配置两节点集群。”
过程概述
本文介绍了如何利用 Oracle 自动存储管理,在一个 Oracle Solaris Cluster 四节点区域集群配置中安装 Oracle RAC(参见图 1)。
需要执行三个主要步骤:
- 创建一个区域集群,并在该区域集群内创建特定的 Oracle RAC 基础架构。
- 准备环境,随后安装并配置 Oracle Grid Infrastructure 和 Oracle 数据库。
- 创建 Oracle Solaris Cluster 资源,将这些资源彼此关联并使其联机。
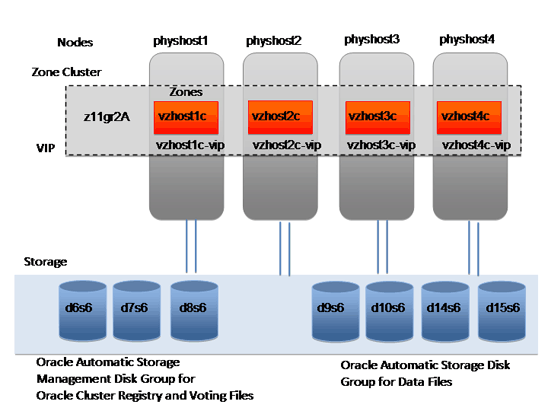
图 1. 四节点区域集群配置
前提条件
请确保满足以下前提条件:
- Oracle Solaris 11 build 175b 或更高版本,且安装了 DNS 和 NIS 名称服务。
- 使用
ha-cluster-full软件包安装 Oracle Solaris Cluster 4.0。 - 配置 Oracle Solaris Cluster 4.0。
- 在全局区域内的
/etc/system文件中配置了 Oracle Solaris 11 内核参数。以下是推荐值的示例:
shmsys:shminfo_shmmax 4294967295
set rlim_fd_cur=1024
- 已知共享磁盘,也称作
/dev/did/rdsk设备。清单 1 是如何从任意集群节点的全局区域中识别共享磁盘的示例:
phyhost1# cldev status

=== Cluster DID Devices ===

Device Instance            Node               Status
---------------            ----               ------
/dev/did/rdsk/d1           phyhost1           Ok

/dev/did/rdsk/d10          phyhost1           Ok
                           phyhost2           Ok
                           phyhost3           Ok
                           phyhost4           Ok

/dev/did/rdsk/d14          phyhost1           Ok
                           phyhost2           Ok
                           phyhost3           Ok
                           phyhost4           Ok

/dev/did/rdsk/d15          phyhost1           Ok
                           phyhost2           Ok
                           phyhost3           Ok
                           phyhost4           Ok

/dev/did/rdsk/d16          phyhost1           Ok
                           phyhost2           Ok
                           phyhost3           Ok
                           phyhost4           Ok

/dev/did/rdsk/d17          phyhost1           Ok
                           phyhost2           Ok
                           phyhost3           Ok
                           phyhost4           Ok

/dev/did/rdsk/d18          phyhost1           Ok
                           phyhost2           Ok
                           phyhost3           Ok
                           phyhost4           Ok

/dev/did/rdsk/d19          phyhost2           Ok

/dev/did/rdsk/d2           phyhost1           Ok

/dev/did/rdsk/d20          phyhost2           Ok

/dev/did/rdsk/d21          phyhost3           Ok

/dev/did/rdsk/d22          phyhost3           Ok

/dev/did/rdsk/d23          phyhost4           Ok

/dev/did/rdsk/d24          phyhost4           Ok


/dev/did/rdsk/d6           phyhost1           Ok
                           phyhost2           Ok
                           phyhost3           Ok
                           phyhost4           Ok

/dev/did/rdsk/d7           phyhost1           Ok
                           phyhost2           Ok
                           phyhost3           Ok
                           phyhost4           Ok

/dev/did/rdsk/d8           phyhost1           Ok
                           phyhost2           Ok
                           phyhost3           Ok
                           phyhost4           Ok

/dev/did/rdsk/d9           phyhost1           Ok
                           phyhost2           Ok
                           phyhost3           Ok
                           phyhost4           Ok
清单 1. 识别共享磁盘
输出显示
phyhost1、phyhost2、phyhost3和phyhost4共享磁盘d6、d7、d8、d9、d10、d14、d15、d16、d17和d18。Oracle 自动存储管理磁盘组将使用下列共享磁盘来存储 Oracle 集群注册表和表决文件:
/dev/did/rdsk/d6s6
/dev/did/rdsk/d7s6
/dev/did/rdsk/d8s6
Oracle 自动存储管理磁盘组将使用下列共享磁盘来存储数据文件:
/dev/did/rdsk/d9s6
/dev/did/rdsk/d10s6
/dev/did/rdsk/d14s6
/dev/did/rdsk/d15s6
在本示例中,分片 6 为 102 GB。有关对磁盘大小的要求,请查看 Oracle Grid Infrastructure 安装指南。
- 已在公共网络上分配了 Oracle 虚拟 IP (VIP) 和单客户端访问名称 (SCAN) IP,例如:
vzhost1d,IP 地址 10.134.35.99,用于 SCAN IP 地址。vzhost1c-vip,IP 地址 10.134.35.100,用作vzhost1c的 VIP 地址。vzhost2c-vip,IP 地址 10.134.35.101,用作vzhost2c的 VIP 地址。vzhost3c-vip,IP 地址 10.134.35.102,用作vzhost3c的 VIP 地址。vzhost4c-vip,IP 地址 10.134.35.103,用作vzhost4c 的 VIP 地址。
注:切勿 在任何地方手动激活这些 IP 地址,包括在集群中和网络上。
- 公共网络拥有一个 IPMP 组,它有一个活动接口和一个备用接口。下面是名为
sc_ipmp0的 IPMP 组的示例。
# ipmpstat -g
GROUP       GROUPNAME   STATE     FDT       INTERFACES
sc_ipmp0    sc_ipmp0    degraded  10.00s    net0 [net1]
创建区域集群
- 使用
sysconfig工具创建系统配置文件:
- 运行以下命令:
# sysconfig create-profile -o /var/tmp/zc2.xml -g location,identity,naming_services,users
- 按 F2 转到 Network 屏幕。输入 physhost1 作为计算机名称。
- 按 F2 进入 DNS Name Service 屏幕。选择 Configure DNS。
- 按 F2 进入 DNS 服务器地址屏幕。输入 DNS 服务器的 IP 地址。至少需要一个 IP 地址,例如:
DNS Server IP address: 192.168.1.10
DNS Server IP address: 192.168.1.11
- 按 F2 进入 DNS Search List 屏幕。在进行 DNS 查询时,输入一系列要搜索的域。(如果没有输入域,将只搜索为该系统选择的 DNS 域。)例如:
Search domain: us.oracle.com
Search domain: oracle.com
Search domain:
- 按 F2 进入 Alternate Name Service 屏幕。从列表中选择 NIS。
- 按 F2 进入下一个屏幕,为 NIS 名称服务器指定域名。使用准确的大小写和标点符号指定域名,例如:
Domain Name: solaris.us.oracle.com
- 按 F2 进入下一个屏幕,指定该系统查找名称服务器的方式。选择 Find one 让软件按搜索名称服务器,或选择 Specify one 在下一个屏幕中指定名称服务器。
软件只能发现本地子网上的名称服务器。
- 按 F2 进入 Time Zone:Regions 屏幕。选择包含您所在时区的区域。
- 按 F2 进入 Time Zone:Locations 屏幕。选择包含您所在时区的位置。
- 按 F2 进入 Time Zone 屏幕。选择您所在的时区。
- 按 F2 进入 Users 屏幕。为系统定义 root 口令,并为自己创建一个用户帐户。
- 按 F2 进入 System Configuration Summary 屏幕。检查所有设置。
- 按 F2 应用设置。
- 运行以下命令:
- 创建
zone.cfg文件,如清单 2 所示:
create
set zonepath=/export/zones/z11gR2A
set limitpriv ="default,proc_priocntl,proc_clock_highres,sys_time"
add dedicated-cpu
set ncpus=16
end
add capped-memory
set physical=12g
set swap=12g
set locked=12g
end
add node
set physical-host=phyhost1
set hostname=vzhost1c
add net
set address=vzhost1c
set physical=e1000g0
end
end
add node
set physical-host=phyhost2
set hostname=vzhost2c
add net
set address=vzhost2c
set physical=e1000g0
end
end
add node
set physical-host=phyhost3
set hostname=vzhost3c
add net
set address=vzhost3c
set physical=e1000g0
end
end
add node
set physical-host=phyhost4
set hostname=vzhost4c
add net
set address=vzhost4c
set physical=e1000g0
end
end
add net
set address=vzhost1d
end
add net
set address=vzhost1c-vip
end
add net
set address=vzhost2c-vip
end
add net
set address=vzhost3c-vip
end
add net
set address=vzhost4c-vip
end
add device
set match="/dev/did/rdsk/d6s6"
end
add device
set match="/dev/did/rdsk/d7s6"
end
add device
set match="/dev/did/rdsk/d8s6"
end
add device
set match="/dev/did/rdsk/d9s6"
end
add device
set match="/dev/did/rdsk/d10s6"
end
add device
set match="/dev/did/rdsk/d14s6"
end
add device
set match="/dev/did/rdsk/d15s6"
end
add device
set match="/dev/did/rdks/d16s6"
end
add device
set match="/dev/did/rdsk/d17s6"
end
add device
set match="/dev/did/rdsk/d18s6"
end
清单 2. 创建
zone.cfg文件 - 如果 SCAN 主机名
vzhost1d解析为多个 IP 地址,则这些 IP 地址中的每一个均应配置独立的全局网络资源。例如,如果 SCAN 解析为三个 IP 地址(10.134.35.97、10.134.35.98 和 10.134.35.99),则应向zone.cfg文件添加以下全局网络资源。
add net
set address=10.134.35.97
end
add net
set address=10.134.35.98
end
add net
set address=10.134.35.99
end
- 以
root身份运行清单 3 所示命令,从一个 节点创建集群:
# clzonecluster configure -f /var/tmp/zone.cfg z11gr2a

# clzonecluster install -c /var/tmp/zc2.xml z11gr2A

# clzonecluster status

=== Zone Clusters ===

--- Zone Cluster Status ---

Name      Node Name   Zone HostName   Status    Zone Status
----      ---------   -------------   ------    -----------
z11gr2A   phyhost1    vzhost1c        Offline   Installed
          phyhost2    vzhost2c        Offline   Installed
          phyhost3    vzhost3c        Offline   Installed
          phyhost4    vzhost4c        Offline   Installed

# clzc boot z11gr2A

# clzc status

=== Zone Clusters ===

--- Zone Cluster Status ---

Name       Node Name   Zone HostName   Status   Zone Status
----       ---------   -------------   ------   -----------
z11gr2A    phyhost1    vzhost1c        Online   Running
           phyhost2    vzhost2c        Online   Running
           phyhost3    vzhost3c        Online   Running
           phyhost4    vzhost4c        Online   Running
清单 3. 创建 Oracle Solaris 区域集群
为区域集群创建 Oracle RAC 框架资源
要以 root 身份创建 Oracle RAC 框架,请从一个 节点执行以下步骤:
- 从一个全局区域集群节点执行
clsetup,如清单 4 所示。
# /usr/cluster/bin/clsetup
*** Main Menu ***

    Please select from one of the following options:

       1) Quorum
        2) Resource groups
        3) Data Services
        4) Cluster interconnect
        5) Device groups and volumes
        6) Private hostnames
        7) New nodes
        8) Other cluster tasks

        ?) Help with menu options
        q) Quit

    Option:  3

 *** Data Services Menu ***

    Please select from one of the following options:

     * 1) Apache Web Server
     * 2) Oracle
     * 3) NFS
     * 4) Oracle Real Application Clusters
     * 5) SAP Web Application Server
     * 6) Highly Available Storage
     * 7) Logical Hostname
     * 8) Shared Address

      * ?) Help
      * q) Return to the Main Menu

    Option:  4

  *** Oracle Solaris Cluster Support for Oracle RAC ***

    Oracle Solaris Cluster provides a support layer for running Oracle
    Real Application Clusters (RAC) database instances. This option allows
    you to create the RAC framework resource group, storage resources,
    database resources and administer them, for managing the Oracle
    Solaris Cluster support for RAC.

    After the RAC framework resource group has been created, you can use
    the Oracle Solaris Cluster system administration tools to administer a
    RAC framework resource group that is configured on a global cluster.
    To administer a RAC framework resource group that is configured on a
    zone cluster, instead use the appropriate Oracle Solaris Cluster
    command.

   Is it okay to continue (yes/no) [yes]?

    Please select from one of the following options:

        1)  Oracle RAC Create Configuration
        2)  Oracle RAC Ongoing Administration

        q)  Return to the Data Services Menu

    Option:  1

   >>> Select Oracle Real Application Clusters Location <<<

    Oracle Real Application Clusters Location:

        1) Global Cluster
        2) Zone Cluster

    Option [2]:  2

   >>> Select Zone Cluster <<<

    From the list of zone clusters, select the zone cluster where you would like to
    configure Oracle Real Application Clusters.

        1) z11gr2A

        ?) Help
        d) Done

    Selected:  [z11gr2A]

   >>> Select Oracle Real Application Clusters Components to Configure <<<

    Select the component of Oracle Real Application Clusters that you are configuring:

        1) RAC Framework Resource Group
        2) Storage Resources for Oracle Files
        3) Oracle Clusterware Framework Resource
        4) Oracle Automatic Storage Management (ASM)
        5) Resources for Oracle Real Application Clusters Database Instances

    Option [1]: 1

   >>> Verify Prerequisites <<<


    This wizard guides you through the creation and configuration of the Real Application
    Clusters (RAC) framework resource group.

    Before you use this wizard, ensure that the following prerequisites are met:


    * All pre-installation tasks for Oracle Real Application Clusters are completed.

    * The Oracle Solaris Cluster nodes are prepared.

    * The data services packages are installed.

    * All storage management software that you intend to use is installed and configured
    on all nodes where Oracle Real Application Clusters is to run.


    Press RETURN to continue

   >>> Select Nodes <<<

    Specify, in order of preference, a list of names of nodes where Oracle Real
    Application Clusters is to run. If you do not explicitly specify a list, the list
    defaults to all nodes in an arbitrary order.


    The following nodes are available on the zone cluster z11skgxn:

       1) vzhost1c
       2) vzhost2c
       3) vzhost3c
       4) vzhost4c

       r) Refresh and Clear All
       a) All
       ?) Help
       d) Done

    Selected:  [vzhost1c, vzhost2c, vzhost3c, vzhost4c]
    Options:  d


   >>> Review Oracle Solaris Cluster Objects <<<


    The following Oracle Solaris Cluster objects will be created.

    Select the value you are changing:

          Property Name               Current Setting
          =============               ===============
        1) Resource Group Name        rac-framework-rg
        2) RAC Framework Resource N...rac-framework-rs

        d) Done
        ?) Help

    Option:  d

   >>> Review Configuration of RAC Framework Resource Group <<<


    The following Oracle Solaris Cluster configuration will be created.

    To view the details for an option, select the option.

                   Name                         Value
                   ====                         =====
        1) Resource Group Name        rac-framework-rg
        2) RAC Framework Resource N...rac-framework-rs

        c) Create Configuration
        ?) Help

    Option:  c
清单 4. 执行
clsetup - 从一个全局区域集群节点验证 Oracle RAC 框架资源:
# clrs status -Z z11gr2A

=== Cluster Resources ===

Resource Name        Node Name     State      Status Message
-------------        ---------     -----      --------------
rac-framework-rs     vzhost1c      Online     Online
                     vzhost2c      Online     Online
                     vzhost3c      Online     Online
                     vzhost4c      Online     Online
在区域集群 z11gr2A 中设置根环境
从每个 全局区域集群节点(phyhost1、phyhost2、phyhost3 和 phyhost4)执行以下操作:
- 以
root身份登录非全局区域节点并执行以下命令:
# /usr/sbin/zlogin z11gr2A
[Connected to zone 'z11gr2A' pts/2]
Last login: Thu Aug 25 17:30:14 on pts/2
Oracle Corporation      SunOS 5.10      Generic Patch   January 2005
- 将以下路径包含到
.bash_profile中:
/u01/grid/product/11.2.0.3/bin
/usr/cluster/bin
- 确保每个区域集群节点上均安装了
make:
- 检查节点上是否存在
make程序包:
# pkg list *make*
- 如果不存在,以
root身份执行该命令来安装make程序包:
# pkg install developer/build/make
- 检查节点上是否存在
- 从每个 节点(以
root身份)配置 NTPslew_always设置,将其作为 Oracle Solaris 的 SMF 属性:
# svccfg -s svc:/network/ntp:default setprop config/slew_always=true
# cp /etc/inet/ntp.client /etc/inet/ntp.conf
# svcadm enable ntp
为 Oracle 软件创建用户和组
- 以
root身份从各节点执行以下命令:
# groupadd -g 300 oinstall
# groupadd -g 301 dba
# useradd -g 300 -G 301 -u 302 -d /u01/ora_home -s /usr/bin/bash ouser

# mkdir -p /u01/ora_home
# chown ouser:oinstall /u01/ora_home
# mkdir /u01/oracle
# chown ouser:oinstall /u01/oracle
# mkdir /u01/grid
# chown ouser:oinstall /u01/grid
# mkdir /u01/oraInventory
# chown ouser:oinstall /u01/oraInventory
- 在软件所有者
ouser的.bash_profile文件中包含这些路径:
export ORACLE_BASE=/u01/oracle
export ORACLE_HOME=/u01/oracle/product/11.2.0.3
export AWT_TOOLKIT=XToolkit
- 为软件所有者
ouser创建口令:
# passwd ouser
New Password:
Re-enter new Password:
passwd: password successfully changed for ouser
bash-3.00#
- 以软件所有者
ouser的身份从每个节点设置 SSH:
$ ssh-keygen -t rsa
Generating public/private rsa key pair.
Enter file in which to save the key (/u01/ora_home/.ssh/id_rsa):
Enter passphrase (empty for no passphrase):
Enter same passphrase again:
Your identification has been saved in /u01/ora_home/.ssh/id_rsa.
Your public key has been saved in /u01/ora_home/.ssh/id_rsa.pub.
The key fingerprint is:
e6:63:c9:71:fe:d1:8f:71:77:70:97:25:2a:ee:a9:33 local1@vzhost1c
$
$ pwd
/u01/ora_home/.ssh
- 从第一个节点
vzhost1c,执行以下操作:
$ cd  /u01/ora_home/.ssh
$ cat id_rsa.pub >> authorized_keys
$ chmod 600 authorized_keys
$ scp authorized_keys vzhost2c:/u01/ora_home/.ssh
- 从第二个节点
vzhost2c,执行以下操作:
$ cd /u01/ora_home/.ssh
$ cat id_rsa.pub >> authorized_keys
$ scp authorized_keys vzhost3c:/u01/ora_home/.ssh
- 从第三个节点
vzhost3c,执行以下操作:
$ cd /u01/ora_home/.ssh
$ cat id_rsa.pub >> authorized_keys
$ scp authorized_keys vzhost4c:/u01/ora_home/.ssh
- 从第四个节点
vzhost4c,执行以下操作:
$ cd /u01/ora_home/.ssh
$ cat id_rsa.pub >> authorized_keys
$ scp authorized_keys vzhost1c:/u01/ora_home/.ssh
- 从第一个节点
vzhost1c,执行以下操作:
$ cd /u01/ora_home/.ssh
$ scp authorized_keys vzhost2c:/u01/ora_home/.ssh
$ scp authorized_keys vzhost3c:/u01/ora_home/.ssh
- 从各个 节点,测试 SSH 设置:
$ ssh vzhost1c date
$ ssh vzhost2c date
$ ssh vzhost3c date
$ ssh vzhost4c date
- 在每个 本地区域集群节点中,以
root身份设置 Oracle 自动存储管理候选磁盘:
# for i in 6 7 8 9 10 14 15 > do > chown ouser:oinstall /dev/did/rdsk/d${i}s6 > chmod 660 /dev/did/rdsk/d${i}s6 > done - 在本地区域集群中,以软件所有者身份,从一个 节点执行以下操作:
$ for i in 6 7 8 9 10 14 15
> do
> dd if=/dev/zero of=/dev/did/rdsk/d${i}s6 bs=1024k count=200
> done
在 Oracle Solaris 区域集群节点中安装 Oracle Grid Infrastructure 11.2.0.3
- 以软件所有者身份,在一个 节点上执行清单 5 所示的命令:
$ bash
$ export DISPLAY=<hostname>:<n>
$ cd <PATH to 11.2.0.3 based software image>/grid/
$ ./runInstaller
starting Oracle Universal Installer...

Checking Temp space: must be greater than 180 MB.   Actual 20766 MB    Passed
Checking swap space: must be greater than 150 MB.   Actual 23056 MB    Passed
Checking monitor: must be configured to display at least 256 colors
    >>> Could not execute /usr/bin/xdpyinfo    Failed <<<<

Some requirement checks failed. You must fulfill these requirements before
continuing with the installation,

Continue? (y/n) [n]
清单 5. 启动 Oracle Universal Installer
- 键入 y 继续。
- 向 Oracle Universal Installer 提供以下输入:
- 在 Select Installation Option 页上,选择 Install and Configure Oracle Grid Infrastructure for a Cluster。
- 在 Select Installation Type 页上,选择 Advanced Installation。
- 在 Select Product Languages 页上,选择 English。
- 在 Grid Plug and Play Information 页上指定以下内容,如图 2 所示。
- 为 Cluster Name 指定 vzhost-cluster。
- 为 SCAN Name 指定 vzhost1d。
- 为 SCAN Port 指定 1521。
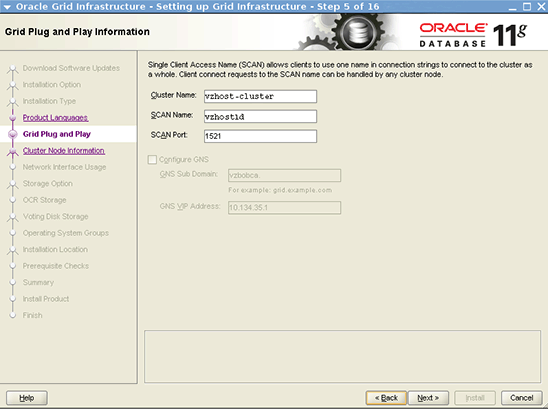
图 2. Grid Plug and Play Information 页
- 在 Cluster Node Information 页上指定以下内容,如图 3 所示:
公共主机名 虚拟主机名 vzhost1cvzhost1c-vipvzhost2cvzhost2c-vipvzhost3cvzhost3c-vipvzhost4cvzhost4c-vip
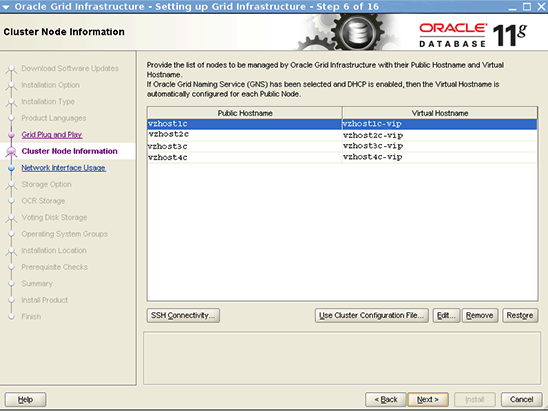
图 3. Cluster Node Information 页
- 在 Network Interface Usage 页上,接受默认设置。
- 在 Storage Option Information 页上,选择 Oracle Automatic Storage Management。
- 在 Create ASM Disk Group 页上,按照图 4 所示执行以下操作:
- 单击 Change Discovery Path 按钮,将磁盘发现路径指定为 /dev/did/rdsk/d*s6。
- 将 Disk Group Name 指定为 crsdg。
- 选择 Candidate Disks,然后选择 /dev/did/rdsk/d6s6、/dev/did/rdsk/d7s6 和 /dev/did/rdsk/d8s6。
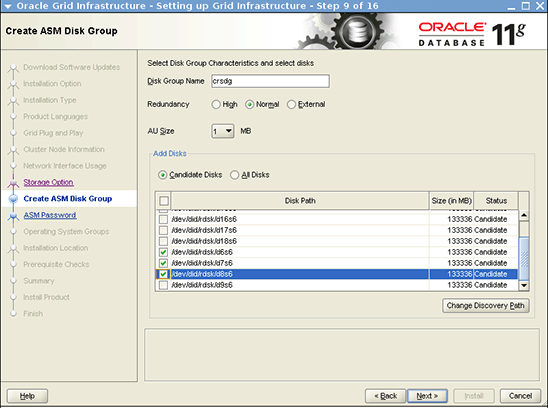
图 4. Create ASM Disk Group 页
- 在图 5 所示的 Specify ASM Password 页上,输入 SYS 和 ASMSNMP 帐户的用户名和口令。

图 5. Specify ASM Password 页
- 在 Privileged Operating System Groups 页上,使用默认设置:
- 为 Oracle ASM DBA (OSDBA for ASM) 选择 oinstall。
- 还可为 Oracle ASM Operator (OSOPER for ASM) Group (Optional) 选择一个组。
- 为 Oracle ASM Administrator (OSASM) Group 选择 oinstall。
- 在 Software Installation Location 页上,指定以下内容:
- 为 Oracle Base 指定 /u01/oracle。
- 为 Software Location 指定 /u01/grid/product/11.2.0.3。
- 在 Create Inventory 页上,为 Inventory Directory 选择 /u01/oraInventory。
- 在 Perform Prerequisite Checks 页上,选择 Ignore All,如图 6 所示:

图 6. Perform Prerequisite Checks 页
- 在 Summary 页上,单击 Install 开始安装软件。
图 7 所示的 Execute Configuration Scripts 对话框要求您以
root身份执行/u01/oraInventory/orainstRoot.sh和/u01/grid/product/11.2.0.3/root.sh脚本。
图 7. 与执行配置脚本相关的消息
- 打开一个终端窗口,并以
root身份在各 区域集群节点上执行相关脚本。清单 6 是一个例子。
# /u01/oraInventory/orainstRoot.sh
Changing permissions of /u01/oraInventory.
Adding read,write permissions for group.
Removing read,write,execute permissions for world.

Changing groupname of /u01/oraInventory to oinstall.
The execution of the script is complete.


# cd /u01/grid/product/11.2.0.3
# ./root.sh
Performing root user operation for Oracle 11g

The following environment variables are set as:
    ORACLE_OWNER= ouser
    ORACLE_HOME=  /u01/grid/product/11.2.0.3

Enter the full pathname of the local bin directory: [/usr/local/bin]: /opt/local/bin
Creating /opt/local/bin directory...
   Copying dbhome to /opt/local/bin ...
   Copying oraenv to /opt/local/bin ...
   Copying coraenv to /opt/local/bin ...


Creating /var/opt/oracle/oratab file...
Entries will be added to the /var/opt/oracle/oratab file as needed by
Database Configuration Assistant when a database is created
Finished running generic part of root script.
Now product-specific root actions will be performed.
Using configuration parameter file: /u01/grid/product/11.2.0.3/crs/install/crsconfig_params
Creating trace directory
User ignored Prerequisites during installation
OLR initialization - successful
  root wallet
  root wallet cert
  root cert export
  peer wallet
  profile reader wallet
  pa wallet
  peer wallet keys
  pa wallet keys
  peer cert request
  pa cert request
  peer cert
  pa cert
  peer root cert TP
  profile reader root cert TP
  pa root cert TP
  peer pa cert TP
  pa peer cert TP
  profile reader pa cert TP
  profile reader peer cert TP
  peer user cert
  pa user cert
Adding Clusterware entries to inittab
CRS-2672: Attempting to start 'ora.mdnsd' on 'vzhost1c'
CRS-2676: Start of 'ora.mdnsd' on 'vzhost1c' succeeded
CRS-2672: Attempting to start 'ora.gpnpd' on 'vzhost1c'
CRS-2676: Start of 'ora.gpnpd' on 'vzhost1c' succeeded
CRS-2672: Attempting to start 'ora.cssdmonitor' on 'vzhost1c'
CRS-2672: Attempting to start 'ora.gipcd' on 'vzhost1c'
CRS-2676: Start of 'ora.cssdmonitor' on 'vzhost1c' succeeded
CRS-2676: Start of 'ora.gipcd' on 'vzhost1c' succeeded
CRS-2672: Attempting to start 'ora.cssd' on 'vzhost1c'
CRS-2672: Attempting to start 'ora.diskmon' on 'vzhost1c'
CRS-2676: Start of 'ora.diskmon' on 'vzhost1c' succeeded
CRS-2676: Start of 'ora.cssd' on 'vzhost1c' succeeded

ASM created and started successfully.

Disk Group crsdg created successfully.

clscfg: -install mode specified
Successfully accumulated necessary OCR keys.
Creating OCR keys for user 'root', privgrp 'root'..
Operation successful.
CRS-4256: Updating the profile
Successful addition of voting disk 621725b80bf24f53bfc8c56f8eaf3457.
Successful addition of voting disk 630c40e735134f2bbf78571ea35bb856.
Successful addition of voting disk 4a78fd6ce8564fdbbfceac0f0e9d7c37.
Successfully replaced voting disk group with +crsdg.
CRS-4256: Updating the profile
CRS-4266: Voting file(s) successfully replaced
##  STATE    File Universal Id                File Name Disk group
--  -----    -----------------                --------- ---------
 1. ONLINE   621725b80bf24f53bfc8c56f8eaf3457 (/dev/did/rdsk/d6s6) [CRSDG]
 2. ONLINE   630c40e735134f2bbf78571ea35bb856 (/dev/did/rdsk/d7s6) [CRSDG]
 3. ONLINE   4a78fd6ce8564fdbbfceac0f0e9d7c37 (/dev/did/rdsk/d8s6) [CRSDG]
Located 3 voting disk(s).

CRS-2672: Attempting to start 'ora.asm' on 'vzhost1c'
CRS-2676: Start of 'ora.asm' on 'vzhost1c' succeeded
CRS-2672: Attempting to start 'ora.CRSDG.dg' on 'vzhost1c'
CRS-2676: Start of 'ora.CRSDG.dg' on 'vzhost1c' succeeded
Configure Oracle Grid Infrastructure for a Cluster ... succeeded
清单 6. 执行脚本
- 在最后一个节点上执行完两个脚本后,单击 GUI 中的 OK 继续操作。
此时出现
[INS-20802] Oracle Cluster Verification Utility failed错误消息,如图 8 所示。oraInstall日志也会显示错误,指出ntp.conf设置不适合 Oracle Solaris 11。INFO: Check for NTP daemon or service alive passed on all nodes INFO: NTP daemon slewing option check failed on some nodes INFO: Check failed on nodes: INFO: vzgray2a,vzgray3a,vzgray4a,vzgray1a INFO: PRVF-5436 : The NTP daemon running on one or more nodes lacks the slewing option "'slewalways yes' & 'disable pll'" INFO: Clock synchronization check using Network Time Protocol(NTP) failed INFO: PRVF-9652 : Cluster Time Synchronization Services check failed INFO: Checking VIP configuration. INFO: Checking VIP Subnet configuration. INFO: Check for VIP Subnet configuration passed. INFO: Checking VIP reachability INFO: Check for VIP reachability passed. INFO: Post-check for cluster services setup was unsuccessful on all the nodes. INFO: WARNING: INFO: Completed Plugin named: Oracle Cluster Verification Utility
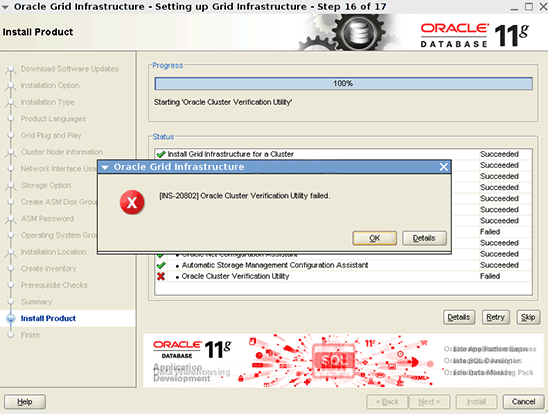
图 8. 错误消息
- 单击 OK,然后依次单击 Skip 和 Next 继续。
此时显示 INS-32091 消息,如图 9 所示:
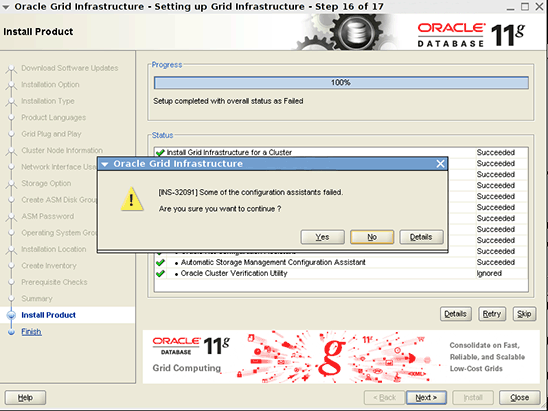
图 9. 另一条错误消息
- 单击 Yes 继续。
Oracle Grid Infrastructure 11.2.0.3 的安装至此完成。
- 从任意节点检查 Oracle Grid Infrastructure 资源的状态,如清单 7 所示:
# /u01/grid/product/11.2.0.3/bin/crsctl status res -t
--------------------------------------------------------------------------------
NAME           TARGET  STATE        SERVER                   STATE_DETAILS
--------------------------------------------------------------------------------
Local Resources
--------------------------------------------------------------------------------
ora.CRSDG.dg
               ONLINE  ONLINE       vzhost1c
               ONLINE  ONLINE       vzhost2c
               ONLINE  ONLINE       vzhost3c
               ONLINE  ONLINE       vzhost4c
ora.LISTENER.lsnr
               ONLINE  ONLINE       vzhost1c
               ONLINE  ONLINE       vzhost2c
               ONLINE  ONLINE       vzhost3c
               ONLINE  ONLINE       vzhost4c
ora.asm
               ONLINE  ONLINE       vzhost1c               Started
               ONLINE  ONLINE       vzhost2c               Started
               ONLINE  ONLINE       vzhost3c               Started
               ONLINE  ONLINE       vzhost4c               Started
ora.gsd
               OFFLINE OFFLINE      vzhost1c
               OFFLINE OFFLINE      vzhost2c
               OFFLINE OFFLINE      vzhost3c
               OFFLINE OFFLINE      vzhost4c
ora.net1.network
               ONLINE  ONLINE       vzhost1c
               ONLINE  ONLINE       vzhost2c
               ONLINE  ONLINE       vzhost3c
               ONLINE  ONLINE       vzhost4c
ora.ons
               ONLINE  ONLINE       vzhost1c
               ONLINE  ONLINE       vzhost2c
               ONLINE  ONLINE       vzhost3c
               ONLINE  ONLINE       vzhost4c
--------------------------------------------------------------------------------
Cluster Resources
--------------------------------------------------------------------------------
ora.LISTENER_SCAN1.lsnr
      1        ONLINE  ONLINE       vzhost1c
ora.cvu
      1        ONLINE  ONLINE       vzhost2c
ora.oc4j
      1        ONLINE  ONLINE       vzhost3c
ora.scan1.vip
      1        ONLINE  ONLINE       vzhost4c
ora.vzhost1c.vip
      1        ONLINE  ONLINE       vzhost1c
ora.vzhost2c.vip
      1        ONLINE  ONLINE       vzhost2c
ora.vzhost3c.vip
      1        ONLINE  ONLINE       vzhost3c
ora.vzhost4c.vip
      1        ONLINE  ONLINE       vzhost4c
清单 7. 检查资源的状态
- 修改 Oracle Grid Infrastructure 时区:
- 停止所有区域集群节点上的 Oracle High Availability Services:
# crsctl stop crs
- 通过在每个 区域集群节点上执行以下操作,查找系统的时区:
# svccfg -s timezone:default listprop timezone/localtime
timezone/localtime astring     US/Pacific
- 更改
$GRID_HOME/crs/install/s_crsconfig_<nodename>_env.txt中的TZ值,使之与系统时区相符。本例中为TZ=US/Pacific。 - 重新启动服务:
# crsctl start crs
- 停止所有区域集群节点上的 Oracle High Availability Services:
安装 Oracle Database 11.2.0.3 并创建数据库
- 执行以下命令来启动 ASM Configuration Assistant,在此为数据库创建名为
swbdg的磁盘组。
$ export DISPLAY=<hostname>:<n>
$ /u01/grid/product/11.2.0.3/bin/asmca
- 在 ASM Configuration Assistant 中,执行以下操作:
- 如图 10 所示,在 Disk Groups 选项卡中单击 Create。
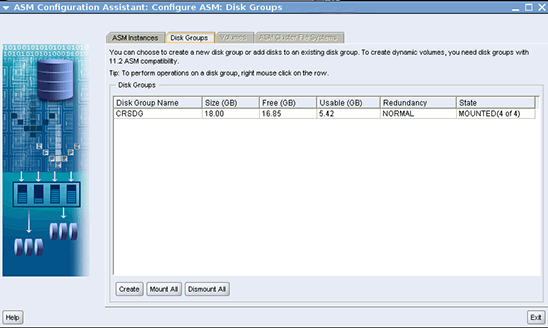
图 10. ASM Configuration Assistant
- 在图 11 所示的 Create Disk Group 页上,执行以下操作:
- 将 Disk Group Name 指定为 swbdg。
- 选择 /dev/did/rdsk/d9s6、/dev/did/rdsk/d10s6、/dev/did/rdsk/d14s6 和 /dev/did/rdsk/d15s6。
- 将 fgr1 指定为磁盘
/dev/did/rdsk/d9s6和/dev/did/rdsk/d10s6的故障组。 - 将 fgr2 指定为磁盘
/dev/did/rdsk/d14s6和/dev/did/rdsk/d15s6的故障组。 - 单击 OK 创建磁盘组。
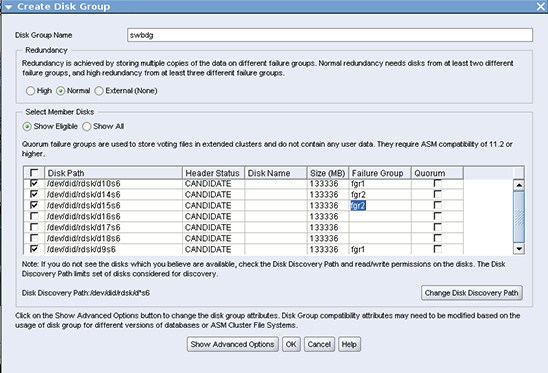
图 11. Create Disk Group 页
swbdg磁盘组创建完毕后,单击 Exit 关闭 ASM Configuration Assistant。
- 如图 10 所示,在 Disk Groups 选项卡中单击 Create。
- 从一个 节点运行清单 8 中显示的命令,打开 Oracle Universal Installer 安装 Oracle 数据库:
$ export DISPLAY=<hostname>:<n>
$ cd <PATH to 11.2.0.3 based software image>/database
$ ./runInstaller
starting Oracle Universal Installer...

Checking Temp space: must be greater than 180 MB.   Actual 20766 MB    Passed
Checking swap space: must be greater than 150 MB.   Actual 23056 MB    Passed
Checking monitor: must be configured to display at least 256 colors
    >>> Could not execute /usr/bin/xdpyinfo    Failed <<<<

Some requirement checks failed. You must fulfill these requirements before

continuing with the installation,

Continue? (y/n) [n]
清单 8. 启动 Oracle Universal Installer
- 键入 y 继续。
- 向 Oracle Universal Installer 提供以下输入:
- 在 Configuration Security Updates 页和 Download Software Updates 页上提供所需信息。
- 在 Select Installation Option 页上,选择 Create and configure a database。
- 在 System Class 页上,选择 Server Class。
- 在图 12 所示的 Grid Installation Options 页上,执行以下操作:
- 选择 Oracle Real Application Clusters database installation。
- 确保选中所有节点。
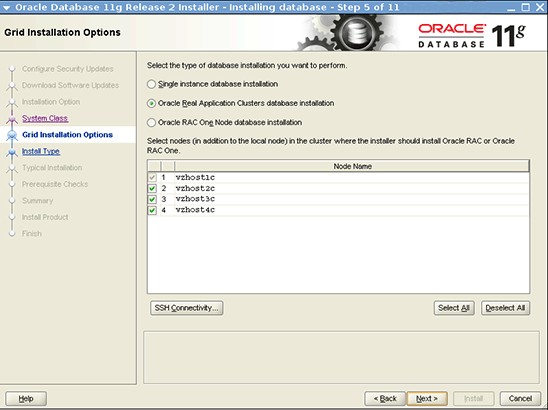
图 12. Grid Installation Options 页
- 在 Select Install Type 页上,选择 Advanced install。
- 在 Select Product Languages 页上,选择默认值。
- 在 Select Database Edition 页上,选择 Enterprise Edition。
- 在 Specify Installation Location 页上,指定以下内容:
- 为 Oracle Base 选择 /u01/oracle。
- 为 Software Location 选择 /u01/oracle/product/11.2.0.3。
- 在 Select Configuration Type 页上,选择 General Purpose/Transaction Processing。
- 在 Specify Database Identifiers 页上,指定以下内容:
- 将 Global Database Name 指定为 swb。
- 将 Oracle Service Identifier 指定为 swb。
- 在图 13 所示的 Specify Configuration Options 页中,使用默认设置。

图 13. Specify Configuration Options 页
- 在 Specify Management Options 页上,使用默认设置。
- 在 Specify Database Storage Options 页上,执行以下步骤:
- 选择 Oracle Automatic Storage Management。
- 为 ASMSNMP 用户指定口令。
- 在 Specify Recovery Options 页上,选择 Do not enable automated backups。
- 在 Select ASM Disk Group 页上,选择 SWBDG,如图 14 所示。
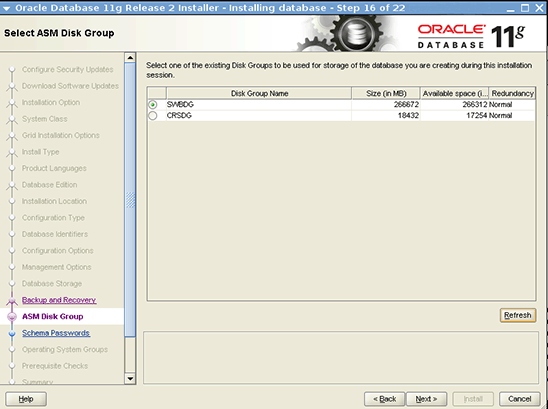
图 14. Select ASM Disk Group 页
- 在 Specify Schema Passwords 页上,为 SYS、SYSTEM、SYSMAN 和 DBSNMP 帐户指定口令。
- 在 Privileged Operating System Groups 页上,指定以下内容:
- 为 Database Administrator (OSDBA) Group 选择 dba。
- 为 Database Operator (OSOPER) Group (Optional) 选择 oinstall。
- 在 Perform Prerequisite Checks 页上,选择 Ignore All,如图 15 所示。
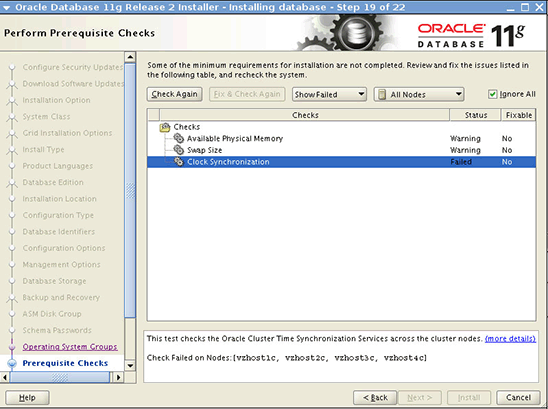
图 15. Perform Prerequisite Checks 页
此时将显示一条 INS-13016 消息,如图 16 所示。
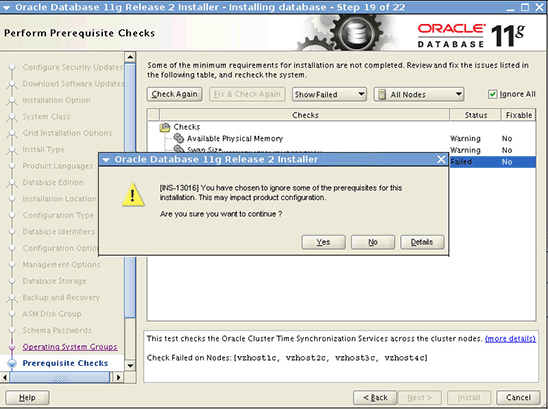
图 16. 错误消息
- 选择 Yes 继续。
- 在图 17 所示的 Summary 页上,单击 Install。
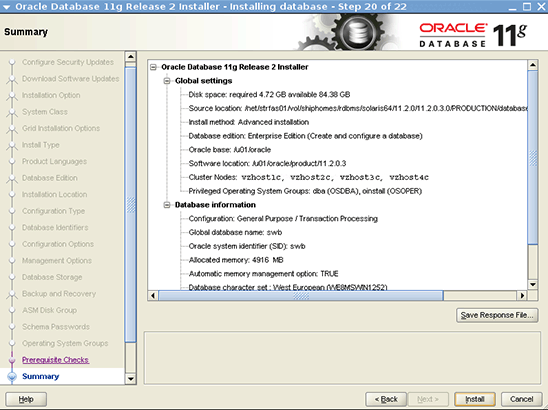
图 17. Summary 页
- 在 Database Configuration Assistant 对话框中,单击 OK 继续,如图 18 所示。
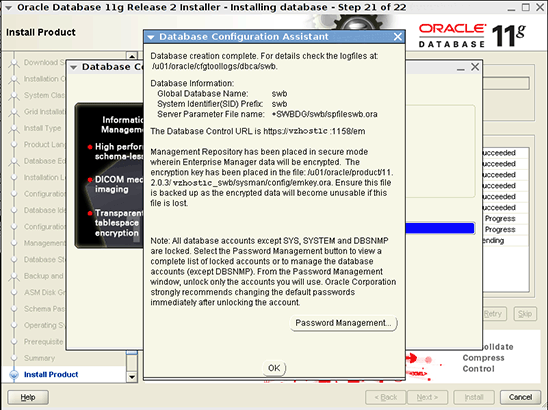
图 18. Database Configuration Assistant 对话框
Execute Configuration Scripts 对话框要求您在各 节点上执行
root.sh,如图 19 所示。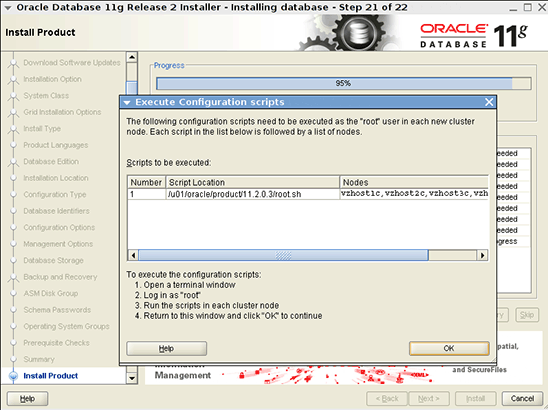
图 19. Execute Configuration Scripts 对话框
- 在最后一个节点上执行
root.sh脚本之后,单击 OK 继续。
Finish 页显示,Oracle 数据库的安装和配置已完成,如图 20 所示。
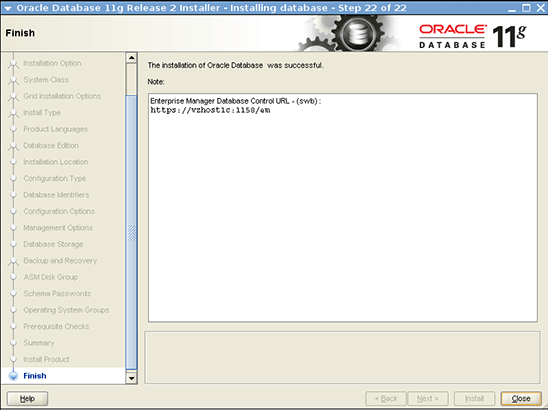
图 20. Finish 页
创建 Oracle Solaris Cluster 资源
使用以下过程创建 Oracle Solaris Cluster 资源。或者,您也可以使用 clsetup 向导。
- 从一个 区域集群节点执行以下命令,在区域集群中注册
SUNW.crs_framework资源类型:
# clrt register SUNW.crs_framework
- 将
SUNW.crs_framework资源类型的一个实例添加到 Oracle RAC 框架资源组:
# clresource create -t SUNW.crs_framework \
-g rac-framework-rg \
-p resource_dependencies=rac-framework-rs \
crs-framework-rs
- 注册可伸缩的 Oracle 自动存储管理实例代理资源类型:
# clresourcetype register SUNW.scalable_asm_instance_proxy
- 注册 Oracle 自动存储管理磁盘组资源类型:
# clresourcetype register SUNW.scalable_asm_diskgroup_proxy
- 创建资源组
asm-inst-rg和asm-dg-rg:
# clresourcegroup create -S asm-inst-rg asm-dg-rg
- 设置
asm-inst-rg对rac-fmwk-rg的强正相关性:
# clresourcegroup set -p rg_affinities=++rac-framework-rg asm-inst-rg
- 设置
asm-dg-rg对asm-inst-rg的强正相关性:
# clresourcegroup set -p rg_affinities=++asm-inst-rg asm-dg-rg
- 创建一个
SUNW.scalable_asm_instance_proxy资源并设置资源依赖性:
# clresource create asm-inst-rg \ -t SUNW.scalable_asm_instance_proxy \ -p ORACLE_HOME=/u01/grid/product/11.2.0.3 \ -p CRS_HOME=/u01/grid/product/11.2.0.3 \ -p "ORACLE_SID{vzhost1c}"=+ASM1 \ -p "ORACLE_SID{vzhost2c}"=+ASM2 \ -p "ORACLE_SID{vzhost3c}"=+ASM3 \ -p "ORACLE_SID{vzhost4c}"=+ASM4 \ -p resource_dependencies_offline_restart=crs-framework-rs \ -d asm-inst-rs - 将 Oracle 自动存储管理磁盘组资源类型添加到
asm-dg-rg资源组:
# clresource create -g asm-dg-rg -t SUNW.scalable_asm_diskgroup_proxy \
-p asm_diskgroups=CRSDG,SWBDG \
-p resource_dependencies_offline_restart=asm-inst-rs \
-d asm-dg-rs
- 在集群节点上,使
asm-inst-rg资源组在托管状态下联机:
# clresourcegroup online -eM asm-inst-rg
- 在集群节点上,使
asm-dg-rg资源组在托管状态下联机:
# clresourcegroup online -eM asm-dg-rg
- 为 Oracle RAC 数据库服务器创建可伸缩的资源组以包含代理资源:
# clresourcegroup create -S \
-p rg_affinities=++rac-framework-rg,++asm-dg-rg \
rac-swbdb-rg
- 注册
SUNW.scalable_rac_server_proxy资源类型:
# clresourcetype register SUNW.scalable_rac_server_proxy
- 将数据库资源添加到资源组中:
# clresource create -g rac-swbdb-rg \ -t SUNW.scalable_rac_server_proxy \ -p resource_dependencies=rac-framework-rs \ -p resource_dependencies_offline_restart=crs-framework-rs,asm-dg-rs \ -p oracle_home=/u01/oracle/product/11.2.0.3 \ -p crs_home=/u01/grid/product/11.2.0.3 \ -p db_name=swb \ -p "oracle_sid{vzhost1c}"=swb1 \ -p "oracle_sid{vzhost2c}"=swb2 \ -p "oracle_sid{vzhost3c}"=swb3 \ -p "oracle_sid{vzhost4c}"=swb4 \ -d rac-swb-srvr-proxy-rs - 使资源组联机:
# clresourcegroup online -emM rac-swbdb-rg
- 检查集群资源的状态,如清单 9 所示:
# clrs status

=== Cluster Resources ===

Resource Name             Node Name      State      Status Message
-------------             ---------      -----      --------------
crs_framework-rs          vzhost1c       Online     Online
                          vzhost2c       Online     Online
                          vzhost3c       Online     Online
                          vzhost4c       Online     Online

rac-framework-rs          vzhost1c       Online     Online
                          vzhost2c       Online     Online
                          vzhost3c       Online     Online
                          vzhost4c       Online     Online

asm-inst-rs               vzhost1c       Online     Online - +ASM1 is UP and ENABLED
                          vzhost2c       Online     Online - +ASM2 is UP and ENABLED
                          vzhost3c       Online     Online - +ASM3 is UP and ENABLED
                          vzhost4c       Online     Online - +ASM4 is UP and ENABLED

asm-dg-rs                 vzhost1c       Online     Online - Mounted: SWBDG
                          vzhost2c       Online     Online - Mounted: SWBDG
                          vzhost3c       Online     Online - Mounted: SWBDG
                          vzhost4c       Online     Online - Mounted: SWBDG

rac-swb-srvr-proxy-rs     vzhost1c       Online     Online - Oracle instance UP
                          vzhost2c       Online     Online - Oracle instance UP
                          vzhost3c       Online     Online - Oracle instance UP
                          vzhost4c       Online     Online - Oracle instance UP
清单 9. 检查集群资源状态
另请参见
下面是其他一些资源:
- ”Oracle Grid Infrastructure 安装“指南中的“Oracle 自动存储管理存储配置”:http://docs.oracle.com/cd/E11882_01/install.112/e24616/storage.htm#CACIJEGH
- “Oracle Solaris 管理:命名服务和目录服务”指南中的“管理 DNS 任务”:http://docs.oracle.com/cd/E23824_01/html/821-1455/dnsadmin-1.html#scrolltoc
- “Oracle Solaris 管理:命名服务和目录服务”指南中的“名称服务切换”:http://docs.oracle.com/cd/E23824_01/html/821-1455/dnsadmin-1.html#scrolltoc
- Oracle Solaris Cluster 4.0 文档库:http://www.oracle.com/technetwork/cn/server-storage/solaris-cluster/documentation/index.html
- 所有 Oracle Solaris Cluster 技术资源:http://www.oracle.com/technetwork/server-storage/solaris-cluster/documentation/cluster-how-to-1389544.html
- Oracle Solaris Cluster 4.0 版本说明:http://docs.oracle.com/cd/E23623_01/html/E23438/index.html
- Oracle Solaris 补丁和更新:http://www.oracle.com/technetwork/server-storage/solaris-cluster/downloads/cluster-archive-168201.html
- Oracle Solaris Cluster 下载:http://www.oracle.com/technetwork/cn/server-storage/solaris-cluster/downloads/index.html
- Oracle Solaris Cluster 培训:http://www.oracle.com/technetwork/cn/server-storage/solaris-cluster/training/index.html
关于作者
Vinh Tran 是 Oracle Solaris Cluster 小组的一名质量工程师。他的职责包括但不限于 Oracle Solaris Cluster 上的 Oracle RAC 认证和资格认定。
| 修订版 1.0,2012 年 7 月 27 日 |
要了解所有 Oracle 技术中与系统管理员相关的内容,请在 Facebook 和 Twitter 上关注 OTN Systems。