 Articles
Server and Storage Administration
Articles
Server and Storage Administration
Oracle Solaris 11ゾーン・クラスタへのOracle RACの配置方法
Vinh Tran著
Oracle Solarisゾーン・クラスタを作成する方法、ゾーン・クラスタ内でOracle Grid Infrastructure 11.2.0.3およびOracle Real Application Clusters(Oracle RAC)11.2.0.3のインストールと構成を行う方法、Oracle RACインスタンス向けのOracle Solaris Cluster 4.0リソースを作成する方法について説明します。
2012年7月公開
|
はじめに
プロセスの概要
前提条件
ゾーン・クラスタの作成
ゾーン・クラスタ向けのOracle RACフレームワーク・リソースの作成
ゾーン・クラスタ
z11gr2Aでのルート環境のセットアップOracleソフトウェアのユーザーおよびグループの作成
Oracle Solarisゾーン・クラスタ・ノード内でのOracle Grid Infrastructure 11.2.0.3のインストール
Oracle Database 11.2.0.3のインストールとデータベースの作成
Oracle Solaris Clusterリソースの作成
参考情報
著者について
この記事では、Oracle Solaris 11のOracle Solaris Cluster環境でOracle Solarisゾーン・クラスタを作成する方法、ゾーン・クラスタ内でOracle Grid Infrastructure 11.2.0.3およびOracle Real Application Clusters(Oracle RAC)11.2.0.3のインストールと構成を行う方法、Oracle RACインスタンス向けのOracle Solaris Cluster 4.0リソースを作成する方法について説明します。
類似の記事が3つあり、それぞれ異なるバージョンのソフトウェアを使用して同じ手順を実行する方法を説明しており、この記事はそのうちの1つです。次の表にこの3つの記事についてまとめます。
| 記事 | RACバージョン | Solarisバージョン | Clusterバージョン |
|---|---|---|---|
| Oracle Solarisゾーン・クラスタへのOracle RAC 11.2.0.2の配置方法 | 11.2.0.2 | 10 | 3.3 |
| Oracle Solarisゾーン・クラスタへのOracle RAC 11.2.0.3の配置方法 | 11.2.0.3 | 10 | 3.3 |
| Oracle Solaris 11ゾーン・クラスタへのOracle RAC 11.2.0.3の配置方法 | 11.2.0.3 | 11 | 4.0 |
はじめに
Oracle Solaris Clusterには、高可用性ゾーン・クラスタの作成機能が備わっています。 1つのゾーン・クラスタは複数のOracle Solarisゾーンで構成され、それぞれのゾーンは個別の専用サーバー上に存在します。クラスタを構成するゾーンは互いに関連付けられ、単一の仮想クラスタを形成します。 それぞれのゾーン・クラスタはお互いに分離されているため、セキュリティが向上します。 また、ゾーンがクラスタ化されているため、ホストされるアプリケーションの高可用性が実現されます。 1つの物理クラスタ上に複数のゾーン・クラスタを構成できるため、1つのクラスタ上にマルチクラスタ・アプリケーションを統合する手段が得られます。
ゾーン・クラスタ内部にOracle RACをインストールすることによって、同じデータベースの異なるデータベース・バージョンや異なる配置(たとえば、本番環境用の配置と開発環境用の配置)の共存が可能です。 このようなアーキテクチャを使用して、多層ソリューションのさまざまな構成要素を、それぞれ別の仮想ゾーン・クラスタに配置することもできます。 たとえば、Oracle RACとアプリケーション・サーバーを、同じクラスタのそれぞれ異なるゾーンに配置できます。 このアプローチによって、層および管理ドメインを互いに分離するだけでなく、Oracle Solaris Clusterの簡素化された管理機能を活用することもできます。
ゾーン・クラスタへのOracle RACの配置に使用できるさまざまな構成については、『Running Oracle Real Application Clusters on Oracle Solaris Zone Clusters』ホワイト・ペーパーを参照してください。
このドキュメントでは、次の手順について説明します。
- Oracle Solarisゾーン・クラスタの作成
- ゾーン・クラスタでのOracle Grid InfrastructureおよびOracle RAC 11.2.0.3データベースのインストールと構成
- ゾーン・クラスタ内のOracle RACで使用するOracle Solaris Clusterリソースの作成
注: このドキュメントは、パフォーマンスのベスト・プラクティスを紹介するガイドではありません。次のトピックについては対象外です。
- Oracle Solaris OSのインストール
- ストレージ構成
- ネットワーク構成
- Oracle Solaris Clusterのインストール
注: Oracle Solaris Cluster 4.0のインストールの詳細は、『How to Install and Configure a Two-Node Cluster Using Oracle Solaris Cluster 4.0 on Oracle Solaris 11』を参照してください。
プロセスの概要
この記事では、Oracle Automatic Storage Managementを使用して、Oracle Solaris Clusterの4ノードのゾーン・クラスタ構成でOracle RACをセットアップする方法について説明します(図1を参照)。
次の3つの重要な手順を実行する必要があります。
- ゾーン・クラスタを作成し、このゾーン・クラスタ内で特定のOracle RACインフラストラクチャを作成する。
- 環境を準備し、Oracle Grid InfrastructureおよびOracle Databaseのインストールと構成を行う。
- Oracle Solaris Clusterリソースを作成し、リソース同士を関連付け、オンラインにする。
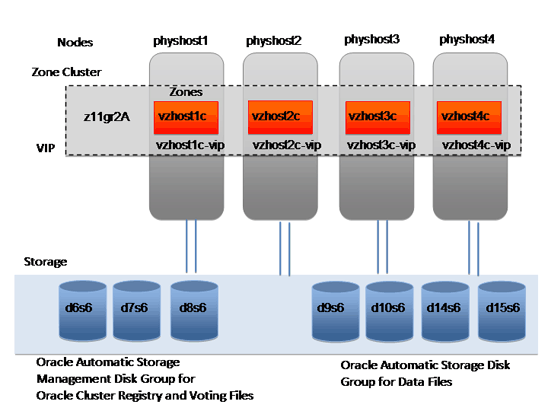
図1. 4ノードのゾーン・クラスタ構成
前提条件
次の前提条件を満たしていることを確認してください。
- Oracle Solaris 11ビルド175b以降とDNS/NISネーム・サービスをインストールしていること。
- Oracle Solaris Cluster 4.0を、
ha-cluster-fullというパッケージ名でインストールしていること。 - Oracle Solaris Cluster 4.0が構成されていること。
- Oracle Solaris 11カーネル・パラメーターが、大域ゾーン内の
/etc/systemファイルに構成されていること。 推奨値の例は次のとおりです。
shmsys:shminfo_shmmax 4294967295
set rlim_fd_cur=1024
- 共有ディスク(
/dev/did/rdskデバイスとも言う)を認識していること。 リスト1に、クラスタ・ノードの大域ゾーンから共有ディスクを識別する方法の例を示します。
phyhost1# cldev status

=== Cluster DID Devices ===

Device Instance            Node               Status
---------------            ----               ------
/dev/did/rdsk/d1           phyhost1           Ok

/dev/did/rdsk/d10          phyhost1           Ok
                           phyhost2           Ok
                           phyhost3           Ok
                           phyhost4           Ok

/dev/did/rdsk/d14          phyhost1           Ok
                           phyhost2           Ok
                           phyhost3           Ok
                           phyhost4           Ok

/dev/did/rdsk/d15          phyhost1           Ok
                           phyhost2           Ok
                           phyhost3           Ok
                           phyhost4           Ok

/dev/did/rdsk/d16          phyhost1           Ok
                           phyhost2           Ok
                           phyhost3           Ok
                           phyhost4           Ok

/dev/did/rdsk/d17          phyhost1           Ok
                           phyhost2           Ok
                           phyhost3           Ok
                           phyhost4           Ok

/dev/did/rdsk/d18          phyhost1           Ok
                           phyhost2           Ok
                           phyhost3           Ok
                           phyhost4           Ok

/dev/did/rdsk/d19          phyhost2           Ok

/dev/did/rdsk/d2           phyhost1           Ok

/dev/did/rdsk/d20          phyhost2           Ok

/dev/did/rdsk/d21          phyhost3           Ok

/dev/did/rdsk/d22          phyhost3           Ok

/dev/did/rdsk/d23          phyhost4           Ok

/dev/did/rdsk/d24          phyhost4           Ok


/dev/did/rdsk/d6           phyhost1           Ok
                           phyhost2           Ok
                           phyhost3           Ok
                           phyhost4           Ok

/dev/did/rdsk/d7           phyhost1           Ok
                           phyhost2           Ok
                           phyhost3           Ok
                           phyhost4           Ok

/dev/did/rdsk/d8           phyhost1           Ok
                           phyhost2           Ok
                           phyhost3           Ok
                           phyhost4           Ok

/dev/did/rdsk/d9           phyhost1           Ok
                           phyhost2           Ok
                           phyhost3           Ok
                           phyhost4           Ok
リスト1. 共有ディスクの識別
この出力は、ディスク
d6、d7、d8、d9、d10、d14、d15、d16、d17、d18が、phyhost1、phyhost2、phyhost3、phyhost4によって共有されていることを示しています。以下の共有ディスクは、Oracle Automatic Storage Managementディスク・グループでOracle Cluster Registryおよび投票ファイルを保存するために使用されます。
/dev/did/rdsk/d6s6
/dev/did/rdsk/d7s6
/dev/did/rdsk/d8s6
以下の共有ディスクは、Oracle Automatic Storage Managementディスク・グループでデータ・ファイルを保存するために使用されます。
/dev/did/rdsk/d9s6
/dev/did/rdsk/d10s6
/dev/did/rdsk/d14s6
/dev/did/rdsk/d15s6
この例では、スライス6のサイズは102GBです。 ディスク・サイズ要件については、『Oracle Grid Infrastructure Installation Guide』を確認してください。
- Oracle仮想IP(VIP)およびSingle Client Access Name(SCAN)IPの各要件はパブリック・ネットワーク上に割り当てられています。たとえば、次のとおりです。
vzhost1d(IPアドレス10.134.35.99)は、SCAN IPアドレスとして使用される。vzhost1c-vip(IPアドレス10.134.35.100)は、vzhost1cのVIPアドレスとして使用される。vzhost2c-vip(IPアドレス10.134.35.101)は、vzhost2cのVIPアドレスとして使用される。vzhost3c-vip(IPアドレス10.134.35.102)は、vzhost3cのVIPアドレスとして使用される。vzhost4c-vip(IPアドレス10.134.35.103)は、vzhost4cのVIPアドレスとして使用される。
注: ネットワーク上のクラスタ内を含むいずれの場所でも、これらのIPアドレスを手動で組み込むことはしないでください。
- パブリック・ネットワークのIPMPグループ(アクティブ・インタフェースを1つ、スタンバイ・インタフェースを1つ)を構成します。
sc_ipmp0というIPMPグループを構成する例は次のとおりです。
# ipmpstat -g
GROUP       GROUPNAME   STATE     FDT       INTERFACES
sc_ipmp0    sc_ipmp0    degraded  10.00s    net0 [net1]
ゾーン・クラスタの作成
sysconfigツールを使用し、システム構成プロファイルを作成します。
- 次のコマンドを実行します。
# sysconfig create-profile -o /var/tmp/zc2.xml -g location,identity,naming_services,users
- [F2]を押し、Network画面に進みます。 コンピュータ名としてphyshost1と入力します。
- [F2]を押し、DNS Name Service画面に進みます。 「Configure DNS」を選択します。
- [F2]を押し、DNS Server Addresses画面に進みます。 DNSサーバーのIPアドレスを入力します。 少なくとも1つのIPアドレスを指定する必要があります。次に例を示します。
DNS Server IP address: 192.168.1.10
DNS Server IP address: 192.168.1.11
- [F2]を押し、DNS Search List画面に進みます。 DNSへの問合せを行う際の検索対象となるドメインのリストを入力します (ドメインを入力しない場合、このシステムで選択されたDNSドメインのみが検索されます)。 次に例を示します。
Search domain: us.oracle.com
Search domain: www.oracle.com
Search domain:
- [F2]を押し、Alternate Name Service画面に進みます。 リストから、「NIS」を選択します。
- [F2]を押し、NISネーム・サーバーのドメイン名を指定する画面に進みます。 ドメイン名を、大文字小文字および句読点の誤りがないように指定します。次に例を示します。
Domain Name: solaris.us.oracle.com
- [F2]を押し、このシステムのネーム・サーバーの検索方法を指定する画面に進みます。 ネーム・サーバーの検索を自動的に実行する場合は「Find one」を選択します。次の画面でネーム・サーバーを指定する場合は「Specify one」を選択します。
ネーム・サーバーがローカルのサブネット上にある場合に限り、ネーム・サーバーを自動的に検索できます。
- [F2]を押し、Time Zone: Regions画面に進みます。 使用するタイムゾーンが含まれる地域を選択します。
- [F2]を押し、Time Zone: Locations画面に進みます。 使用するタイムゾーンが含まれるロケーションを選択します。
- [F2]を押し、Time Zone画面に進みます。 使用するタイムゾーンを選択します。
- [F2]を押し、Users画面に進みます。 システムのrootパスワードを定義し、自分用のユーザー・アカウントを作成します。
- [F2]を押し、System Configuration Summary画面に進みます。 これまでのすべての設定のリストを確認します。
- [F2]を押し、設定を適用します。
- 次のコマンドを実行します。
- 以下のリスト2に示している内容で
zone.cfgという名前のファイルを作成します。
create
set zonepath=/export/zones/z11gR2A
set limitpriv ="default,proc_priocntl,proc_clock_highres,sys_time"
add dedicated-cpu
set ncpus=16
end
add capped-memory
set physical=12g
set swap=12g
set locked=12g
end
add node
set physical-host=phyhost1
set hostname=vzhost1c
add net
set address=vzhost1c
set physical=e1000g0
end
end
add node
set physical-host=phyhost2
set hostname=vzhost2c
add net
set address=vzhost2c
set physical=e1000g0
end
end
add node
set physical-host=phyhost3
set hostname=vzhost3c
add net
set address=vzhost3c
set physical=e1000g0
end
end
add node
set physical-host=phyhost4
set hostname=vzhost4c
add net
set address=vzhost4c
set physical=e1000g0
end
end
add net
set address=vzhost1d
end
add net
set address=vzhost1c-vip
end
add net
set address=vzhost2c-vip
end
add net
set address=vzhost3c-vip
end
add net
set address=vzhost4c-vip
end
add device
set match="/dev/did/rdsk/d6s6"
end
add device
set match="/dev/did/rdsk/d7s6"
end
add device
set match="/dev/did/rdsk/d8s6"
end
add device
set match="/dev/did/rdsk/d9s6"
end
add device
set match="/dev/did/rdsk/d10s6"
end
add device
set match="/dev/did/rdsk/d14s6"
end
add device
set match="/dev/did/rdsk/d15s6"
end
add device
set match="/dev/did/rdks/d16s6"
end
add device
set match="/dev/did/rdsk/d17s6"
end
add device
set match="/dev/did/rdsk/d18s6"
end
リスト2.
zone.cfgファイルの作成 - SCANホスト名
vzhost1dが複数のIPアドレスに解決される場合は、SCANホスト名が解決されるそれぞれのIPアドレスに対して個別の大域ネット・リソースを構成します。 たとえば、SCANが3つのIPアドレス(10.134.35.97、10.134.35.98、10.134.35.99)に解決される場合、zone.cfgファイルに次の大域ネット・リソースを追加します。
add net
set address=10.134.35.97
end
add net
set address=10.134.35.98
end
add net
set address=10.134.35.99
end
rootとして、リスト3に示すコマンドを1つのノードから実行し、クラスタを作成します。
# clzonecluster configure -f /var/tmp/zone.cfg z11gr2a

# clzonecluster install -c /var/tmp/zc2.xml z11gr2A

# clzonecluster status

=== Zone Clusters ===

--- Zone Cluster Status ---

Name      Node Name   Zone HostName   Status    Zone Status
----      ---------   -------------   ------    -----------
z11gr2A   phyhost1    vzhost1c        Offline   Installed
          phyhost2    vzhost2c        Offline   Installed
          phyhost3    vzhost3c        Offline   Installed
          phyhost4    vzhost4c        Offline   Installed

# clzc boot z11gr2A

# clzc status

=== Zone Clusters ===

--- Zone Cluster Status ---

Name       Node Name   Zone HostName   Status   Zone Status
----       ---------   -------------   ------   -----------
z11gr2A    phyhost1    vzhost1c        Online   Running

           phyhost2    vzhost2c        Online   Running
           phyhost3    vzhost3c        Online   Running
           phyhost4    vzhost4c        Online   Running
リスト3. Oracle Solarisゾーン・クラスタの作成
ゾーン・クラスタ向けのOracle RACフレームワーク・リソースの作成
rootとして、1つのノードから次の手順を実行し、Oracle RACフレームワークを作成します。
- 1つの大域ゾーン・クラスタ・ノードから
clsetupを実行します(リスト4を参照)。
# /usr/cluster/bin/clsetup
*** Main Menu ***

    Please select from one of the following options:

       1) Quorum
        2) Resource groups
        3) Data Services
        4) Cluster interconnect
        5) Device groups and volumes
        6) Private hostnames
        7) New nodes
        8) Other cluster tasks

        ?) Help with menu options
        q) Quit

    Option:  3

 *** Data Services Menu ***

    Please select from one of the following options:

     * 1) Apache Web Server
     * 2) Oracle
     * 3) NFS
     * 4) Oracle Real Application Clusters
     * 5) SAP Web Application Server
     * 6) Highly Available Storage
     * 7) Logical Hostname
     * 8) Shared Address

      * ?) Help
      * q) Return to the Main Menu

    Option:  4

  *** Oracle Solaris Cluster Support for Oracle RAC ***

    Oracle Solaris Cluster provides a support layer for running Oracle
    Real Application Clusters (RAC) database instances. This option allows
    you to create the RAC framework resource group, storage resources,
    database resources and administer them, for managing the Oracle
    Solaris Cluster support for RAC.

    After the RAC framework resource group has been created, you can use
    the Oracle Solaris Cluster system administration tools to administer a
    RAC framework resource group that is configured on a global cluster.
    To administer a RAC framework resource group that is configured on a
    zone cluster, instead use the appropriate Oracle Solaris Cluster
    command.

   Is it okay to continue (yes/no) [yes]?

    Please select from one of the following options:

        1)  Oracle RAC Create Configuration
        2)  Oracle RAC Ongoing Administration

        q)  Return to the Data Services Menu

    Option:  1

   >>> Select Oracle Real Application Clusters Location <<<

    Oracle Real Application Clusters Location:

        1) Global Cluster
        2) Zone Cluster

    Option [2]:  2

   >>> Select Zone Cluster <<<

    From the list of zone clusters, select the zone cluster where you would like to
    configure Oracle Real Application Clusters.

        1) z11gr2A

        ?) Help
        d) Done

    Selected:  [z11gr2A]

   >>> Select Oracle Real Application Clusters Components to Configure <<<

    Select the component of Oracle Real Application Clusters that you are configuring:

        1) RAC Framework Resource Group
        2) Storage Resources for Oracle Files
        3) Oracle Clusterware Framework Resource
        4) Oracle Automatic Storage Management (ASM)
        5) Resources for Oracle Real Application Clusters Database Instances

    Option [1]: 1

   >>> Verify Prerequisites <<<


    This wizard guides you through the creation and configuration of the Real Application
    Clusters (RAC) framework resource group.

    Before you use this wizard, ensure that the following prerequisites are met:


    * All pre-installation tasks for Oracle Real Application Clusters are completed.

    * The Oracle Solaris Cluster nodes are prepared.

    * The data services packages are installed.

    * All storage management software that you intend to use is installed and configured
    on all nodes where Oracle Real Application Clusters is to run.


    Press RETURN to continue

   >>> Select Nodes <<<

    Specify, in order of preference, a list of names of nodes where Oracle Real
    Application Clusters is to run. If you do not explicitly specify a list, the list
    defaults to all nodes in an arbitrary order.


    The following nodes are available on the zone cluster z11skgxn:

       1) vzhost1c
       2) vzhost2c
       3) vzhost3c
       4) vzhost4c

       r) Refresh and Clear All
       a) All
       ?) Help
       d) Done

    Selected:  [vzhost1c, vzhost2c, vzhost3c, vzhost4c]
    Options:  d


   >>> Review Oracle Solaris Cluster Objects <<<


    The following Oracle Solaris Cluster objects will be created.

    Select the value you are changing:

          Property Name               Current Setting
          =============               ===============
        1) Resource Group Name        rac-framework-rg
        2) RAC Framework Resource N...rac-framework-rs

        d) Done
        ?) Help

    Option:  d

   >>> Review Configuration of RAC Framework Resource Group <<<


    The following Oracle Solaris Cluster configuration will be created.

    To view the details for an option, select the option.

                   Name                         Value
                   ====                         =====
        1) Resource Group Name        rac-framework-rg
        2) RAC Framework Resource N...rac-framework-rs

        c) Create Configuration
        ?) Help

    Option:  c
リスト4.
clsetupの実行 - 1つの大域ゾーン・クラスタ・ノードからOracle RACフレームワーク・リソースを確認します。
# clrs status -Z z11gr2A

=== Cluster Resources ===

Resource Name        Node Name     State      Status Message
-------------        ---------     -----      --------------
rac-framework-rs     vzhost1c      Online     Online
                     vzhost2c      Online     Online
                     vzhost3c      Online     Online
                     vzhost4c      Online     Online
ゾーン・クラスタz11gr2Aでのルート環境のセットアップ
それぞれの大域ゾーン・クラスタ・ノード(phyhost1、phyhost2、phyhost3、phyhost4)から、次の手順を実行します。
- 非大域ゾーン・ノードにログインし、
rootとして次のコマンドを実行します。
# /usr/sbin/zlogin z11gr2A
[Connected to zone 'z11gr2A' pts/2]
Last login: Thu Aug 25 17:30:14 on pts/2
Oracle Corporation      SunOS 5.10      Generic Patch   January 2005
.bash_profileに次のパスを追加します。
/u01/grid/product/11.2.0.3/bin
/usr/cluster/bin
- それぞれのゾーン・クラスタ・ノードに
makeが確実にインストールされているようにします。
- ノード上に
makeパッケージが存在することを確認します。
# pkg list *make*
- 存在しない場合は、
rootとして次のコマンドを実行し、makeパッケージをインストールします。
# pkg install developer/build/make
- ノード上に
- それぞれのノードから、
rootとして、NTPslew_always設定をOracle SolarisのSMFプロパティとして構成します。
# svccfg -s svc:/network/ntp:default setprop config/slew_always=true
# cp /etc/inet/ntp.client /etc/inet/ntp.conf
# svcadm enable ntp
Oracleソフトウェアのユーザーおよびグループの作成
rootとして、それぞれのノードから次のコマンドを実行します。
# groupadd -g 300 oinstall
# groupadd -g 301 dba
# useradd -g 300 -G 301 -u 302 -d /u01/ora_home -s /usr/bin/bash ouser

# mkdir -p /u01/ora_home
# chown ouser:oinstall /u01/ora_home
# mkdir /u01/oracle
# chown ouser:oinstall /u01/oracle
# mkdir /u01/grid
# chown ouser:oinstall /u01/grid
# mkdir /u01/oraInventory
# chown ouser:oinstall /u01/oraInventory
- ソフトウェア所有者
ouserの.bash_profileファイルに次のパスを追加します。
export ORACLE_BASE=/u01/oracle
export ORACLE_HOME=/u01/oracle/product/11.2.0.3
export AWT_TOOLKIT=XToolkit
- ソフトウェア所有者
ouserのパスワードを作成します。
# passwd ouser
New Password:
Re-enter new Password:
passwd: password successfully changed for ouser
bash-3.00#
- ソフトウェア所有者
ouserとして、それぞれのノードからSSHをセットアップします。
$ ssh-keygen -t rsa
Generating public/private rsa key pair.
Enter file in which to save the key (/u01/ora_home/.ssh/id_rsa):
Enter passphrase (empty for no passphrase):
Enter same passphrase again:
Your identification has been saved in /u01/ora_home/.ssh/id_rsa.
Your public key has been saved in /u01/ora_home/.ssh/id_rsa.pub.
The key fingerprint is:
e6:63:c9:71:fe:d1:8f:71:77:70:97:25:2a:ee:a9:33 local1@vzhost1c
$
$ pwd
/u01/ora_home/.ssh
- 1つ目のノード
vzhost1cから、次のコマンドを実行します。
$ cd  /u01/ora_home/.ssh
$ cat id_rsa.pub >> authorized_keys
$ chmod 600 authorized_keys
$ scp authorized_keys vzhost2c:/u01/ora_home/.ssh
- 2つ目のノード
vzhost2cから、次のコマンドを実行します。
$ cd /u01/ora_home/.ssh
$ cat id_rsa.pub >> authorized_keys
$ scp authorized_keys vzhost3c:/u01/ora_home/.ssh
- 3つ目のノード
vzhost3cから、次のコマンドを実行します。
$ cd /u01/ora_home/.ssh
$ cat id_rsa.pub >> authorized_keys
$ scp authorized_keys vzhost4c:/u01/ora_home/.ssh
- 4つ目のノード
vzhost4cから、次のコマンドを実行します。
$ cd /u01/ora_home/.ssh
$ cat id_rsa.pub >> authorized_keys
$ scp authorized_keys vzhost1c:/u01/ora_home/.ssh
- 1つ目のノード
vzhost1cから、次のコマンドを実行します。
$ cd /u01/ora_home/.ssh
$ scp authorized_keys vzhost2c:/u01/ora_home/.ssh
$ scp authorized_keys vzhost3c:/u01/ora_home/.ssh
- それぞれのノードから、SSHセットアップをテストします。
$ ssh vzhost1c date
$ ssh vzhost2c date
$ ssh vzhost3c date
$ ssh vzhost4c date
- それぞれのローカル・ゾーン・クラスタ・ノードから、
rootとして、Oracle Automatic Storage Management候補ディスクをセットアップします。
# for i in 6 7 8 9 10 14 15 > do > chown ouser:oinstall /dev/did/rdsk/d${i}s6 > chmod 660 /dev/did/rdsk/d${i}s6 > done - ローカル・ゾーン・クラスタで、ソフトウェア所有者として、1つのノードから次のコマンドを実行します。
$ for i in 6 7 8 9 10 14 15
> do
> dd if=/dev/zero of=/dev/did/rdsk/d${i}s6 bs=1024k count=200
> done
Oracle Solarisゾーン・クラスタ・ノード内でのOracle Grid Infrastructure 11.2.0.3のインストール
- ソフトウェア所有者として、1つのノード上でリスト5に示すコマンドを実行します。
$ bash
$ export DISPLAY=<ホスト名>:<n>
$ cd <PATH to 11.2.0.3 based software image>/grid/
$ ./runInstaller
starting Oracle Universal Installer...

Checking Temp space: must be greater than 180 MB.   Actual 20766 MB    Passed
Checking swap space: must be greater than 150 MB.   Actual 23056 MB    Passed
Checking monitor: must be configured to display at least 256 colors
    >>> Could not execute /usr/bin/xdpyinfo    Failed <<<<

Some requirement checks failed. You must fulfill these requirements before
continuing with the installation,

Continue? (y/n) [n]
リスト5. Oracle Universal Installerの起動
- yと入力して次に進みます。
- Oracle Universal Installerに対して次の入力を行います。
- Select Installation Optionページで、「Install and Configure Oracle Grid Infrastructure for a Cluster」を選択します。
- Select Installation Typeページで、「Advanced Installation」を選択します。
- Select Product Languagesページで、「English」を選択します。
- Grid Plug and Play Informationページで、図2に示すとおり、次の情報を指定します。
- Cluster Nameに対して「vzhost-cluster」を指定します。
- SCAN Nameに対して「vzhost1d」を指定します。
- SCAN Portに対して「1521」を指定します。
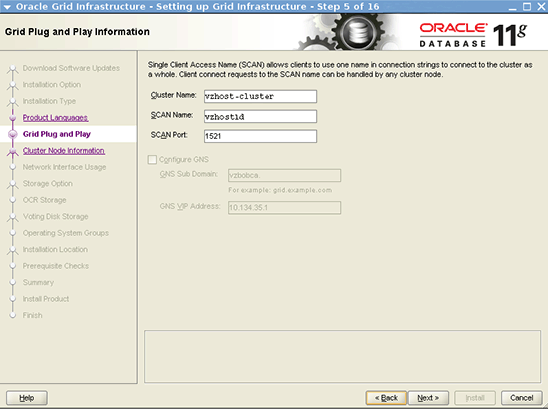
図2. Grid Plug and Play Informationページ
- Cluster Node Informationページで、図3に示すとおり、次の情報を指定します。
Public Hostname Virtual Hostname vzhost1cvzhost1c-vipvzhost2cvzhost2c-vipvzhost3cvzhost3c-vipvzhost4cvzhost4c-vip
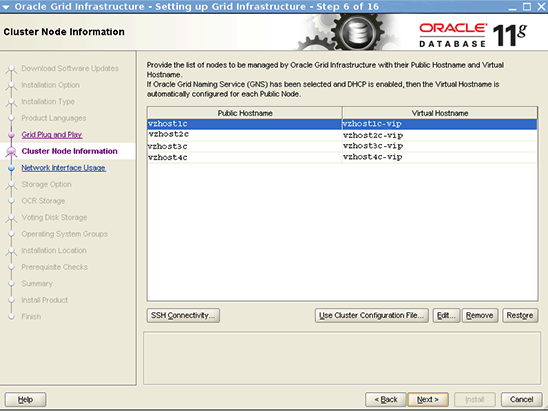
図3. Cluster Node Informationページ
- Network Interface Usageページで、デフォルト設定を受け入れます。
- Storage Option Informationページで、「Oracle Automatic Storage Management」を選択します。
- Create ASM Disk Groupページで、図4に示すとおり、次の手順を実行します。
- 「Change Discovery Path」ボタンをクリックし、ディスク検出パスに/dev/did/rdsk/d*s6を追加します。
- Disk Group Nameに対して「crsdg」を指定します。
- 「Candidate Disks」を選択し、次に「/dev/did/rdsk/d6s6」、「/dev/did/rdsk/d7s6」、「/dev/did/rdsk/d8s6」を選択します。
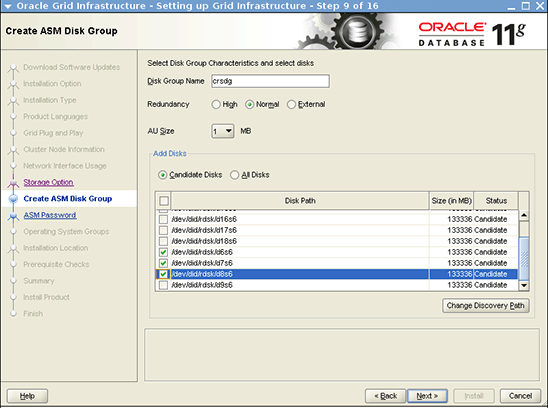
図4. Create ASM Disk Groupページ
- Specify ASM Passwordページで、図5に示すとおり、SYSアカウントおよびASMSNMPアカウントのユーザー名とパスワードを入力します。

図5. Specify ASM Passwordページ
- Privileged Operating System Groupsページで、デフォルト設定を使用します。
- Oracle ASM DBA (OSDBA for ASM) Groupに対して、「oinstall」を選択します。
- オプションとして、Oracle ASM Operator (OSOPER for ASM) Group (Optional)に対して、1つのグループを選択します。
- Oracle ASM Administrator (OSASM) Groupに対して、「oinstall」を選択します。
- Software Installation Locationページで、次の情報を指定します。
- Oracle Baseに対して「/u01/oracle」を指定します。
- Software Locationに対して「/u01/grid/product/11.2.0.3」を指定します。
- Create Inventoryページで、Inventory Directoryに対して「/u01/oraInventory」を選択します。
- Perform Prerequisite Checksページで、図6に示すとおり、「Ignore All」を選択します。

図6. Perform Prerequisite Checksページ
- Summaryページで、「Install」をクリックし、ソフトウェアのインストールを開始します。
図7に示すExecute Configuration Scriptsダイアログ・ボックスに、
rootとして/u01/oraInventory/orainstRoot.shスクリプトと/u01/grid/product/11.2.0.3/root.shスクリプトを実行することを要求するメッセージが表示されます。
図7. 構成スクリプトの実行に関するメッセージ
- ターミナル・ウィンドウを開き、
rootとして、それぞれのゾーン・クラスタ・ノード上でスクリプトを実行します。 リスト6に例を示します。
# /u01/oraInventory/orainstRoot.sh
Changing permissions of /u01/oraInventory.
Adding read,write permissions for group.
Removing read,write,execute permissions for world.

Changing groupname of /u01/oraInventory to oinstall.
The execution of the script is complete.


# cd /u01/grid/product/11.2.0.3
# ./root.sh
Performing root user operation for Oracle 11g

The following environment variables are set as:
    ORACLE_OWNER= ouser
    ORACLE_HOME=  /u01/grid/product/11.2.0.3

Enter the full pathname of the local bin directory: [/usr/local/bin]: /opt/local/bin
Creating /opt/local/bin directory...
   Copying dbhome to /opt/local/bin ...
   Copying oraenv to /opt/local/bin ...
   Copying coraenv to /opt/local/bin ...


Creating /var/opt/oracle/oratab file...
Entries will be added to the /var/opt/oracle/oratab file as needed by
Database Configuration Assistant when a database is created
Finished running generic part of root script.
Now product-specific root actions will be performed.
Using configuration parameter file: /u01/grid/product/11.2.0.3/crs/install/crsconfig_params
Creating trace directory
User ignored Prerequisites during installation
OLR initialization - successful
  root wallet
  root wallet cert
  root cert export
  peer wallet
  profile reader wallet
  pa wallet
  peer wallet keys
  pa wallet keys
  peer cert request
  pa cert request
  peer cert
  pa cert
  peer root cert TP
  profile reader root cert TP
  pa root cert TP
  peer pa cert TP
  pa peer cert TP
  profile reader pa cert TP
  profile reader peer cert TP
  peer user cert
  pa user cert
Adding Clusterware entries to inittab
CRS-2672: Attempting to start 'ora.mdnsd' on 'vzhost1c'
CRS-2676: Start of 'ora.mdnsd' on 'vzhost1c' succeeded
CRS-2672: Attempting to start 'ora.gpnpd' on 'vzhost1c'
CRS-2676: Start of 'ora.gpnpd' on 'vzhost1c' succeeded
CRS-2672: Attempting to start 'ora.cssdmonitor' on 'vzhost1c'
CRS-2672: Attempting to start 'ora.gipcd' on 'vzhost1c'
CRS-2676: Start of 'ora.cssdmonitor' on 'vzhost1c' succeeded
CRS-2676: Start of 'ora.gipcd' on 'vzhost1c' succeeded
CRS-2672: Attempting to start 'ora.cssd' on 'vzhost1c'
CRS-2672: Attempting to start 'ora.diskmon' on 'vzhost1c'
CRS-2676: Start of 'ora.diskmon' on 'vzhost1c' succeeded
CRS-2676: Start of 'ora.cssd' on 'vzhost1c' succeeded

ASM created and started successfully.

Disk Group crsdg created successfully.

clscfg: -install mode specified
Successfully accumulated necessary OCR keys.
Creating OCR keys for user 'root', privgrp 'root'..
Operation successful.
CRS-4256: Updating the profile
Successful addition of voting disk 621725b80bf24f53bfc8c56f8eaf3457.
Successful addition of voting disk 630c40e735134f2bbf78571ea35bb856.
Successful addition of voting disk 4a78fd6ce8564fdbbfceac0f0e9d7c37.
Successfully replaced voting disk group with +crsdg.
CRS-4256: Updating the profile
CRS-4266: Voting file(s) successfully replaced
##  STATE    File Universal Id                File Name Disk group
--  -----    -----------------                --------- ---------
 1. ONLINE   621725b80bf24f53bfc8c56f8eaf3457 (/dev/did/rdsk/d6s6) [CRSDG]
 2. ONLINE   630c40e735134f2bbf78571ea35bb856 (/dev/did/rdsk/d7s6) [CRSDG]
 3. ONLINE   4a78fd6ce8564fdbbfceac0f0e9d7c37 (/dev/did/rdsk/d8s6) [CRSDG]
Located 3 voting disk(s).

CRS-2672: Attempting to start 'ora.asm' on 'vzhost1c'
CRS-2676: Start of 'ora.asm' on 'vzhost1c' succeeded
CRS-2672: Attempting to start 'ora.CRSDG.dg' on 'vzhost1c'
CRS-2676: Start of 'ora.CRSDG.dg' on 'vzhost1c' succeeded
Configure Oracle Grid Infrastructure for a Cluster ... succeeded
リスト6. スクリプトの実行
- 最後のノードで両方のスクリプトを実行した後、GUIの「OK」をクリックして次に進みます。
図8に示すとおり、
[INS-20802] Oracle Cluster Verification Utility failedというエラー・メッセージが表示されます。oraInstallログにも、Oracle Solaris 11に適用不可能なntp.conf設定に関するエラーが記録されます。INFO: Check for NTP daemon or service alive passed on all nodes INFO: NTP daemon slewing option check failed on some nodes INFO: Check failed on nodes: INFO: vzgray2a,vzgray3a,vzgray4a,vzgray1a INFO: PRVF-5436 : The NTP daemon running on one or more nodes lacks the slewing option "'slewalways yes' & 'disable pll'" INFO: Clock synchronization check using Network Time Protocol(NTP) failed INFO: PRVF-9652 : Cluster Time Synchronization Services check failed INFO: Checking VIP configuration. INFO: Checking VIP Subnet configuration. INFO: Check for VIP Subnet configuration passed. INFO: Checking VIP reachability INFO: Check for VIP reachability passed. INFO: Post-check for cluster services setup was unsuccessful on all the nodes. INFO: WARNING: INFO: Completed Plugin named: Oracle Cluster Verification Utility
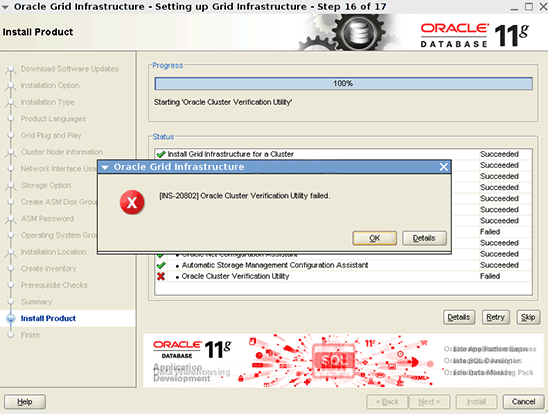
図8. エラー・メッセージ
- 「OK」、「Skip」、「Next」の順にクリックして次に進みます。
図9に示すとおり、エラー・メッセージINS-32091が表示されます。
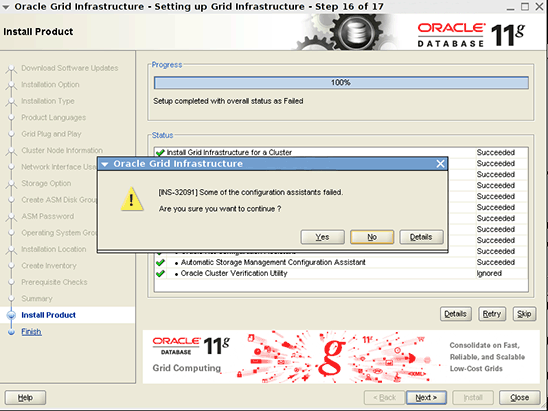
図9. 別のエラー・メッセージ
- 「Yes」をクリックして次に進みます。
Oracle Grid Infrastructure 11.2.0.3のインストールはこれで完了です。
- 任意のノードから、リスト7に示すとおり、Oracle Grid Infrastructureリソースのステータスを確認します。
# /u01/grid/product/11.2.0.3/bin/crsctl status res -t
--------------------------------------------------------------------------------

NAME           TARGET  STATE        SERVER                   STATE_DETAILS
--------------------------------------------------------------------------------
Local Resources
--------------------------------------------------------------------------------
ora.CRSDG.dg
               ONLINE  ONLINE       vzhost1c
               ONLINE  ONLINE       vzhost2c
               ONLINE  ONLINE       vzhost3c
               ONLINE  ONLINE       vzhost4c
ora.LISTENER.lsnr
               ONLINE  ONLINE       vzhost1c
               ONLINE  ONLINE       vzhost2c
               ONLINE  ONLINE       vzhost3c
               ONLINE  ONLINE       vzhost4c
ora.asm
               ONLINE  ONLINE       vzhost1c               Started
               ONLINE  ONLINE       vzhost2c               Started
               ONLINE  ONLINE       vzhost3c               Started
               ONLINE  ONLINE       vzhost4c               Started
ora.gsd
               OFFLINE OFFLINE      vzhost1c
               OFFLINE OFFLINE      vzhost2c
               OFFLINE OFFLINE      vzhost3c
               OFFLINE OFFLINE      vzhost4c
ora.net1.network
               ONLINE  ONLINE       vzhost1c
               ONLINE  ONLINE       vzhost2c
               ONLINE  ONLINE       vzhost3c
               ONLINE  ONLINE       vzhost4c
ora.ons
               ONLINE  ONLINE       vzhost1c
               ONLINE  ONLINE       vzhost2c
               ONLINE  ONLINE       vzhost3c
               ONLINE  ONLINE       vzhost4c
--------------------------------------------------------------------------------
Cluster Resources
--------------------------------------------------------------------------------
ora.LISTENER_SCAN1.lsnr
      1        ONLINE  ONLINE       vzhost1c
ora.cvu
      1        ONLINE  ONLINE       vzhost2c
ora.oc4j
      1        ONLINE  ONLINE       vzhost3c
ora.scan1.vip
      1        ONLINE  ONLINE       vzhost4c
ora.vzhost1c.vip
      1        ONLINE  ONLINE       vzhost1c
ora.vzhost2c.vip
      1        ONLINE  ONLINE       vzhost2c
ora.vzhost3c.vip
      1        ONLINE  ONLINE       vzhost3c
ora.vzhost4c.vip
      1        ONLINE  ONLINE       vzhost4c
リスト7. リソースのステータスの確認
- Oracle Grid Infrastructureのタイムゾーンを修正します。
- すべてのゾーン・クラスタ・ノードでOracle High Availability Servicesを停止します。
# crsctl stop crs
- ぞれぞれのゾーン・クラスタ・ノードで次のコマンドを実行し、システムのタイムゾーンを検索します。
# svccfg -s timezone:default listprop timezone/localtime
timezone/localtime astring     US/Pacific
$GRID_HOME/crs/install/s_crsconfig_<ノード名>_env.txtのTZの値を、システムのタイムゾーンに合うように変更します。 この例では、TZ=US/Pacificとなります。- サービスを再起動します。
# crsctl start crs
- すべてのゾーン・クラスタ・ノードでOracle High Availability Servicesを停止します。
Oracle Database 11.2.0.3のインストールとデータベースの作成
- 次のコマンドを実行し、ASM Configuration Assistantを起動します。ASM Configuration Assistantでは、データベース作成用の
swbdgというディスク・グループを作成できます。
$ export DISPLAY=<ホスト名>:<n>
$ /u01/grid/product/11.2.0.3/bin/asmca
- ASM Configuration Assistantで、次の手順を実行します。
- 図10に示すDisk Groupsタブで、「Create」をクリックします。
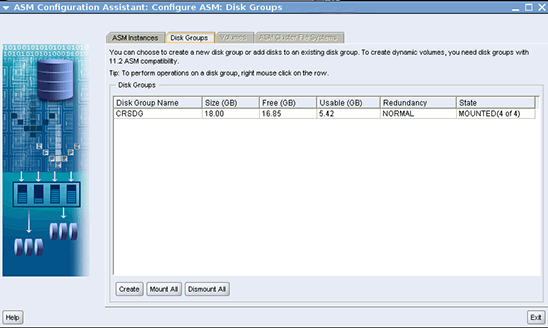
図10. ASM Configuration Assistant
- 図11に示すCreate Disk Groupページで、次の手順を実行します。
- Disk Group Nameに対して「swbdg」を指定します。
- 「/dev/did/rdsk/d9s6」、「/dev/did/rdsk/d10s6」、「/dev/did/rdsk/d14s6」、「/dev/did/rdsk/d15s6」を選択します。
- 「fgr1」を、ディスク
/dev/did/rdsk/d9s6および/dev/did/rdsk/d10s6のFailure Groupとして指定します。 - 「fgr2」を、ディスク
/dev/did/rdsk/d14s6および/dev/did/rdsk/d15s6のFailure Groupとして指定します。 - 「OK」をクリックし、ディスク・グループを作成します。
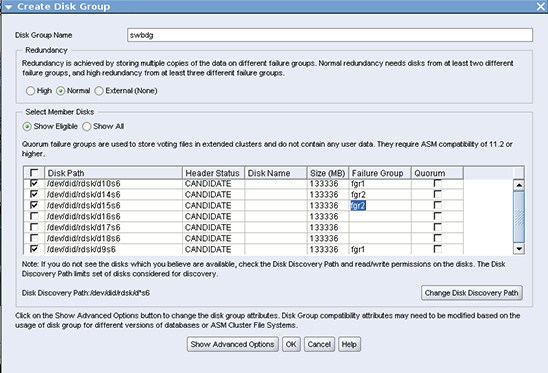
図11. Create Disk Groupページ
swbdgディスク・グループの作成が完了した後、「Exit」をクリックしてASM Configuration Assistantを閉じます。
- 図10に示すDisk Groupsタブで、「Create」をクリックします。
- 1つのノードから、リスト8に示すコマンドを実行して、Oracle Universal Installerを開きOracle Databaseをインストールします。
$ export DISPLAY=<ホスト名>:<n>
$ cd <PATH to 11.2.0.3 based software image>/database
$ ./runInstaller
starting Oracle Universal Installer...

Checking Temp space: must be greater than 180 MB.   Actual 20766 MB    Passed
Checking swap space: must be greater than 150 MB.   Actual 23056 MB    Passed
Checking monitor: must be configured to display at least 256 colors
    >>> Could not execute /usr/bin/xdpyinfo    Failed <<<<

Some requirement checks failed. You must fulfill these requirements before

continuing with the installation,

Continue? (y/n) [n]
リスト8. Oracle Universal Installerの起動
- yと入力して次に進みます。
- Oracle Universal Installerに対して次の入力を行います。
- Configuration Security UpdatesページとDownload Software Updatesページで、必要な情報を入力します。
- Select Installation Optionページで、「Create and configure a database」を選択します。
- System Classページで、「Server Class」を選択します。
- 図12に示すGrid Installation Optionsページで、次の手順を実行します。
- 「Oracle Real Application Clusters database installation」を選択します。
- すべてのノードが選択済みであることを確認します。
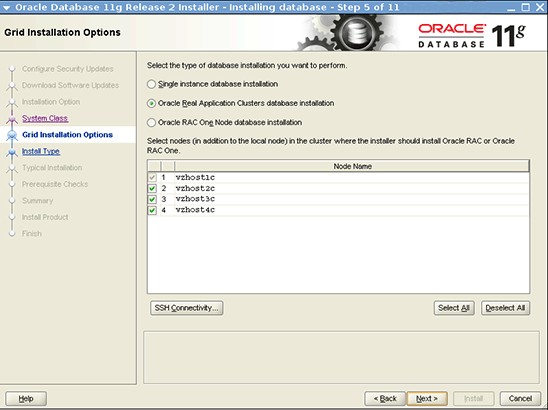
図12. Grid Installation Optionsページ
- Select Install Typeページで、「Advanced install」を選択します。
- Select Product Languagesページで、デフォルト値を使用します。
- Select Database Editionページで、「Enterprise Edition」を選択します。
- Specify Installation Locationページで、次の情報を指定します。
- Oracle Baseに対して「/u01/oracle」を選択します。
- Software Locationに対して「/u01/oracle/product/11.2.0.3」を選択します。
- Select Configuration Typeページで、「General Purpose/Transaction Processing」を選択します。
- Specify Database Identifiersページで、次の情報を指定します。
- Global Database Nameに対して「swb」を指定します。
- Oracle Service Identifierに対して「swb」を指定します。
- 図13に示すSpecify Configuration Optionsページで、デフォルト設定を使用します。

図13. Specify Configuration Optionsページ
- Specify Management Optionsページで、デフォルト設定を使用します。
- Specify Database Storage Optionsページで、次の手順を実行します。
- 「Oracle Automatic Storage Management」を選択します。
- ASMSNMPユーザーのパスワードを指定します。
- Specify Recovery Optionsページで、「Do not enable automated backups」を選択します。
- 図14に示すSelect ASM Disk Groupページで、「SWBDG」を選択します。
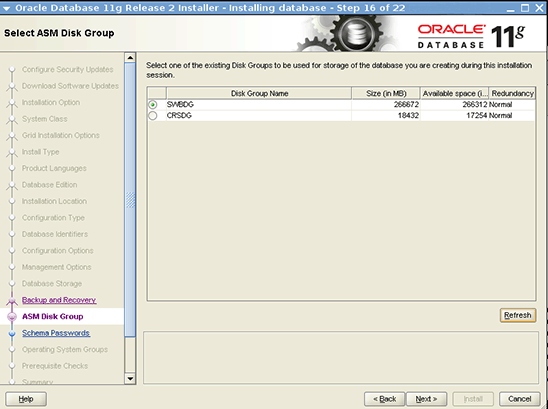
図14. Select ASM Disk Groupページ
- Specify Schema Passwordsページで、SYS、SYSTEM、SYSMAN、DBSNMPの各アカウントのパスワードを指定します。
- Privileged Operating System Groupsページで、次の情報を指定します。
- Database Administrator (OSDBA) Groupに対して「dba」を選択します。
- Database Operator (OSOPER) Group (Optional)に対して「oinstall」を選択します。
- 図15に示すPerform Prerequisite Checksページで、「Ignore All」を選択します。
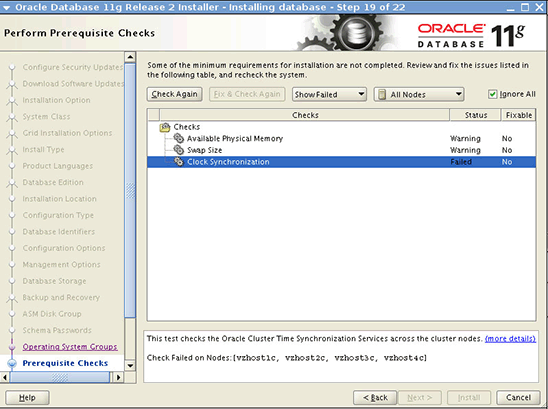
図15. Perform Prerequisite Checksページ
図16に示すとおり、エラー・メッセージINS-13016が表示されます。
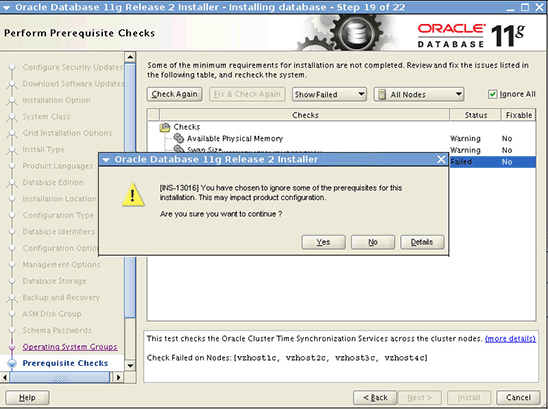
図16. エラー・メッセージ
- 「Yes」を選択して次に進みます。
- 図17に示すSummaryページで、「Install」をクリックします。
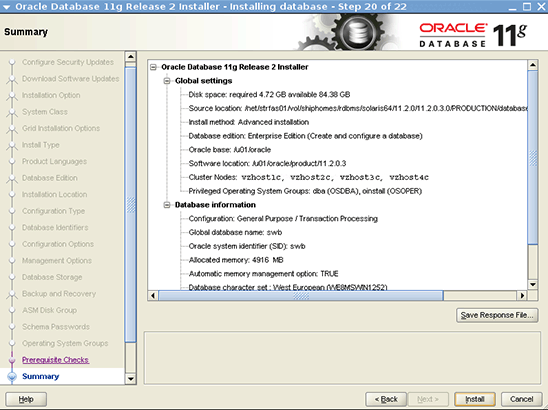
図17. Summaryページ
- 図18に示すDatabase Configuration Assistantダイアログ・ボックスで、「OK」をクリックして次に進みます。
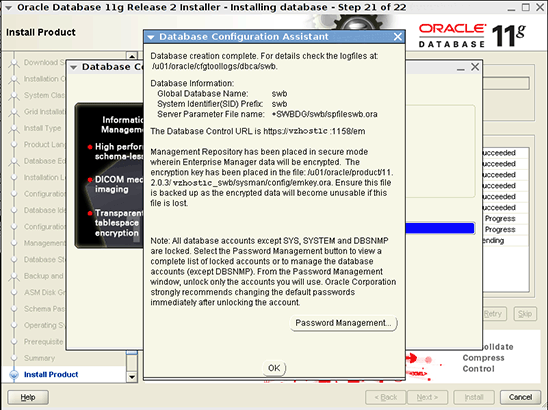
図18. Database Configuration Assistantダイアログ・ボックス
図19に示すとおり、Execute Configuration Scriptsダイアログ・ボックスに、それぞれのノード上で
root.shを実行する必要があるというメッセージが表示されます。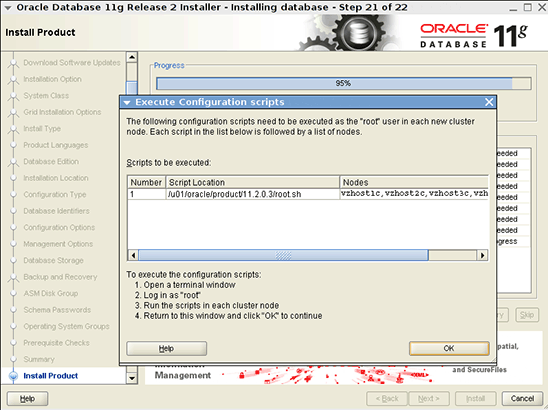
図19. Execute Configuration Scriptsダイアログ・ボックス
- 最後のノードで
root.shスクリプトを実行した後、「OK」をクリックして次に進みます。
図20に示すFinishページで、Oracle Databaseのインストールと構成が完了したことが示されます。
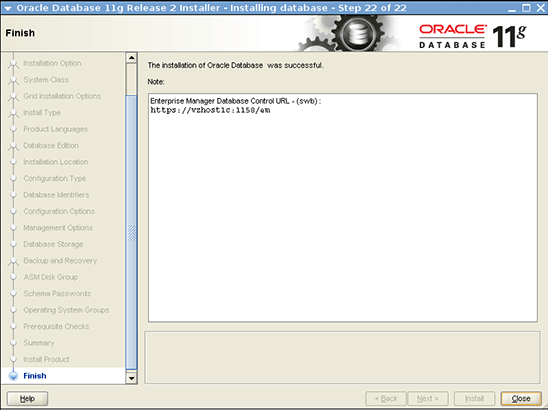
図20. Finishページ
Oracle Solaris Clusterリソースの作成
次の手順で、Oracle Solaris Clusterリソースを作成します。 または、clsetupウィザードを使用することもできます。
- 1つのゾーン・クラスタ・ノードから、次のコマンドを実行して、ゾーン・クラスタ内に
SUNW.crs_frameworkリソース・タイプを登録します。
# clrt register SUNW.crs_framework
SUNW.crs_frameworkリソース・タイプのインスタンスを、Oracle RACフレームワークのリソース・グループに追加します。
# clresource create -t SUNW.crs_framework \
-g rac-framework-rg \
-p resource_dependencies=rac-framework-rs \
crs-framework-rs
- スケーラブルなOracle Automatic Storage Managementインスタンス・プロキシ・リソース・タイプを登録します。
# clresourcetype register SUNW.scalable_asm_instance_proxy
- Oracle Automatic Storage Managementディスク・グループ・リソース・タイプを登録します。
# clresourcetype register SUNW.scalable_asm_diskgroup_proxy
- リソース・グループ
asm-inst-rgとasm-dg-rgを作成します。
# clresourcegroup create -S asm-inst-rg asm-dg-rg
asm-inst-rgによるrac-fmwk-rgに対する強い肯定的なアフィニティを設定します。
# clresourcegroup set -p rg_affinities=++rac-framework-rg asm-inst-rg
asm-dg-rgによるasm-inst-rgに対する強い肯定的なのアフィニティを設定します。
# clresourcegroup set -p rg_affinities=++asm-inst-rg asm-dg-rg
SUNW.scalable_asm_instance_proxyリソースを作成し、リソースの依存性を設定します。
# clresource create asm-inst-rg \ -t SUNW.scalable_asm_instance_proxy \ -p ORACLE_HOME=/u01/grid/product/11.2.0.3 \ -p CRS_HOME=/u01/grid/product/11.2.0.3 \ -p "ORACLE_SID{vzhost1c}"=+ASM1 \ -p "ORACLE_SID{vzhost2c}"=+ASM2 \ -p "ORACLE_SID{vzhost3c}"=+ASM3 \ -p "ORACLE_SID{vzhost4c}"=+ASM4 \ -p resource_dependencies_offline_restart=crs-framework-rs \ -d asm-inst-rs- Oracle Automatic Storage Managementディスク・グループ・リソース・タイプを、
asm-dg-rgリソース・グループに追加します。
# clresource create -g asm-dg-rg -t SUNW.scalable_asm_diskgroup_proxy \
-p asm_diskgroups=CRSDG,SWBDG \
-p resource_dependencies_offline_restart=asm-inst-rs \
-d asm-dg-rs
- 1つのクラスタ・ノードで、管理状態にある
asm-inst-rgリソース・グループをオンラインにします。
# clresourcegroup online -eM asm-inst-rg
- 1つのクラスタ・ノードで、管理状態にある
asm-dg-rgリソース・グループをオンラインにします。
# clresourcegroup online -eM asm-dg-rg
- Oracle RACデータベース・サーバーのプロキシ・リソースを含むスケーラブルなリソース・グループを作成します。
# clresourcegroup create -S \
-p rg_affinities=++rac-framework-rg,++asm-dg-rg \
rac-swbdb-rg
SUNW.scalable_rac_server_proxyリソース・タイプを登録します。
# clresourcetype register SUNW.scalable_rac_server_proxy
- データベース・リソースをこのリソース・グループに追加します。
# clresource create -g rac-swbdb-rg \ -t SUNW.scalable_rac_server_proxy \ -p resource_dependencies=rac-framework-rs \ -p resource_dependencies_offline_restart=crs-framework-rs,asm-dg-rs \ -p oracle_home=/u01/oracle/product/11.2.0.3 \ -p crs_home=/u01/grid/product/11.2.0.3 \ -p db_name=swb \ -p "oracle_sid{vzhost1c}"=swb1 \ -p "oracle_sid{vzhost2c}"=swb2 \ -p "oracle_sid{vzhost3c}"=swb3 \ -p "oracle_sid{vzhost4c}"=swb4 \ -d rac-swb-srvr-proxy-rs - リソース・グループをオンラインにします。
# clresourcegroup online -emM rac-swbdb-rg
- リスト9に示すとおり、クラスタ・リソースのステータスを確認します。
# clrs status

=== Cluster Resources ===

Resource Name             Node Name      State      Status Message
-------------             ---------      -----      --------------
crs_framework-rs          vzhost1c       Online     Online
                          vzhost2c       Online     Online
                          vzhost3c       Online     Online
                          vzhost4c       Online     Online

rac-framework-rs          vzhost1c       Online     Online
                          vzhost2c       Online     Online
                          vzhost3c       Online     Online
                          vzhost4c       Online     Online

asm-inst-rs               vzhost1c       Online     Online - +ASM1 is UP and ENABLED
                          vzhost2c       Online     Online - +ASM2 is UP and ENABLED
                          vzhost3c       Online     Online - +ASM3 is UP and ENABLED
                          vzhost4c       Online     Online - +ASM4 is UP and ENABLED

asm-dg-rs                 vzhost1c       Online     Online - Mounted: SWBDG
                          vzhost2c       Online     Online - Mounted: SWBDG
                          vzhost3c       Online     Online - Mounted: SWBDG
                          vzhost4c       Online     Online - Mounted: SWBDG

rac-swb-srvr-proxy-rs     vzhost1c       Online     Online - Oracle instance UP
                          vzhost2c       Online     Online - Oracle instance UP
                          vzhost3c       Online     Online - Oracle instance UP
                          vzhost4c       Online     Online - Oracle instance UP
リスト9. クラスタ・リソースのステータスの確認
参考情報
次のような追加のリソースがあります。
- 『Oracle Grid Infrastructure Installation Guide』の「Oracle Automatic Storage Management Storage Configuration」
- 『Oracle Solaris Administration: Naming and Directory Services』ガイドの「Managing DNS Tasks」
- 『Oracle Solaris Administration: Naming and Directory Services』ガイドの 「Managing the Name Service Switch」
- Oracle Solaris Cluster 4.0ドキュメント・ライブラリ
- Oracle Solaris Clusterの全テクニカル・リソース
- Oracle Solaris Cluster 4.0のリリース・ノート
- Oracle Solarisのパッチおよび更新プログラム
- Oracle Solaris Clusterのダウンロード
- Oracle Solaris Clusterのトレーニング
著者について
Vinh TranはOracle Solaris Cluster Groupの品質管理エンジニアです。 Oracle Solaris Cluster上でのOracle RACの認証や適格性検査などを担当しています。
| リビジョン1.0、2012/07/27 |
オラクルのすべてのテクノロジーに関するシステム管理関連のコンテンツについては、OTN SystemsのFacebookとTwitterをフォローして確認してください。