 Create
a Virtual Cloud Network for Cloud Manager in the Oracle Cloud
Infrastructure Console (Optional)
Create
a Virtual Cloud Network for Cloud Manager in the Oracle Cloud
Infrastructure Console (Optional) Before You Begin
This 45-minute tutorial shows you how to create a virtual cloud network (VCN) in the Oracle Cloud Infrastructure Console.
Background
To create a Cloud Manager instance on Oracle Cloud Infrastructure, you need a Virtual Cloud Network, or VCN, subnets that are either public or private, route table, and security lists to define access rules and restrictions. If you use Resource Manager to install the Cloud Manager stack, you can create a VCN and necessary networking resources as part of the Resource Manager process. In that case you can skip this tutorial. This procedure is meant for advanced users who want to set up the network resources manually.
This is the fourth tutorial in the Install PeopleSoft Cloud Manager series. Read the tutorials in the order listed. The optional tutorials offer alternate methods for setup.
- Prepare to Install PeopleSoft Cloud Manager
- Verify Oracle Cloud Account Information for PeopleSoft Cloud Manager
- Plan the Virtual Cloud Network for PeopleSoft Cloud Manager (optional)
- Create a Virtual Cloud Network for PeopleSoft Cloud Manager in the Oracle Cloud Infrastructure Console (optional)
- Create a Custom Linux Image for PeopleSoft Cloud Manager (optional)
- Create a Custom Windows Image for PeopleSoft Cloud Manager in Oracle Cloud Infrastructure (optional)
- Generate API Signing Keys for PeopleSoft Cloud Manager
- Install the PeopleSoft Cloud Manager Stack with Resource Manager
- Log in to the Cloud Manager Instance
- Specify Cloud Manager Settings
- Use File Storage Service for PeopleSoft Cloud Manager
- Manage Cloud Manager Users, Roles, and Permission Lists
- Configure a Web Proxy for PeopleSoft Cloud Manager (optional)
 Create
a VCN with Related Resources
Create
a VCN with Related Resources
To create a VCN with related (default) resources:
- In the Compute Console, select Networking, Virtual Cloud Networks.
-
Click Create Virtual Cloud Network.

Description of this image -
On the Create Virtual Cloud Network dialog box, select the compartment you want to work in from the drop-down list, which is mycmprt in this example.

Description of this image -
Enter a name for the VCN, such as pscm_network. Make a note of the name, as you will need it when creating the Cloud Manager instance.
-
Select the option CREATE VIRTUAL CLOUD NETWORK PLUS RELATED RESOURCES, as shown in this example, to create a VCN with default components, including three public subnets, an Internet gateway, a route table, and a security list.
If you prefer to define the resources for the VCN, select the option CREATE VIRTUAL CLOUD NETWORK ONLY. After you create the VCN, create the necessary components to fit your requirements.
-
Select the option USE DNS HOSTNAMES IN THIS VCN. The Create VCN process assigns a DNS label based on the VCN name.
-
Click Create Virtual Cloud Network.

Description of this image -
When the network is ready, click Close.

Description of this image -
On the Virtual Cloud Networks page, select the VCN name to review the details.
- Update the security lists to allow all necessary ports.
 Create
Subnets and Edit Security Lists
Create
Subnets and Edit Security Lists
This section gives an example of creating a public subnet with a security list that allows access between the Cloud Manager instance and file server instance. The subnet where Cloud Manager is created (and where NFS also gets provisioned) needs to allow the ingress of four NFS-related TCP ports (2049, 111, 892, 32803). This will ensure that NFS mounts will work across Linux and Windows in all the subnets within the VCN. For simplicity, the source in the stateful ingress rules can be the whole VCN’s CIDR.
-
If you want to add more public or private subnets, go to the details page for the VCN and click Create Subnet.

Description of this image - If you want to modify or add a security list to one of the
subnets, select the subnet. On the details page, click Edit
All Rules.
Note that the subnet already includes a security rule to allow SSH access on port 22, and two security rules for ICMP traffic.

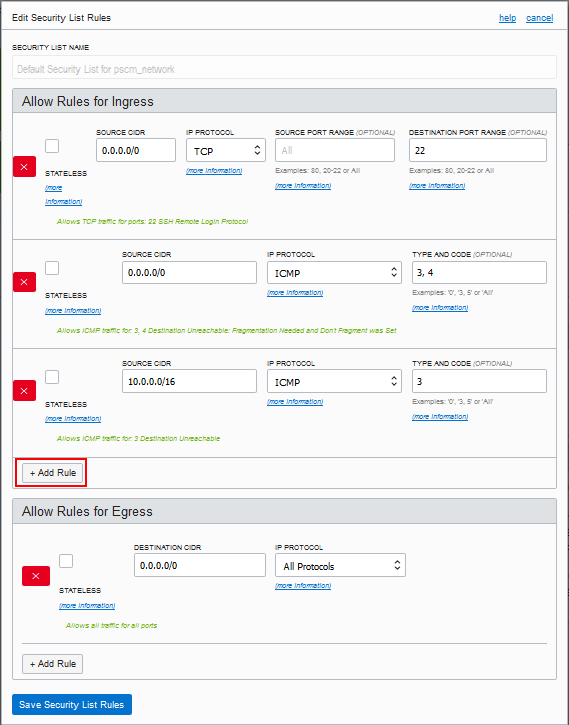
Description of this image -
On the Edit Security List Rules dialog box, under Allow Rules for Ingress, click Add Rule.
Description of this image -
Enter 10.0.0.0/16 for the Source CIDR. This is the same as the CIDR for the VCN.
-
Accept TCP as the protocol.
-
Enter 2049 for the Destination Port Range.
-
Repeat steps 3 through 6 for NFS-related ports 111, 892, 32803. Also add a rule for the HTTP port, default 8000, and any other ports you need.
-
When you have added all the security rules, click Save Security List Rules.
-
Specify this subset when you create the Cloud Manager and file server instances.
 Create
a NAT Gateway for a Private Subnet (Optional)
Create
a NAT Gateway for a Private Subnet (Optional)
Here are the high-level steps for creating a NAT Gateway for a private subnet. This section assumes that you have already created a VCN, and want to add a NAT Gateway.
For more information, see the Oracle Cloud Infrastructure Documentation, NAT Gateway.
-
In the Oracle Cloud Infrastructure Console, select Networking > Virtual Cloud Networks and select your VCN.
-
Create a NAT Gateway.
-
Create a Route Table, and select the NAT Gateway as the target.
-
Create a private subnet, and select the Route Table.
-
Select the private subnet when creating environment templates in Cloud Manager.
After setting up the NAT gateway, you can use various methods for setting up inbound connections, such as VPN or bastion. If you don’t want to use a NAT gateway for any reason, you can also enable access to the internet by configuring a web proxy.
 Next
Tutorial
Next
Tutorial
Create a Custom Linux Image for PeopleSoft Cloud Manager (optional)
 Want
to Learn More?
Want
to Learn More?
- PeopleSoft Cloud Manager Image Overview, My Oracle Support, Doc ID 2233277.1
- Cumulative Feature Overview Tool (Go to the original CFO tool and select Cloud Manager at the top)
- Oracle Cloud Documentation in Oracle Help Center