 Install
the PeopleSoft Cloud Manager Stack with Resource Manager
Install
the PeopleSoft Cloud Manager Stack with Resource Manager Before You Begin
This 45-minute tutorial shows you how to obtain the PeopleSoft Cloud Manager stack from Oracle Cloud Infrastructure Marketplace and install it using Resource Manager.
Background
Resource Manager is an Oracle Cloud Infrastructure service that helps you install, configure, and manage resources. Resource Manager uses Terraform (which is part of the service) to codify your infrastructure in declarative configuration files, which allows you to review and edit, version, persist, reuse, and share them across teams. You can then use Resource Manager to provision Oracle Cloud Infrastructure resources using your Terraform configurations.
In this tutorial, you obtain the configuration files, or stack, for Cloud Manager from the Oracle Cloud Infrastructure Marketplace, and use Resource Manager to create an instance and associated resources such as a Virtual Cloud Network (VCN), subnet, gateways, and route tables. You enter the necessary passwords and other information in the Resource Manager interface, and choose the types of resources created.
See Overview of Resource Manager in the Oracle Cloud Infrastructure documentation.
This is the eighth tutorial in the Install PeopleSoft Cloud Manager series. Read the tutorials in the order listed. The optional tutorials offer alternate methods for setup.
- Prepare to Install PeopleSoft Cloud Manager
- Verify Oracle Cloud Account Information for PeopleSoft Cloud Manager
- Plan the Virtual Cloud Network for PeopleSoft Cloud Manager (optional)
- Create a Virtual Cloud Network for PeopleSoft Cloud Manager in the Oracle Cloud Infrastructure Console (optional)
- Create a Custom Linux Image for PeopleSoft Cloud Manager (optional)
- Create a Custom Windows Image for PeopleSoft Cloud Manager in Oracle Cloud Infrastructure (optional)
- Generate API Signing Keys for PeopleSoft Cloud Manager
- Install the PeopleSoft Cloud Manager Stack with Resource Manager
- Log in to the Cloud Manager Instance
- Specify Cloud Manager Settings
- Use File Storage Service for PeopleSoft Cloud Manager
- Manage Cloud Manager Users, Roles, and Permission Lists
- Configure a Web Proxy for PeopleSoft Cloud Manager (optional)
What Do You Need?
See the prerequisites in the tutorial Prepare to Install PeopleSoft Cloud Manager.
When using Resource Manager, the recommendation is to restrict access to the stacks and stack jobs using roles and policies.
See Policies for Managing Stacks and Jobs in the Oracle Cloud Infrastructure Documentation.
 Gather
Information for the Cloud Manager Stack
Gather
Information for the Cloud Manager Stack
The Resource Manager stack setup prompts you for account and instance information. This section describes how to gather the information before you run the script. Alternatively, you may prefer to have a Compute Console window open as you enter the values, and copy the necessary OCIDs as needed.
-
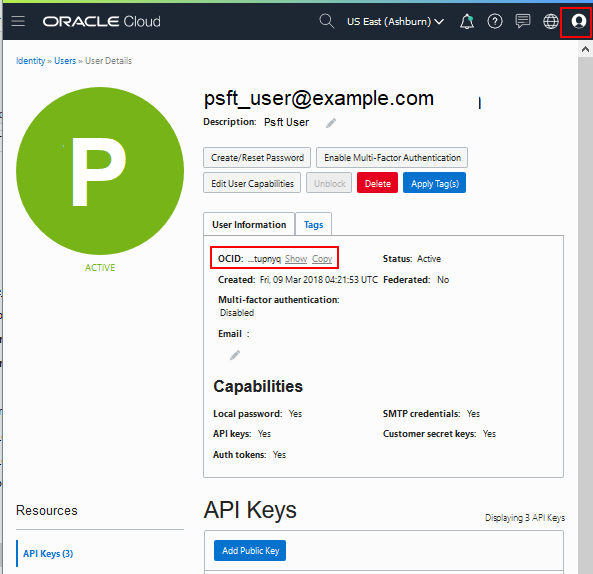
Sign in to Oracle Cloud Infrastructure, and select Identity > Users from the Menu (
 )
at the top left of the window.
)
at the top left of the window. - Locate your user account, and select View User
Details from the actions menu.
Alternatively, click the user icon at the top of the page, as shown in the next illustration, and select your user name.
- On the User Details page, copy the user OCID.
Description of this illustration (oci_user_details.png) - Select Administration > Tenancy Details
from the Menu at the top right of the Oracle Cloud
Infrastructure window.
Alternatively, expand the regions drop-down list at the top of the Compute window, and select Manage Regions. In the illustration above, the regions drop-down list displays the current region, US East (Ashburn).
- On the tenancy page, under Resources, select Regions from the Resources list on the left. Make a note of the Home Region.
- On the tenancy page, select Service Limits from the Resources list on the left.
- Identify an Availability Domain with sufficient resources, including Compute Shapes, Resource Manager stacks, and File System service mount points.
- Make a note of the shape to install Cloud Manager.
See the tutorial Verify Oracle Cloud Account Information for PeopleSoft Cloud Manager.
- Create the API signing pair and note the passphrase.
See the tutorial Generate API Signing Pair.
- If you want to use an existing VCN for the Cloud Manager
installation, note the name.
You can also choose to create a new VCN as part of the Resource Manager job. The fields on the Configure Values page for the stack change depending upon your selections. To create a VCN outside Resource Manager, see the tutorial Create a Virtual Cloud Network for Cloud Manager.
- If you want to use a web proxy to access Cloud Manager, you
must first set it up and obtain the IP address or FQDN and
port.
See the tutorial Configure a Web Proxy for Cloud Manager.
 Obtain
the PeopleSoft Cloud Manager Stack from the Marketplace
Obtain
the PeopleSoft Cloud Manager Stack from the Marketplace
To obtain the PeopleSoft Cloud Manager stack:
- On the Oracle Cloud Infrastructure console home page, click
the MENU icon ()
and select Marketplace > Applications.
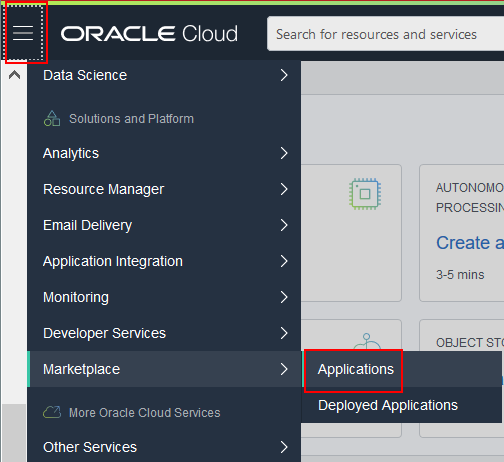
Description of this illustration (obtain_stack_marketplace_menu.png) - Under Filters on the left, select Stack from the Type drop-down list, and Oracle from the Publisher drop-down list.
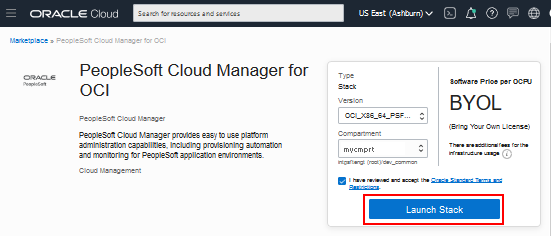
- On the Marketplace page locate and click the PeopleSoft Cloud Manager tile.
- On the Overview page for the PeopleSoft Cloud Manager stack, select the compartment to install the instance.
- Review the Oracle terms, and then select the option indicating that you have reviewed and understand the conditions.
- Click Launch Stack.
Description of this illustration (obtain_stack_launchstack.png) - On the Create Stack, Stack Information page, enter a stack
name and description if desired.
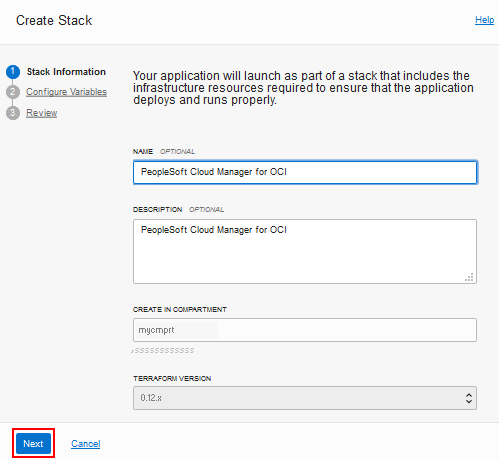
Description of this illustration (create_stack_page_stack_information.png) - Click Next.
- Continue with the steps in Enter Cloud Manager Instance Values.
 Enter
Cloud Manager Instance Values
Enter
Cloud Manager Instance Values
The Create Stack, Configure Variables page includes a list of the parameters needed to create and configure the Cloud Manager instance.
- In the Cloud Manager Instance section, select the Availability Domain where you want to create the Cloud Manager instance from the drop-down list.
- Select a shape with at least 1 OCPU and 14 GB or more of
memory for the Cloud Manager instance from the Shape drop-down
list.
VM.Standard2.1 (1 OCPU, 15 GB RAM) is recommended, as shown in the following example.
Note. Remember to confirm that the required resources are available in your tenancy and Availability Domain.
- Select the storage volume size in GBs for the secondary
block volume for the Cloud Manager instance. In this example
of the top of the page, the storage volume size is 200 GBs.

Description of this illustration (create_stack_page_config_vars_top.png) - Enter your SSH public key in a single line, with no line
feeds or spaces.
Note. The SSH Public Key field does not expand.
See the section Generate SSH Keys in the tutorial Prepare to Install Cloud Manager.
- Enter your User OCID in a single line, with no line feeds or spaces.
- Enter the contents of your API Private Key.
See the tutorial Generate API Signing Keys for PeopleSoft Cloud Manager.
- Enter the passphrase for the API Private Key, if you
created one.
Enter a passphrase containing alphanumeric characters and the following special characters: ~@#%^*-_=+[{]}:.,?/
- Select the home region for your tenancy from the drop-down
list. In this example, the Home Region is us-phoenix-1.
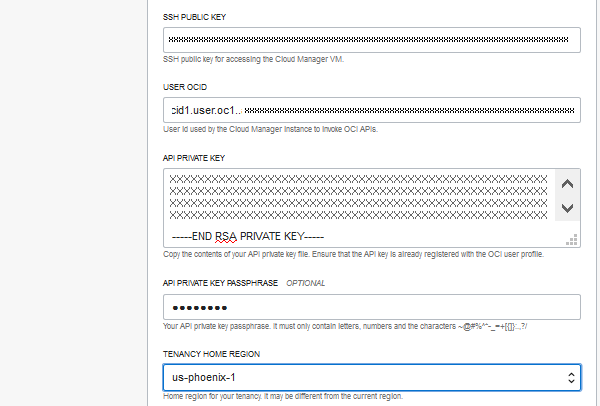
Description of this illustration (create_stack_page_config_vars_middle.png) - Enter the values listed in the following table for
configuring Cloud Manager.
Parameter Description Requirements Database Name
The default name is CMPSDB. Ensure that the name begins with an uppercase letter followed by 7 or fewer uppercase letters or numbers. DB Connect Password
PeopleSoft Connect ID password. The default ID is people. Ensure the password is between 6 and 30 characters in length. It must only contain letters and numbers. Access ID PeopleSoft Database Access ID. The default ID is SYSADM. NA
Access ID password Password for the Access ID.
Ensure the password begins with a letter, contains only alphanumeric characters, and is no more than 8 characters in length. DB Admin Password Database Administrator (SYS and SYSTEM) password. The database administrators are SYS and SYSTEM. Ensure that the password is between 8 and 30 characters in length. It must contain at least one lowercase letter, one uppercase letter, one number, and one special character. The special character must be either an underscore (_), dash (-), or number sign (#). Cloud Manager Administrator password
Password for the domain boot user (CLADM). Ensure the password contains only alphanumeric characters and is no more than 8 characters in length. Integration Gateway User password
Password for the default Integration Gateway user, which is administrator.
Ensure the password contains only alphanumeric characters and is between 8 and 30 characters in length.
WebLogic Administrator User password
Oracle WebLogic administrator password. The default Oracle WebLogic administrator is system.
Ensure that the password is between 8 and 30 characters in length with at least one lowercase letter and one uppercase letter. It must also contain one number or one special character (!@#$%^&).
Web profile password
PeopleSoft Web Profile password. The default web profile user is PTWEBSERVER.
Ensure the password contains only alphanumeric characters and is between 8 and 30 characters in length.
Domain Connect Password Application Server Domain connection password.
Ensure the password contains only alphanumeric characters and is between 8 and 20 characters in length.
- If you want to set up a new VCN, continue with the next section, Enter Values for a New Virtual Cloud Network.
- If you want to use an existing VCN, skip the next section and continue with the section Enter Values for an Existing Virtual Cloud Network.
 Enter
Values for a New Virtual Cloud Network
Enter
Values for a New Virtual Cloud Network
Use these instructions if you want to set up a new VCN for Cloud Manager. If you want to select an existing VCN, skip this section and go to the next section, Enter Values for an Existing Virtual Cloud Network.
To set up the Cloud Manager stack to create a new VCN:
- In the Networking section, enter a host name for the Cloud
Manager instance.
This name will be used as part of the URL you use to access Cloud Manager in a browser. The name must start with an alphanumeric character, following by alphanumeric characters or hyphens.
- Select Create Network Resources.
The VCN will include gateways, subnets, and security rules, in the same compartment as the Cloud Manager instance. The exact items included depend upon the other selections that you make in the Networking section.
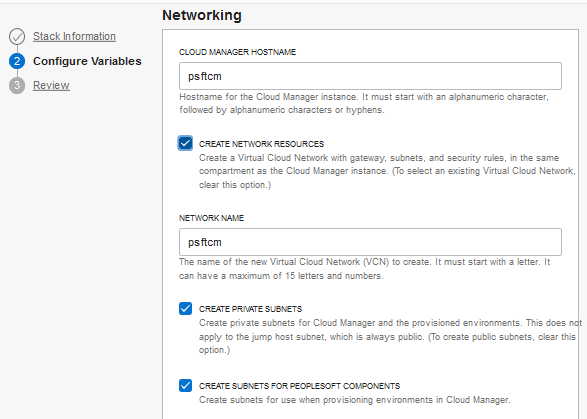
Description of this illustration (create_stack_new_vcn.png) - Enter a name for the new VCN.
The name must start with a letter. It can have a maximum of 15 letters and numbers.
- Select Create Private Subnets if you want
the Cloud Manager instance, and the components for provisioned
environments, to reside in private subnets.
If you want to use public subnets, clear this option. This does not apply to the jump host subnet, if you create one, which is always public.
Note. For security reasons, the public subnets do not allow access to the Internet by default. Review the subnets after installation and add any necessary security rules.
- Select Create Subnets for PeopleSoft Components
if you want to create subnets that you can use when you
provision environments in Cloud Manager.
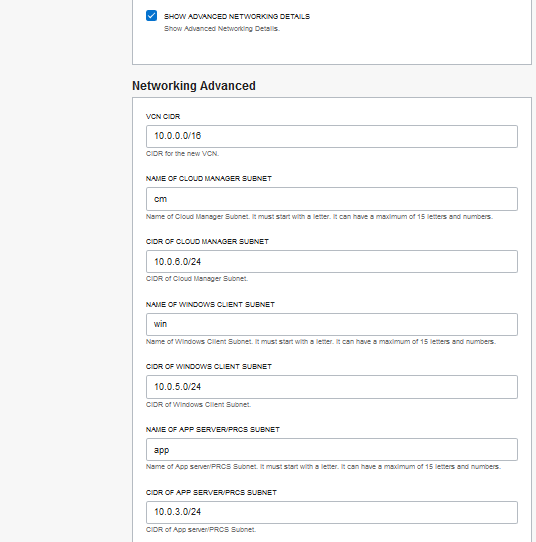
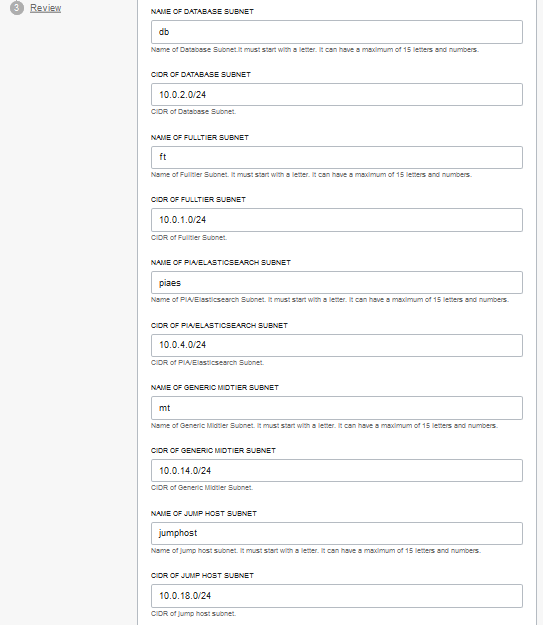
This includes the PeopleSoft components such as application server, Process Scheduler, web server, the PeopleTools client, and so on. The subnets are set up with the correct rules to allow the various components to communicate. The following table lists the subnets that are created by default:
# Subnet Name Usage 1 app PeopleSoft application server and Process Scheduler nodes
2 cm Cloud Manager instance and File Storage Service file server
3 db Database instances
4 ft PUM fulltier instances
5 jumphost Bastion host that provides external connectivity for SSH, HTTP, and so on, when external Internet connection is blocked.
6 mt Generic subnet for mid-tier instances including application server, Process Scheduler, PIA and Elasticsearch. This is an alternative to using the piaes and app subnets.
7 piaes PIA and ELK stack (Elasticsearch and Kibana) instances
8 win Windows clients
If you only want to create a subnet for the Cloud Manager instance, clear the Create Subnets for PeopleSoft Components option.
Note. If you do not select this option, the network will include a single subnet called cm. The cm subnet security rule will allow access to all ports within the subnet.
- Select Create a Jump Host to create a jump
host instance to use for connecting to the Cloud Manager
instance.
Select this option if the Cloud Manager instance resides in a private subnet. The IP for a private subnet cannot be accessed directly from the Internet. In this case, you can set up a jump host (or bastion host) to enable SSH tunneling and Socket Secure (SOCKS) proxy connection to the Cloud Manager web server (PIA). The jump host is created using an Oracle Linux platform image, and will be created inside the new VCN.
Note. If you create a VCN with public subnets, and you do not create a jump host, the public subnets will include Internet access for the PIA HTTP and HTTPS ports by default.
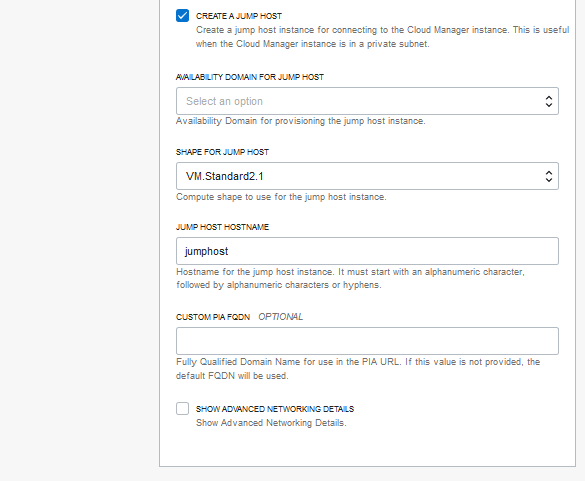
Description of this illustration (create_stack_create_jump_host.png) - If you select Create a Jump Host, select the Availability Domain and Shape for the jump host, and enter a name.
- (Optional) For Custom PIA FQDN, enter a
custom fully-qualified domain name (FQDN) for the URL used to
access Cloud Manager PIA in a browser. Use the format hostname.example.com.
If you do not enter a custom FQDN, the default domain name is based on the subnet and VCN names in this format: <hostname>.<subnet label>.<vcn label>.oraclevcn.com
For example, you may want to assign a custom URL if you have purchased or otherwise obtained a Domain Name System (DNS) name, and want to map the Cloud Manager IP to that DNS name. If you assign a custom PIA, it also sets up a corresponding authentication domain for the Cloud Manager PIA.
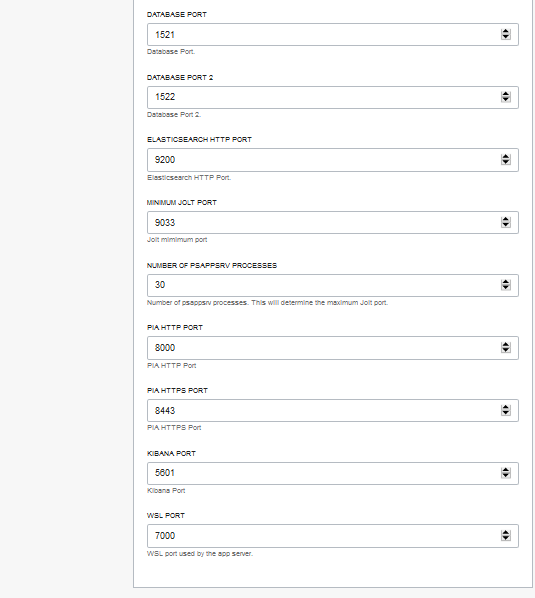
- (Optional) Select Show Advanced Networking Details to review
and modify networking items such as the subnets, CIDR, and
ports associated with the network.
Description of this illustration (create_stack_network_advanced_top.png)
Description of this illustration (create_stack_network_advanced_middle.png)
Description of this illustration (create_stack_network_advanced_bottom.png)
 Enter
Values for an Existing Virtual Cloud Network
Enter
Values for an Existing Virtual Cloud Network
Use these instructions if you want to use an existing VCN for Cloud Manager. If you want to create a new VCN, skip this section, and use the instructions in the previous section, Enter Values for a New Virtual Cloud Network.
To set up the Cloud Manager stack to use an existing VCN:
- In the Networking section, enter a host name for the Cloud
Manager instance.
This name will be used as part of the URL you use to access Cloud Manager in a browser.
- Clear the option Create Network Resources.
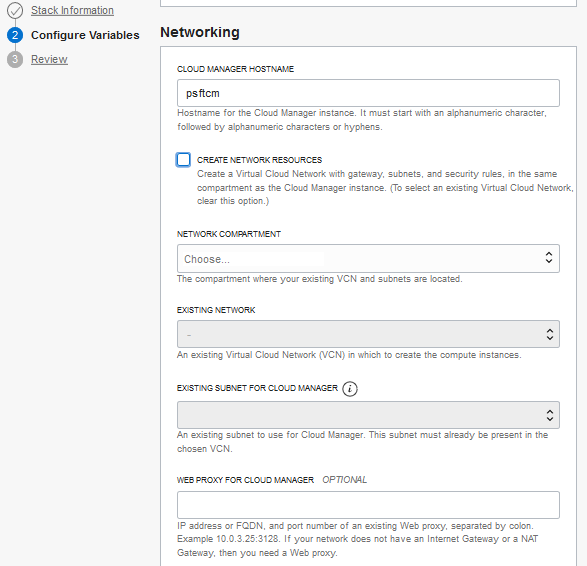
Description of this illustration (create_stack_existing_vcn.png) - From the Network Compartment drop-down list, select the compartment containing the VCN and subnets you want to use.
- From the Existing Network drop-down list, select the VCN that you want to use.
- From the Existing Subnet for Cloud Manager drop-down list, select an existing subnet for the Cloud Manager instance. The subnet must be present in the VCN you selected.
- (Optional) Enter the information for an existing Web
Proxy for Cloud Manager.
If your network does not have an Internet Gateway or a NAT Gateway, you need a web proxy. Enter an IP address or fully-qualified domain name (FQDN) for an existing web proxy, followed by a colon and port number.
<proxy host>:<proxy port>For example: 198.51.100.10:80 or webproxy.example.com:80
After you complete the Cloud Manager installation, follow the instructions in the tutorial Configure a Web Proxy for Cloud Manager.
- If you select Create a Jump Host, select the Availability Domain and Shape for the jump host, and enter a name. Select an existing subnet.
- (Optional) For Custom PIA FQDN, enter a
custom fully-qualified domain name (FQDN) for the URL used to
access Cloud Manager PIA in a browser. Use the format hostname.example.com.
If you do not enter a custom FQDN, the default domain name is based on the subnet and VCN names in this format: <hostname>.<subnet label>.<vcn label>.oraclevcn.com
For example, you may want to assign a custom URL if you have purchased or otherwise obtained a Domain Name System (DNS) name, and want to map the Cloud Manager IP to that DNS name. If you assign a custom PIA, it also sets up a corresponding authentication domain for the Cloud Manager PIA.
 Run
the Cloud Manager Stack Job
Run
the Cloud Manager Stack Job
- After supplying the required information on the Create Stack pages, click Next, or click Back to make changes.
- Review the configuration variables, and then click Create.
- Resource Manager executes the Terraform Apply job to create the specified resources. Follow the progress on the Stack Details page for the job.
- When the Apply job is complete, select Associated
Resources from the Resources list on the left to
see the links to the Cloud Manager instance,
oci_core_instance, and other resources you configured.
This example shows the bottom portion of the Job Details page, with the Associated Resources list.
Note. Cloud Manager is not ready to use when the Apply job is complete. The Cloud Manager instance configuration ("bootstrap") script must run to complete the installation setup. The instance configuration script is launched automatically after the Apply job succeeds.
To monitor the script status, log in to the Cloud Manager instance as described in the tutorial Log in to the Cloud Manager Instance, and review the log file /home/opc/bootstrap/CloudManagerStatus.log.
For example, to view the end of the log file, enter this command:
$ tail /home/opc/bootstrap/CloudManagerStatus.log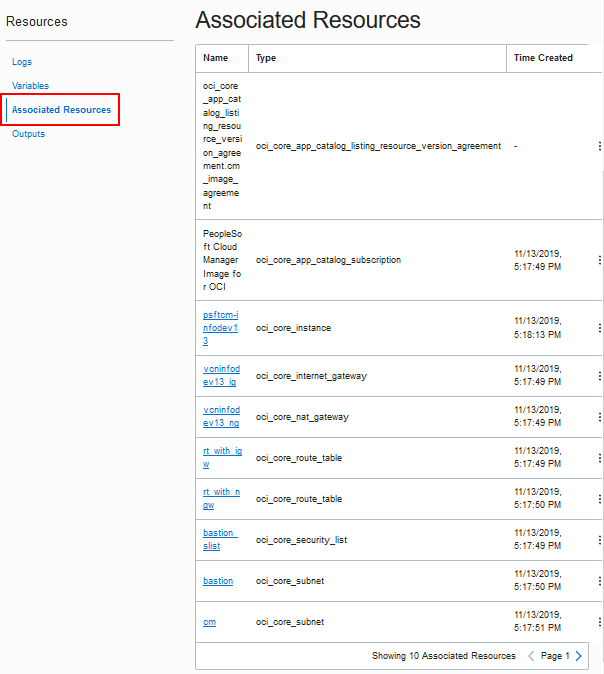
Description of this illustration (stack_details_apply_job_assoc_resources.png) - Select Outputs from the Resources list on
the left.
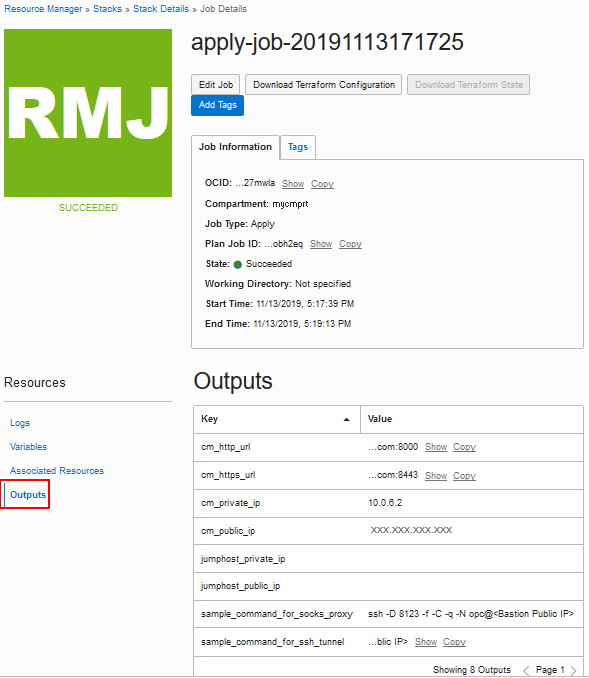
Description of this illustration (stack_details_apply_job_outputs.png) The outputs of the stack setup include the following:
- cm_http_url — Use this URL to access Cloud Manager in a browser.
- cm_https_url — Use as the secure URL to access Cloud Manager in a browser.
- cm_private_ip — The private IP address for the Cloud Manager instance.
- cm_public_ip — The public IP address for the Cloud Manager instance.
- jumphost_private_ip —The private IP address for the jump host.
- jumphost_public_ip — The private IP address for the jump host.
- sample_command_for_socks_proxy — Use this command to set up a SOCKS proxy, if you created a jump host to access private subnets.
- sample_command_for_ssh_tunnel — Use this command to set up an SSH tunnel proxy, if you created a jump host to access private subnets.
 Working
with Resource Manager Jobs (Optional)
Working
with Resource Manager Jobs (Optional)
In some cases you may want to install Cloud Manager without starting from the beginning with a newly downloaded Marketplace stack. For example, if there is a problem with the stack execution, you can run the Terraform plan and apply jobs for the stack from Resource Manager without needing to download the stack again.
If you are rerunning the stack setup due to a problem, it is a good idea to remove the associated resources from the unsuccessful run first.
- If necessary, from the Oracle Cloud Infrastructure menu, select Resource Manager > Stacks.
- Select your compartment if necessary, and locate the Cloud Manager stack you downloaded from the Marketplace.
- If you want to remove resources from a previous run, select Terraform Actions > Destroy, and supply a name for the Destroy job.
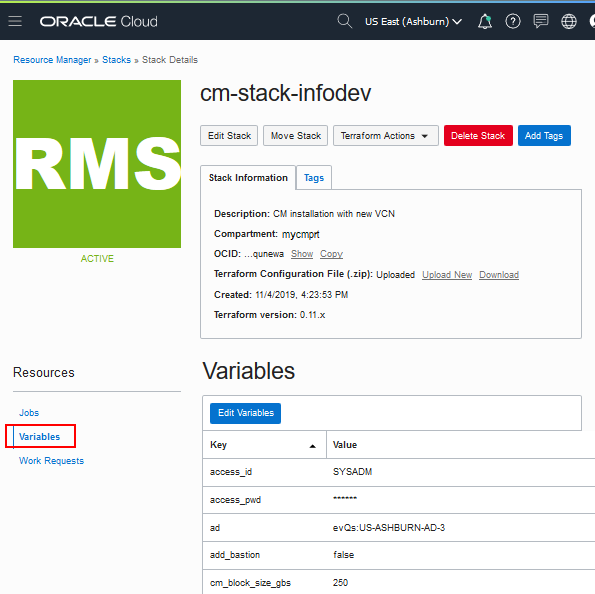
- You can view your input by selecting Variables from the
Resources list on the left.
Click Edit Variables if you want to make any changes.
Description of this illustration (resmgr_stack_details_variables.png) - Select Terraform Actions > Plan.
It is a good idea to run a Terraform plan, so that you can validate the configuration, correct any errors, and preview the resources that will be created.

Description of this illustration (resmgr_stack_plan.png) - On the Plan dialog box, enter a name or accept the default.
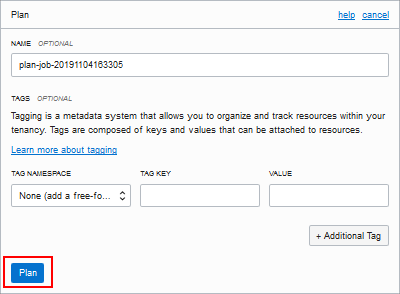
Description of this illustration (stack_details_plan_dialog_box.png) - Optionally, select or enter a tag, and then click Plan.
- When the plan execution is complete, on the Job Details page
for the plan select Logs on the left, and
review the Terraform plan details.
Scroll through to check for errors.
- If you want to save the configuration files, click Download Terraform Configuration at the top of the page.
- Select Stack Details at the top of the page.
- To execute the plan and complete the Cloud Manager installation, select Terraform Actions > Apply.
- On the Apply dialog box, enter a name for the apply job, or accept the default.
- Select the job plan to use from the Apply Job Plan
Resolution drop-down list.
Select Automatically approve, or select the latest successful job plan to run.
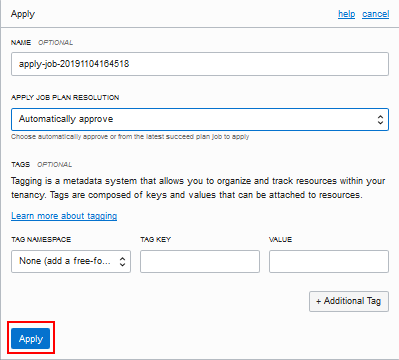
Description of this illustration (stack_details_apply_dialog_box.png) - Click Apply.
 Next
Tutorial
Next
Tutorial
Log in to the Cloud Manager Instance
 Want
to Learn More?
Want
to Learn More?
- PeopleSoft Cloud Manager Image Overview, My Oracle Support, Doc ID 2233277.1
- Cumulative Feature Overview Tool (Go to the original CFO tool and select PeopleSoft Cloud Manager at the top.)
- Oracle Cloud Documentation in Oracle Help Center