 Log
In To the Cloud Manager Instance
Log
In To the Cloud Manager Instance Before You Begin
This 15-minute tutorial shows you how to access the Cloud Manager instance from a local Linux or Microsoft Windows computer.
Background
The Cloud Manager stack includes a instance configuration ("bootstrap") script that runs in the VM for the Cloud Manager instance after the Resource Manager Apply job completes successfully. The instance can be accessed from a Microsoft Windows machine using an SSH client such as PuTTY, or directly from a Linux machine.
This is the ninth tutorial in the Install PeopleSoft Cloud Manager series. Read the tutorials in the order listed. The optional tutorials offer alternate methods for setup.
- Prepare to Install PeopleSoft Cloud Manager
- Verify Oracle Cloud Account Information for PeopleSoft Cloud Manager
- Plan the Virtual Cloud Network for PeopleSoft Cloud Manager (optional)
- Create a Virtual Cloud Network for PeopleSoft Cloud Manager in the Oracle Cloud Infrastructure Console (optional)
- Create a Custom Linux Image for PeopleSoft Cloud Manager (optional)
- Create a Custom Windows Image for PeopleSoft Cloud Manager in Oracle Cloud Infrastructure (optional)
- Generate API Signing Keys for PeopleSoft Cloud Manager
- Install the PeopleSoft Cloud Manager Stack with Resource Manager
- Log in to the Cloud Manager Instance
- Specify Cloud Manager Settings
- Use File Storage Service for PeopleSoft Cloud Manager
- Manage Cloud Manager Users, Roles, and Permission Lists
- Configure a Web Proxy for PeopleSoft Cloud Manager (optional)
 Log In
To the Cloud Manager Instance VM from a Linux or UNIX System
Log In
To the Cloud Manager Instance VM from a Linux or UNIX System
To access the instance from a Linux or UNIX computer:
- Get the IP address for the Cloud Manager instance from the
instance details page using one of these methods:
- From the Resource Manager Apply job (Resource Manager > Stack > Stack Details > Job Details), select Associated Resources, and then select the link to the Cloud Manager instance, oci_core_instance.
- From the Oracle Cloud Infrastructure home page, click the menu icon at the top left, and select Compute > Instances. Select your compartment, and view the instance details page. The Primary VNIC information section includes the Public IP Address.
- Enter the following command:
ssh -i <path_to_private_key_file>/<private_key_name> -o ServerAliveInterval=5 -o ServerAliveCountMax=1 opc@<public_ip_address_of_instance>
- If you entered a passphrase when creating your SSH key pair, enter the passphrase when prompted.
- The first time you connect to your instance, the SSH utility prompts you to confirm the public key. In response to the prompt, enter yes.
 Log In
To the Cloud Manager Instance VM from a Microsoft Windows System
Log In
To the Cloud Manager Instance VM from a Microsoft Windows System
To access the instance from a Microsoft Windows computer:
- Get the IP address for the Cloud Manager instance from the
instance details page using one of these methods:
- From the Resource Manager Apply job (Resource Manager > Stack > Stack Details > Job Details), select Associated Resources, and then select the link to the Cloud Manager instance, oci_core_instance.
- From the Oracle Cloud Infrastructure home page, click the menu icon at the top left, and select Compute > Instances. Select your compartment, and view the instance details page. The Primary VNIC information section includes the Public IP Address.
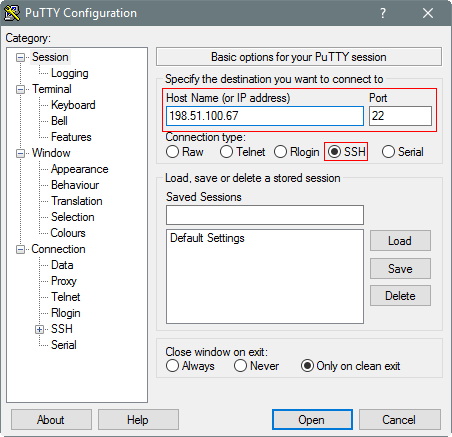
- Start PuTTY. The PuTTY Configuration window is displayed, showing the Session panel.
- In the Host Name (or IP address) field, enter the public IP address of your instance.
- In the Connection type field, select SSH
if it is not already selected.
Description of this illustration (putty_login3.png) -
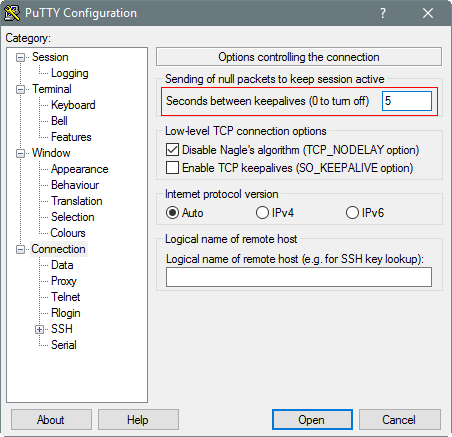
In the Category pane, click Connection. Enter 5 in the Seconds between keepalives (0 to turn off) text box.
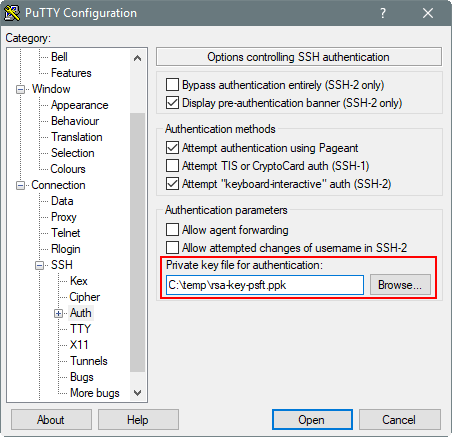
Description of this illustration (putty_login4.png) - In the Category pane, expand SSH, and then click Auth. The Auth panel is displayed.
- In the Private key file for authentication
field, click Browse and select the private
key file that you saved earlier, rsa-key-psft.ppk
in this example.
Description of this illustration (putty_login6.png) - In the Category tree, click Session.
The Session panel is displayed.
- In the Saved Sessions field, enter a name for this connection configuration, and then click Save.
- Click Open to open the connection.
The PuTTY Configuration window is closed and the PuTTY window is displayed.
- When prompted for a user name, enter opc.
- Enter the passphrase you had provided for your SSH key pair.
- The first time you connect to your instance, the PuTTY Security Alert window is displayed, prompting you to confirm the public key. Click Yes to continue.
 Set Up
SSH Access to a Private Cloud Manager Instance through a Jump
Host
Set Up
SSH Access to a Private Cloud Manager Instance through a Jump
Host
If you created Network resources, private or public subnets, and a jump host as part of the Cloud Manager installation, use these instructions to set up SSH access (tunnel) to a Cloud Manager private subnet through a jump host. The SSH access lasts until you close the Bash shell or git bash shell.
You must supply an SSH private key in the OpenSSH format for these commands. If you created an SSH private key in PuTTY in the RSA format, convert it to the OpenSSH format, as follows:
- Open the PuTTY generator and load the current private key.
- Select Conversions > Export OpenSSH key.
- Save the file, and make a note of the full path and key
name.
Note. If you want to distinguish this private key from the private key that you use with PuTTY, you can save the file to a different name. You cannot use this version of the key with PuTTY.
- Use the newly exported key in the command to create the SSH tunnel.
To create the SSH access with the jump host:
- In the Compute console, select Resource Manager > Stacks, and locate the Cloud Manager stack.
- On the Stack Details page for the Cloud Manager instance, select the Apply job.
- On the Job Details page, select Outputs
from the Resources list on the left.
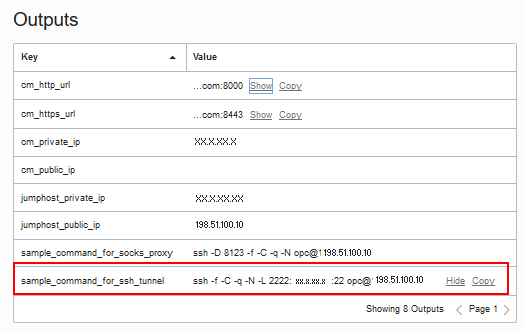
Description of this illustration (ssh_access_private_instance_outputs.png) See the tutorial Install the PeopleSoft Cloud Manager Stack with Resource Manager.
- In the Outputs table, copy the value for
sample_command_for_ssh_tunnel.
The command has this format, where <Bastion Public IP> is the value of jumphost_public_ip in the Outputs table.
ssh -f -C -q -N -L 2222:10.0.6.2:22 opc@<Bastion Public IP>
- In a Bash shell (Linux) or a git bash shell (Microsoft
Windows), enter the command with the jumphost_public_ip to
create the ssh tunnel.
Add the -i <private_key_path_and_name> option, and supply the full path and key name to the OpenSSH-formatted key. For example:
ssh -f -C -q -N -i <private_key_path_and_name> -L 2222:XX.X.X.X:22 opc@198.51.100.10
If you created a passphrase when generating the private key, you will be prompted to enter it.
- Create the ssh connection to the Cloud Manager instance
using the command:
ssh –p 2222 opc@localhost -i <private_key_path_and_name>
- To verify the current path after you access the Cloud
Manager instance, enter pwd.
$ pwd

/home/opc - To leave the Cloud Manager instance and return to the Bash shell or git bash shell prompt, type exit.
Note. In the Bash or git bash shell, in case of error, use CTRL+c to terminate a command.
Note. One way to verify the SSH tunnel connection is to use the following command and look for "tunnel" in the output:
ps -ef | grep ssh
 Monitor
the Cloud Manger Configuration Process and Review the Log Files
Monitor
the Cloud Manger Configuration Process and Review the Log Files
Monitor the configuration process status by reviewing the log file /home/opc/bootstrap/CloudManagerStatus.log.
- Access the Cloud Manager instance in a Linux terminal window or with PuTTY.
- To view the end of the log file, enter this command:
$ tail /home/opc/bootstrap/CloudManagerStatus.log
- In case you want to review other log files, use these
commands to navigate.
Enter pwd to verify the current directory.
$ pwd
/home/opc
- Change to the /home/opc/bootstrap directory.
$ cd bootstrap
- To view the files and directories in /home/opc/bootstrap,
enter ls.
$ ls
The configuration process takes several minutes. When the process completes successfully, the same log file includes the Cloud Manager URL to sign in to the PeopleSoft Pure Internet Architecture (PIA) in a browser.
Other log files include the following:
- /home/opc/bootstrap/CloudManagerStatus.log — Input logs for the Cloud Manager Instance Configuration wizard
- /home/opc/bootstrap/psft_oci_setup.log — Cloud Manager provisioning log
- /home/psadm2/psft/data/cloud/cmlogs/BOOTSTRAP_LOGS/* — PeopleSoft Cloud Administrator logs related to processes such as file server creation
- /opt/oracle/psft/dpks/setup/psft_dpk_setup.log — Detailed Puppet log for the Cloud Manager installation.
For more information, see PeopleSoft Cloud Manager for Oracle Cloud Infrastructure, "Cloud Manager Logs." Select Online Help (HTML) or PeopleBooks (PDF) on the PeopleSoft Cloud Manager page on the Oracle Help Center.
 Copy
the Log Files from the VM to a Windows Computer (Optional)
Copy
the Log Files from the VM to a Windows Computer (Optional)
If you want to copy the log files to a Microsoft Windows computer, use a secure copy or secure FTP utility such as those associated with Putty.
For example, to transfer the files using the PSCP utility in PuTTY:
- Create a saved session in PuTTY to connect to the Cloud Manager Linux instance.
- Make a note of the path to your Putty installation on your laptop (for example, C:\Program Files (x86)\PuTTY).
- Make a note of the path on the Linux VM with the files you want to copy, and the path on your laptop where you want to save them.
- Open a command prompt and make a note of your PATH
environment variable.
To list the environment variables, enter the command
set.Copy the contents of PATH to Notepad or elsewhere as a backup. - In the command prompt, append the path to the PuTTY
installation to the beginning of your PATH. For example:
set PATH=C:\Program Files (x86)\PuTTY;%PATH%
Note. This environment variable setting only lasts until the command window closes.
-
Use this command to connect to the session with user opc, and copy files from the source Linux VM to the target Microsoft Windows computer:
pscp –l <user> <session name>:<source> <target>
-
Enter the passphrase for the SSH key at the prompt.
>pscp -l opc cm-oci-infodev:/home/opc/bootstrap/psft_oci_setup.log C:\user\CloudManager\target
Passphrase for key "rsa-key-psft":
psft_oci_setup.log | 1142 kB | 1142.5 kB/s | ETA: 00:00:00 | 100%
 Next
Tutorial
Next
Tutorial
Specify Cloud Manager Settings
 Want
to Learn More?
Want
to Learn More?
- PeopleSoft Cloud Manager Image Overview, My Oracle Support, Doc ID 2233277.1
- Cumulative Feature Overview Tool (Go to the original CFO tool and select PeopleSoft Cloud Manager at the top.)
- Oracle Cloud Documentation in Oracle Help Center