Before You Begin
Purpose
This tutorial covers ongoing administrative tasks for OEMM such as enforcing security, running scripts, and maintaining logs.
Time to Complete
Approximately 20 minutes.
Introduction
This Oracle By Example (OBE) is seventh and last in a series of seven OBEs. The recommendation is to do them in order. The series is:
- Installing OEMM, on a Windows PC.
- Harvesting Metadata from Various Sources: DB, ODI, OBIEE, and others.
- Managing the Configuration and Metadata Stitching with OEMM, including backup and restore.
- Configuring Data Lineage Analysis, graphically and exporting to Excel.
- Using Impact Analysis, the "opposite" of data lineage.
- Creating a Business Glossary in OEMM, using the enterprise edition.
- Administering OEMM, creating users, groups, and scripts (you are currently viewing this OBE).
Note: In previous versions of OEMM, "groups" were referred to as "roles."
Scenario
You have installed OEMM using the default user (Administrator) with the default permissions (can view all). You want to create a new user Joe User
who has fewer privileges. You want to enforce the permissions on an object-by-object basis. Lastly you want to audit when Joe User signed on and off.
Software and Hardware Requirements
The following is a list of software and hardware requirements used in this Oracle By Example (OBE):
- Software
- Oracle Database 11.2.0.4.0 or higher
- Oracle Business Intelligence Enterprise Edition (OBIEE) was installed at one time, but no longer is installed.
- Oracle Enterprise Metadata Manager (OEMM) 12.1.3.0.2 or higher. The OEMM Install and Setup Guide is available online and in the product itself.
- Oracle Data Integrator (ODI) 12.1.3 or higher. At least one copy of ODI for Windows must be on the same machine as OEMM. (ODI is not a requirement for OEMM, but is a requirement for parts of this OBE.)
- Alternatively, the VM contains Database, ODI, and OEMM sample repositories (but not OEMM software) pre-installed with Oracle Enterprise Linux (OEL) 6.4. The VM (approx 7 GB) requires Oracle VirtualBox to run. The VM is available in either of two places (both are the same VM):
- internally for employees only
- externally on OTN for all students and customers
- Hardware
- At least 2 GB RAM for each target (database or ODI)
- At least 5 GB RAM for the VM (if you are using that)
Prerequisites
Before starting this tutorial, you should:
- Have an account to download Oracle software.
- Have access to or have installed the sample lab artifacts
- Have attended ODI 12c training, [D82167GC10] Oracle Data Integrator 12c: Integration and Administration, or equivalent experience. (ODI is not a requirement for OEMM, but is a requirement for parts of this OBE.)
Typographic Conventions
These are the conventions used throughout this practice to indicate who types what.
-
Filenameor/path/subdirectory/. Often you can navigate to a destination without having to type it. - Command or value that you type, such as gedit .bashrc. Be mindful of periods at the end of sentences that are not part of the command.
- Click this such as or .
- Some variable or
<variable>as something you replace. Often prefixed with "my" such as<myName>or<myHost>. - A Menu Item or dialog Field Prompt or Tab name. For example, "click the Designer tab and select Models > New Model".
- Generally a red rectangle in the graphics is not part of the original image, but added to draw your attention to an item.
1. Administer Security
The OEMM administration is functional right out of the box based on installation configuration defaults, but best practices dictate that an administrator sign on with their real name (instead of just Adminsitrator
)for audit purposes. Furthermore, some administrators may need access to only certain folders and not have access to other folders (for example, an engineering admin should not have access to the HR databases.) To more effectively administer the security, perform the following tasks:
1.1 Create and Update Users
-
On the main screen, go to Tools > Administration to get to the administration user interface.
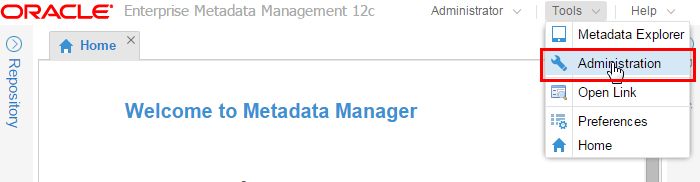
Description of this image -
On the Users tab, click Add (
 ) to add a new user.
Description of this image -
Fill in all of the fields as appropriate. Name can be mixed case, but should not have any blanks. There is no built-in password complexity enforced, but if you used LDAP, then that might enforce password complexity. Note that you can have multiple Groups, they are cumulative in permissions. You can also designate a user as Steward explicitly by checking the box.
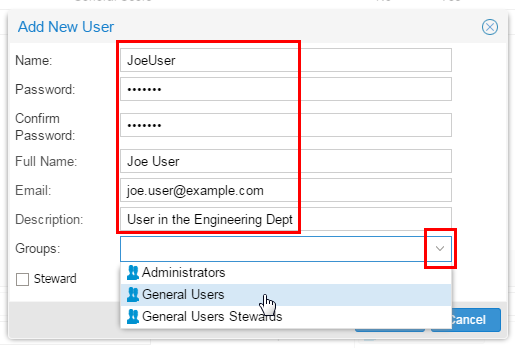
Description of this image Click (behind the drop-down).
-
To update a user, highlight the user you wish to update, then change the fields as needed.
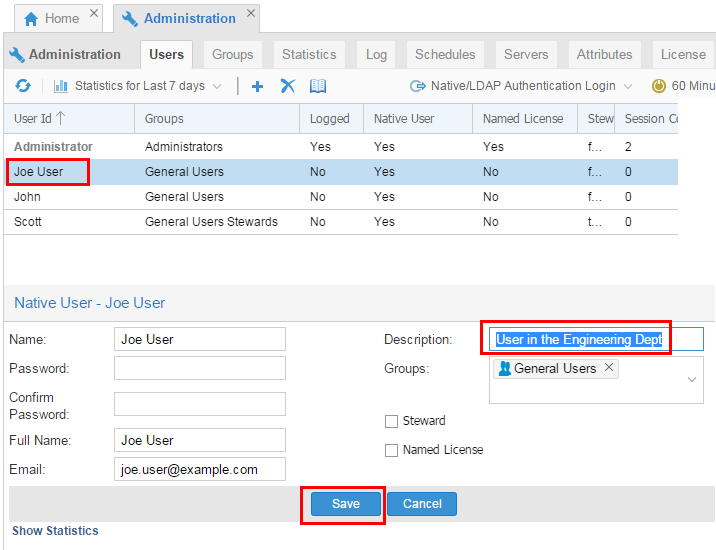
Description of this image Click to make the changes permanent.
-
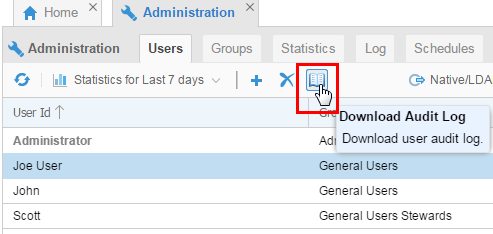
For purposes of auditing, best practices would suggest you disable the default Administrator account and have people log in as themselves. Then you could Download the Audit Log as needed for certifying compliance with audit policies.
Description of this image
You have created and updated users. You have assigned new users to existing groups. You could delete users as well, or (for audit purposes), leave the user in the system but just remove all groups.
1.2 Assigning Access to Users
Different groups can be created. Go through the different properties.
-
Click the Groups tab. This displays the existing groups. If you highlight a specific group, then you can Show Users that are associated with that group. You can also change the Description for a group.
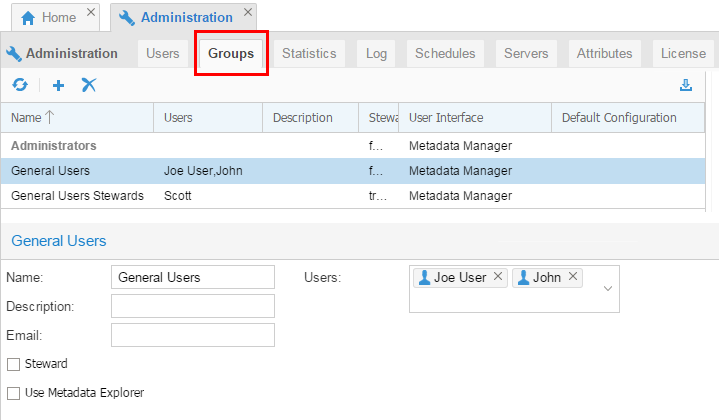
Description of this image If you change any values for a group, then click to make the changes permanent.
-
On the Groups tab, click Add (
) to add a new group. Fill in the Name and Description. Decide whether persons in this group can view everything or if they need to be granted visibility on an object-by-object basis. 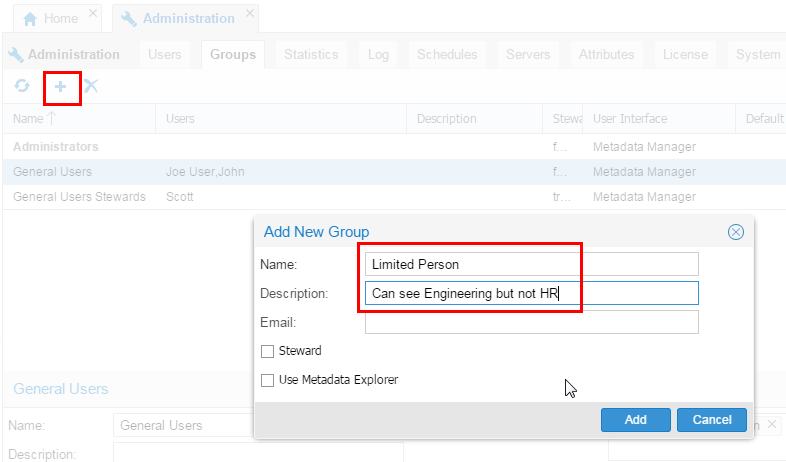
Description of this image Click .
-
If a person is a member of Group X and you try to delete Group X, OEMM will do it! There is no referential integrity in that respect. A person who used to belong to Group X just has that entry removed.
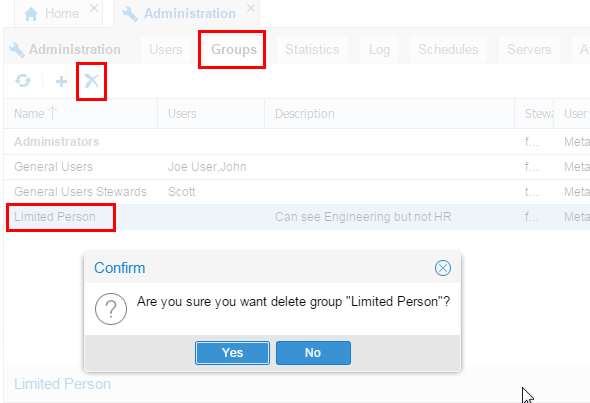
Description of this image Do not do it, this is just for illustration purposes.
You have created, updated, and deleted groups.
1.3 Controlling Access to Resources by Permissions
In order to set access control to various folders/models/configurations, perform the following steps:
-
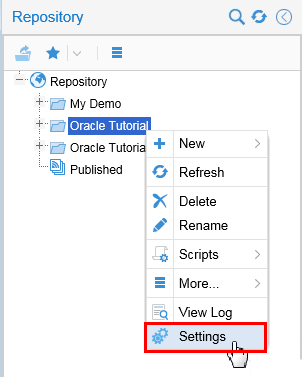
In the repository tree, right-click an object and select Settings.
Description of this image -
Go to the Security tab. Now you can assign View/Update/Administer privileges to any group or user.
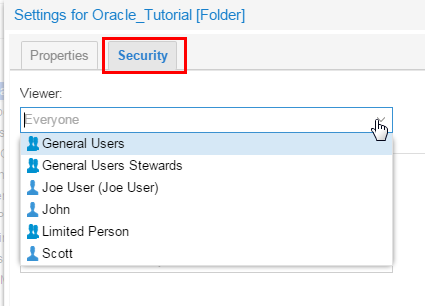
Description of this image -
You can do this group-setting for Folders as well as objects under folders (for example, models, glossaries, or shown here configurations).
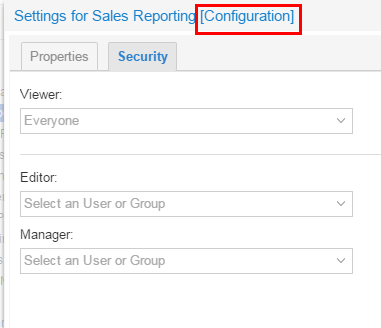
Description of this image
You have set access of objects to groups that are otherwise limited.
You have administered security by assigning users, groups, and permissions.
2. Scripts
Scripts help to automate repetitive tasks. Repetitive
may be scheduled or simply repeated as needed. Writing your own scripts is not supported, and users should not edit the supplied scripts.
To explore the scripting functionality, perform the following steps:
2.1 Schedule Scripts
-
Now go back to Administration screen and select the Schedules tab for scheduling a script. Look at the scripts available (in this example, there is only one). Select the Execution History tab for the list of times this script has run.
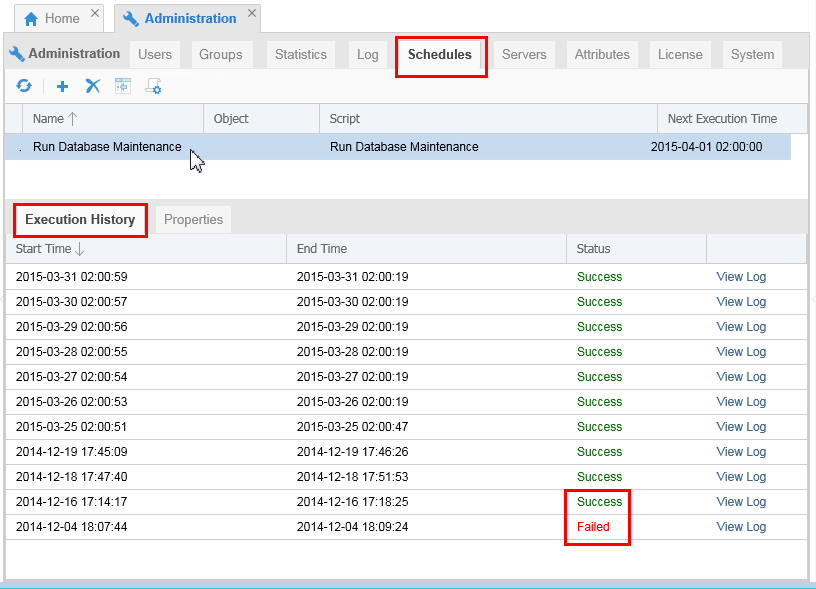
Description of this image If a script Failed, you can View Log to find out why.
-
Click the Properties tab to set a run schedule. You can run the scripts One Time or Recurring based on a schedule pattern.
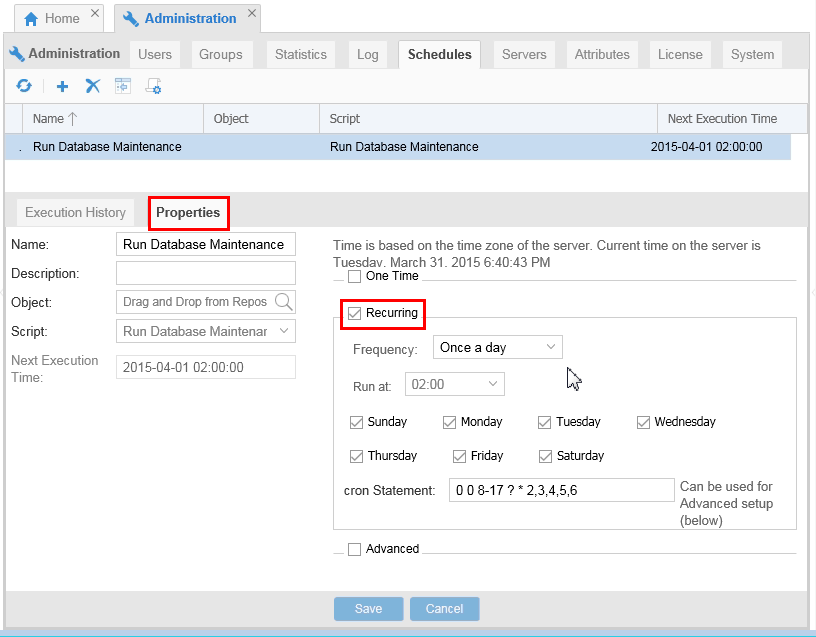
Description of this image Just looking, nothing to change.
-
Other script actions can be found by right-clicking on the Repository folders and selecting Scripts.
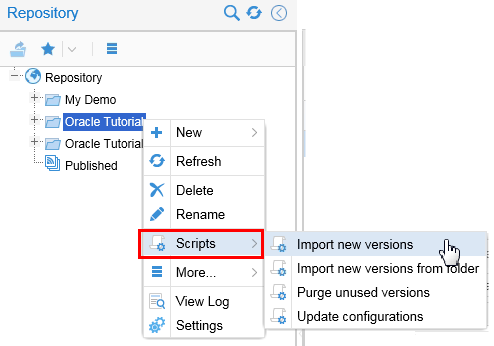
Description of this image
You have looked at scripts and their schedules and success/failure status of those runs.
2.2 Performance Scripts
-
Under System, you get to know the details on the server and database being used.
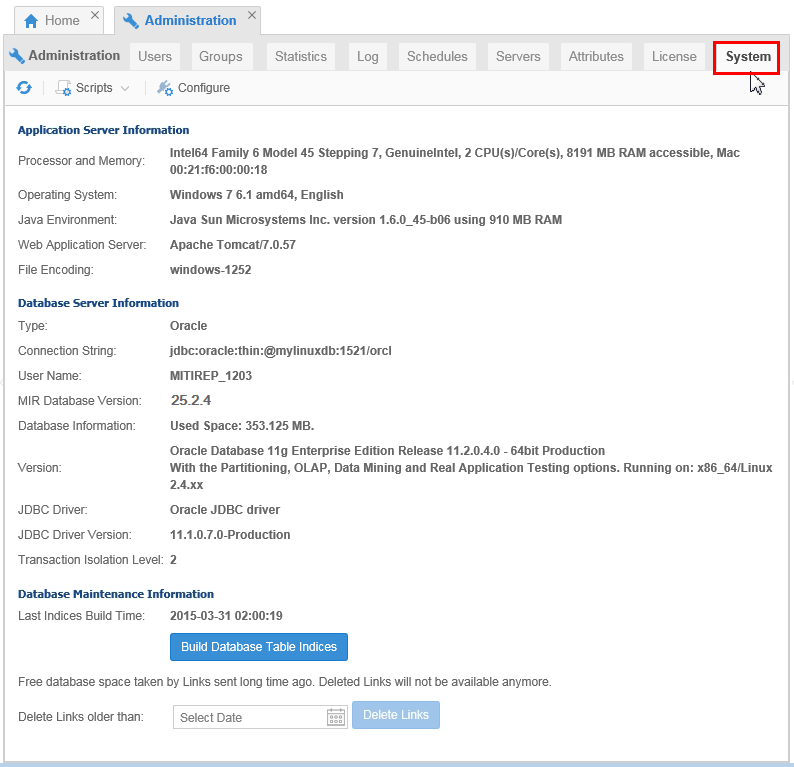
Description of this image If you ever need to call Oracle Support, they will want this information.
-
You have a test script to measure the performance of the installation.
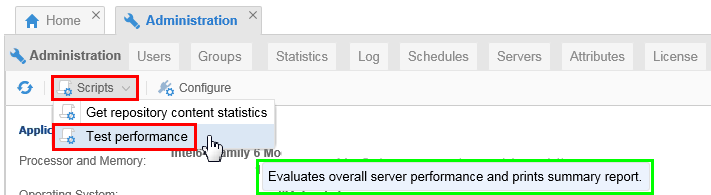
Description of this image Run the script Test Performance.
-
The script should complete in around one minute. If it takes longer then the resources allocated to OEMM are not optimal.
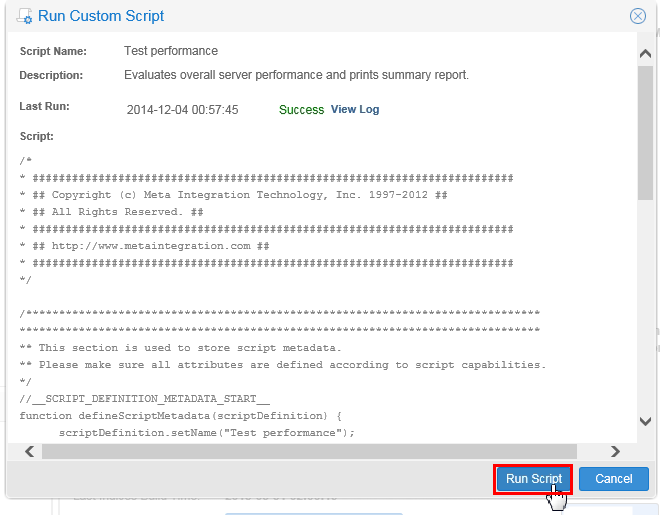
Description of this image Click . If the script takes too long, then investigate database and OEMM server resources as well as network connection between OEMM and DB.
You have gathered information about the performance and makeup of your environment.
You have explored scheduling, viewing, and running pre-installed scripts.
3. Logs
There is a running log of everything that happens in OEMM, as well as individual logs related to an object.
3.1 Systemwide Logs
-
To see a history of everything that has been happening, go to Administration > Log tab. You can filter the level of what is shown by selecting Status and the level of messages (from All=most shown to Errors=least shown).
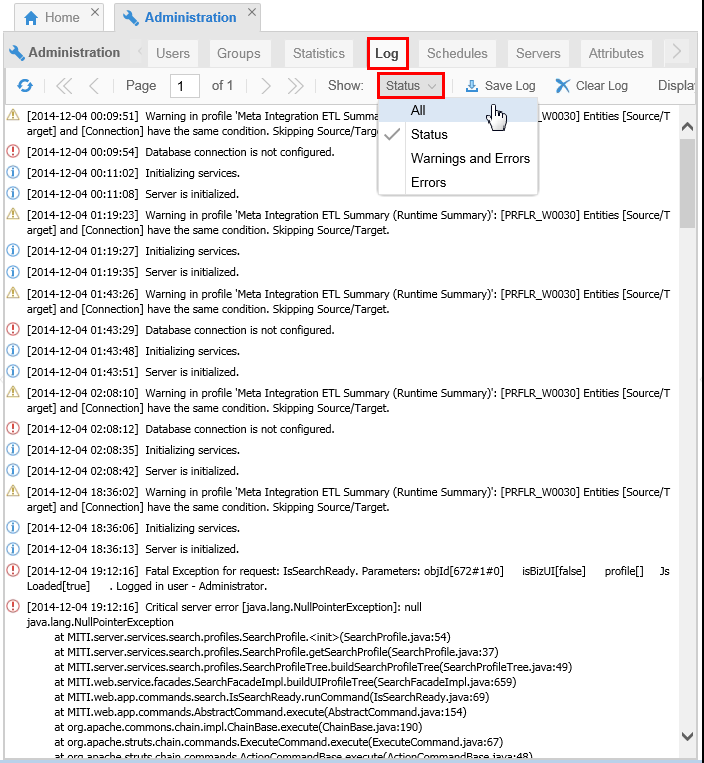
Description of this image From here you can Save or Clear the system log.
You have administered the systemwide logs.
3.2 Individual Object Logs
-
Open the Repository and right-click on any object at any level. Select View Log.
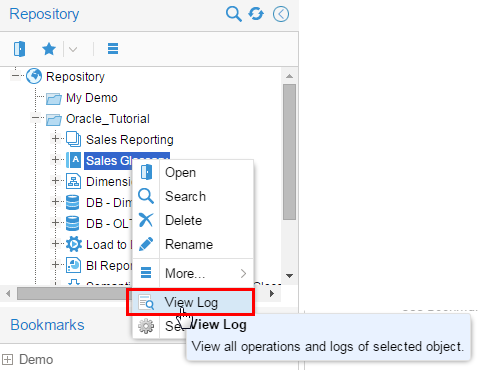
Description of this image Some objects may not have any logs, some may have several logs.
-
You can view or purge an individual log.
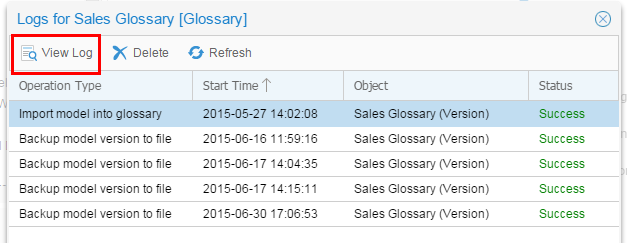
Description of this image
You have administered logs for individual objects.
You have explored logs, both systemwide and individual, in OEMM.
Want to Learn More
While the default behavior of OEMM will run in a proof-of-concept or development environment, a production environment usually requires additional administration and configuration to enforce best practices for security.
In this tutorial, you learned to:
- Create users
- Create groups
- Assign users to groups
- Assign security to folders
- Schedule scripts
- Document and measure performance of the environment
- Display and download logs
Resources
Following is a list of conceptual or procedural Help topics relevant to the topic of this tutorial:
- Product marketing information
- Product documentation in PDF format.
- Virtual Machine demo environment on OTN
- Internal (employee) resources:
- MetaIntegration, the owner of the OEM version of this product.
- To learn more about OEMM, refer to additional OBEs in the Oracle Learning Library <can link to a specific set of OBEs on the subject or product(s)>
Credits
- Lead Curriculum Developer: Jayant Mahto
- Other Contributors: Steve Friedberg