Before You Begin
Purpose
This tutorial covers how to use OEMM data mapping for bridging the gap, when harvesting bridges are not enough.
Time to Complete
Approximately 20 minutes.
Introduction
This Oracle By Example (OBE) is sixth in a series of eight OBEs. The recommendation is to do them in order. The series is:
- Installing OEMM, on a Windows PC.
- Harvesting Metadata from Various Sources: DB, ODI, OBIEE, and others.
- Managing the Configuration and Metadata Stitching with OEMM, including backup and restore.
- Configuring Data Lineage Analysis, graphically and exporting to Excel.
- Using Impact Analysis, the
opposite
of data lineage. - Data Mapping: Bridging the Gap, When Harvesting Bridges Aren't Available (you are currently viewing this OBE).
- Creating a Business Glossary in OEMM, using the enterprise edition.
- Administering OEMM, creating users, roles, and scripts.
Scenario
There are times when the data flow processes are not harvestable from the existing bridges, perhaps due to political (non-technical) reasons. In those cases there will be a gap in the lineage between the models. For these cases the flow between the models can be mapped using the data mapping feature. Suppose there is a temporary communications outage from model A to model B, but you still want to trace the flow.
Software and Hardware Requirements
The following is a list of software and hardware requirements used in this Oracle By Example (OBE):
- Software
- Oracle Database 11.2.0.4.0 or higher
- Oracle Business Intelligence Enterprise Edition (OBIEE) was installed at one time, but no longer is installed.
- Oracle Enterprise Metadata Manager (OEMM) 12.1.3.0.2 or higher. The OEMM Install and Setup Guide is available online and in the product itself.
- Oracle Data Integrator (ODI) 12.1.3 or higher. At least one copy of ODI for Windows must be on the same machine as OEMM. (ODI is not a requirement for OEMM, but is a requirement for parts of this OBE.)
- Alternatively, the VM contains Database, ODI, and OEMM sample repositories (but not OEMM software) pre-installed with Oracle Enterprise Linux (OEL) 6.4. The VM (approx 7 GB) requires Oracle VirtualBox to run. The VM is available in either of two places (both are the same VM):
- internally for employees only
- externally on OTN for all students and customers
- Hardware
- At least 2 GB RAM for each target (database or ODI)
- At least 5 GB RAM for the VM (if you are using that)
Prerequisites
Before starting this tutorial, you should:
- Have an account to download Oracle software.
- Have access to or have installed the sample lab artifacts
- Have attended ODI 12c training, [D82167GC10] Oracle Data Integrator 12c: Integration and Administration, or equivalent experience. (ODI is not a requirement for OEMM, but is a requirement for parts of this OBE.)
Typographic Conventions
These are the conventions used throughout this practice to indicate who types what.
-
Filenameor/path/subdirectory/. Often you can navigate to a destination without having to type it. - Command or value that you type, such as gedit .bashrc. Be mindful of periods at the end of sentences that are not part of the command.
- Click this such as or .
- Some variable or
<variable>as something you replace. Often prefixed with "my" such as<myName>or<myHost>. - A Menu Item or dialog Field Prompt or Tab name. For example, "click the Designer tab and select Models > New Model".
- Generally a red rectangle in the graphics is not part of the original image, but added to draw your attention to an item.
1. Prerequisites
This OBE has a few more requirements than the others. First make sure you have all of the pieces to complete this OBE beyond the requirements for the other seven OBEs.
1.1 Patch for OEMM
This requires a later software build than the other OBEs.
-
On the main menu, go to Help > About OEMM.
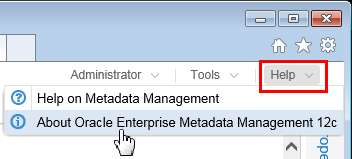
Description of this image -
Make sure that the version is at least 12.1.3.0.2, and more importantly, make sure that the Build is at least 2015-03-18 (the light grey text in the red box is hard to read...)
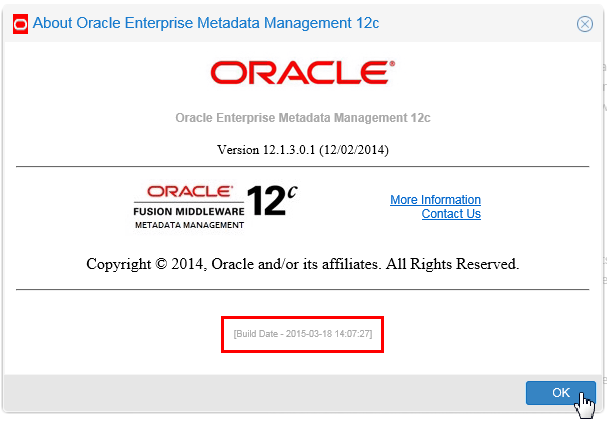
Description of this image Click to close the About panel.
You have the proper version of OEMM software to complete the OBE.
1.2 Get the Excel Spreadsheet
This spreadsheet is describing a file whose data is physically on the ODI server. ODI may be mapped to only use some of the columns, this spreadsheet would describe all of the columns.
-
Download the Excel spreadsheet
FORODI_SRC_SALES_PERSON.xlsxfrom here, and save it somewhere on the OEMM host (perhaps inC:\ > username > Downloads.)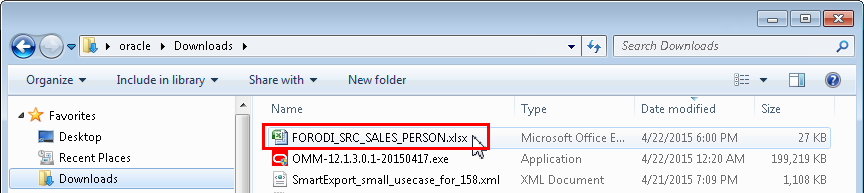
Description of this image -
Make sure you can view the spreadsheet using Microsoft Excel, or a viewer such as Open Office or any
.xlsxspreadsheet viewer. You do not have to modify the files, so a viewer will suffice.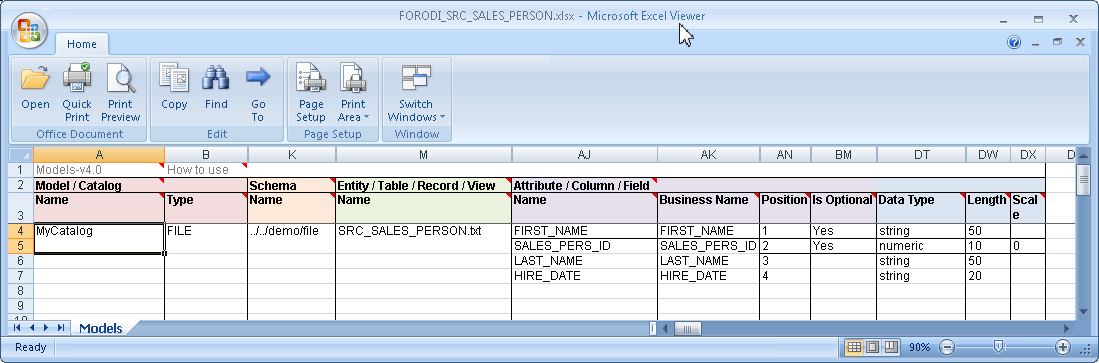
Description of this image Notice that many of the columns are hidden, such as columns C through J, and N through AI, and so on. They have headings, but no data.
All of the columns except Model/Catalog Name must match exactly the values in the ODI model. Model/Catalog Name is purely for your documentation and can be anything.
You have saved the sample spreadsheet used in this OBE.
1.3 OPTIONAL: Install the Excel Add-In
If you have Microsoft Excel, you can optionally add a module that allows you to create and further manipulate the metadata spreadsheet. It is optional for this OBE.
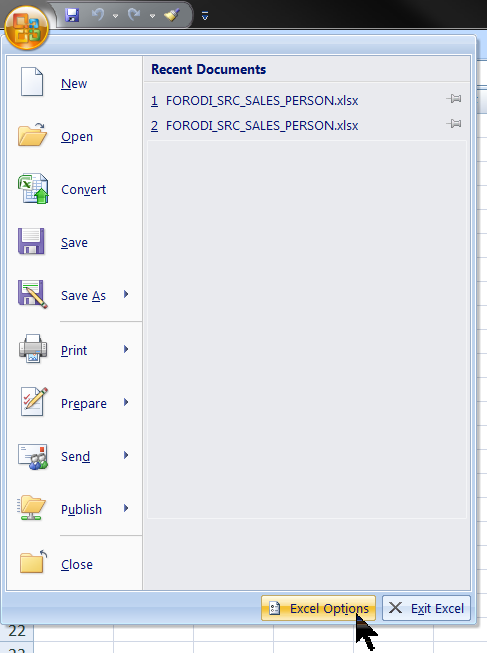
-
Click the Office Button, then click Excel Options.
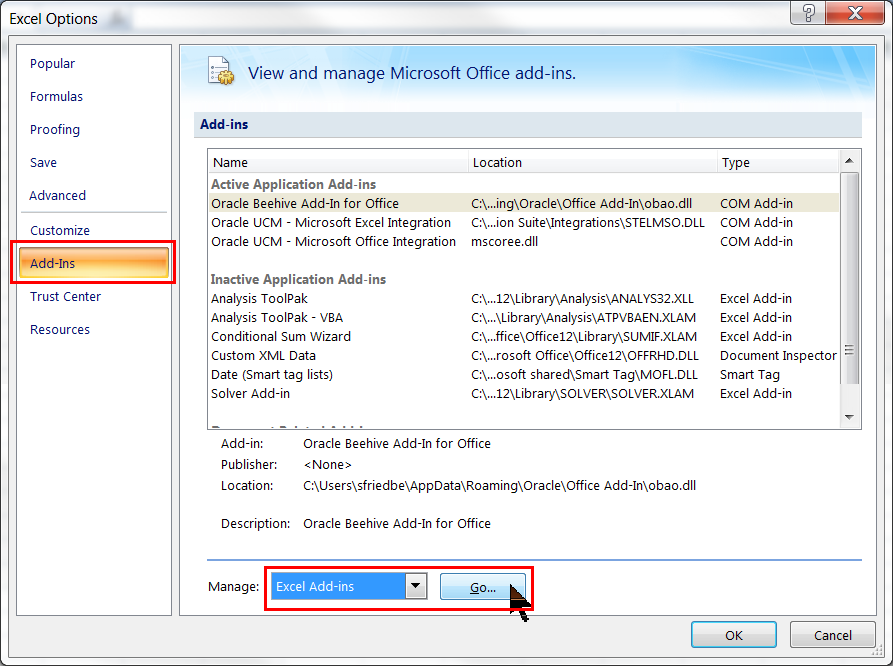
Description of this image -
Select Add-ins on the left, then Manage: Excel Add-ins at the bottom, then click .
Description of this image Your list of Active and Inactive Application Add-ins may be different.
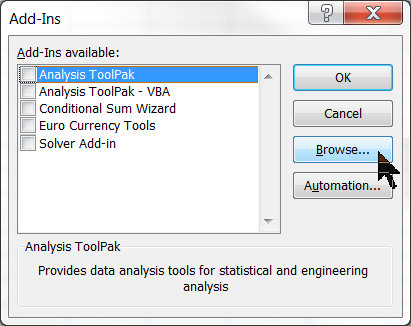
-
Click .
Description of this image Your list of Add-Ins available may be different.
-
Navigate to
C:\Program Files (x86)\Oracle\Metadata Management\conf\MIRModelBridgeTemplate\MIRMicrosoftExceland selectStandard-Addin.xlam, then click .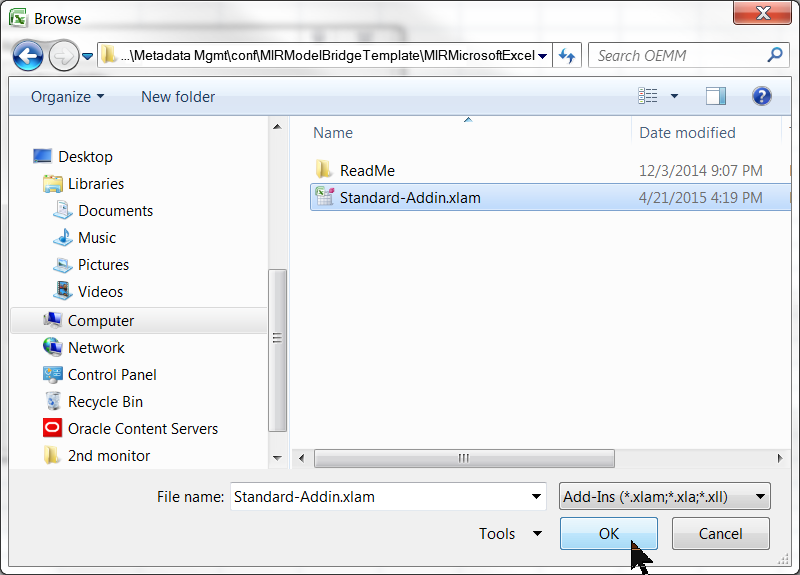
Description of this image Your OEMM install directory (the
C:\Program Files (x86)\Oracle\Metadata Management\part) may be different depending on whether you took the defaults when installing. -
With Meta Integration Standard Add-in selected, click .
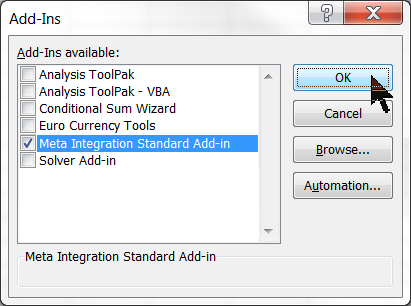
Description of this image Your list of Add-Ins available may be different.
-
Now when you open the spreadsheet, you should have a new tab at the far right labeled Metadata. It will display many options, in particular the Used icon to hide all blank columns.
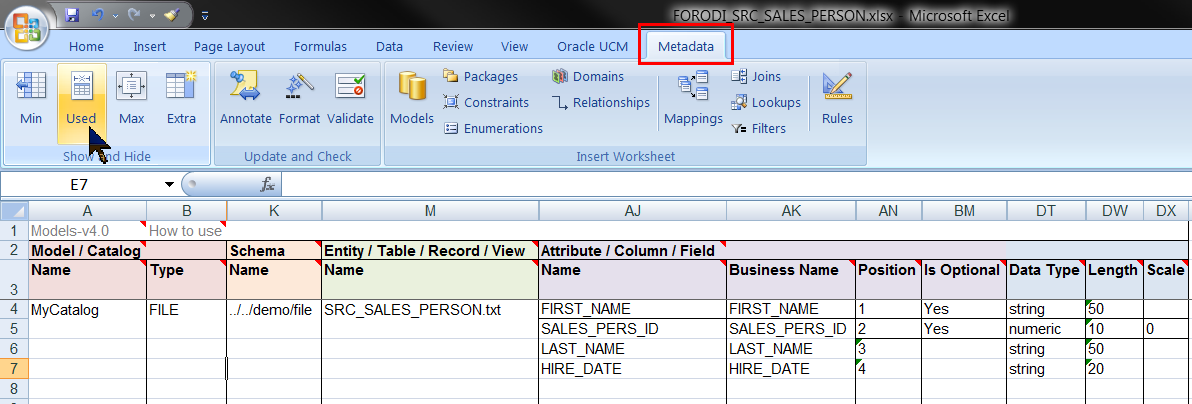
Description of this image To Unhide columns, do the normal Excel operation: select columns A through DY, then right-click the columns, and select Unhide.
You have installed the optional Microsoft Excel Add-in to create and manage the metadata spreadsheets. The creation of the spreadsheet is beyond the scope of this OBE. For our purposes, it has been given to you pre-created.
You have verified the prerequisites to this OBE, both downloading the file and preparing the spreadsheet viewer.
2. Create New Model with the Excel Import Bridge
The Sales Reporting configuration references the the ODI repositories that contain SRC_SALES_PERSON.TXT, but do not mention SRC_SALES_PERSON.TXT directly. You have SRC_SALES_PERSON.TXT defined externally in a Microsoft Excel spreadhseet. Using an Import Bridge, you will add that to the existing Sales Reporting configuration.
2.1 Examine the "Before" State of the Diagram
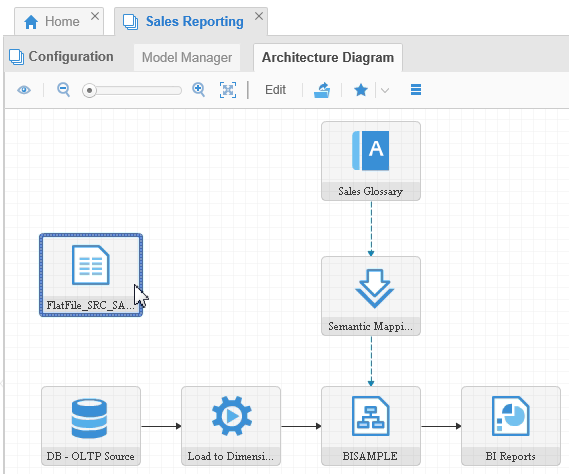
-
In the OEMM Repository, expand Oracle Tutorial and open Sales Reporting. Click the Architecture Diagram tab.
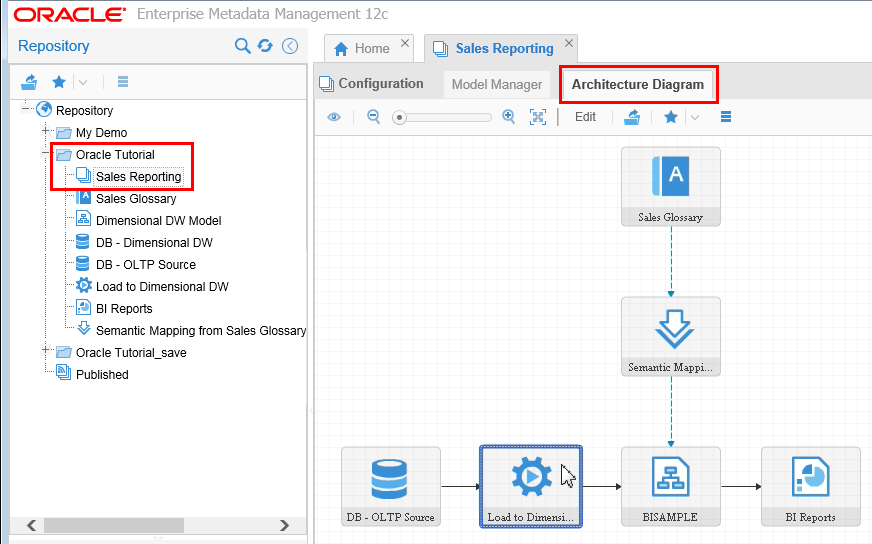
Description of this image The blue "gear" box Load to Dimensional DW is the ODI model, but it does not mention the
SRC_SALES_PERSON.TXTflat file.
Just remember what the diagram looks like "before" you add a new model.
2.2 Add a New Model by Import Bridge
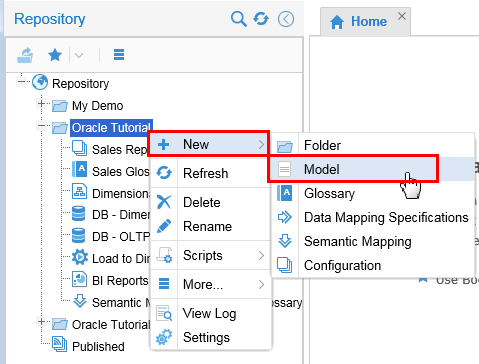
-
Right-click Oracle Tutorial, then click New > Model.
Description of this image -
Create the Model with Name: FlatFile_SRC_SALES_PERSON. Using the pull-down, select Import from: Microsoft Office Excel.
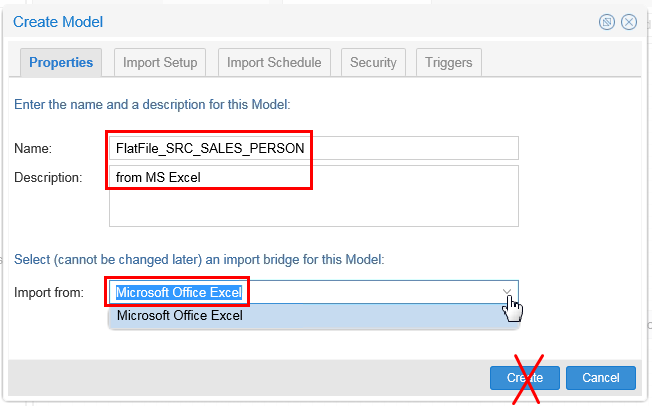
Description of this image Do NOT click Create yet.
-
Click Import Setup tab. On the File parameter, enter the path or browse (
 ) to where your
 .xlsxspreadsheet is.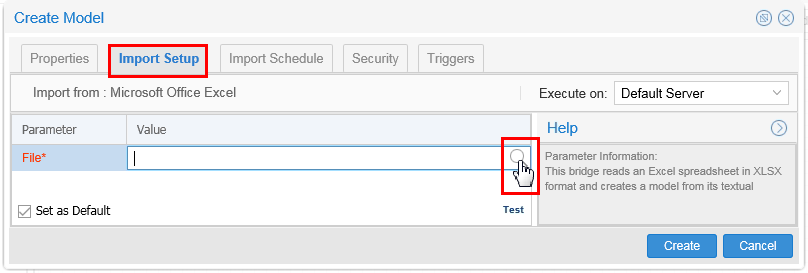

Note that this is not the location of the data file, but rather the metadata file.
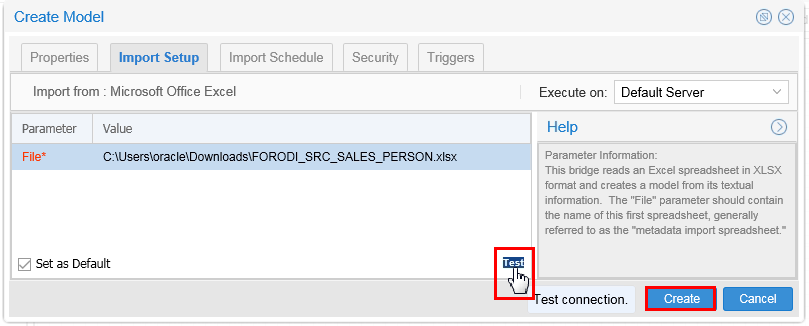
Description of this image Click Test. If it is successful, click .
-
On the Confirm dialog, import a new version now.
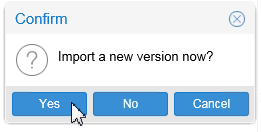
Description of this image Click .
-
When the import successfully completes, click to open it.
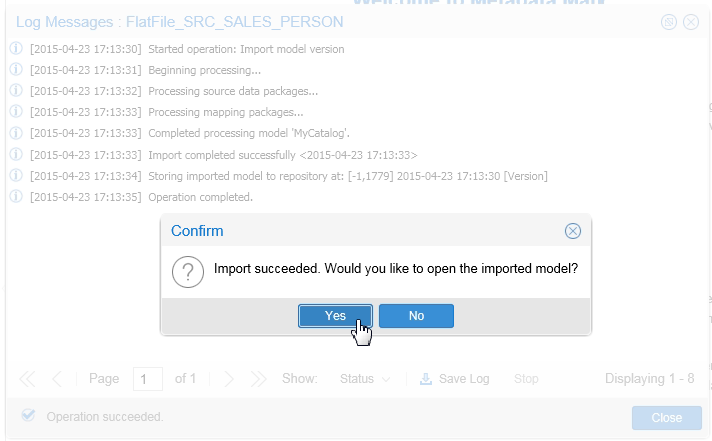
Description of this image -
Expand MyCatalog > Tables > SRC_SALES_PERSON.txt. After you are satisfied that the columns match what is in the spreadsheet, close the FlatFile_SRC_SALES_PERSON tab.
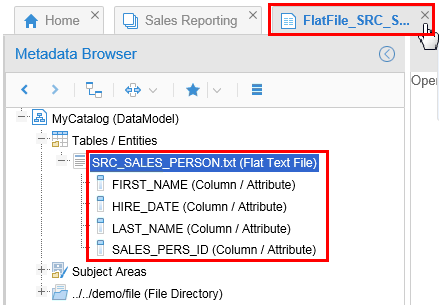
Description of this image
You have imported a Microsoft Excel spreadsheet representing a flat file model.
You have added a new model to the repository, but it is not connected to anything yet.
3. Add the Model to a Configuration
Since the model was not harvested automatically, you need to manually indicate where it fits (what it is connected to) in the configuration.
3.1 Drop the Model into the Configuration.
-
Click on the Sales Reporting tab, and make sure you are still looking at the Architecture Diagram tab. Drag the FlatFile_SRC_SALES_PERSON model and drop it on an empty spot in the diagram.
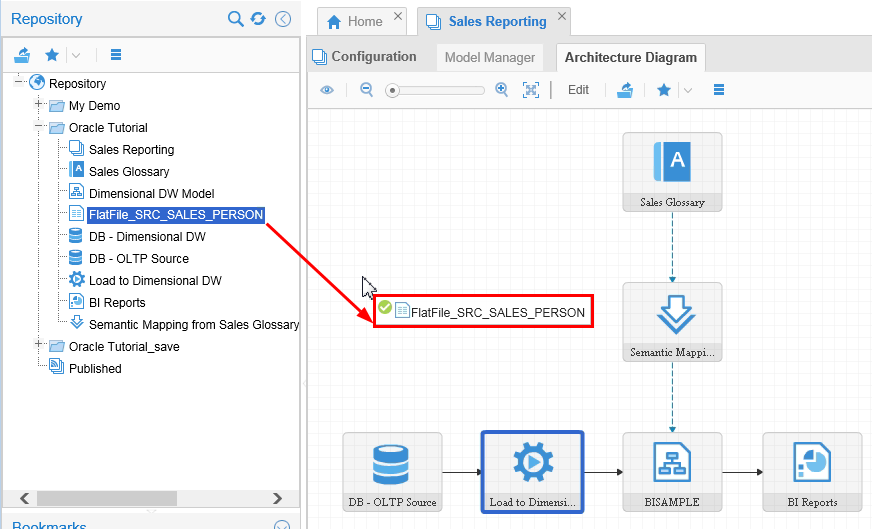
When you drop it, the file will be free-floating (not attached to any other box).
Description of this image
The model is part of the configuration, but still not attached to anything explicitly.
3.2 Add Connections
-
Click the Model Manager tab. Select Load to Dimensional DW, then click Edit Connection.
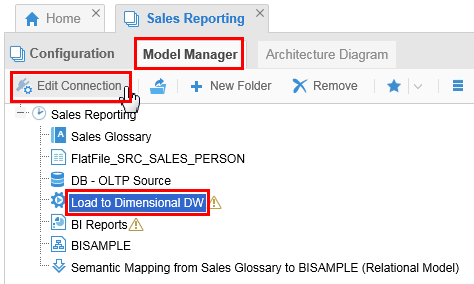
Description of this image -
On the FILE_GENERIC line, under Store, click [Ignore] and change it to FlatFile model.
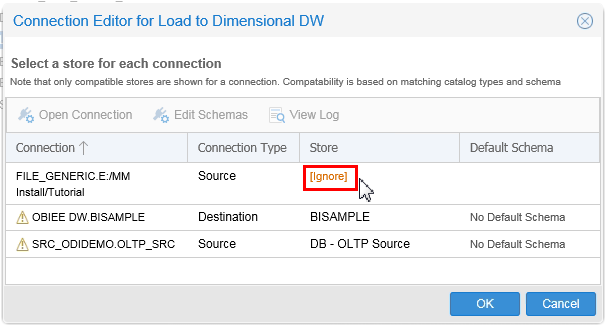
BUG: Jayant, Where is the flat file option? I did install the latest patch level, this was supposed to fix that, right?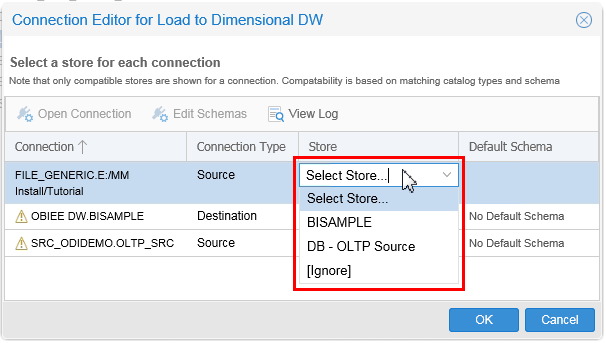
Description of this image Click .
-
Validate.

Description of this image
The connection for the flat file has been attached to the ODI process.
3.3 Examine the "After" State of the Diagram
-
<Step 1 instructions>

Description of this image -
<Step 2 instructions>

Description of this image -
<Step 3 instructions>

Description of this image
The flat file model is now attached to the proper places in the diagram.
You have added the flat file model to the Sales Reporting configuration.
Want to Learn More
<Include a short summary of what users accomplished by following all the steps. You may also include additional information that you think is relevant and helpful, optional additional exercises for the user to learn more about related functionality, and related topics links, as described in the Resources section below.>
In this tutorial, you learned to:
- <Summary point>
- <Summary point>
- <Summary point>
- <Summary point>
Resources
Following is a list of conceptual or procedural Help topics relevant to the topic of this tutorial:
- Product marketing information
- Product documentation in PDF format.
- Virtual Machine demo environment on OTN
- Internal (employee) resources:
- MetaIntegration, the owner of the OEM version of this product.
- To learn more about OEMM, refer to additional OBEs in the Oracle Learning Library <can link to a specific set of OBEs on the subject or product(s)>
Credits
- Lead Curriculum Developer: Jayant Mahto
- Other Contributors: Steve Friedberg