Before You Begin
Purpose
This tutorial covers creating models to support harvesting metadata from various sources such as Oracle Databases, ODI, OBIEE, and so on.
Time to Complete
Approximately 20 minutes.
Introduction
This Oracle By Example (OBE) is second in a series of seven OBEs. The recommendation is to do them in order. The series is:
- Installing OEMM, on a Windows PC.
- Harvesting Metadata from Various Sources: DB, ODI, OBIEE, and others (you are currently viewing this OBE).
- Managing the Configuration and Metadata Stitching with OEMM, including backup and restore.
- Configuring Data Lineage Analysis, graphically and exporting to Excel.
- Using Impact Analysis, the "opposite" of data lineage.
- Creating a Business Glossary in OEMM, using the enterprise edition.
- Administering OEMM, creating users, roles, and scripts.
Scenario
The VM contains a pre-populated set of models from some software that was installed but is no longer installed. You will make a few live models, and then use the pre-configured models for the rest of the exercises.
Software and Hardware Requirements
The following is a list of software and hardware requirements used in this Oracle By Example (OBE):
- Software
- Oracle Database 11.2.0.4.0 or higher
- Oracle Business Intelligence Enterprise Edition (OBIEE) was installed at one time, but no longer is installed.
- Oracle Enterprise Metadata Manager (OEMM) 12.1.3.0.2 or higher. The OEMM Install and Setup Guide is available online and in the product itself.
- Oracle Data Integrator (ODI) 12.1.3 or higher. At least one copy of ODI for Windows must be on the same machine as OEMM. (ODI is not a requirement for OEMM, but is a requirement for parts of this OBE.)
- Alternatively, the VM contains Database, ODI, and OEMM sample repositories (but not OEMM software) pre-installed with Oracle Enterprise Linux (OEL) 6.4. The VM (approx 7 GB) requires Oracle VirtualBox to run. The VM is available in either of two places (both are the same VM):
- internally for employees only
- externally on OTN for all students and customers
- Hardware
- At least 2 GB RAM for each target (database or ODI)
- At least 5 GB RAM for the VM (if you are using that)
Prerequisites
Before starting this tutorial, you should:
- Have an account to download Oracle software.
- Have access to or have installed the sample lab artifacts
- Have attended ODI 12c training, [D82167GC10] Oracle Data Integrator 12c: Integration and Administration, or equivalent experience. (ODI is not a requirement for OEMM, but is a requirement for parts of this OBE.)
Typographic Conventions
These are the conventions used throughout this practice to indicate who types what.
-
Filenameor/path/subdirectory/. Often you can navigate to a destination without having to type it. - Command or value that you type, such as gedit .bashrc. Be mindful of periods at the end of sentences that are not part of the command.
- Click this such as or .
- Some variable or
<variable>as something you replace. Often prefixed with "my" such as<myName>or<myHost>. - A Menu Item or dialog Field Prompt or Tab name. For example, "click the Designer tab and select Models > New Model".
- Generally a red rectangle in the graphics is not part of the original image, but added to draw your attention to an item.
1. Preparation
There are a couple of preliminary one-time steps to be ready to make models for OEMM harvesting.
1.1 Start OEMM
- The detailed instructions for installing and starting OEMM were contained in the first OBE: Installing OEMM.
-
Start the OEMM services (Tomcat) on the Windows PC as a Service.

Description of this image If Tomcat opens a console window (with a Java icon
 on the running bar), leave the window open but minimized.
 There are alternative ways to (auto)start Tomcat in the background.
-
Log in to the local OEMM on a web browser at URL http://localhost:11580/MM/ (right-click this link to open it in a new tab).
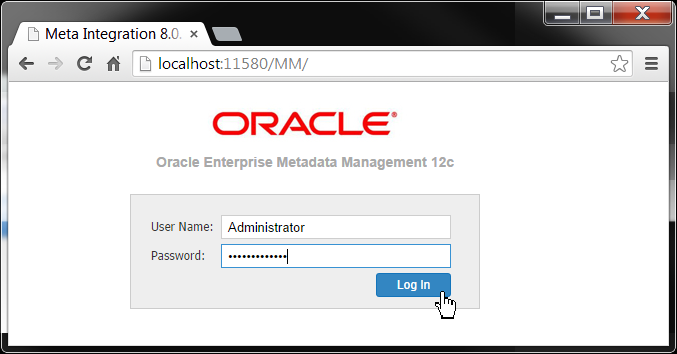
Description of this image The default password is Administrator.
You should now be logged into a running instance of OEMM.
1.2 Create Folders
Folders help you organize your models. You can make as many or as few as you need.
-
Create a new folder by right-clicking on Repository and then select New > Folder.
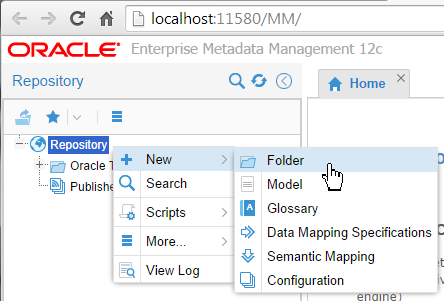
Description of this image -
Name it My Demo. The Description is optional but recommended.
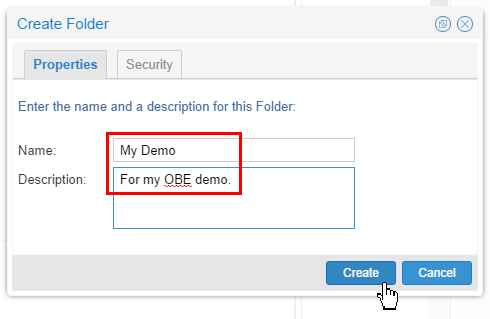
Description of this image Click to continue.
You should now have an empty folder for storing and organizing your models.
OEMM is now prepared to start making models for harvesting.
2. Harvesting from Oracle Database Schemas
To create a model for harvesting an Oracle database schema, perform the following steps:
2.1 Modelling a New Schema
First you are going to make a model for the HR sample schema (which we will not use), and then you will just look at the pre-created one for OLTP (which we will use).
-
Right-click the
My Demofolder, and select New > Model.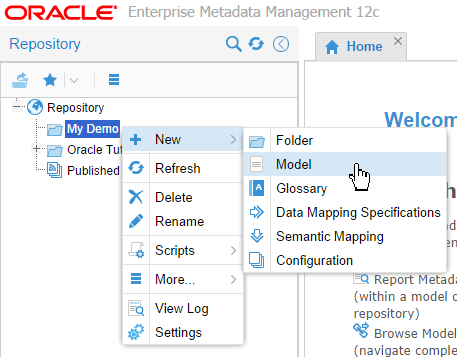
Description of this image -
Name it HR Source.
On the Import from pull-down, scroll down and select Oracle Database (via JDBC).
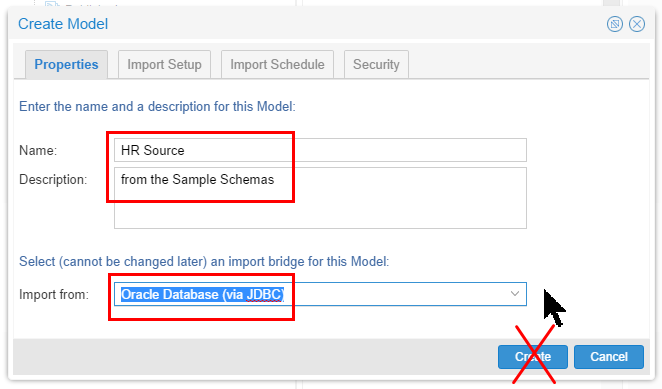
Description of this image Stay on this panel, do not click Create yet.
-
Click the Import Setup tab and enter the following case-sensitive values:
- Host: localhost or the actual host IP address
- Port: 1530 or 1521 as appropriate
- Service: orcl
- User: SYS as SYSDBA
- Password: oracle (displays as *******)
- Schema: HR
(You can either type the schema name or you can use the to browse for it. Note a blank means all schemas.)
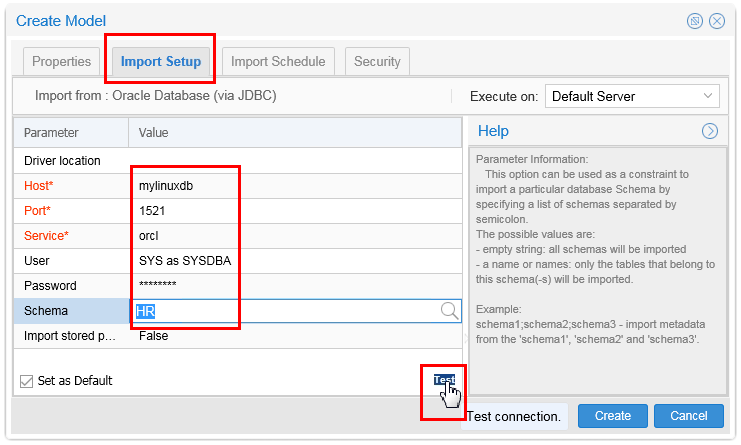
Description of this image Click Test to verify your parameters.
If the test was successful, click to continue.
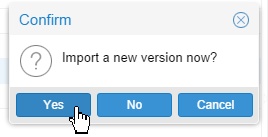
-
You must have at least one version, and there currently is none, so click to continue.
Description of this image -
The Log Messages show the progress.
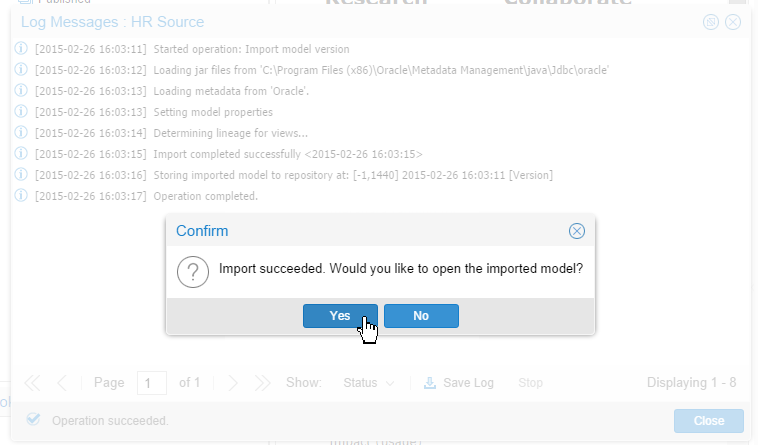
Description of this image Click to continue.
-
The Metadata Browser is displayed. Drill down as far as you can until you can see the columns in
REGIONS.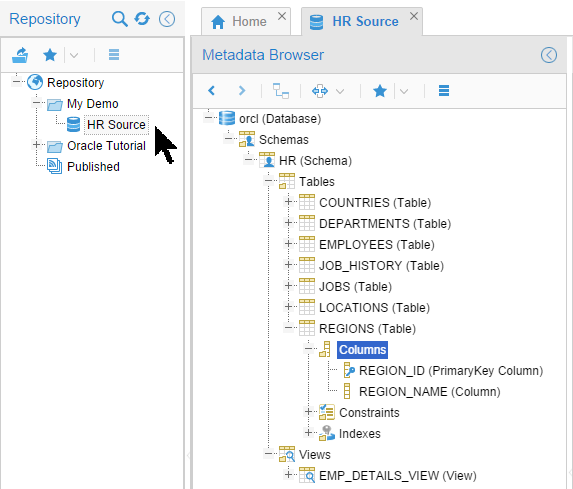
Description of this image
You have created a new model (though we will not be using it).
2.2 Existing Schema Models
-
Just like you did for the HR schema, examine the pre-created model for Oracle Tutorial > DB - OLTP Source. Drill down until you can see the columns in
SRC_CITY.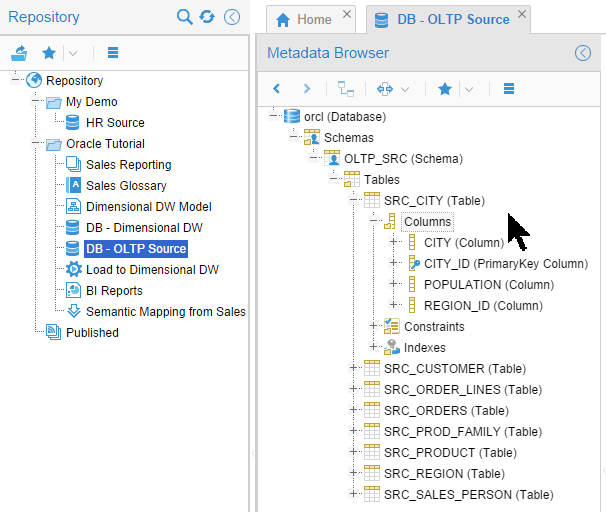
Description of this image Close the
DB - OLTP Sourcetab when you are done looking at it. -
Similarly, examine the pre-created model for Oracle Tutorial > DB - Dimensional DW. Drill down until you can see the columns in
AG_BISAMPLE. (There are many more tables than are shown here.)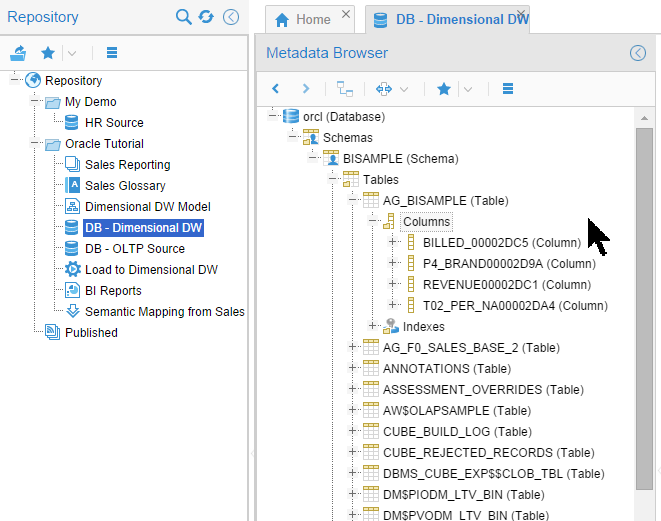
Description of this image Close the
DB - Dimensional DWtab when you are done looking at it.
These models were pre-created. Interestingly, neither of the schemas still exist on the database even though both metadata models persist.
You have created and examined models harvested from Oracle database schemas.
3. Harvesting from ODI
Oracle Data Integrator (ODI) is a drag-and-drop tool for doing Extract-Transform-Load (ETL) or Extract-Load-Transform (EL-T) on heterogeneous sources and targets in either a scheduled batch or ongoing micro-batch mode. ODI does reverse-engineering of sources and targets with results very similar to OEMM.
3.1 Start ODI
-
On the Linux desktop, click the ODI 12c Studio launcher.
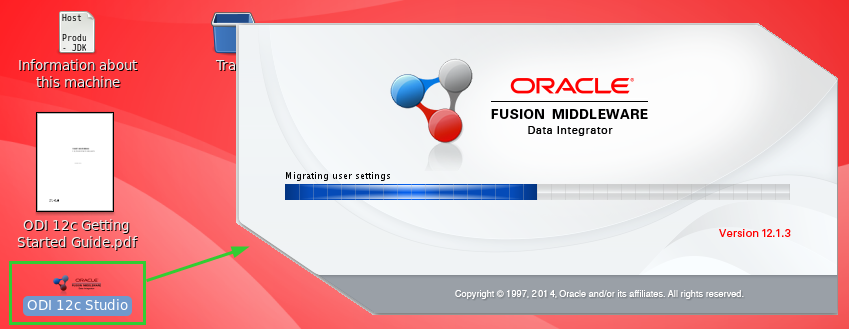
Description of this image Double-click it only ONCE, otherwise you will get multiple copies.
-
Click Connect to Repository, and accept the defaults.
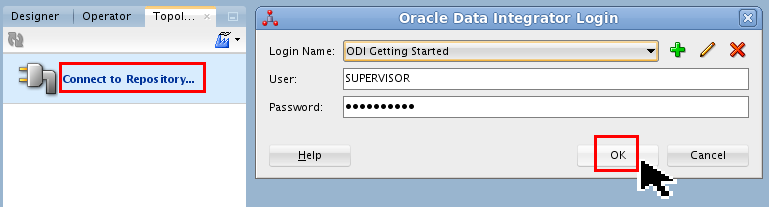
Description of this image Click to continue.
-
Go to the Designer tab to familiarize yourself with the kinds of objects (Projects and Models) that are out there in the ODI Master and Work Repositories.
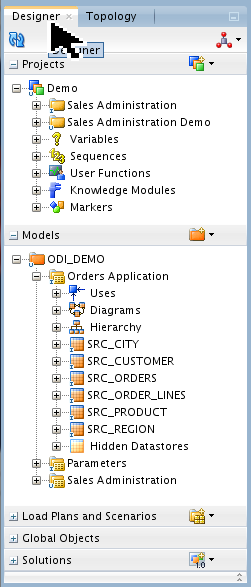
ODI Studio is now started. The repository in the database was available before this, as long as the database is running.
3.2 Create a New Model
First you are going to make a model for ODI (which we will not use), and then you will just look at the pre-created one for Load to Dimensional DW (which we will use).
-
Right-click the
My Demofolder, and select New > Model.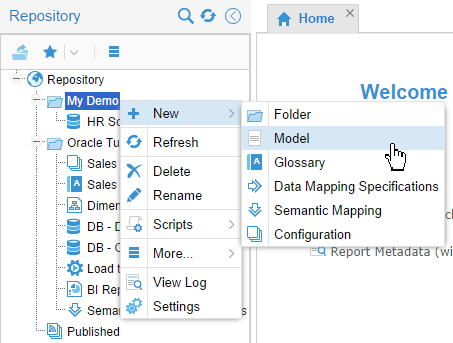
Description of this image -
Name it Orders App.
On the Import from pull-down, scroll down and select Oracle Data Integrator (ODI).
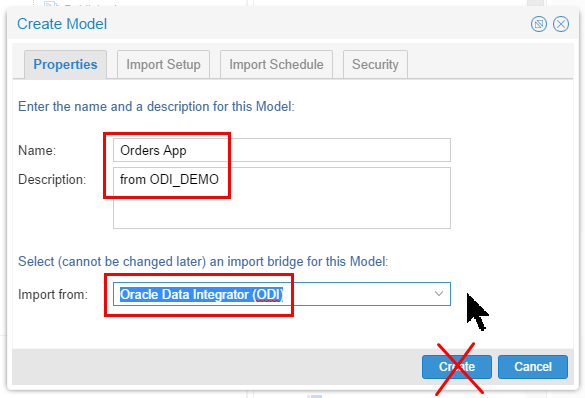
Description of this image Stay on this panel, do not click Create yet.
-
Click the Import Setup tab and enter the following case-sensitive values:
- Oracle Home path: C:\Oracle\Middleware\Oracle_Home
- URL:
jdbc:oracle:thin:@mylinuxdb:1521:orcl (See URL note below)) - Master Repo User: prod_odi_repo
- Master Repo Password: oracle
- ODI User: SUPERVISOR
- ODI User Password: SUPERVISOR (displays as *******)
- Work repository: WORKREP
- Scope: Projects
- Content: (Leave this blank for the moment, but it cannot remain permanently blank.)
- Context: Global
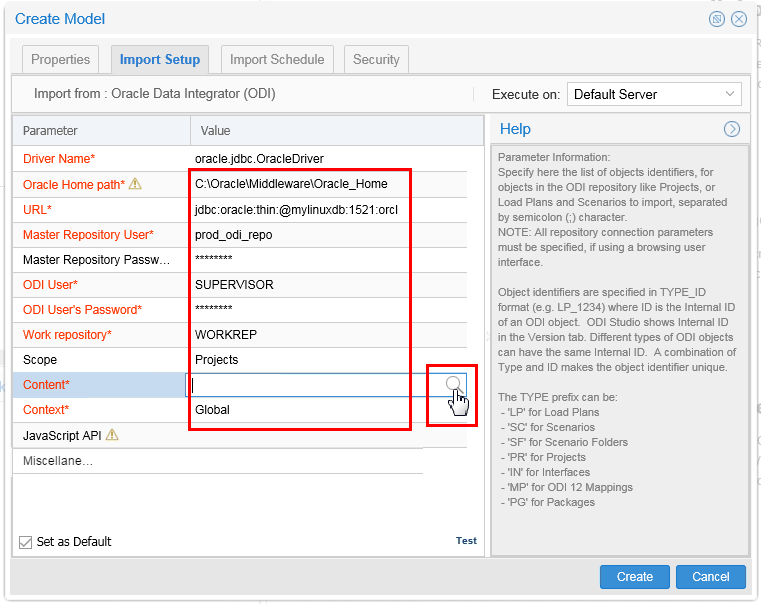
Description of this image Use the
to browse for Content. (This doubles as a connectivity test.) The URL
hostnamedepends on whether you are running the database and OEMM on the same host or not. If so, then use localhost:1530. If not, then use the actual host IP address:port of the database (your address will be different than the one shown here asmylinuxdb:1521, and may be different each day if using DHCP).If you are using the pre-built ODI VM and the Windows is on a different host, then you also need to go into ODI Studio, Topology > Repositories > Work Repositories > WORKREP, click on the connection icon (looks like a plug), then JDBC and change the URL
localhostto an actual IP address.If the database is running in the VM, then the port is probably 1530 instead of the default of
1521.Note that the
Oracle Home pathmust be on the same machine as OEMM, even if you normally use ODI Studio on another platform such as Linux. -
Select the objects for which you want to capture metadata.
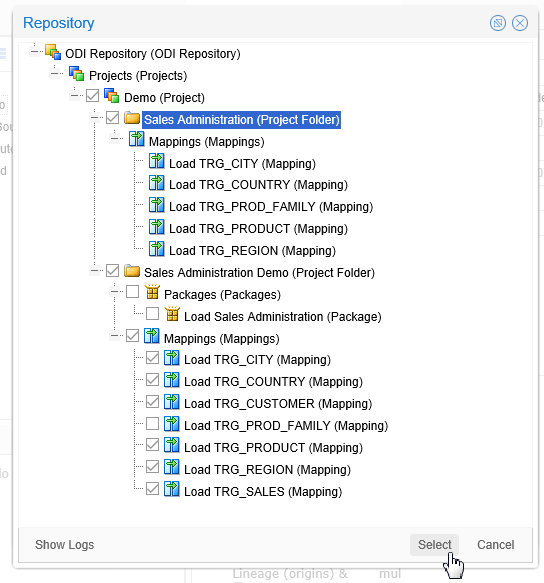
Description of this image Click to continue.
CAUTION: The check boxes themselves do not indicate whether there is a partial or full sub-selection. For example, by selecting
Sales Administration (Project Folder), that causes the sub-items to be selected, and their check boxes no longer display. Compare that behavior to selectingLoad TRG_CUSTOMER (Mapping)which causes the hierarchical objects above it (such asMappings (Mappings)andSales Administration Demo (Project Folder)) to be selected, but those partial-selection check boxes look no different than the full-selection check boxes. -
Click Test to verify your parameters.
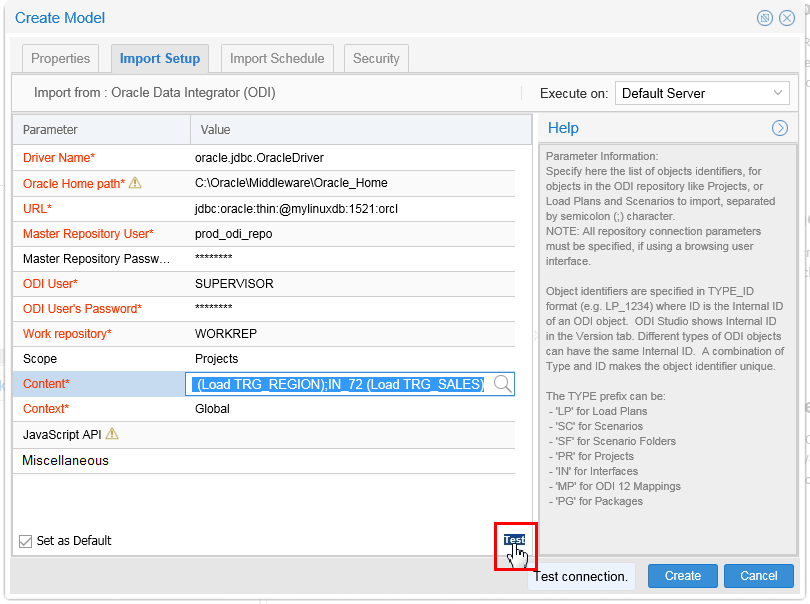
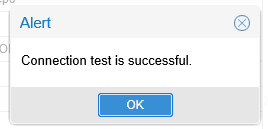
Description of this image If the test was successful, click , then click to continue.
-
There is no version yet, so you do want to import a new one.
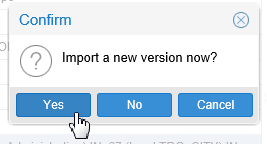
Description of this image Click to continue.
-
The import may take quite a while, depending on the number of objects you are importing. Note the timestamps.
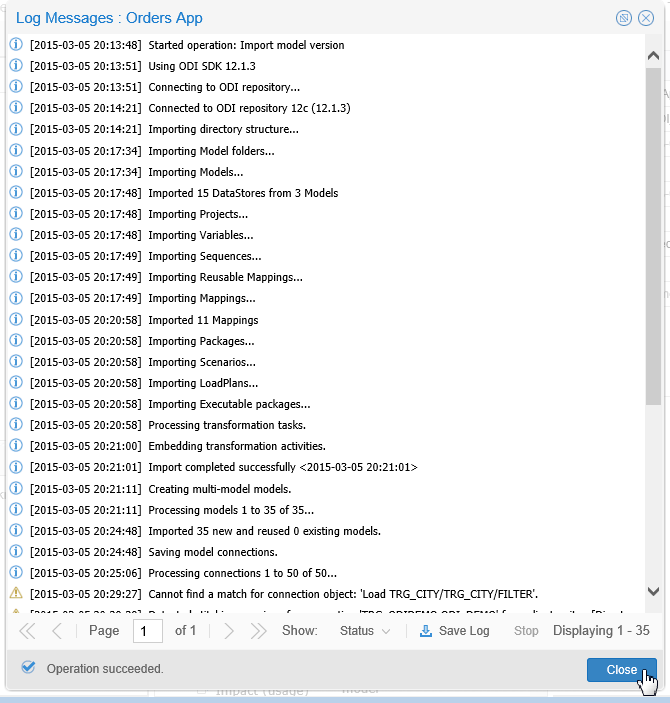
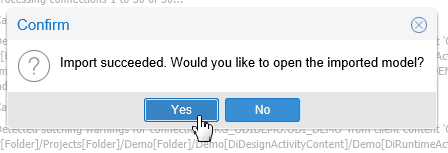
Description of this image Click to inspect your new metadata. When done experimenting, click to continue.
-
This is what was produced by the previous experimentation.
Description of this image Close the tabs when you are done looking.
You have created a new ODI model.
3.3 Reviewing Existing Models
-
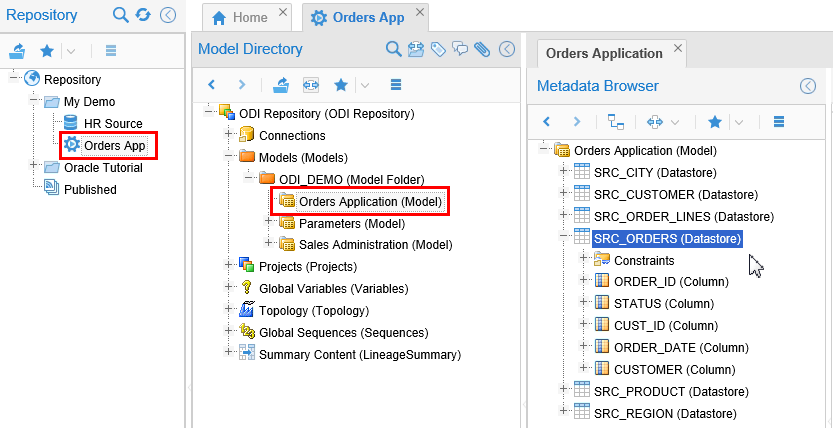
On the main Repository navigation panel, expand "+" Repository > Oracle Tutorial > Load to Dimensional DW, then in the Model Directory panel, expand "+" Models > ODI_DEMO > Orders Application, then in the Metadata Browser panel, expand "+" Orders Application (Model) > SRC_ORDERS (Datastore).
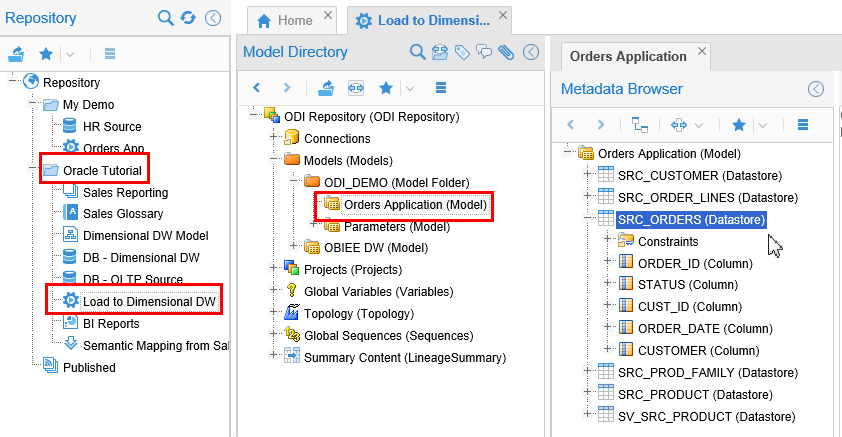
Description of this image This should look very similar to the one you created, only a subset. Notice it is missing
SRC_CITYwhen compared to the model you did.
You have reviewed the existing ODI models.
You have created models in OEMM for ODI, and reviewed ODI models that were previously created.
4. Harvesting from OBIEE
Oracle Business Intelligence Enterprise Edition (OBIEE) does robust reporting, ad-hoc query and analysis. It runs in WebLogic Server (WLS). OBIEE was installed here at one time, but is no longer installed on this VM. The metadata reports can persist in OEMM even after the OBIEE product is disconnected/removed.
4.1 Browse OBIEE Reports
-
On the main Repository navigation panel, expand "+" Repository > Oracle Tutorial > BI Reports, then in the Model Directory panel, expand "+" localhost > Reports (folder) > User Folders > My Folders > MyProductsDashboard > page 1 > Products Report, then in the Metadata Browser panel, expand "+" Presentation Layer > A - Sample Sales (Subject Area).
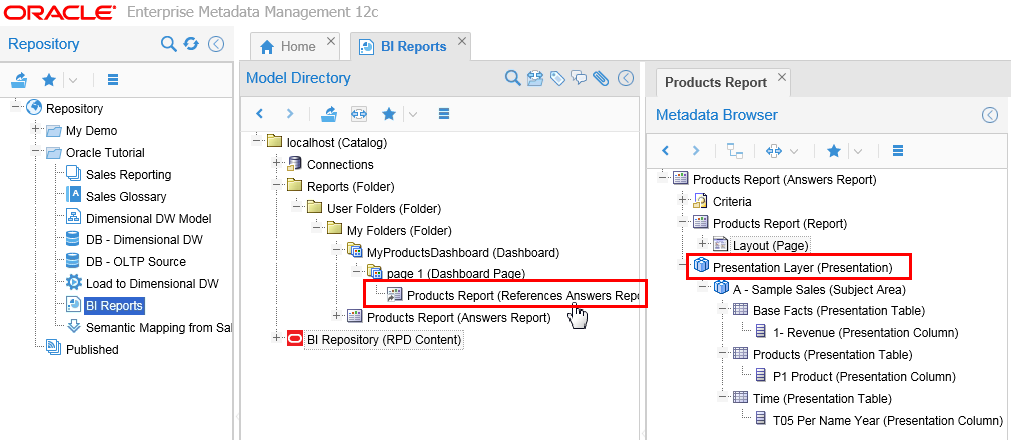
Description of this image As with all metadata, this is not the report, this is metadata about the report.
This is the metadata for a previous BI report.
4.2 Create Models
Since BI is not installed on this VM, you cannot do a live setup, but you can review the previous setup values. BI requires WLS as a prerequisite.
-
In Oracle Tutorial, right-click BI Reports and select Settings.
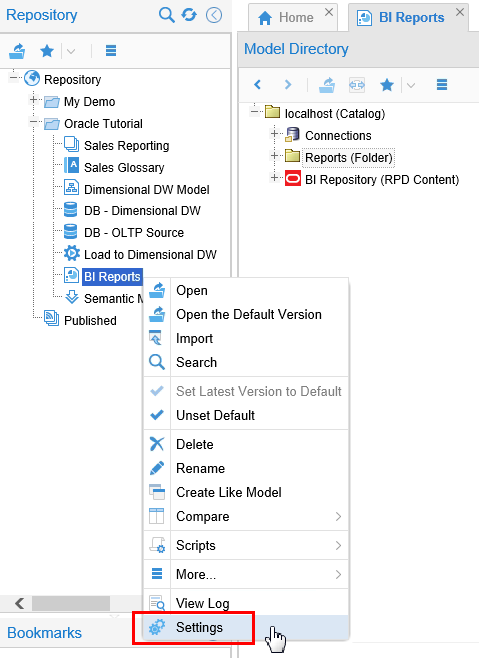
Description of this image -
On the Properties tab, note that the bridge is OBIEE.
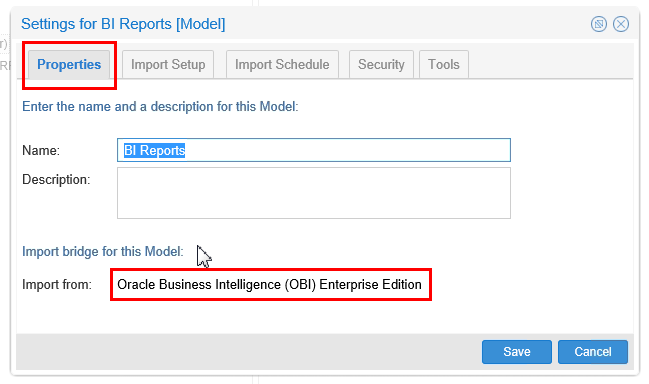
Description of this image -
On the Import Setup tab, review the possible parameters.
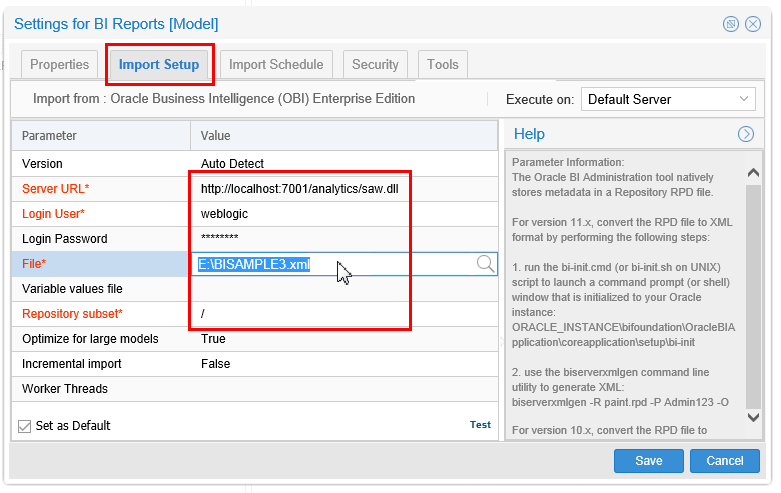
Description of this image Several of the options have browse (
) capability. When you are done, close the BI Reports tab.
If OBIEE was present, you would have been able to create a new model; but since OBIEE is not present, all you could do was review the previous setup parameters.
You have reviewed some of the configuration options for OBIEE.
5. Harvesting from Others
You may have more sources than the ones already shown. Other than the Oracle database, ODI, and OBIEE, OEMM can harvest metadata from many different sources from many different vendors. You will not actually do it in this next section, but you can see the variety of sources that are supported. To get a sampling of possible sources, do the following steps:
5.1 Review the list of Import Bridges
-
In the Repository panel, right-click the
My Demofolder, and select New > Model.
Description of this image You are not going to save anything, so it does not matter what you name it.
-
Review the list of available import bridges, there are about a hundred to choose from!
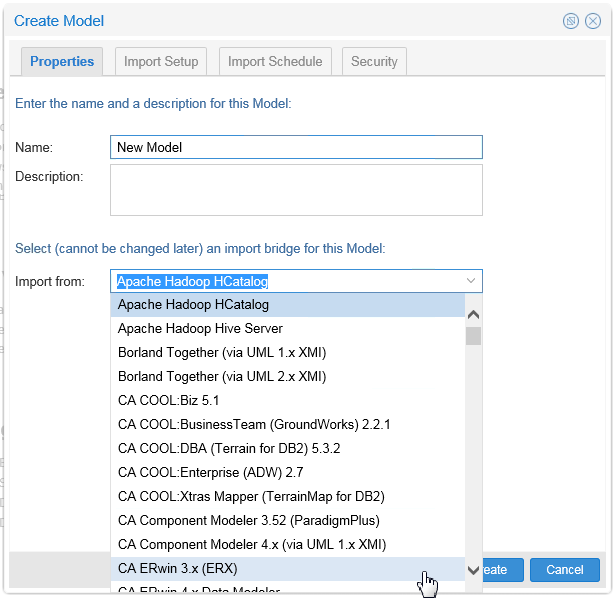
Description of this image Scroll down and pick an import bridge, then examine the respective Import Setup parameters.
-
OBE 6. Data Mapping: Bridging the Gap, when Harvesting Bridges aren't available, demonstrates how to use Microsoft Excel as an import bridge to harvest metadata. The Excel spreadsheet is created manually. If you wish, you may do that OBE to see about harvesting using the Excel import bridge.
OEMM can harvest metadata from many different kinds of integration sources from many different vendors.
In all cases, connectivity to the target application is necessary to get the initial version of the metadata, but is not required on an ongoing basis (unless of course you need ongoing updates, which is most often the case.).
Want to Learn More
Once OEMM is installed, the next step is to make models of the sources of data. Once the models are created, an initial version of metadata is harvested. This can be browsed in the web-based Metadata Manager by drilling down various levels and inspecting the properties.
In this tutorial, you learned to:
- Create and examine models for Oracle Database schemas
- Create and examine models for Oracle Data Integrator projects
- Examine existing models for OBIEE reports
- Examine other possible sources of metadata using import bridges
Resources
Following is a list of conceptual or procedural Help topics relevant to the topic of this tutorial:
- Product marketing information
- Product documentation in PDF format.
- Virtual Machine demo environment on OTN
- Internal (employee) resources:
- MetaIntegration, the owner of the OEM version of this product.
- To learn more about OEMM, refer to additional OBEs in the Oracle Learning Library <can link to a specific set of OBEs on the subject or product(s)>
Credits
- Lead Curriculum Developer: Jayant Mahto
- Other Contributors: Steve Friedberg