Prepare for Activation
Welcome to Oracle—we're glad you're here.
Plan for activation
A little preparation can help avoid delays, duplicate accounts, and unnecessary rework.
Understand the Cloud account
Your Cloud account is your organization's foundation—it’s where enterprise-level identity, security, and account governance are managed.
This is different from the administration of a SaaS application, such as Aconex or Primavera Cloud.
Even experienced SaaS Application Administrators may require support from IT, Identity Domain Administrators, or Cloud Administrators during activation.
Tip: Application Administrators and Cloud Account Administrators are not always the same.
Cloud Account Administrator Role
The Cloud Account Administrator is responsible for key activation decisions, including:
- Determining whether to use an existing Cloud account or create a new one
- Identifying who will administer the account after activation
- Selecting the home region (this choice is critical and cannot be changed later)
- Ensuring alignment with organizational identity and security standards
Because some choices, especially the home region, are permanent, it's important to get them right during activation.
It is also recommended to have more than one person able to administer the Cloud account to ensure continuity and proper account management.
Build your activation team
Activation usually goes more smoothly when the right people are involved from the start. A practical activation team often includes:
- Cloud Account Administrator (or sometimes referred to as the Tenancy Administrator)
- Internal IT, Identity Domain Administrator, or SSO owner
- Procurement or ordering contact, if order details need to be confirmed
Decide before you begin
Activation typically includes confirming the Cloud Account Administrators, choosing a home region, setting initial Cloud administration access, and establishing sign-in and security basics. Because these decisions are specific to your business, we recommend reviewing the details below so your team can make an informed decision when it’s time to activate.
Confirm Administrators
Make sure the correct Administrators are identified before completing activation.
- Identify a primary Cloud Account Administrator
- Assign a backup Administrator
- Ensure Administrators use an individual corporate email address (not a shared account or inbox)
- Confirm who will manage the account after activation
Decide your activation path
As you consider the setup of your Cloud account, Oracle gives you the flexibility to add your subscription to a new or existing Oracle Cloud account.
Review your organization’s Cloud strategy to determine the best approach. We've also put together these considerations for selecting a new or existing Cloud account.
Home region and Cloud account name (if setting up new Cloud account)
If you are creating a new Cloud Account, you will need to define both the account name and Home Region. These decisions are the foundation of your Oracle services and cannot be undone once a selection is made.
Cloud account name (tenancy name):
- Should not include personal or confidential information
- 25 character limit
- Usually represents your organization or tenancy
Home region:
- Cannot be changed after selection
- Is the geographic location where the Cloud account and identity domain are created
- Does not determine where services are provisioned - provisioning will occur in the region specified in the order
Tip: Review these key resources to help make your home region decision
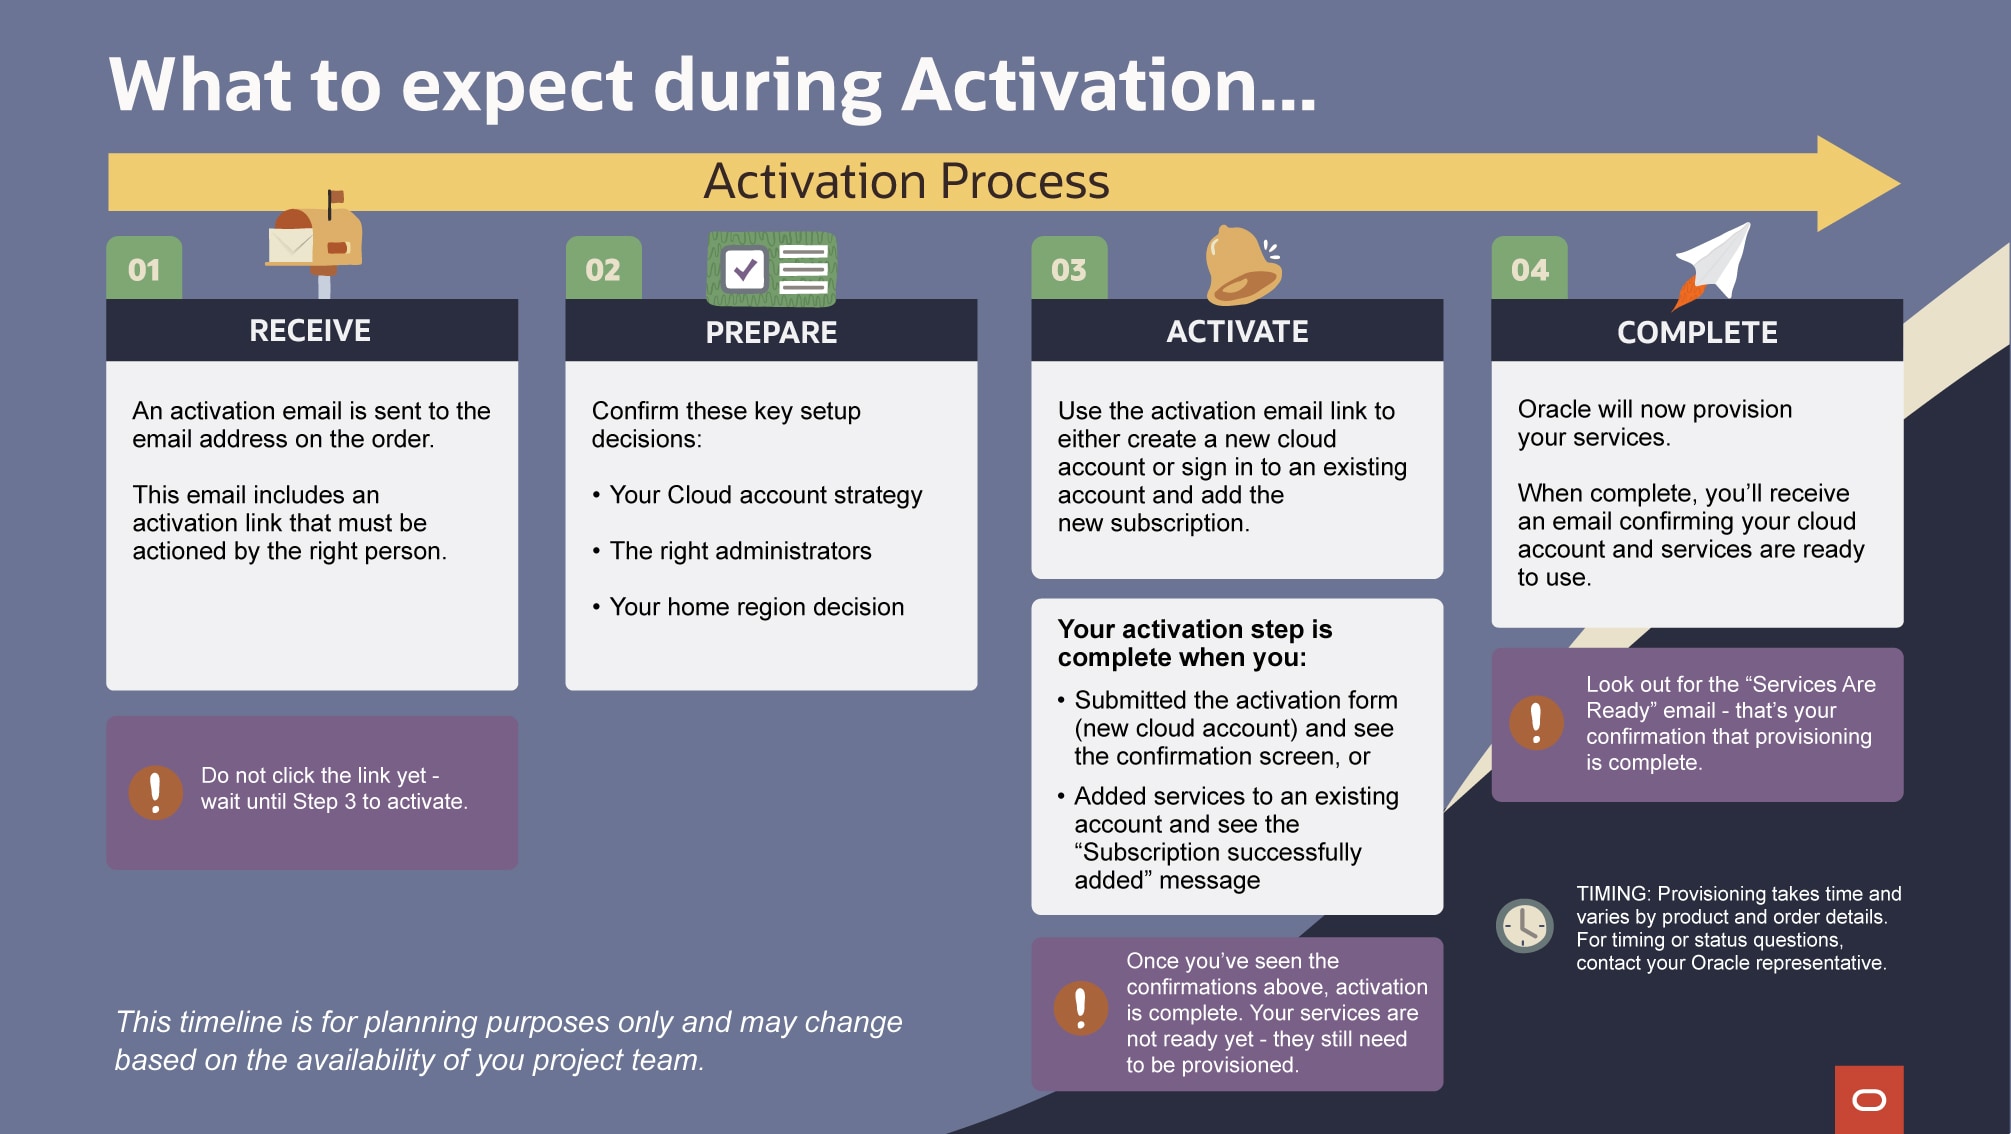
Activate your services
Once planning is complete, you are ready to activate your services.
Always start with the activation email
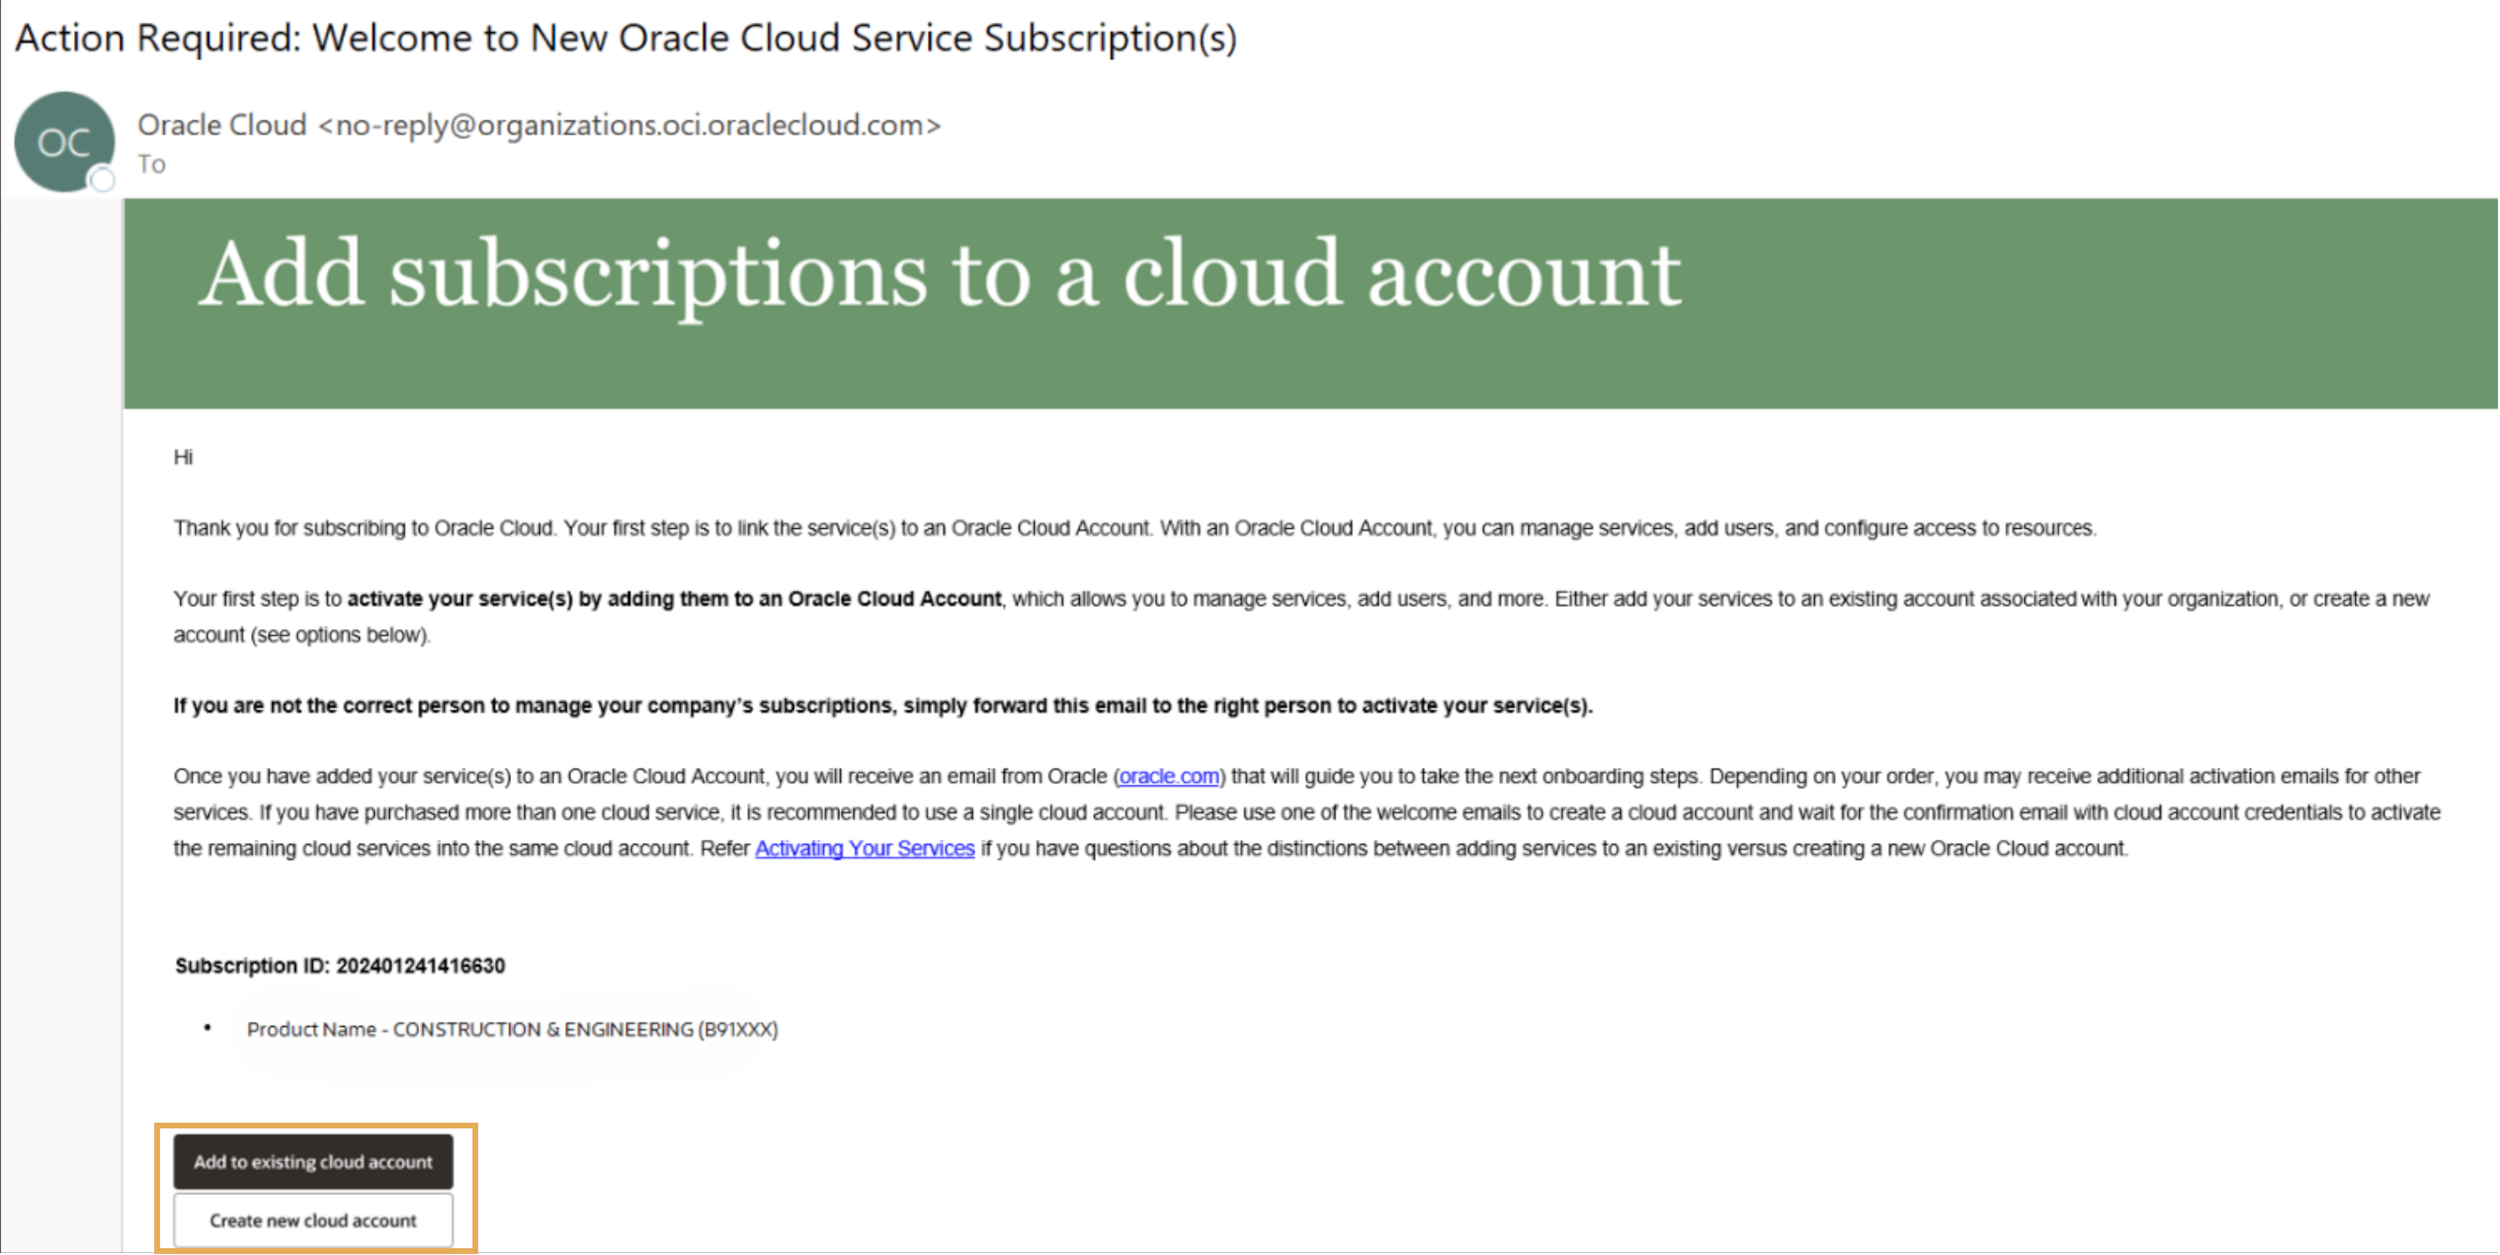
Activating your services always begins with the activation email sent to the contact associated with the order.
Before selecting the activation link:
- Review service details
- Confirm that the correct person is completing activation (this might not be the person who received the email)
Keep these tips in mind for the activation email:
- The email is sent to the person identified as the Cloud Account Administrator at the time of ordering
- The email is sent from no-reply@organizations.oci.oraclecloud.com with the Subject line: Action Required: Welcome to New Oracle Cloud Service Subscription(s).
- Check spam or junk folders if needed
- The email can be forwarded to another trusted person in the organization who is or who will act as the Cloud Account Administrator
- The email contains a unique activation token specific to the product the customer ordered
New Cloud account
To create a new Cloud account:
- Select Create a new cloud account from the activation email
- Important note: You must create the account using the link in your activation email—otherwise, it won't be properly associated with your subscription.
- Complete the activation form:
- Confirm the Cloud Account Administrator
- The form will be pre-populated with the Cloud Account Administrator email from the order. If this is not the right person, overwrite the email address.
- Select the Home Region
- Enter your Cloud Account Name (also known as tenancy name)
- Confirm the Cloud Account Administrator
- Review the information and Terms of Use
- Select Create Cloud Account
Existing Cloud Account
Before you begin:
- Ensure you know your Cloud account/tenancy name
- Ensure you have Administrator access to the associated identity domain
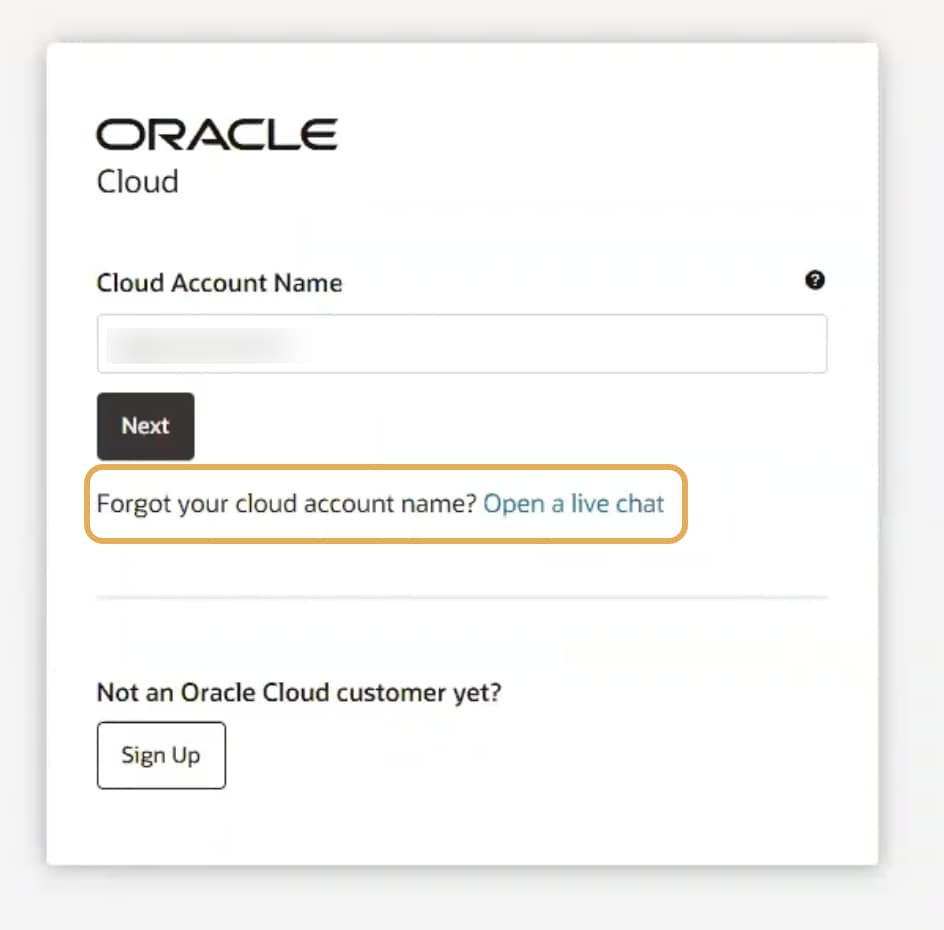
If you have forgotten your Cloud account name, use the Forgot your cloud account name option on the sign-in page.
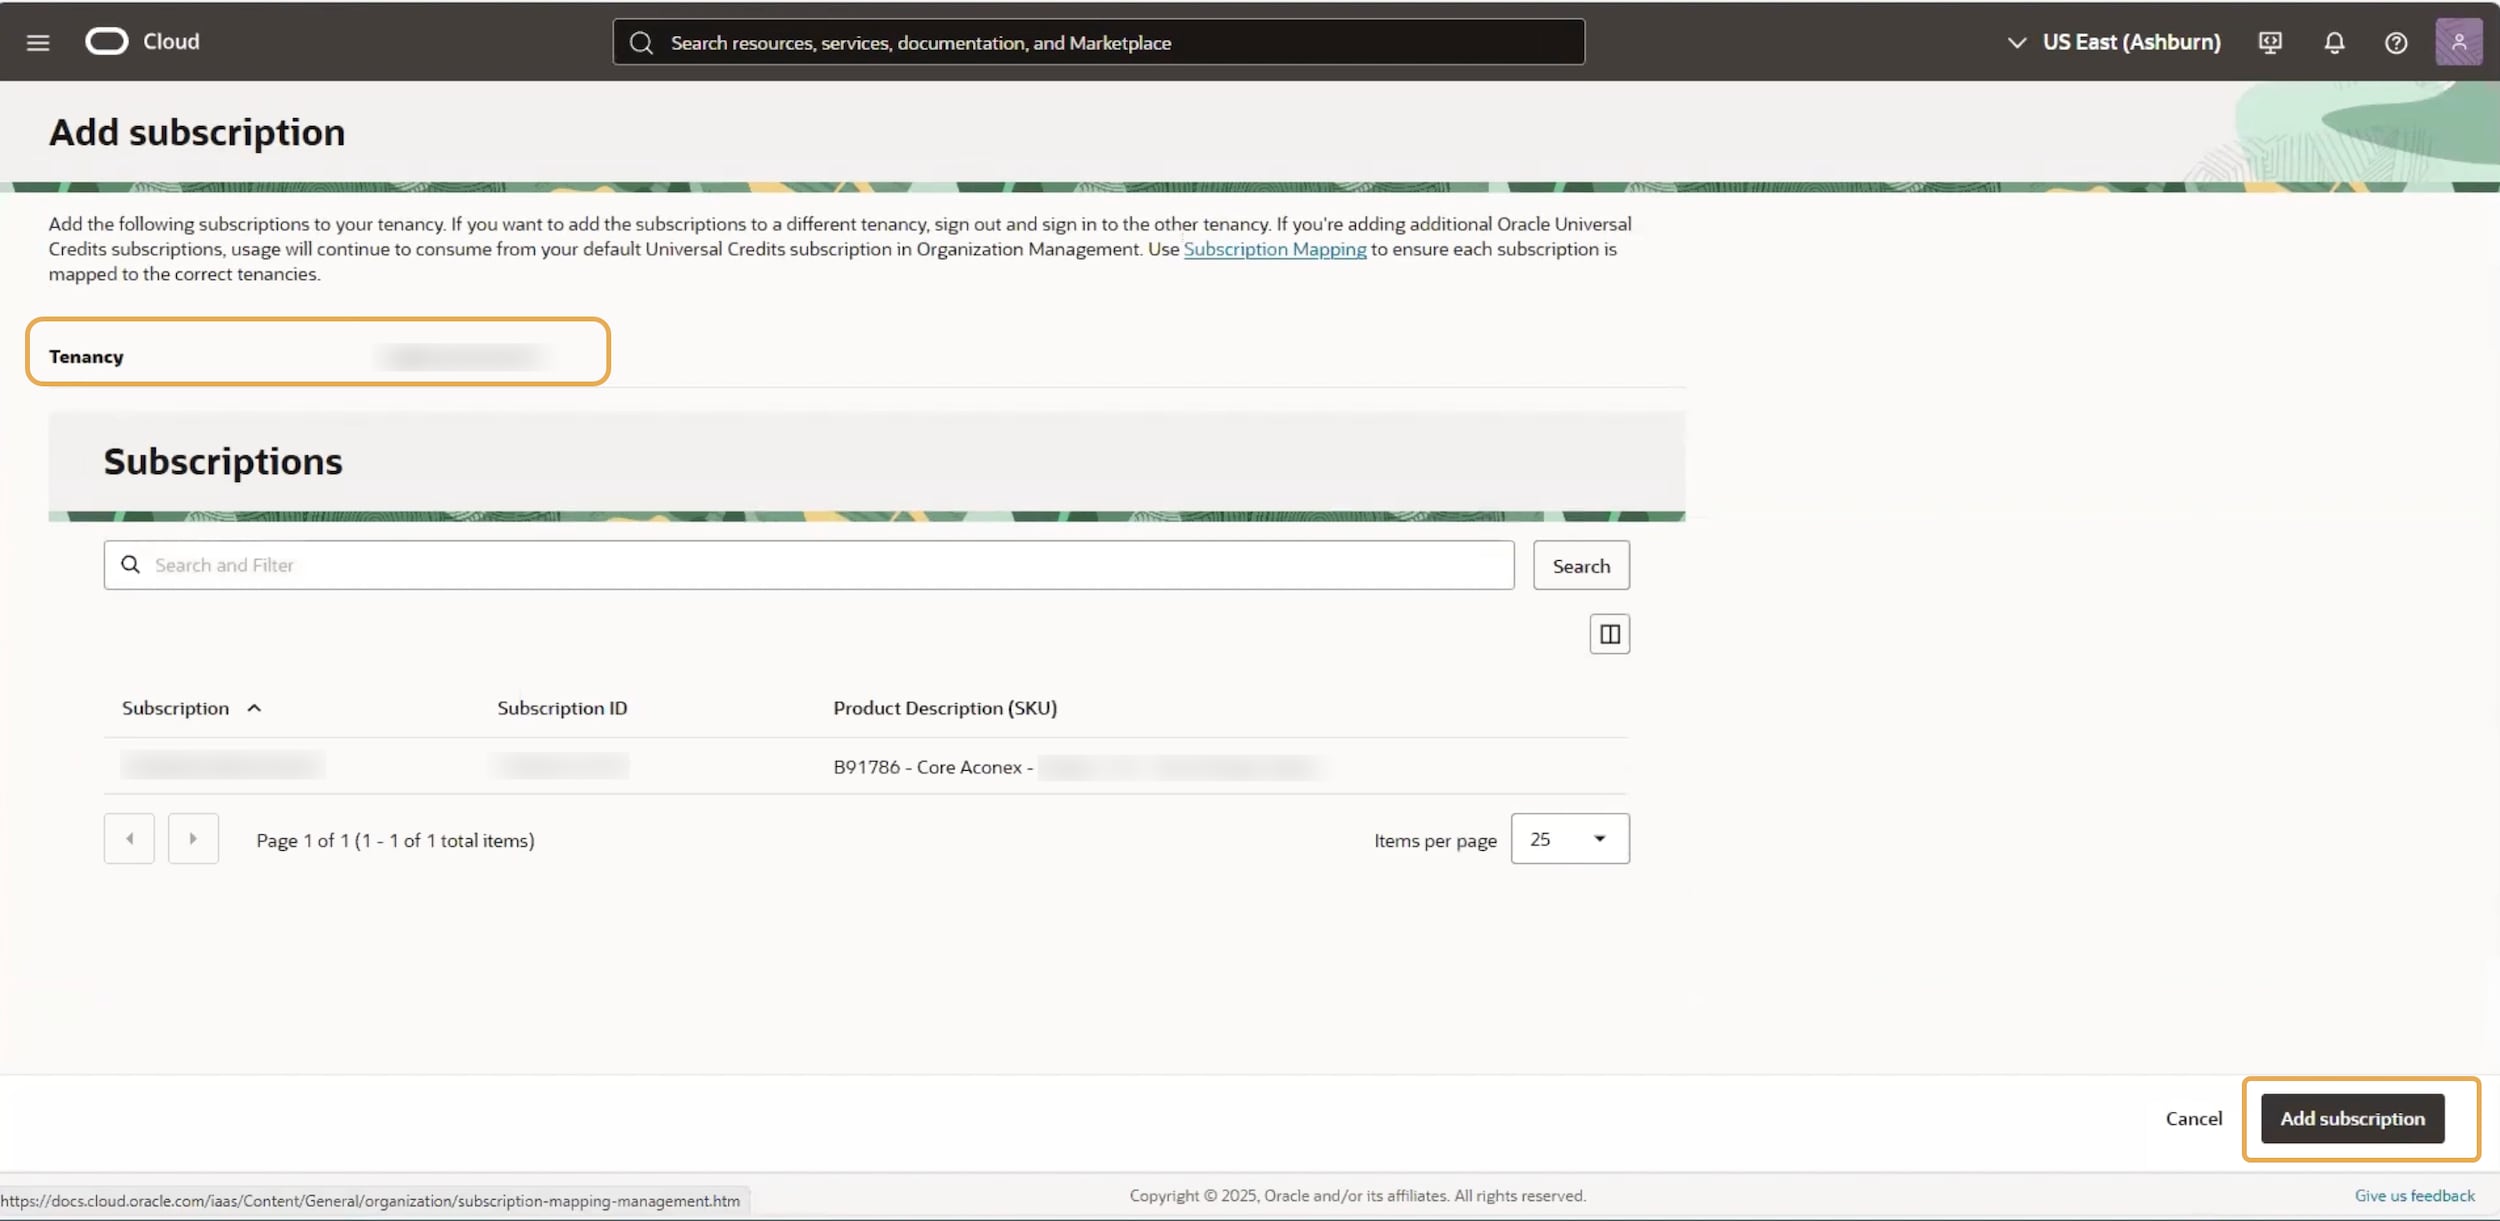
To add services to an existing Cloud account:
- Select Add to existing cloud account from the activation email
- Important note: You must use the link in your activation email—subscriptions can't be added to a Cloud Account from within the account itself.
- Sign in to the Cloud account. Warning! Don't click Sign Up next to Not an Oracle Cloud customer yet?. If you do go down this route, you will create a new and unconnected Oracle Cloud Account.
- Review the subscription details on the Add Subscription page
- Select Add Subscription
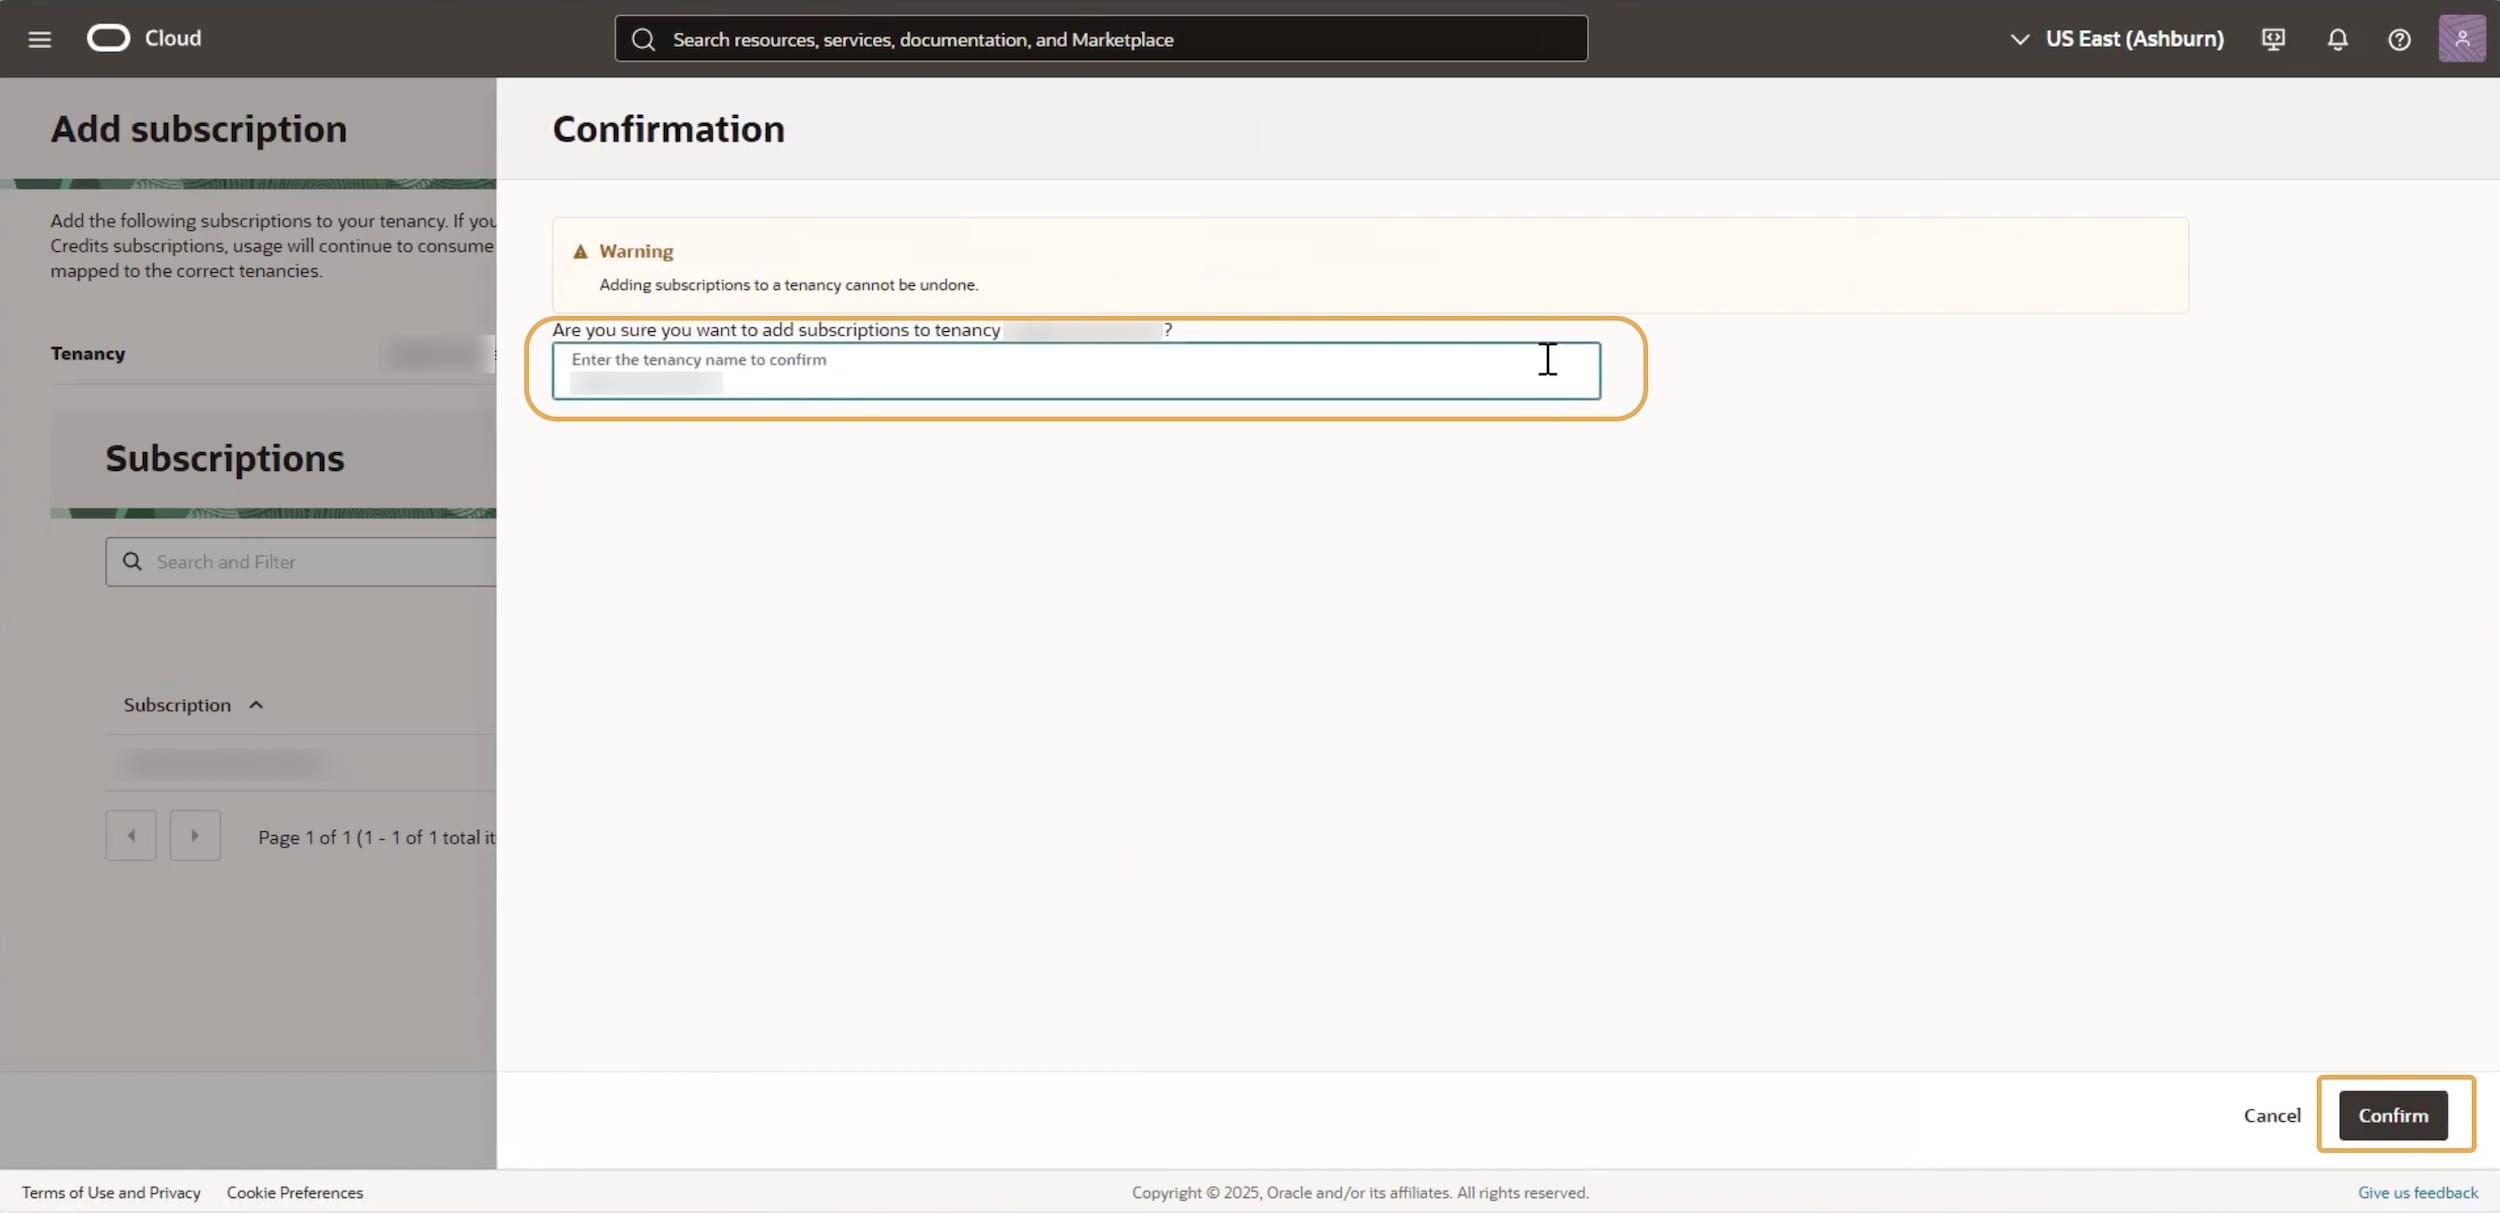
- Confirm the tenancy by entering the tenancy name and selecting Confirm
Complete activation
After you create a new Cloud account or add services to an existing Cloud account, your activation steps are complete and Oracle provisioning begins.
You may see an on-screen confirmation, such as a confirmation screen or a Subscription successfully added message. This means your activation action was submitted successfully. It does not mean your services are ready to use yet.
Provisioning takes time and varies by product and order details. For timing or status questions, contact your Oracle representative.
For your records, save the following details:
- Cloud account name, also called the tenancy name
- Cloud Console URL
- Administrator usernames
- Home region selection and reason for choosing it
Watch for the Services Are Ready email, which confirms that your services are fully provisioned and available.
To learn more, see:
What's next
Continue onboarding your Construction & Engineering products.
Visit the Construction & Engineering Hub, select your product, and follow the onboarding essential steps to get started.