Configuring and Connecting to Oracle Cloud with Oracle Developer Tools for Visual Studio
This page shows you how to create an Oracle Cloud account, set up the Oracle Cloud Infrastructure config file, connect to Oracle Cloud Infrastructure, and view your Oracle Autonomous Database resources in Visual Studio.
1. Create an Oracle Cloud Account
Sign up for Oracle Cloud Free Tier if you don't already have an Oracle Cloud account.
2. Set up the Oracle Cloud Infrastructure Config File
- The following steps help you quickly generate an API key pair and a config file. For more complete instructions including how to generate an encrypted key file, please read the OCI Developer Guide
- Open a web browser and log into your Oracle Cloud account. The cloud console will open.
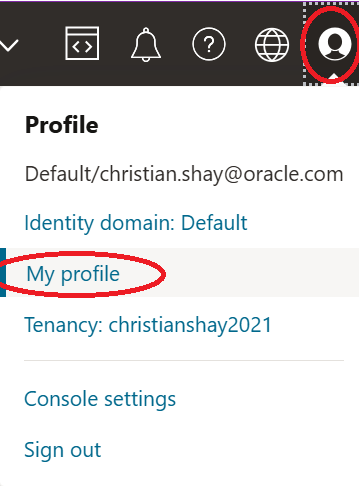
- In the upper right hand corner of the cloud console, click on the profile icon and then click on the My Profile link.
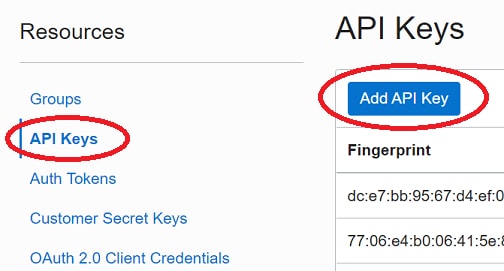
- On the left side of the screen, under Resources, click API Keys.
- Click the Add API Key button
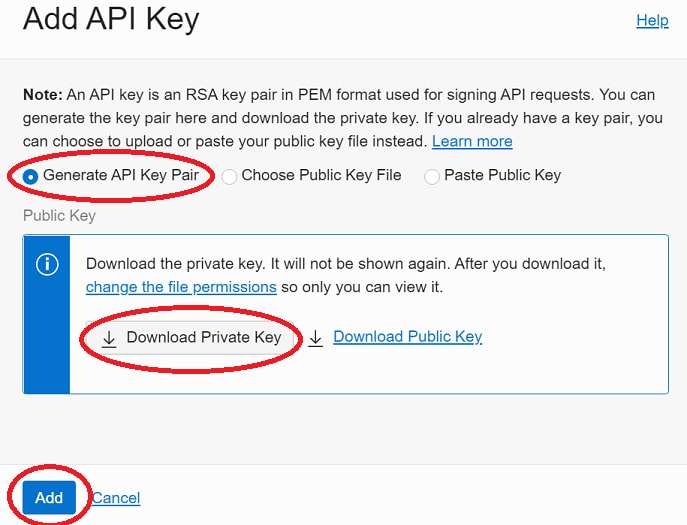
- Select the Generate API Key Pair radio button, click Download Private Key and make a note where you saved the .pem file, then click Add.
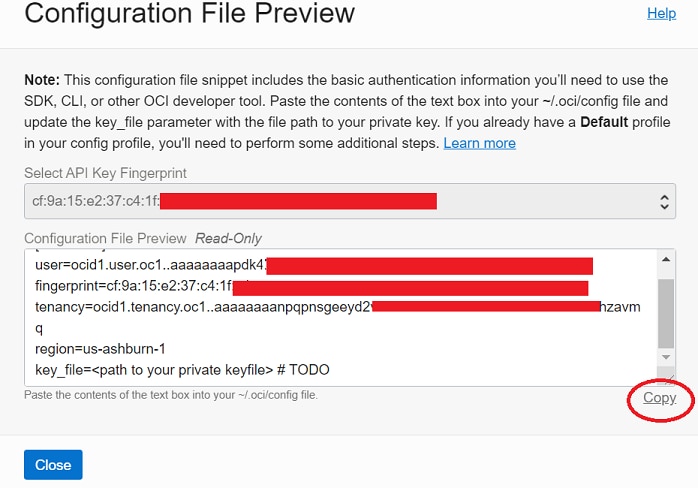
- In the Configuration File Preview, click the Copy link to copy the contents of the dialog to the clipboard. (If the Configuration File Preview has been closed, go to the right of the newly added key, click the three dots and select View Configuration File).
- Paste the contents of the clipboard into a file named config and save it to %HOMEDRIVE%%HOMEPATH%\.oci. (You may need to create the .oci directory. Please note that the file name is config with no file extension).
- Modify the config file to set the key_file entry to the location of the private key (.pem file ) you downloaded earlier.
- Save the config file and close it.
3. Connect to Oracle Cloud Infrastructure in Visual Studio
- Open Visual Studio
- Install the Oracle Developer Tools for Visual Studio extension if it is not already installed.
- Open Server Explorer (from the Visual Studio menu, select View->Server Explorer).
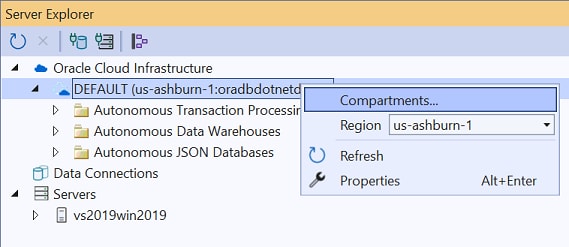
- Right click on the Oracle Cloud Infrastructure node and choose Refresh from the menu.
- If you see the message No OCI account profile found this means that the config file is not in the correct location (or is not named config with no file extension). Other error messages may pop up. For example, the path to the .PEM file referenced by the config file may be incorrect.
- Once your profile is shown, click on the profile node to expand it. You will be prompted for a passphrase. Enter any value (such as a space) and press OK. (The pem file downloaded using the steps above uses no passphrase).
- Right click on the profile node and select Compartments. Change the compartment to the location where your Autonomous Database resources are located.