Technical Article
GlassFish and MySQL, Part 4: Creating a RESTful Web Service and JavaFX Client
By Ed Ort and Carol McDonald,
March 2009
- The Application
- Building the Application
Building the Application
Here's how to build the web application and its RESTful web services. As you build the application and web services, you'll see that a lot of the coding is automatically generated by the NetBeans IDE.
If you haven't already done so, download and install the following:
A lot of the coding for the application is automatically generated by the NetBeans IDE.
- Start the NetBeans IDE.
- Ensure that GlassFish is registered in the NetBeans IDE, as follows:
- Click the Services tab in the NetBeans IDE.
- Expand the Servers node. You should see GlassFish v2 in the list of servers. If not, register GlassFish v2 as follows:
- Right-click the Servers node and select Add Server. This opens an Add Server Instance wizard.
- Select GlassFish v2 in the server list of the wizard and click the Next button.
- Enter the location information for the server and click the Next button.
- Enter the admin name and password and click the Finish button.
- Start the MySQL database as follows:
- Click the Services tab in the NetBeans IDE.
- Expand the Databases node. You should see the MySQL server database in the list of databases, as shown in Figure 7.
Figure 7. MySQL Server Database in the Database List
- Right-click on the MySQL server database and select Properties. This opens the MySQL Server Properties dialog box, as shown in Figure 8.
-
Figure 8. MySQL Server Basic Properties
- In the Basic Properties tab, enter the server host name and port number. The IDE specifies
localhostas the default server host name and3306as the default server port number. - Enter the administrator user name, if not displayed, and the administrator password -- the default administrator password is blank.
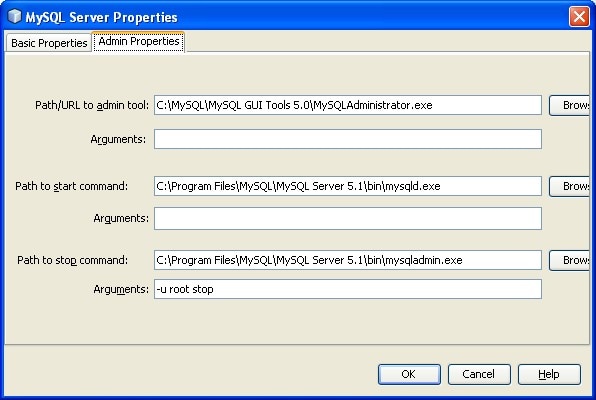
- Click the Admin Properties tab.
- Enter an appropriate path in the Path/URL to admin tool field. You can find the path by browsing to the location of a MySQL Administration application such as the MySQL Admin Tool.
- Enter an appropriate path in the Path to start command. You can find the path by browsing to the location of the MySQL start command. To find the start command, look for
mysqldin thebinfolder of the MySQL installation directory. - Enter an appropriate path in the Path to stop command field. You can find the path by browsing to the location of the MySQL stop command. This is usually the path to
mysqladminin thebinfolder of the MySQL installation directory. If the command ismysqladmin, in the Arguments field, type-u root stopto grant root permissions for stopping the server. The Admin Properties tab should look similar to Figure 9.Figure 9. MySQL Server Administration Properties
- Click the OK button.
- Right-click on the MySQL server database and select Start.
- Create the
petcatalogdatabase as follows:- Right-click on the MySQL server database and select Create Database.
- Enter the database name
petcatalog. This will open a New Database Connection dialog box. Click OK to accept the displayed settings.
- Create the tables in the MySQL petcatalog database as follows:
- Expand the Drivers node. You should see a driver for the
petcatalogdatabase in the list of drivers, as shown in Figure 10.Figure 10. Driver for the
petcatalogDatabase - Right-click the petcatalog driver and select Connect.
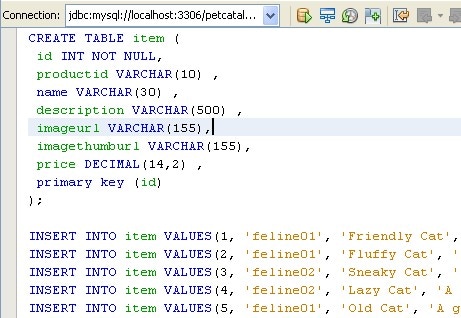
- Right-click the petcatalog driver and select Execute Command. This will open an SQL command window.
- Copy the contents of the catalog.sql file and paste the contents into the SQL editor, as shown in Figure 11.
Figure 11. Creating a Table in the Database
- Click the Run SQL icon
 (Ctrl+Shift+E) in the SQL toolbar above the SQL editor.
You can view the table you just created. Right-click the Tables node below the
petcatalogdatabase in the Services window. You should see theitemtable under the Tables node. You can expand theitemtable node to see the table columns, indexes, and any foreign keys, as shown in Figure 12.Figure 12. An Expanded Table Node
You can view the contents of a table or column by right-clicking the table or column and selecting View Data as shown in Figure 13.
Figure 13. Viewing the Contents of a Table
- Expand the Drivers node. You should see a driver for the
- Create the web application project as follows:
- Select New Project (Ctrl-Shift-N) from the File menu in the NetBeans IDE. This opens the New Project wizard.
- In the New Project wizard, select Java Web from the Categories list and Web Application from the Projects list. Click the Next button. This opens the Name and Location page of the New Project wizard.
- Enter
catalogin the Project name field and a project location in the Project Location field. Check the Set as Main Project checkbox. Click the Next button. This opens the Server and Settings page of the New Project wizard. - Specify GlassFish as the server and select Java EE 5 as the Java EE version. Click the Finish button.
In response, the IDE creates thecatalogproject folder as shown in Figure 14. The project folder contains all the Java source files and project metadata, such as the project's Ant build script. The IDE opens thecatalogproject and opens the welcome page,index.jsp, in the source editor window. You can view the logical structure of the project in the Projects window (Ctrl-1), and the project file structure in the Files window (Ctrl-2) of the IDE.
Figure 14. The
catalogProject and Welcome Page - Add the pet images to the project. Copy the
imagesfolder from thewebdirectory in the completedcatalogapplication to thewebdirectory in the web application that you are building. You should see images in theweb\imagesfolder such as the cat shown in Figure 15. - In the Projects tab, right-click the
catalogproject node for the application and select New. Then select Entity Classes from Database. This opens the New Entity Classes from Database wizard. - Select New Data Source from the Data Source drop-down list. This opens the Create Data Source dialog box.
- In the Create Data Source dialog, enter
jdbc/petcatalogin the JNDI Name field and selectjdbc:mysql://localhost:3306/petcatalogfrom the Database Connection drop-down list. Your entries should look like those in Figure 16. -
Figure 16. Creating a Data Source
- Click the OK button to close the dialog box and display the Database Tables page of the wizard. The
itemtable in thepetcatalogdatabase appears in the Available Tables listbox, as shown in Figure 17.Figure 17. Selecting Tables to Generate Entity Classes
- Click the
itemtable, then the Add button in the Database Tables page. This moves theitemtable in the Available Tables listbox to the Select Tables listbox. Click the Next button. This opens the Entity Classes page of the New Entity Classes from Database wizard. - Enter
modelin the Package field. Make sure that the checkbox labeled Generate Named Query Annotations for Persistent Fields is selected. The Database Tables page should look as shown in Figure 18.Figure 18. Specifying Tables and Entity Classes
- Click the Create Persistence Unit button. This opens the Create Persistence Unit dialog box. Leave the entries as is and click the Create button in the dialog box to create the persistence unit and return to the Database Tables page of the wizard.
- Click the Next button to open the Mapping Options page of the wizard.
- Leave the default values in the Mapping Options page as is and click the Finish button.
In response, the IDE generates an entity class for the
itemtable in thepetcatalogdatabase. You can see this in the Projects tab of the IDE by expanding the Source Packages node for thecatalogproject and then expanding themodelnode. This is shown in Figure 19.Figure 19. New Entities Generated From Database Tables
If you open the generated class, you'll see that the IDE generated the Java code for the class including all the needed annotations.
Generate RESTful web services from the entity class you just created. Another powerful feature of NetBeans IDE 6.5 is that it enables you to quickly create RESTful web services from entity classes. Here's how to generate the RESTful web services:
- In the Projects tab, right-click the catalog project node for the application and select New. Then select RESTful Web Services from Entity Classes. This opens the New RESTful Web Services from Entity Classes wizard. The
Itementity class appears in the Available Entity Classes listbox, as shown in Figure 20.
Another powerful feature of NetBeans IDE 6.5 is that it enables you to quickly create RESTful web services from entity classes.
- Click the OK button to close the dialog box and display the Database Tables page of the wizard. The
-
- Click the
Itementity class, then the Add button in the Entity Classes page. This moves theItementity class in the Available Entity Classes listbox to the Select Entity Classes listbox. Click the Next button. This opens the Generated Classes page of the New RESTful Web Services from Entity Classes wizard as shown in Figure 21.Figure 21. Generated RESTful Web Services Classes
- Leave the default values in the Generated Classes page as is and click the Finish button.
In response, the IDE creates the RESTful web services. The IDE uses the container-item pattern to generate the resource classes. For example, for the
Itementity class, the IDE generates a container resource calledItemsResourceand anitemresource calledItemResource. Also, for each resource class, the IDE generates a converter class, that is,ItemsConverterandItemConverter. Each converter class is used to generate the resource representation (XML or JSON) from the corresponding entity instance.You can see the generated RESTful web services in the Projects tab of the IDE by expanding the Source Packages node for the catalog project and then expanding the RESTful Web Services node. Expand each RESTful web services node to display its HTTP methods and sub-resource locator methods, as shown in Figure 22. The value in the square brackets,
[/items/], for theItemsResourceRESTful web service is the value for the URI template.Figure 22. RESTful Web Services in the catalog Project
You can display the source file for a RESTful web service by double-clicking on its node.
Figure 20. Selecting Entity Classes to Generate RESTful Web Services
Test the RESTful web services using the test facilities of NetBeans IDE 6.5. Here's how to test the RESTful web services:
- In the Projects tab, right-click the catalog project node for the application and select Test RESTful Web Services. This deploys the application to the GlassFish v2.1 server and opens the Test RESTful Web Services page in your default web browser as shown in Figure 23:
NetBeans IDE 6.5 provides a facility to test RESTful web services.
- Click the
-
- Click the
itemsnode in the left side of the page. In response, the browser displays a list of parameters for testing theitemsservice, as shown in Figure 24.Figure 24. Selecting Testing Parameters
You can set the following parameters:
- Choose method to test: Select the method (GET or POST) and MIME type (application/xml or application/json) for the test from a drop-down list.
- Start: Choose the number of the first entity to display. Note that the numbering begins with 0, not 1.
- Max: Specify the maximum number of entities to fetch. If set to 0, all entities are fetched.
- Expand level: Specifies the depth of the hierarchy to display in the Raw View. Some RESTful web services return an infinitely repeating tree hierarchy.
- Query: Specify a query for the test. The query must conform to Java Persistence query language.
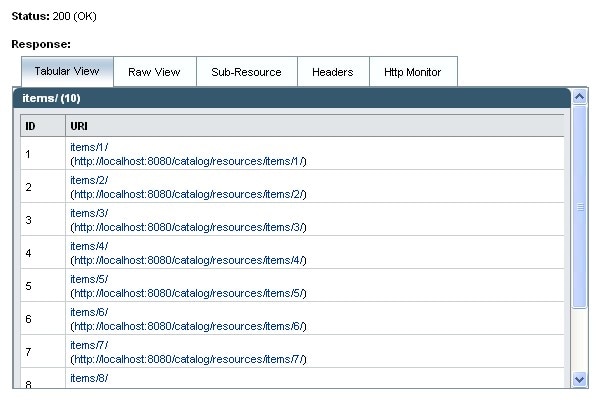
- Leave the default values for the parameters as is and click the Test button. The results are displayed in the Test Output section of the page. See Figure 25.
Figure 25. Test Results
Notice the following tabs in the Test Output section:
- Tabular View displays a flattened view of all the URIs in the resulting document. You can navigate to a specific item by clicking on its URI link.
- Raw View displays the actual data returned. The data displayed is either in XML or JSON format, depending on the MIME type you selected as a test parameter.
- Headers displays the HTTP header information.
- HTTP Monitor displays the HTTP requests and responses sent and received.
For example, Figure 26 shows the raw view of the JSON output returned in the
itemsservice test.Figure 26. Raw View of JSON Output
Figure 23. Testing RESTful Web Services
- Click the

Note that the MySQL Connector/J JDBC Driver, which is necessary for communication between Java platforms and the MySQL database protocol, is included in NetBeans IDE 6.5.
Set the properties of the MySQL server database as follows:
The MySQL Connector/J JDBC Driver, which is necessary for communication between Java platforms and the MySQL database protocol, is included in the NetBeans IDE.


 (Ctrl+Shift+E) in the SQL toolbar above the SQL editor.


Figure 15. An Image of a Cat
Generate entity classes from the database. One of the powerful features of NetBeans IDE 6.5 is that it enables you to quickly create Java Persistence API entity classes from tables in a database. Here's how to generate entity classes from the tables that you created in the MySQL database:
One of the powerful features of NetBeans IDE 6.5 is that it enables you to quickly create Java Persistence API entity classes from tables in a database.


Running the JavaFX Client
Here's how to run the JavaFX client that accesses the RESTful web services for the pet catalog application.
- If you haven't already done so, download and install NetBeans IDE 6.5 for JavaFX 1.1. If you already have NetBeans IDE 6.5 installed, you can add support for the JavaFX platform by installing the JavaFX 1.1 Plugin for NetBeans IDE 6.5.
-
Download and expand the JavaFX Pet Catalog Client (catalogclient) package. You should now see the newly extracted directory as
<install_dir>\catalogclient, where<install_dir>is the directory where you expanded the package. For example, if you extracted the contents toC:\on a Windows machine, then your newly created directory should be atC:\catalogclient. - Start the NetBeans IDE.
- Open the
catalogclientproject as follows:- In NetBeans IDE, click Open Project in the File menu. This opens the Open Project dialog.
- Navigate in the Open Project dialog to the
catalogclientdirectory and click the Open Project button.
In response, the IDE opens the
catalogclientproject. The project folder contains all the JavaFX source files as shown in Figure 27. You can view the logical structure of the project in the Projects window (Ctrl-1), and the project file structure in the Files window (Ctrl-2) of the IDE.Figure 27.
catalogclientSource Files - Configure the client to execute on the desktop, in the browser, or on a mobile device, as follows:
- Right-click on the
catalogclientproject and select Properties. This opens the Project Properties dialog box. Notice that the Main Class field is already set tocatalog.Main. Leave this default setting. - Select Run in the Categories box and click one of the radio buttons under Application Execution Model, as shown in Figure 28.
Figure 28. Application Execution Model Choices
The radio buttons and their meanings are as follows:- Standard Execution. Executes the client on the desktop. This is the default selection.
- Web Start Execution. Executes the client on the desktop using Java Web Start technology.
- Run in Browser. Executes the client as an applet in a web browser.
- Run in Mobile Emulator. Executes the client as a MIDlet in the JavaFX Mobile Emulator. This option is currently available on the Microsoft Windows platform only.
- Right-click on the
- Run the web service client by right-clicking on the
catalogclientproject in the Projects window and selecting Run Project. The NetBeans IDE compiles the web service client. Depending on the Application Execution Model you selected, you should see the UI for the pet catalog application displayed in one of the following ways:


Summary
This article showed you how to use the NetBeans IDE with GlassFish and MySQL to create a RESTful web service that accesses an online catalog of pets. JAX-RS provides a standardized API for Java developers to build RESTful web services. GlassFish supports JAX-RS and its production-ready reference implementation, Jersey. In addition, GlassFish has a built-in persistence manager, the Java Persistence API.
These capabilities, combined with the simplicity of querying and manipulating MySQL databases, make it easy to build a RESTful web service that accesses a MySQL database with data persistence. It also makes it easy to create web applications that access web services. NetBeans IDE 6.5, which integrates MySQL and GlassFish, includes features that make it even easier to build web services and web applications that use web services.
This article also showed you how to use the NetBeans IDE with JavaFX support to run a JavaFX client that accesses a RESTful web service. Java FX is a platform that simplifies the development of RIAs -- web applications that use rich media types such as video, audio, and graphics -- that can run in a wide variety of devices, anywhere from handsets to laptops to desktops. In many cases, you can compile and run the same JavaFX application code in a mobile environment, in a desktop environment, or in a browser.
JavaFX provides a declarative scripting language, JavaFX Script, that makes it easy to program in a visual context. In addition, JavaFX provides a rich set of libraries that makes it easy to include graphics, media, and web services in an application. And you can use any Java library in a JavaFX application. These features allow you to create highly expressive UIs, including those that access web services, quickly and easily. NetBeans IDE with JavaFX support makes it easy to build, preview, and debug JavaFX applications. It also makes it easy to run JavaFX applications on the desktop, in the browser, as well as in a mobile environment.
- The Application
- Building the Application