Build Your Own Oracle Extended RAC Cluster on Oracle VM and Oracle Enterprise Linux
by Jakub Wartak
Updated October 2008
The information in this guide is not validated by Oracle, is not supported by Oracle, and should only be used at your own risk; it is for educational purposes only.
6. Preparing for Oracle Software Installation
Unzip Oracle Database and Oracle Clusterware on rac1 VM:
[root@rac1 ~]#

cd     /u01/install/
[root@rac1 install]#

unzip linux.x64_11gR1_database.zip
[root@rac1 install]#

unzip linux.x64_11gR1_clusterware.zip
Change password for oracle account and setup directories for Database and Clusterware (on both RAC nodes):
[root@rac1 ~]#

passwd oracle
Changing password for user oracle.
New UNIX password:
BAD PASSWORD: it is WAY too short
Retype new UNIX password:
passwd: all authentication tokens updated successfully.
[root@rac1 ~]#

mkdir -p /u01/app/oracle
[root@rac1 ~]#

chown -R oracle:oinstall /u01/app
[root@rac1 ~]#

chmod -R 775 /u01/app
[root@rac1 ~]#
[root@rac1 ~]#

mkdir -p /u01/app/crs
[root@rac1 ~]#

chown -R oracle:oinstall /u01/app/crs
[root@rac1 ~]#

chmod -R 775 /u01/app/crs
Edit oracle's user .bash_profile script on rac1 and rac2 to look similar to the following, but keep in mind that ORACLE_SID must be set individually for each RAC node:
# ~oracle .bash_profile


# Get the aliases and functions
if [ -f ~/.bashrc ]; then
      . ~/.bashrc
fi


alias ls="ls -FA"


# User specific environment and startup programs
export ORACLE_BASE=/u01/app/oracle
export ORACLE_HOME=$ORACLE_BASE/product/11.1.0/db_1
export ORA_CRS_HOME=/u01/app/crs
export ORACLE_PATH=$ORACLE_BASE/common/oracle/sql:.:$ORACLE_HOME/rdbms/admin


# Each RAC node must have a unique ORACLE_SID.

export ORACLE_SID=erac1


export PATH=.:${JAVA_HOME}/bin:${PATH}:$HOME/bin:$ORACLE_HOME/bin
export PATH=${PATH}:/usr/bin:/bin:/usr/bin/X11:/usr/local/bin
export PATH=${PATH}:$ORACLE_BASE/common/oracle/bin
export ORACLE_TERM=xterm
export TNS_ADMIN=$ORACLE_HOME/network/admin
export ORA_NLS10=$ORACLE_HOME/nls/data
export LD_LIBRARY_PATH=$ORACLE_HOME/lib
export LD_LIBRARY_PATH=${LD_LIBRARY_PATH}:$ORACLE_HOME/oracm/lib
export LD_LIBRARY_PATH=${LD_LIBRARY_PATH}:/lib:/usr/lib:/usr/local/lib
export CLASSPATH=$ORACLE_HOME/JRE
export CLASSPATH=${CLASSPATH}:$ORACLE_HOME/jlib
export CLASSPATH=${CLASSPATH}:$ORACLE_HOME/rdbms/jlib
export CLASSPATH=${CLASSPATH}:$ORACLE_HOME/network/jlib
export THREADS_FLAG=native
export TEMP=/tmp
export TMPDIR=/tmp
Set Up Oracle SSH User Equivalence
“User equivalence” is a method of using RSH/SSH that enables the local user account to access all other nodes in the cluster without the need for a password. User equivalence is mainly used by Oracle's installers to perform installation on the rest of the nodes without asking for a password. This command line excerpt illustrates how to quickly set up user equivalence using SSH key-based authentication:
[root@rac1 ~]#

su - oracle
[oracle@rac1 ~]$

mkdir -p ~/.ssh
[oracle@rac1 ~]$

chmod 700 ~/.ssh
[oracle@rac1 ~]$

/usr/bin/ssh-keygen -t rsa
Generating public/private rsa key pair.
Enter file in which to save the key     (/home/oracle/.ssh/id_rsa):

<ENTER>
Enter passphrase (empty for no passphrase):

<ENTER>
Enter same passphrase again:

<ENTER>
Your identification has been saved in /home/oracle/.ssh/id_rsa.
Your public key has been saved in /home/oracle/.ssh/id_rsa.pub.
The key fingerprint is:
cb:a6:d0:4a:cc:39:9d:78:70:24:f7:5b:99:14:7e:53 oracle@rac1
[oracle@rac1 ~]$
[oracle@rac1 ~]$

ssh rac1 cat ~/.ssh/id_rsa.pub >> ~/.ssh/authorized_keys
The authenticity of host 'rac1 (10.99.1.91)' can't be     established.
RSA key fingerprint is 1e:8c:1f:f7:dc:2e:10:75:0f:08:01:13:a8:49:31:0c.
Are you sure you want to continue connecting (yes/no)? yes
Warning: Permanently added 'rac1,10.99.1.91' (RSA) to the     list of known hosts.
oracle@rac1's password:
[oracle@rac1 ~]$

ssh rac2 cat ~/.ssh/id_rsa.pub >> ~/.ssh/authorized_keys
The authenticity of host 'rac2 (10.99.1.92)' can't be established.
RSA key fingerprint is 1e:8c:1f:f7:dc:2e:10:75:0f:08:01:13:a8:49:31:0c.
Are you sure you want to continue connecting (yes/no)? yes
Warning: Permanently added 'rac2,10.99.1.92' (RSA) to the list of known hosts.
oracle@rac2's password:
[oracle@rac1 ~]$

scp .ssh/authorized_keys rac2:.ssh/
oracle@rac2's password:
authorized_keys                                              100%  786         0.8KB/s   00:00
[oracle@rac1 ~]$

chmod 600 ~/.ssh/authorized_keys
You set up your shell to avoid being asked for a key passphrase (also with X11 workstation address for Graphical Installers):
[oracle@rac1 ~]$

exec /usr/bin/ssh-agent $SHELL
[oracle@rac1 ~]$

/usr/bin/ssh-add
Identity added: /home/oracle/.ssh/id_rsa (/home/oracle/.ssh/id_rsa)
[oracle@rac1 ~]$
[oracle@rac1 ~]$

export DISPLAY=10.99.1.1:0
From the same shell session, try to verify if the SSH user equivalence is working as intended:
[oracle@rac1 ~]$

ssh rac1 date
Sat May 10 13:16:43 CEST 2008
[oracle@rac1 ~]$

ssh rac2 date
Sat May 10 13:16:45 CEST 2008
[oracle@rac1 ~]$
On workstation, you must configure the X11 environment to allow remote X11 connections from RAC nodes for graphical installation and configuration utilities:
[vnull@xeno ~]$

xhost +10.99.1.91
10.99.1.91 being added to access control list
[vnull@xeno ~]$

xhost +10.99.1.92
10.99.1.92 being added to access control list
[vnull@xeno ~]$
You should now ensure that you are passing traffic from rac1 and rac2 systems on all firewalls between you and that nodes (typically TCP port 6000).
ASMLib Configuration
ASMLIB is optional, more efficient, mechanism for I/O operations and managing storage. ASMLIB on Linux mainly helps to reduce context switches and thus CPU utilization by bypassing standard UNIX I/O calls and providing it's own kernel part of performing those operations, but main key use in this scenario is to ease device management.
Perform ASMLib configuration on both nodes:
[root@rac1 ~]#

/etc/init.d/oracleasm configure
Configuring the Oracle ASM library driver.


This will configure the on-boot properties of the Oracle ASM library
driver.  The following questions will determine whether the driver is
loaded on boot and what permissions it will have.  The current values
will be shown in brackets ('[]'). Hitting <ENTER> without typing an
answer will keep that current value.  Ctrl-C will abort.


Default user to own the driver interface []:

oracle
Default group to own the driver interface []:

oinstall
Start Oracle ASM library driver on boot (y/n) [n]:

y
Scan for Oracle ASM disks on boot (y/n) [y]:

y
Writing Oracle ASM library driver configuration: done
Initializing the Oracle ASMLib driver:                     [  OK  ]
Scanning the system for Oracle ASMLib disks:               [  OK  ]
[root@rac1 ~]#
Put into ASMLIB management two iSCSI LUNs (perform only on rac1, ):
 [root@rac1 ~]#

/etc/init.d/oracleasm createdisk VOL1ASM1 /dev/iscsi/racdata1.asm1/lun0/part1
Marking disk "VOL1ASM1" as an ASM disk:                    [  OK  ]
[root@rac1 ~]#

/etc/init.d/oracleasm createdisk VOL2ASM1 /dev/iscsi/racdata2.asm1/lun0/part1
Marking disk "VOL2ASM1" as an ASM disk:                    [  OK  ]
[root@rac1 ~]#
[root@rac1 ~]#

/etc/init.d/oracleasm listdisks
VOL1ASM1
VOL2ASM1
[root@rac1 ~]#
Rescan for new ASM disks on rac2:
[root@rac2 ~]#

/etc/init.d/oracleasm scandisks
Scanning the system for Oracle ASMLib disks:               [  OK  ]
[root@rac2 ~]#

/etc/init.d/oracleasm listdisks
VOL1ASM1
VOL2ASM1
[root@rac2 ~]#
7. Oracle Clusterware Installation
Oracle Clusterware is a core component containing the database and related helper applications related for RAC. It allows the DBA to register and invite an Oracle instance (or instances) to the cluster. During routine operation, Oracle Clusterware will send messages (via a special ping operation) to all nodes configured in the cluster, often called the "heartbeat." If the heartbeat fails for any of the nodes, it checks with the Oracle Clusterware configuration files (on the shared disk) to distinguish between a real node failure and a network failure.
After installing Oracle Clusterware, the Oracle Universal Installer (OUI) used to install the Oracle Database software (next section) will automatically recognize these nodes. Like the Oracle Clusterware install you will be performing in this section, the Oracle Database software only needs to be run from one node. The OUI will copy the software packages to all nodes configured in the RAC cluster.
As you want your third location for voting disk to be geographically independent from the main data centers, you must take into account how, and using what storage protocol, your RAC nodes will connect to that third site. You could use a third iSCSI array/server, but in reality buying iSCSI storage for only several megabytes of used storage for voting disk is a waste of money. Fortunately, Oracle Clusterware comes with option to put voting disk on NFS storage, which can be installed on any remote UNIX/Linux server.
Here you will use your management workstation as your NFS third site with voting disk file. (This file is used as whole disk.)
Make NFS export with CRS voting pseudo-diskfile on your workstation:
[root@xeno ~]#

mkdir /votedisk
[root@xeno ~]#

echo '/votedisk  *(rw,sync,all_squash,anonuid=500,anongid=500)' >> /etc/exports
[root@xeno ~]#

service portmap start
Starting portmap:                                          [  OK  ]
[root@xeno ~]#

service nfs start
Starting NFS services:                                     [  OK  ]
Starting NFS quotas:                                       [  OK  ]
Starting NFS daemon:                                       [  OK  ]
Starting NFS mountd:                                       [  OK  ]
[root@xeno ~]#

chkconfig --level 0123456 nfs on
[root@xeno ~]#

chkconfig --level 0123456 portmap on
[root@xeno ~]#

dd if=/dev/zero of=/votedisk/third_votedisk.crs bs=1M count=320
320+0 records in
320+0 records out
335544320 bytes (336 MB) copied, 1.32737 seconds, 253 MB/s
[root@xeno ~]#
On both RAC nodes, perform the following (enter fstab line in single bash command):
[root@rac1 ~]#

echo -e '10.99.1.1:/votedisk\t/votedisk\tnfs\t rw,bg,hard,intr,rsize=32768,wsize=32768,tcp,noac,vers=3,timeo=600\t0\t0' >> /etc/fstab
[root@rac1 ~]#

service portmap start
Starting portmap:                                          [  OK  ]
[root@rac1 ~]#

service nfs start
Starting NFS services:                                     [  OK  ]
Starting NFS quotas:                                       [  OK  ]
Starting NFS daemon:                                       [  OK  ]
Starting NFS mountd:                                       [  OK  ]
[root@rac1 ~]#

chkconfig --level 0123456 nfs on
[root@rac1 ~]#

mkdir /votedisk
[root@rac1 ~]#

mount /votedisk
[root@rac1 ~]#

ls -al /votedisk
total 328024
drwxr-xr-x  2 oracle     dba       4096 May 27 19:36 .
drwxr-xr-x 26 root       root      4096 May 27 20:40 ..
-rw-r--r--  1 oracle     dba  335544320 May 27 19:36     third_votedisk.crs
[root@rac1 ~]#
First, you should review the system for any incompatibilities. To check the whole system for missing libraries, kernel parameters, and so on, Oracle provides a special tool called runcluvfy.sh with Clusterware. (For a more complete explanation, see Section 20 of Jeff Hunter's “Build Your Own Oracle RAC Cluster on Oracle Enterprise Linux and iSCSI.”) First you have to install it:
[root@rac1 clusterware]#

cd /u01/install/clusterware/rpm/
[root@rac1 rpm]# rpm -Uhv cvuqdisk-1.0.1-1.rpm
Preparing...                ########################################### [100%]
   1:cvuqdisk               ########################################### [100%]
[root@rac1 rpm]#
Then you have to transfer it to rac2 node:
[root@rac1 rpm]#

scp cvuqdisk-1.0.1-1.rpm root@10.99.1.92:.
The authenticity of host '10.99.1.92 (10.99.1.92)' can't be  established.
RSA key fingerprint is  1e:8c:1f:f7:dc:2e:10:75:0f:08:01:13:a8:49:31:0c.
Are you sure you want to continue connecting (yes/no)? yes
Warning: Permanently added '10.99.1.92' (RSA) to the list of known hosts.
root@10.99.1.92's password:
cvuqdisk-1.0.1-1.rpm                                         100% 7273     7.1KB/s  00:00
[root@rac1 rpm]#
... and install it on rac2 too:
[root@rac2 ~]#

rpm -Uhv cvuqdisk-1.0.1-1.rpm
Preparing...                    ########################################### [100%]
    1:cvuqdisk                  ########################################### [100%]
[root@rac2 ~]#
Report for pre-Clusterware requirements can be generated using:
[oracle@rac1 clusterware]$

./runcluvfy.sh  stage -pre crsinst -n rac1,rac2 -verbose
Review the report:
Check: Membership of user "oracle" in group "oinstall" [as Primary]
      Node Name         User Exists   Group Exists  User in Group      Primary       Comment
      ----------------  ------------  ------------  ------------       ------------  ------------
      rac2              yes           yes           yes                no            failed
      rac1              yes           yes           yes                no            failed
Result: Membership check for user "oracle" in group     "oinstall" [as Primary] failed.


Administrative privileges check failed.


[..]


Check: Package existence for "glibc-2.5-12"
      Node Name                       Status                          Comment
      ------------------------------  ------------------------------  ----------------
      rac2                                                            failed
      rac1                                                            failed
Result: Package existence check failed for     "glibc-2.5-12".


Check: Package existence for "glibc-2.5-12"
      Node Name                       Status                          Comment
      ------------------------------  ------------------------------  ----------------
      rac2                            glibc-2.5-18                    passed
      rac1                            glibc-2.5-18                    passed
Result: Package existence check passed for "glibc-2.5-12".
You can safely ignore the missing oracle in group oinstall and the first error for “glibc-2.5-12”. Try to fix every notice or error that runclvfy.sh generates or it may later turn into a more serious problem.
The next CVU check to run will verify the hardware and operating system setup.
[oracle@rac1 clusterware]$

./runcluvfy.sh stage -post hwos -n rac1,rac2 -verbose
This time “No errors” should be written.
Finally, run the Clusterware installer:
[oracle@rac1 clusterware]$

export DISPLAY=10.99.1.1:0


[oracle@rac1 clusterware]$

./runInstaller

Figure 33
You will be presented with the Clusterware installer.
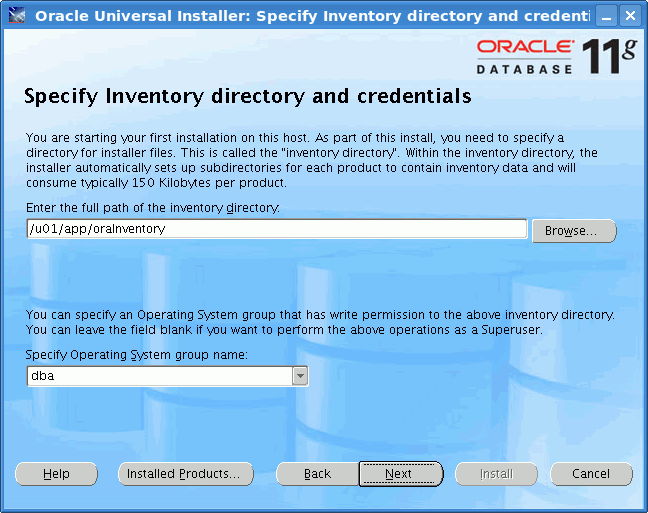
Figure 34
Ensure that you have set /u01/app/oraInventory for the inventory directory.
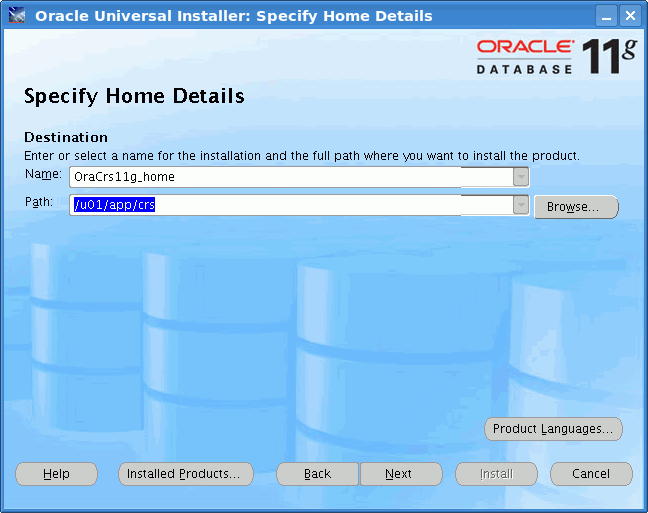
Figure 35
Set /u01/app/crs for Clusterware home. (You are going to separate the CRS install from the Database software install).
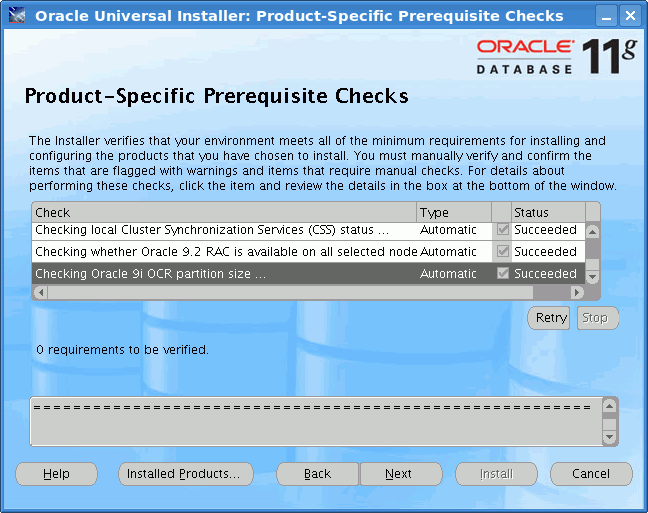
Figure 36
Clusterware will check the system for problems and incompatibilities. All should be OK.
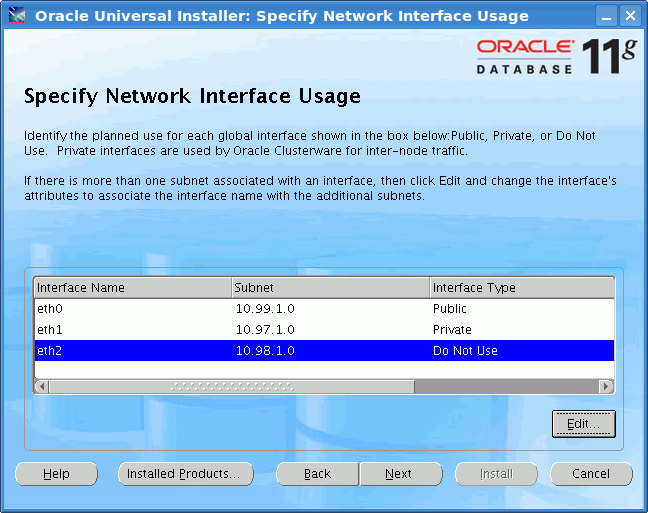
Figure 37
Click on the Edit button and assign the network adapters as follows:
- eth0 should be public
- eth1 should be private (RAC's Cache Fusion/Interconnect)
- eth2 should not be used by CRS (this is our SAN interface for iSCSI)
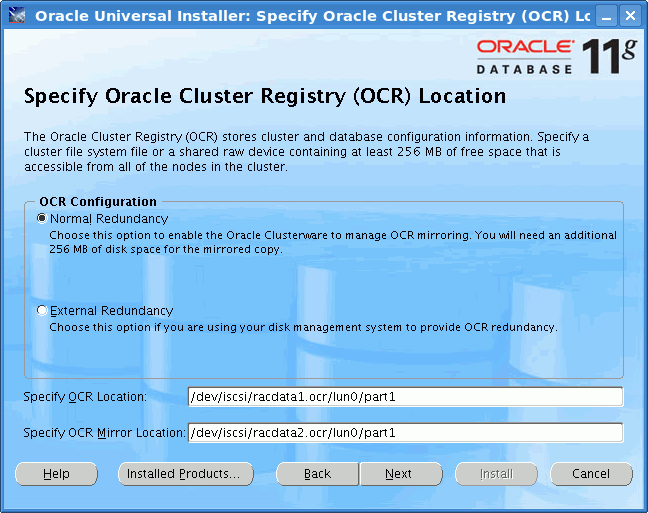
Figure 38
Specify that OCR should be mirrored. You want to mirror it between two iSCSI storage appliances. For the primary OCR location enter /dev/iscsi/racdata1.ocr/lun0/part1. For the backup OCR location enter /dev/iscsi/racdata2.ocr/lun0/part1.

Figure 39
Select “Normal redundancy” for voting disk. You need three voting disks to fulfill the quorum requirements:
- /dev/iscsi/racdata1.voting/lun0/part1
- /dev/iscsi/racdata2.voting/lun0/part1
- /votedisk/voting_disk_file.crs (file on NFS mountpoint on “xeno” workstation)
Note: if you happen to set only one voting disk here, later in this guide I'll show you how to add the remaining voting disks manually.
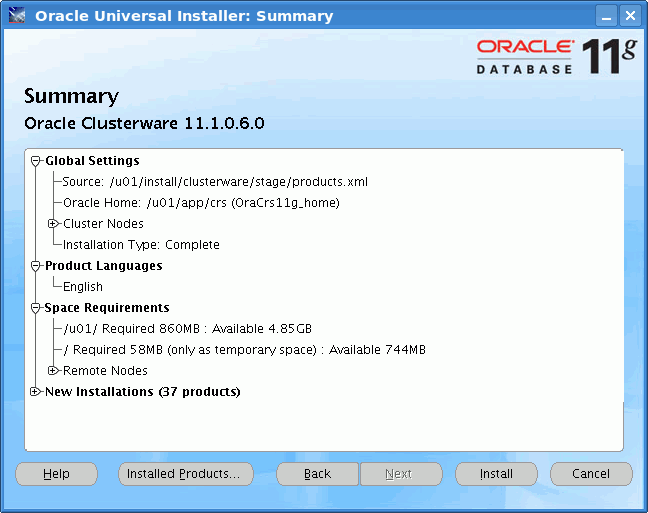
Figure 40
After configuring voting disks a summary window will appear. Review your settings and press Install.
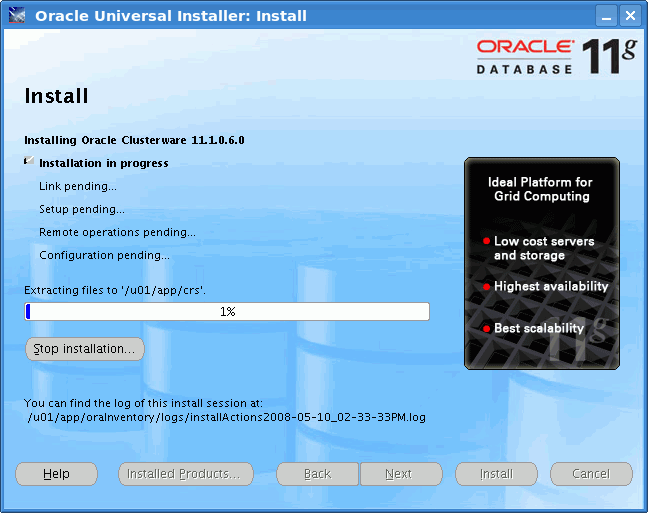
Figure 41
Installation process will take some time.
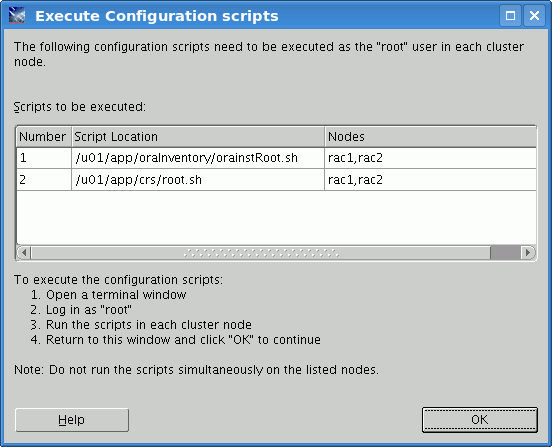
Figure 42
After successful installation you will be prompted to run post-installation finalization scripts.
Verify Clusterware Installation
A successful installation of Clusterware can be checked using several utilities. Here we use crs_stat and crsctl to validate installation:
[oracle@rac1 clusterware]$

$ORA_CRS_HOME/bin/crs_stat -t -v
Name           Type           R/RA   F/FT     Target    State     Host
----------------------------------------------------------------------
ora.rac1.gsd   application    0/5    0/0      ONLINE    ONLINE    rac1
ora.rac1.ons   application    0/3    0/0      ONLINE    ONLINE    rac1
ora.rac1.vip   application    0/0    0/0      ONLINE    ONLINE    rac1
ora.rac2.gsd   application    0/5    0/0      ONLINE    ONLINE    rac2
ora.rac2.ons   application    0/3    0/0      ONLINE    ONLINE    rac2
ora.rac2.vip   application    0/0    0/0      ONLINE    ONLINE    rac2
[oracle@rac1 clusterware]$

$ORA_CRS_HOME/bin/crsctl check crs
Cluster Synchronization Services appears healthy
Cluster Ready Services appears healthy
Event Manager appears healthy
[oracle@rac1 clusterware]$
If everything is online on both nodes you can proceed to Oracle Database 11g installation.
8. Oracle Database Software Installation
First you have to verify your system:
[oracle@rac1 clusterware]$

./runcluvfy.sh stage -pre dbinst -n rac1,rac2 -r 11gR1
You will receive a complaint about glibc (as you did earlier, with Clusterware), but you have a newer version and thus can skip this warning.
Next, unzip the installer:
[root@rac1 ~]#

cd /u01/install/
[root@rac1 install]#

ls
clusterware  linux.x64_11gR1_clusterware.zip  linux.x64_11gR1_database.zip
[root@rac1 install]#

rm -rf clusterware linux.x64_11gR1_clusterware.zip
[root@rac1 install]#

unzip linux.x64_11gR1_database.zip
[root@rac1 install]#

rm linux.x64_11gR1_database.zip
Run it:
[oracle@rac1 ~]$

cd /u01/install/database/


[oracle@rac1 database]$

./runInstaller
Installation windows should appear; select
Custom to choose individual components for your RAC database:
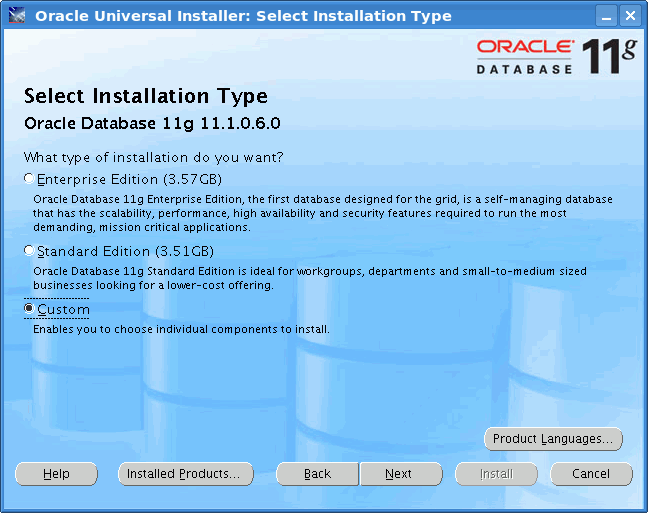
Figure 43
Choose / u01/app/oracle for Oracle base, leave Name and Path in Software Location at defaults.
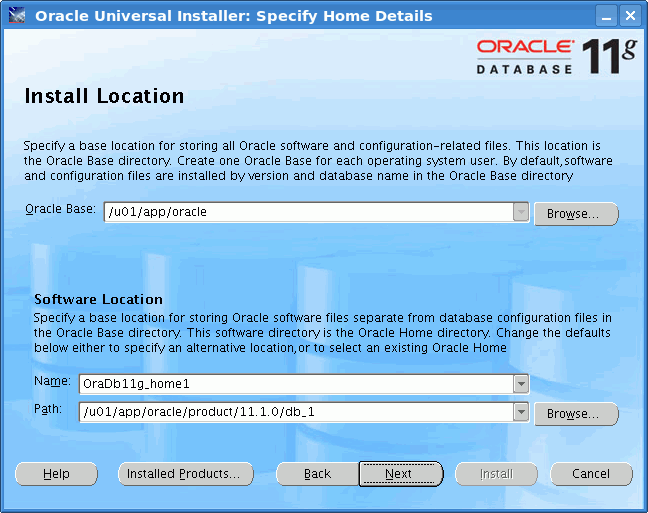
Figure 44
Select Cluster Installation and enable rac1(already marked) and rac2 nodes.
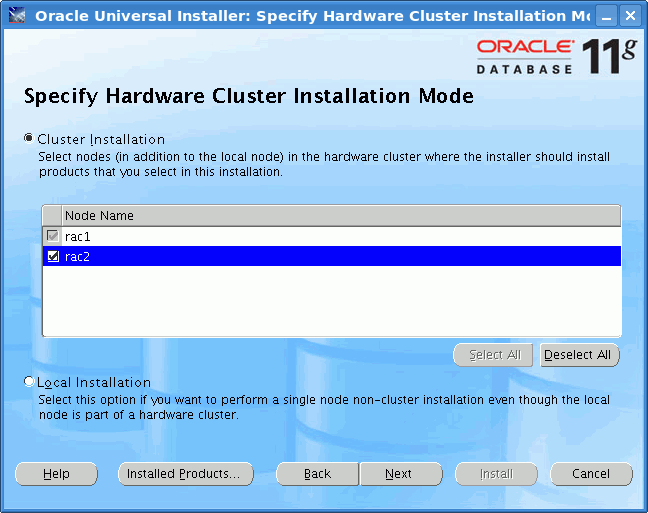
Figure 45
Installer should verify your environment. In your configuration you probably do not have enough swap space, but this hasn't caused any problems, so you can safely “user-verify” this. Also you should ignore the kernel rmem_default parameter notice (it's also OK).
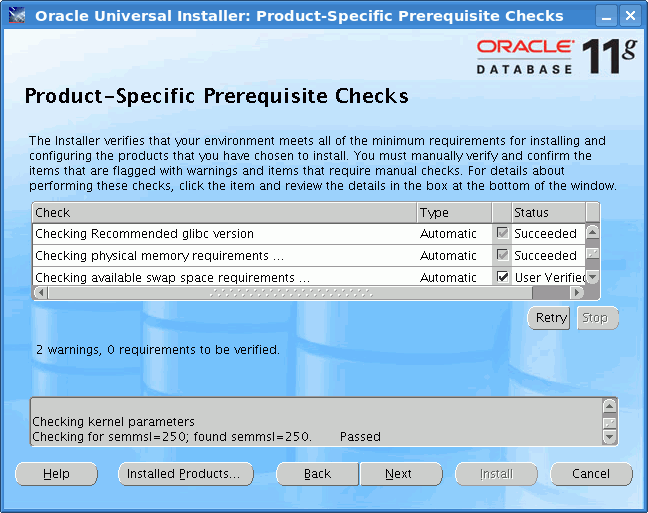
Figure 46
In Product Components choose those components that you will need (fewer components = faster installation process). I've chosen only “Real Application Testing” and “Partitioning” from the Enterprise Edition options.
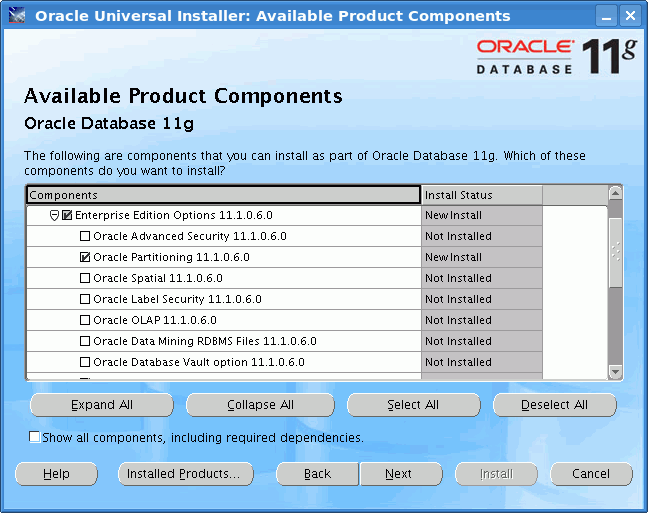
Figure 47
At the Privileged Operating Systems Groups prompt ensure you have selected the “dba” group everywhere. (In serious deployments these groups should be carefully separated for security reasons.)
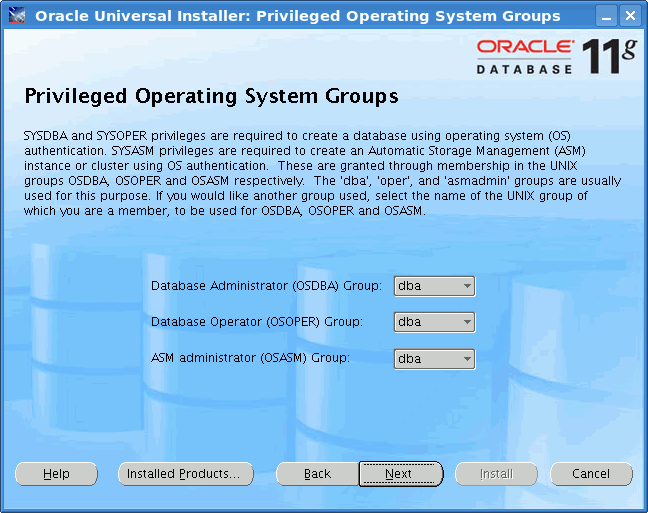
Figure 48
Select Install database software only as you want to create the database later.
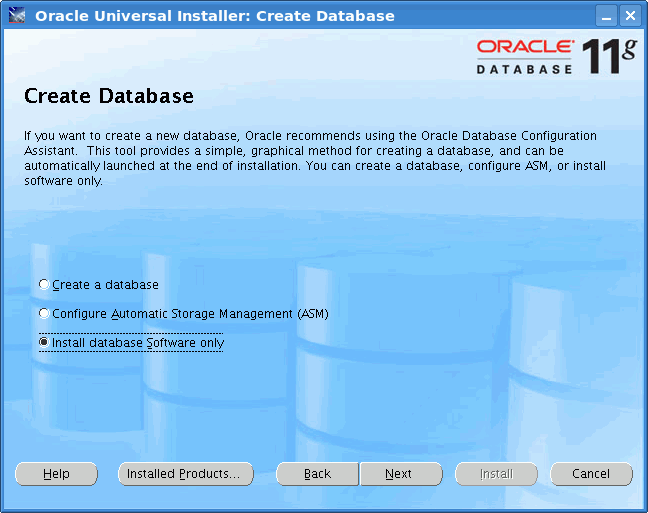
Figure 49
Double-check everything and then click Install.

Figure 50
Installation process will occur. Taking into account that iSCSI and storage optimizations haven't been done yet, it can take up to one hour depending on your hardware.
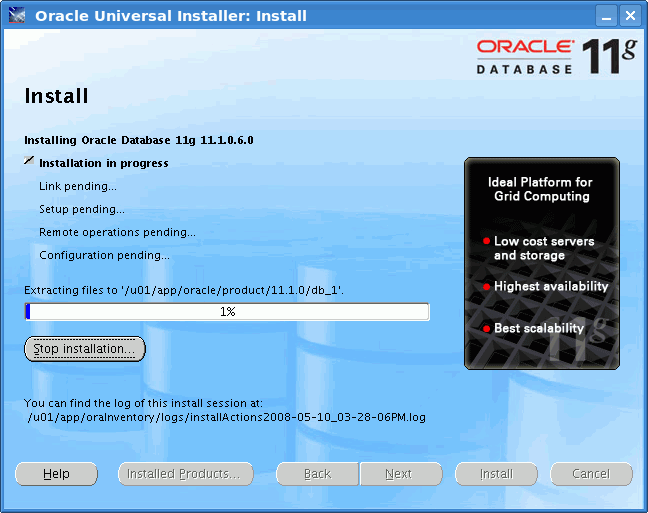
Figure 51
After installation you will be asked to run post-installation scripts on both nodes.
NetCA: Configuring Oracle TNS Services for RAC
Launch netca:
[oracle@rac1 ~]$

cd /u01/app/oracle/product/11.1.0/db_1/bin/
[oracle@rac1 bin]$

./netca
Choose Cluster.
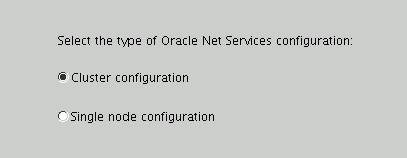
Figure 52
You want to configure Listener.

Figure 53
Select Add.
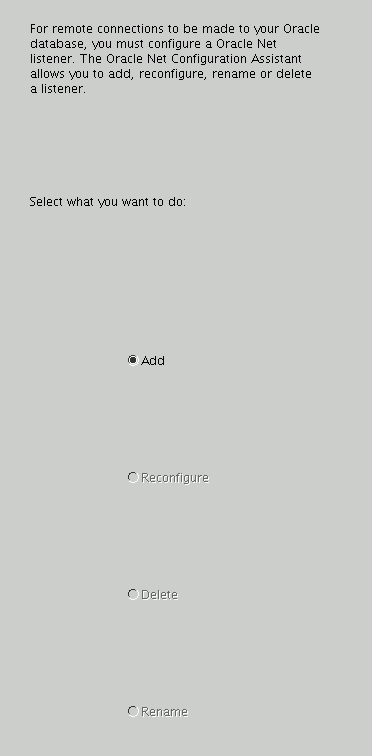
Figure 54
Accept default name (“LISTENER”).
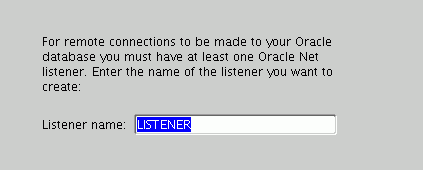
Figure 55
Select “TCP” protocol only.
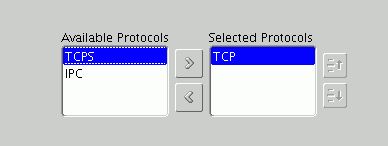
Figure 56
Our listener should be running at Oracle default: TCP port 1521.
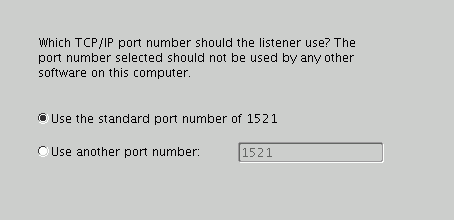
Figure 57
One LISTENER is enough.

Figure 58
Quit.
Now verify that the listener is listening:
[root@rac2 ~]#

ps -ef | grep lsnr | grep -v 'grep' | awk '{print $9}'
LISTENER_RAC2
[root@rac2 ~]#

/u01/app/crs/bin/crs_stat ora.rac2.LISTENER_RAC2.lsnr
NAME=ora.rac2.LISTENER_RAC2.lsnr
TYPE=application
TARGET=ONLINE
STATE=ONLINE on rac2


[root@rac2 ~]#
DBCA: Database Creation
[oracle@rac1 ~]$

cd /u01/app/oracle/product/11.1.0/db_1/bin/
[oracle@rac1 bin]$

./dbca
Choose Real Application Clusters.
Figure 59
Select Create a Database.
Figure 60
Ensure that both nodes are selected.
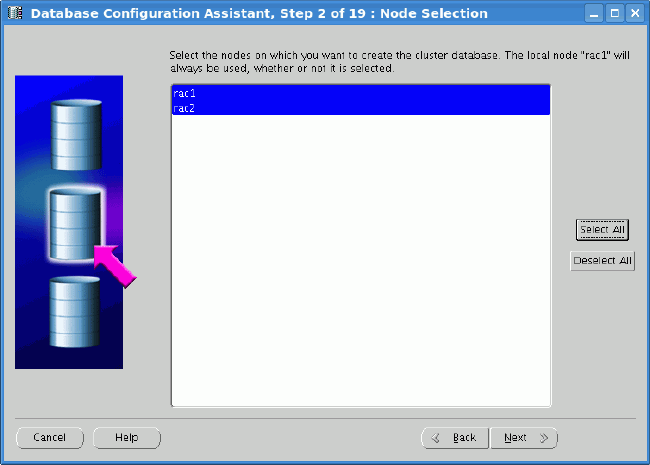
Figure 61
Choose Custom Database to have better flexibility in the database creation process.
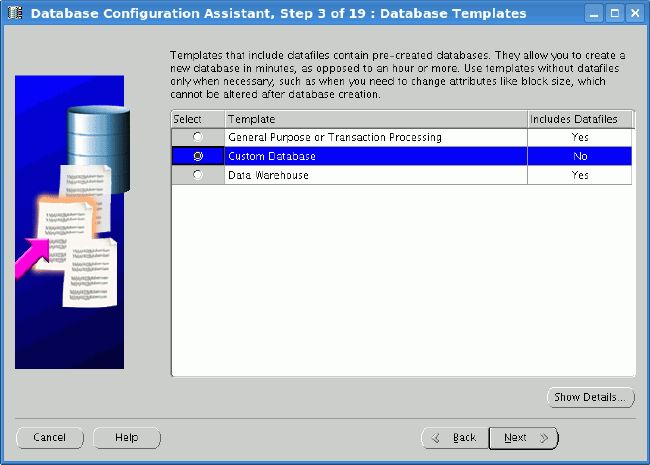
Figure 62
Name your database. For the purpose of this guide call it as “erac.world”. The SID prefix should automatically be set to “erac”. Individual SID are going to be “erac1” .. “eracN”.
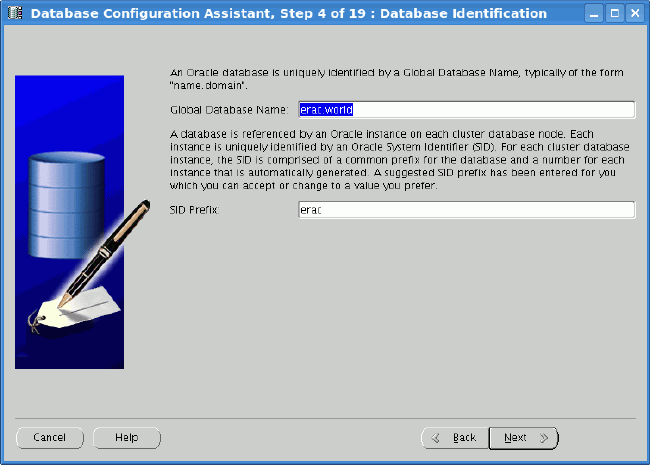
Figure 63
Decide whether you want to install Oracle Enterprise Manager. If yes, configure it appropriately.
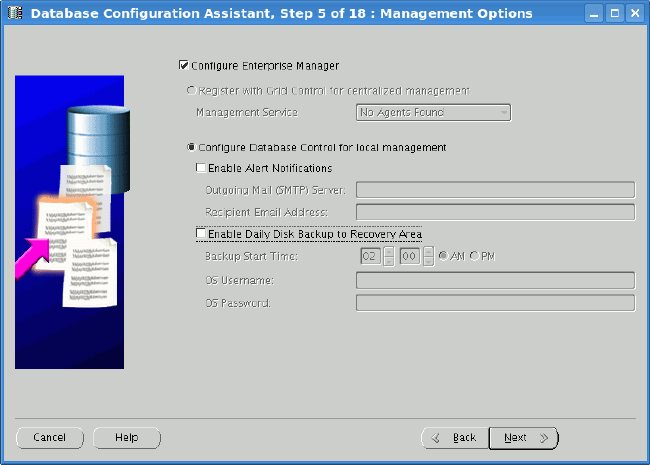
Figure 64
For testing purposes you can select some easy password for all important Oracle accounts.
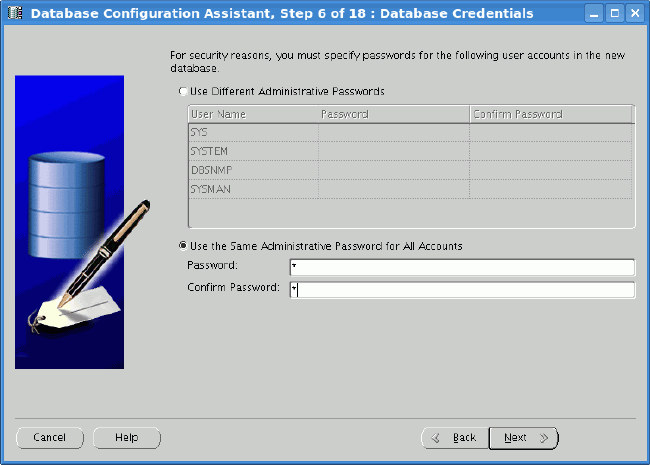
Figure 65
As you want to build an Extended RAC configuration, you must choose ASM as your storage option.
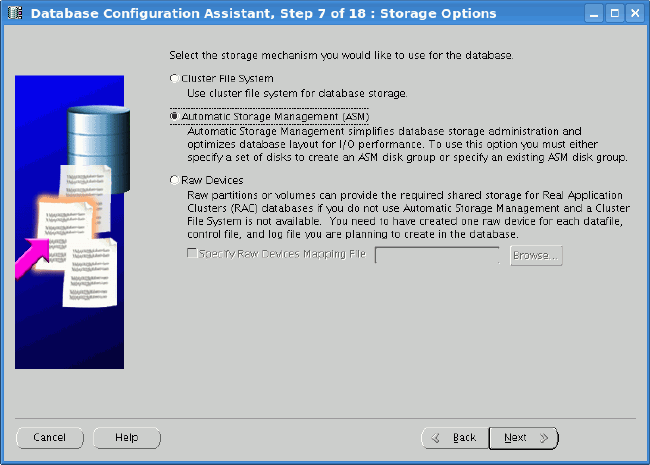
Figure 66
You will use a non-shared PFILE for every ASM instance. You could choose to use a shared SPFILE to have centralized ASM configuration, but then a problem arises: At which storage array should you store this critical file?
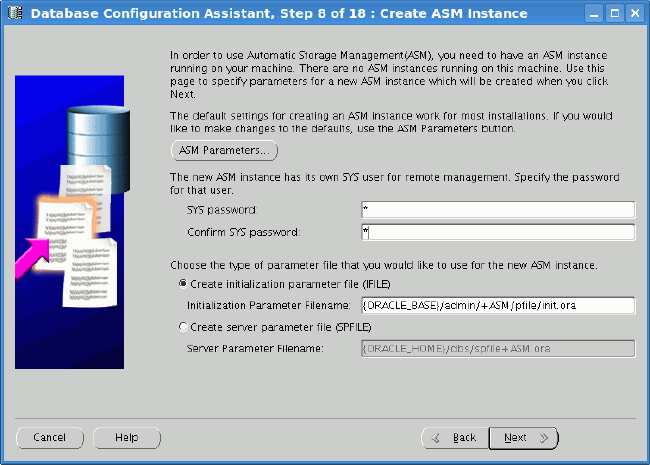
Figure 67
At the Create Diskgroup Window click on Change Disk Discovery Path; a new window should pop up. You have to reconfigure the Disk Discovery Path to find only iSCSI LUNs. Enter “/dev/iscsi/*/*/part1”. This will force ASM to consider only the first partition of every iSCSI LUN.
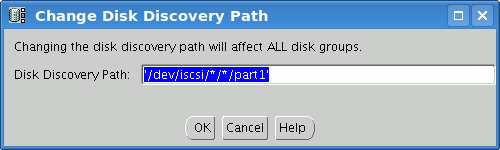
Figure 68
Next create a “DATA1” ASM diskgroup from two iSCSI LUNs from different storage nodes with a NORMAL redundancy (mirroring). As every LUN is on different storage node and you are mirroring between them, you can achieve DISKGROUP with two failgroups. This configuration (as you'll learn later) can lose one entire storage array safely.
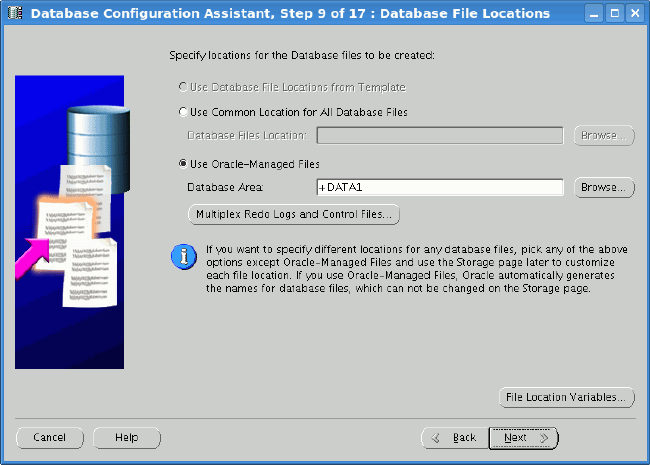
Figure 69
Select Oracle-Managed Files on the new +DATA1 diskgroup.

Figure 70
You can safely disable Flashbacks and Archiving for development purposes.

Figure 71
Disable all database components that you don't need (e.g., Oracle Text, Oracle XML DB). This will significantly shorten database creation time.
At Initialization Parameters you can configure how much memory (total) will be used by this instance. This can be later alter by changing the memory_target parameter. Customize other database parameters to meet yours needs.

Figure 72
There are many new security options in Oracle Database 11g (which are on by default). Accept them all.
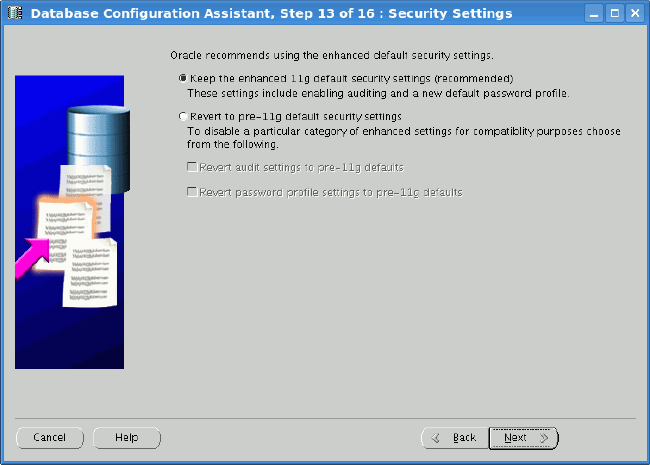
Figure 73
Ensure you have selected Enable automatic maintenance tasks.

Figure 74
At Database Storage you can tune parameters related to REDO logs, controlfiles, and so on. Defaults are appropriate for initial testing.

Figure 75
Select only Create Database; if you'd like you can generate database scripts to speed up creation of a new DB after wiping an old one (e.g. for new experiments).

Figure 76
You will be presented with summary showing which options are going to be installed. The database creation process can be somehow long depending on the options being installed and the storage used. Finally, you will get a quick summary about the created database.
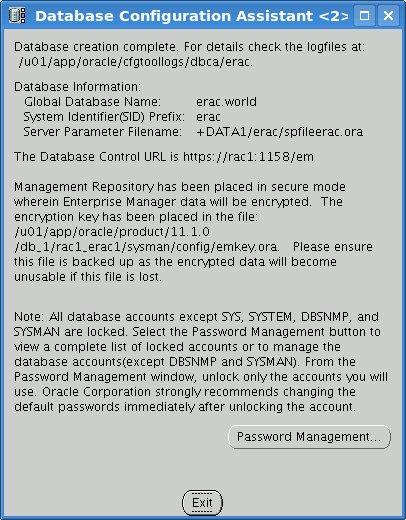
Figure 77
After startup the database will be available through two instances {erac1, erac2}.
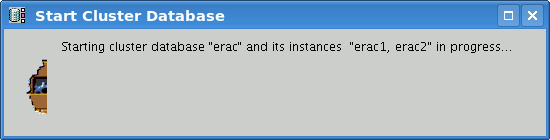
Figure 78
Database Tuning for Extended RAC
Oracle Database 11g delivers two solutions for Extended RAC clusters that are worth mentoring. For more detailed info about Extended RAC with ASM 11g features, please refer to Oracle Automatic Storage Management, Under-the-Hood & Practical Deployment Guide by Nitin Vengurlekar et al (Oracle Press 2008) or the Oracle Storage Administrators Guide.
Preferred reads
Oracle Database 11g provides a new feature called “preferred reads” which enables DBAs to specify a failure group for local reads (typically a failgroup that is geographically closer to the database instance). The preferred reads feature is enabled by setting the ASM_PREFERRED_READ_FAILURE_GROUPS parameter specific to the ASM instance.
First, you have to see what failgroups and diskgroups are available:
[oracle@rac1 ~]$

ORACLE_SID=+ASM1 sqlplus / as sysdba
[..]
SQL>

col inst format 9
SQL>

col path format a36
SQL>

col diskgroup format a8
SQL>

col diskname format a10
SQL>

col failgroup format a10
SQL>

col PR format a2


SQL>

SELECT inst_id inst, path, g.name diskgroup,d.name diskname, failgroup, preferred_read PR


  2

FROM     v$asm_disk d JOIN gv$asm_diskgroup g ON(d.group_number=g.group_number)


  3

WHERE     mount_status='CACHED' ORDER BY 1;


inst PATH                                 DISKGROU DISKNAME   FAILGROUP  PR
---- ------------------------------------ -------- ---------- ---------- --
   1  /dev/iscsi/racdata1.asm1/lun0/part1 DATA1    DATA1_0000 DATA1_0000 U
   1  /dev/iscsi/racdata2.asm1/lun0/part1 DATA1    DATA1_0002 DATA1_0001 U
   2  /dev/iscsi/racdata2.asm1/lun0/part1 DATA1    DATA1_0002 DATA1_0001 U
   2  /dev/iscsi/racdata1.asm1/lun0/part1 DATA1    DATA1_0000 DATA1_0000 U


4 rows selected.


SQL>
“U” in PR column means that the diskgroup has no defined preferred read failure group. Thus, you can point ASM preferred reads to specific failgroups (syntax of ASM_PREFERRED_READ_FAILURE_GROUPS is diskgroup_name.failure_group_name,...'):
SQL>

ALTER SYSTEM SET ASM_PREFERRED_READ_FAILURE_GROUPS='DATA1.DATA1_0000' SID='+ASM1';


System altered.


SQL>

ALTER SYSTEM SET ASM_PREFERRED_READ_FAILURE_GROUPS='DATA1.DATA1_0001' SID='+ASM2';


System altered.


SQL>
On ASM on node erac1 you said that you want to read from DATA1_0000 (iscsi1 with LUNs at /dev/iscsi/racdata1.asm1/lun0/*) and on node erac2 you want to read from failgroup DATA1_0001. You can check that the parameter took effect by querying GV$ASM_DISK from ASM instance:
 SQL>

SELECT path, g.name diskgroup, d.name diskname, failgroup, mode_status


 2 FROM v$asm_disk d JOIN v$asm_diskgroup g ON(d.group_number=g.group_number)


 3 WHERE mount_status='CACHED';


INST PATH                                 DISKGROU DISKNAME   FAILGROUP  PR
---- ------------------------------------ -------- ---------- ---------- --
   1 /dev/iscsi/racdata1.asm1/lun0/part1  DATA1    DATA1_0000 DATA1_0000 N
   1 /dev/iscsi/racdata2.asm1/lun0/part1  DATA1    DATA1_0002 DATA1_0001 Y
   2 /dev/iscsi/racdata2.asm1/lun0/part1  DATA1    DATA1_0002 DATA1_0001 Y
   2 /dev/iscsi/racdata1.asm1/lun0/part1  DATA1    DATA1_0000 DATA1_0000 N


4 rows selected.


SQL>
After generating some read intensive traffic, you can verify that the system is reading from the right storage array by using the following query:
SQL>

SELECT inst_id, failgroup, sum(reads), sum(writes) FROM GV$ASM_DISK GROUP BY inst_id, failgroup;


INST_ID    FAILGROUP  SUM(READS) SUM(WRITES)
---------- ---------- ---------- -----------
     1
     1     DATA1_0000      16976        3778
     1     DATA1_0001       3800        2344
     2
     2     DATA1_0000       2865        2217
     2     DATA1_0001      17401        2217


6 rows selected.


SQL>
You can clearly see that Oracle is preferring reads from failgroup DATA1_0000 for erac1 and DATA1_0001 for erac2.
Note: While setting ASM_PREFERRED_READ_FAILURE_GROUPS on ASM instance without SPFILE but with IFILE (e.g. RAC cluster without clustered file system), remember to make this setting permanent by putting this setting also into the /u01/app/oracle/admin/+ASM/pfile/init.ora file.
Fast Disk Resync
Oracle Database 11g significantly reduces the time need to perform synchronization of failure groups. The main difference between 11g and 10g here is that in 10g failed disks were completely dropped from the diskgroup, while in 11g, Oracle implements a synchronization method that only updates extents that were modified or written. Fast Disk Resync (also called Fast Mirror Resync) requires that the ASM diskgroups should be at 11.1 level compatibility. (For detailed information about how to use Fast Disk Resync, refer to Chapter 4 of the Oracle Database Storage Administrator's Guide 11g Release 1.)
Checking Voting Disks and OCR Mirror for Extended RAC
After installation you should check that everything is OK with your cluster:
 [root@rac1 ~]#

cd /u01/app/crs/bin
[root@rac1 bin]#

./crs_stat -t
Name               Type           Target    State     Host
------------------------------------------------------------
ora.erac.db        application    ONLINE    ONLINE    rac1
ora....c1.inst     application    ONLINE    ONLINE    rac1
ora....c2.inst     application    ONLINE    ONLINE    rac2
ora....SM1.asm     application    ONLINE    ONLINE    rac1
ora....C1.lsnr     application    ONLINE    ONLINE    rac1
ora.rac1.gsd       application    ONLINE    ONLINE    rac1
ora.rac1.ons       application    ONLINE    ONLINE    rac1
ora.rac1.vip       application    ONLINE    ONLINE    rac1
ora....SM2.asm     application    ONLINE    ONLINE    rac2
ora....C2.lsnr     application    ONLINE    ONLINE    rac2
ora.rac2.gsd       application    ONLINE    ONLINE    rac2
ora.rac2.ons       application    ONLINE    ONLINE    rac2
ora.rac2.vip       application    ONLINE    ONLINE    rac2

[root@rac1 bin]#
In 11g you can administer voting disks online. Here you will manually add two of them (iSCSI storage #2 and NFS vote disk) if they were not added during the Clusterware installation phase:
[root@rac1 bin]#

./crsctl query css votedisk
0. 0 /dev/iscsi/racdata1.voting/lun0/part1
Located 1 voting disk(s).
[root@rac1 bin]#

./crsctl add css votedisk /dev/iscsi/racdata2.voting/lun0/part1
Now formatting voting disk: /dev/iscsi/racdata2.voting/lun0/part1.
Successful addition of voting disk /dev/iscsi/racdata2.voting/lun0/part1.
[root@rac1 bin]#

./crsctl add css votedisk /votedisk/third_votedisk.crs
Now formatting voting disk: /votedisk/third_votedisk.crs.
Successful addition of voting disk /votedisk/third_votedisk.crs.

[root@rac1 bin]#
Verify voting disks configuration:
 [root@rac1 bin]#

./crsctl query css votedisk
0. 0     /dev/iscsi/racdata1.voting/lun0/part1
1. 0     /dev/iscsi/racdata2.voting/lun0/part1
2. 0     /votedisk/third_votedisk.crs
Located 3 voting disk(s).

[root@rac1 bin]#

./crsctl check crs
Cluster Synchronization Services appears healthy
Cluster Ready Services appears healthy
Event Manager appears healthy
[root@rac1 bin]#
Oracle Clusterware log (/u01/app/crs/log/rac1/alertrac1.log) should also state something similar to the following:
 2008-05-31 17:07:32.302
[cssd(4506)]CRS-1605:CSSD voting file is online: /dev/iscsi/racdata2.voting/lun0/part1. Details in /u01/app/crs/
log/rac1/cssd/ocssd.log.
[cssd(4506)]CRS-1601:CSSD Reconfiguration complete. Active nodes are rac1 rac2 .
2008-05-31 17:08:07.341
[cssd(4506)]CRS-1605:CSSD voting file is online: /votedisk/third_votedisk.crs. Details in /u01/app/crs/log/rac1/
cssd/ocssd.log.
[cssd(4506)]CRS-1601:CSSD Reconfiguration complete. Active nodes are rac1 rac2.
Also be sure to check that OCR is being protected by OCRmirror:
[root@rac1 bin]#

./ocrcheck
Status of Oracle Cluster Registry is as follows :
               Version                      :          2
               Total space     (kbytes)     :     327188
               Used space     (kbytes)      :       3848
               Available     space (kbytes) :     323340
               ID                           : 2120916034
               Device/File     Name         :     /dev/iscsi/racdata1.ocr/lun0/part1
                                          Device/File integrity check     succeeded
               Device/File     Name         :     /dev/iscsi/racdata2.ocr/lun0/part1
                                          Device/File integrity check     succeeded


Cluster     registry integrity check succeeded


[root@rac1 bin]#
If everything is correct, you can now stress-test the real failover capabilities of Oracle RAC.