 文章
文章
WebLogic 实用技巧 01 — Active GridLink 数据源配置指南
作者:金辉 (Orace)
2015 年 12 月 21 日发布
总体架构
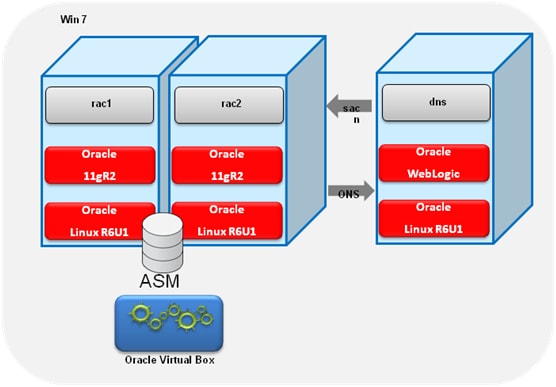
1. 确认环境
由于版本上的差异,DNS 服务器、RAC 数据库环境在配置上略有不同,本文仅作参考,不作为任何技术承诺。
搭建 Oracle 11g RAC;
搭建 DNS 服务器,并配置;
确保使用 WebLogic 11g 或 12c。我使用的是 WebLogic 12c。
2. 搭建Oracle RAC环境
参考《OracleVirtualBox 中 安装 Oracle Linux6.1 和 11gR2(11.0.2.3) RAC》
3. 搭建 DNS 服务器,配置 RAC 的 SCAN
3.1 安装 DNS 服务器包
我的 DNS 服务器主机是 Oracle Linux 6.1 X86—64,安装 bind 包。
rpm -Uvh bind-9.7.3-2.el6.x86_64.rpm

rpm -Uvh bind-chroot-9.7.3-2.el6.x86_64.rpm

rpm -Uvh bind-libs-9.7.3-2.el6.x86_64.rpm

rpm -Uvh bind-utils-9.7.3-2.el6.x86_64.rpm
|
3.2 配置/etc/named.conf
// Provided by Red Hat bind package to configure the ISC BIND named(8) DNS

// server as a caching only nameserver (as a localhost DNS resolver only).

//

// See /usr/share/doc/bind*/sample/ for example named configuration files.

//

options {

listen-on port 53 { 127.0.0.1; 192.168.1.201;};

listen-on-v6 port 53 { ::1; };

directory "/var/named";

dump-file "/var/named/data/cache_dump.db";

statistics-file "/var/named/data/named_stats.txt";

memstatistics-file "/var/named/data/named_mem_stats.txt";

allow-query { localhost; };

recursion yes;

dnssec-enable yes;

dnssec-validation yes;

dnssec-lookaside auto;

/* Path to ISC DLV key */

bindkeys-file "/etc/named.iscdlv.key";

};

logging {

channel default_debug {

file "data/named.run";

severity dynamic;

};

};

zone "." IN {

type hint;

file "named.ca";

};

zone "localdomain." IN {

type master;

file "localdomain.zone";

allow-update { none; };

};

zone "1.168.192.in-addr.arpa." IN {

type master;

file "1.168.192.in-addr.arpa";

allow-update { none; };

};

include "/etc/named.rfc1912.zones";
|
192.168.1.201:是我 DNS 服务器的主机 IP。
1.168.192.in-addr.arpa:是 RAC 的 Public 地址的网段,也是 scan ip 地址的网段
3.3 配置 /var/named/localdomain.zone
$TTL 86400

@ IN SOA localhost root.localhost (

42 ; serial (d. adams)

3H ; refresh

15M ; retry

1W ; expiry

1D ) ; minimum

IN NS localhost

localhost IN A 127.0.0.1

rac1 IN A 192.168.1.111

rac2 IN A 192.168.1.112

rac1-priv IN A 192.168.2.111

rac2-priv IN A 192.168.2.112

rac1-vip IN A 192.168.1.113

rac2-vip IN A 192.168.1.114

ol6-112-scan IN A 192.168.1.115

ol6-112-scan IN A 192.168.1.116

ol6-112-scan IN A 192.168.1.117
|
各地址应与《OracleVirtualBox 中安装 Oracle Linux6.1 和 11gR2(11.0.2.3) RAC》中的配置一致。
3.4 配置 /var/named/1.168.192.in-addr.arpa
$ORIGIN 1.168.192.in-addr.arpa. $TTL 1H @ IN SOA dns.localdomain. root.dns.localdomain. ( 2 3H 1H 1W 1H ) 1.168.192.in-addr.arpa. IN NS dns.localdomain. 101 IN PTR rac1.localdomain. 102 IN PTR rac2.localdomain. 111 IN PTR rac1-vip.localdomain. 112 IN PTR rac2-vip.localdomain. 121 IN PTR ol6-112-scan.localdomain. 122 IN PTR ol6-112-scan.localdomain. 123 IN PTR ol6-112-scan.localdomain. |
dns.localdomain:是我的主机名
3.5 启动 DNS 服务器
# service named start
|
3.6 编辑域名搜索文件 /etc/resolv.conf
# Generated by NetworkManager

search localdomain

nameserver 192.168.1.201
|
192.168.1.201:是我本机地址,也是 DNS 服务器地址
3.7 测试 DNS 中的 SCAN 名
[root@dns named]# ping ol6-112-scan.localdomain PING ol6-112-scan.localdomain (192.168.1.116) 56(84) bytes of data. 64 bytes from 192.168.1.116: icmp_seq=1 ttl=64 time=1.15 ms 64 bytes from 192.168.1.116: icmp_seq=2 ttl=64 time=0.214 ms 64 bytes from 192.168.1.116: icmp_seq=3 ttl=64 time=0.251 ms ^C --- ol6-112-scan.localdomain ping statistics --- 3 packets transmitted, 3 received, 0% packet loss, time 2419ms rtt min/avg/max/mdev = 0.214/0.539/1.153/0.434 ms [root@dns named]# ping ol6-112-scan.localdomain PING ol6-112-scan.localdomain (192.168.1.115) 56(84) bytes of data. 64 bytes from 192.168.1.115: icmp_seq=1 ttl=64 time=0.535 ms 64 bytes from 192.168.1.115: icmp_seq=2 ttl=64 time=0.219 ms 64 bytes from 192.168.1.115: icmp_seq=3 ttl=64 time=0.246 ms ^C --- ol6-112-scan.localdomain ping statistics --- 3 packets transmitted, 3 received, 0% packet loss, time 2211ms rtt min/avg/max/mdev = 0.219/0.333/0.535/0.143 ms [root@dns named]# ping ol6-112-scan.localdomain PING ol6-112-scan.localdomain (192.168.1.117) 56(84) bytes of data. 64 bytes from 192.168.1.117: icmp_seq=1 ttl=64 time=0.500 ms 64 bytes from 192.168.1.117: icmp_seq=2 ttl=64 time=0.253 ms 64 bytes from 192.168.1.117: icmp_seq=3 ttl=64 time=0.232 ms ^C --- ol6-112-scan.localdomain ping statistics --- 3 packets transmitted, 3 received, 0% packet loss, time 2337ms rtt min/avg/max/mdev = 0.232/0.328/0.500/0.122 ms |
[root@dns named]# nslookup ol6-112-scan.localdomain

Server: 192.168.1.201

Address: 192.168.1.201#53

Name: ol6-112-scan.localdomain

Address: 192.168.1.116

Name: ol6-112-scan.localdomain

Address: 192.168.1.117

Name: ol6-112-scan.localdomain

Address: 192.168.1.115
|
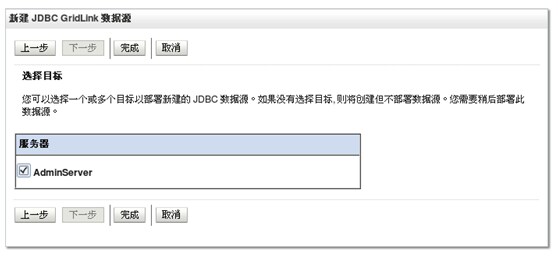
4. 配置 WebLogic 中 GridLink 数据源
4.1 新建 GridLink 数据源
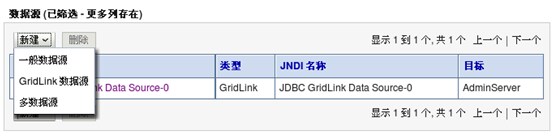
点 GridLink
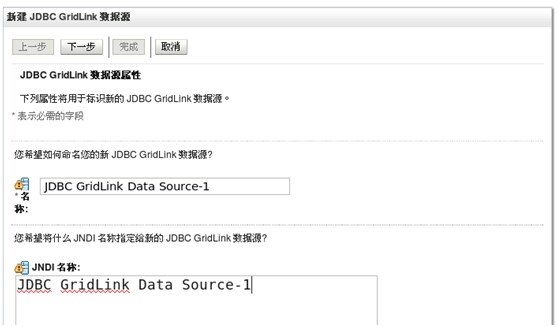
给数据源起个名字,和 JNDI 名


这里如果自己有完整的 URL 串,可以自行输入,我选择“输入单个监听程序信息”
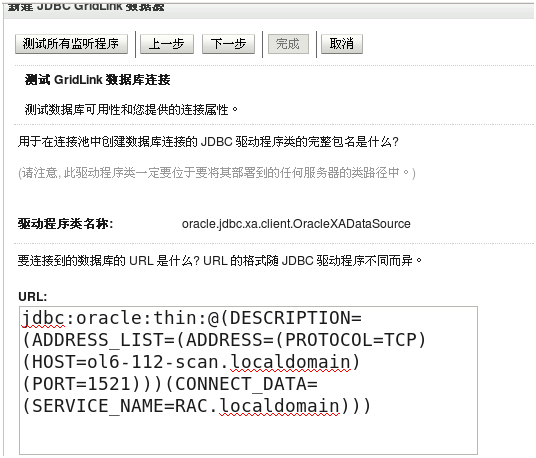
4.1.1 配置以 SCAN 方式寻址的数据库连接
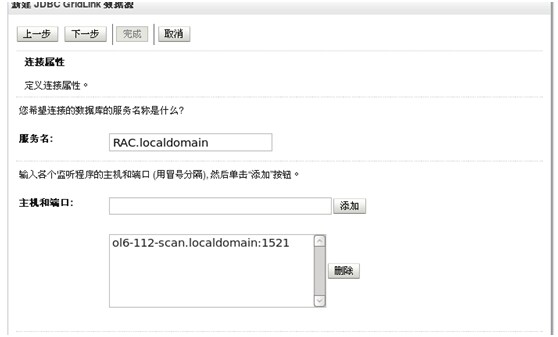
主机输入的是 SCAN 的域名,然后下一步
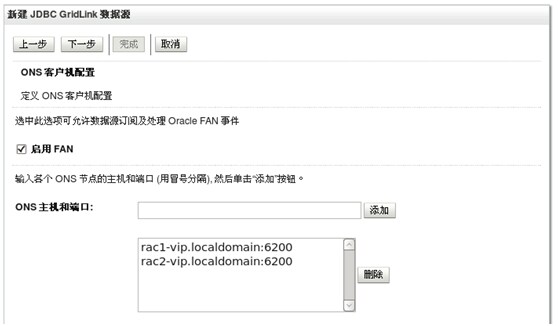
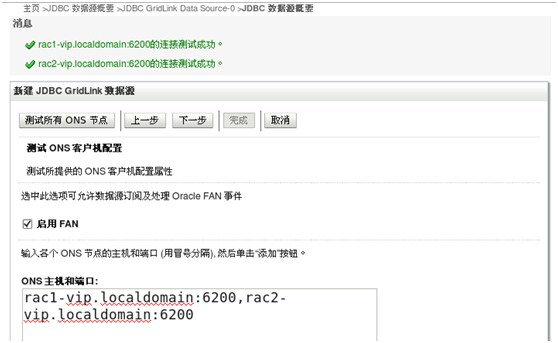
4.1.2 配置以 ONS
配置 ONS,下一步并测试
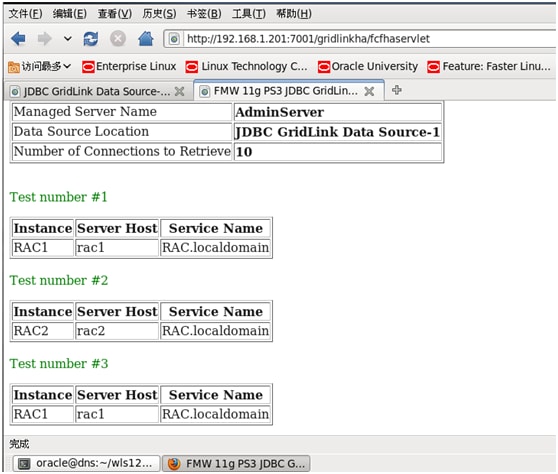
5. 测试 GridLink 数据源
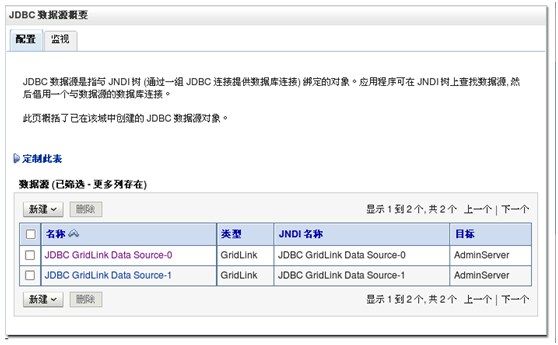
部署一个 gridlinkha 的应用,连接 JNDI 为 JDBC GridLink Data Source-1,10 次。
关于作者
 | 金辉,在 Oracle 负责云和中间件产品的资深售前顾问和团队经理,有十多年的中间件和项目管理经验,专注在企业云构建,企业集成解决方案领域,熟悉业内主要的 SOA 集成产品。参加过北京马拉松和 TNF50 越野比赛。你可以通过邮件 arthur.jin@oracle.com 与他联系。 |