 文章
身份和安全性
文章
身份和安全性
Oracle 身份云服务
深入剖析系列:多租户供应、使用自定义应用模板实现 FedSSO 和即时供应
作者:Ricardo Gutierrez
2017 年 3 月
概述
Oracle 身份云服务 (IDCS) 是 Oracle 公有云 (OPC) 中提供的一种身份即服务 (IDaaS) 解决方案。其设计初衷是为了扩展企业控制,自动化 PaaS 和 SaaS 帐户供应和取消供应,通过提供与企业身份存储和身份验证服务的无缝集成来简化用户的云应用访问体验,并通过明确报告云应用的使用情况来促进合规性活动。
IDCS 基于微服务、多租户架构,包括在自己的进程上运行并公开 RESTful 服务端点的小服务。微服务可以根据其在整个组件中的角色独立地进行扩展。由于微服务仅限于特定功能,因此更易于理解、集成和维护。
IDCS 遵循云设计原则(可扩展性、灵活性、弹性、易于部署、功能敏捷性、技术采用和组织协调性),利用基于标准的 HTTP 协议执行身份验证 (OpenID Connect 1.0)、粗粒度的授权 (OAuth 2.0)、身份联合 (SAML 2.0) 和用户/角色配置文件 (SCIM)。通过利用 HTTP-only 协议,IDCS 确保了身份服务与使用者之间的恰当隔离,这样,OPC 服务和基础设施就无需感知身份服务的物理位置和内部特征。
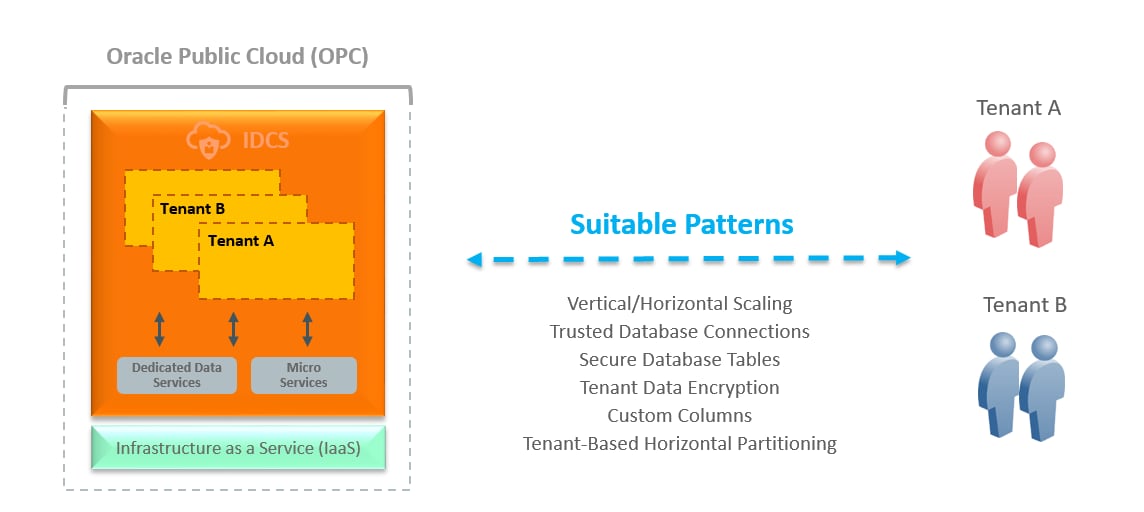
图 1.IDCS 架构概念设计
在混合环境中与 Oracle Identity Manager 集成
Oracle Identity Manager (OIM) 是一种用于跨业务应用和平台管理帐户和访问权限的内部部署解决方案。它可以在混合环境(内部部署和云)中与 IDCS 轻松集成,作为一种可行的云采用途径。IDCS 与 OIM 之间固有的协同具有以下几个优点:
- 在内部部署环境和云环境中进行控制、管理和洞察。
- 一组全面的身份管理功能(通过利用内部部署和云体系的组合)。
- 客户能够将身份管理负载顺利地迁移到云端。
- 双模式身份管理功能,有助于推进双模式 IT。
集成的一个重要组件是用于 IDCS 的 OIM 连接器(即 IDCS 连接器),它为身份数据管理提供供应和协调功能。使用 Oracle Identity Governance Suite(其中 OIM 是主要组件)可以进一步增强这种集成,为内部部署应用和云应用增加认证、职责分离等身份治理功能。
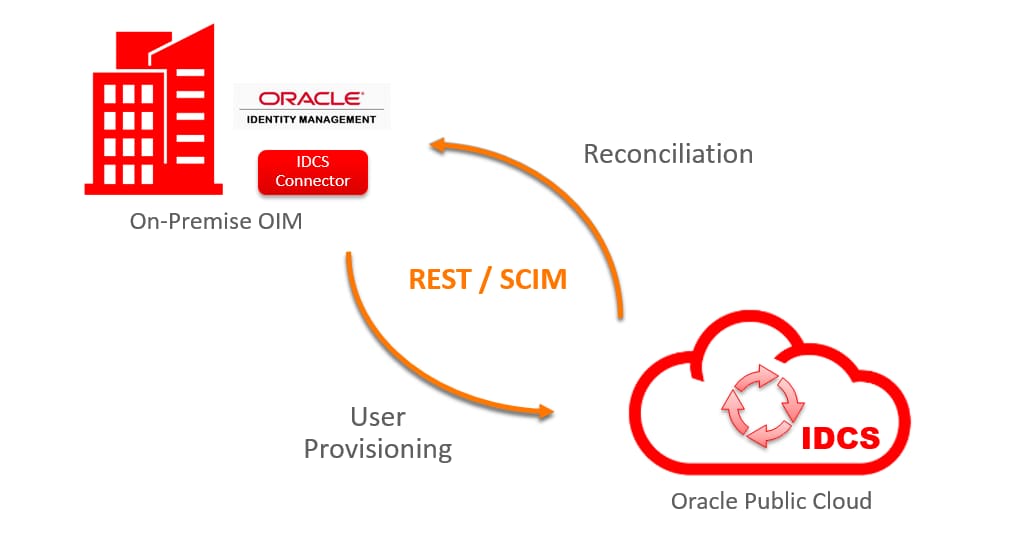
图 2.OIM 与 IDCS 集成
IDCS 连接器
用于 IDCS 的 OIM 连接器(本文以下称作 IDCS 连接器)支持使用 IDCS 作为 Oracle Identity Manager 的托管身份数据源。IDCS 连接器基于 Identity Connector Framework (ICF),利用 REST API 与 IDCS 进行通信,作为支持供应和协调操作的 SCIM 目标。
对于熟悉 OIM 连接器架构的用户来说,IDCS 连接器几乎遵循相同部署模式,只有一个小差别:在运行之前,必须在 IDCS 中定义客户端应用才能建立通信。以下是几个亮点:
- 经认证可与 Oracle Identity Manager 11gR2 PS3 及新的补丁包协同工作。
- 可以安装在 OIM Server 或 Connector Server 11.1.2.1.0 以及 JDK 1.6 或更高版本中。
- IDCS 根证书必须安装在 OIM 密钥库中以启用安全通信。
- 该连接器支持多租户供应或供应多个 IDCS 租户。
有关 IDCS 连接器的其他信息,请查看在线文档。
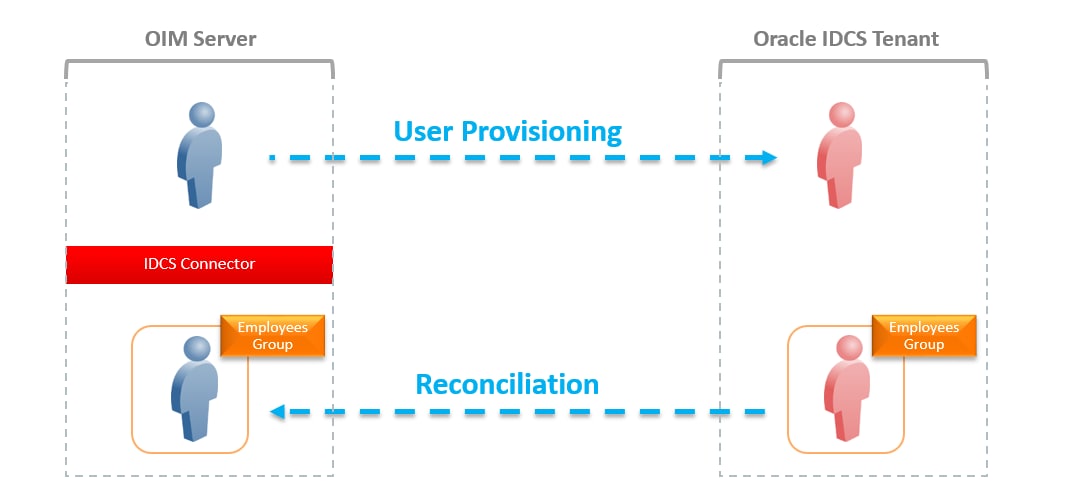
图 3.IDCS 连接器供应和协调
IDCS 连接器部署模型
IDCS 连接器支持两种部署模型通过 IDCS 供应身份数据。
- 单租户供应:使用单租户供应,您可以按典型方式部署连接器,在目标 IDCS 租户中创建一个客户端应用和一个用户帐户用于供应(例如,使用 OAuth 2.0 Resource Owner Password)。
- 多租户供应:使用多租户供应有两种选择:(a) 部署一个具有多个 IT 资源定义的连接器,每个 IDCS 租户一个 IT 资源定义;或者 (b) 部署连接器的多个副本(克隆),每个副本每个 IDCS 租户具有一个 IT 资源定义。在这两种情况下,您都是在每个目标租户上创建客户端应用和用户帐户。它们的主要区别在于,使用连接器的多个副本时,每个连接器有一组不同的资源和进程,您可以根据需要进行自定义。
使用自定义应用模板轻松实现联合
IDCS 中新增的应用模板用于定义 IDCS 与第三方云应用(如移动、客户端或服务器应用)集成所需的身份、访问和配置信息。
用户界面上提供了三种主要应用类型,可以通过易于使用的应用向导进行自定义:
- SAML 应用 — 旨在定义支持使用 SMAL 进行一次性登录的应用。
- 移动应用 — 用于定义使用 OAuth 2.0 规范的移动应用。
- 可信应用 — 使用 OAuth 2.0 的 Web 应用。
除了定义之外,IDCS 还提供了访问控制功能,因此管理员可以直接(分配用户)或间接(通过组成员身份)授予对应用的访问权限。此外,还可以为用户或组授权权利,例如,启用委托管理。
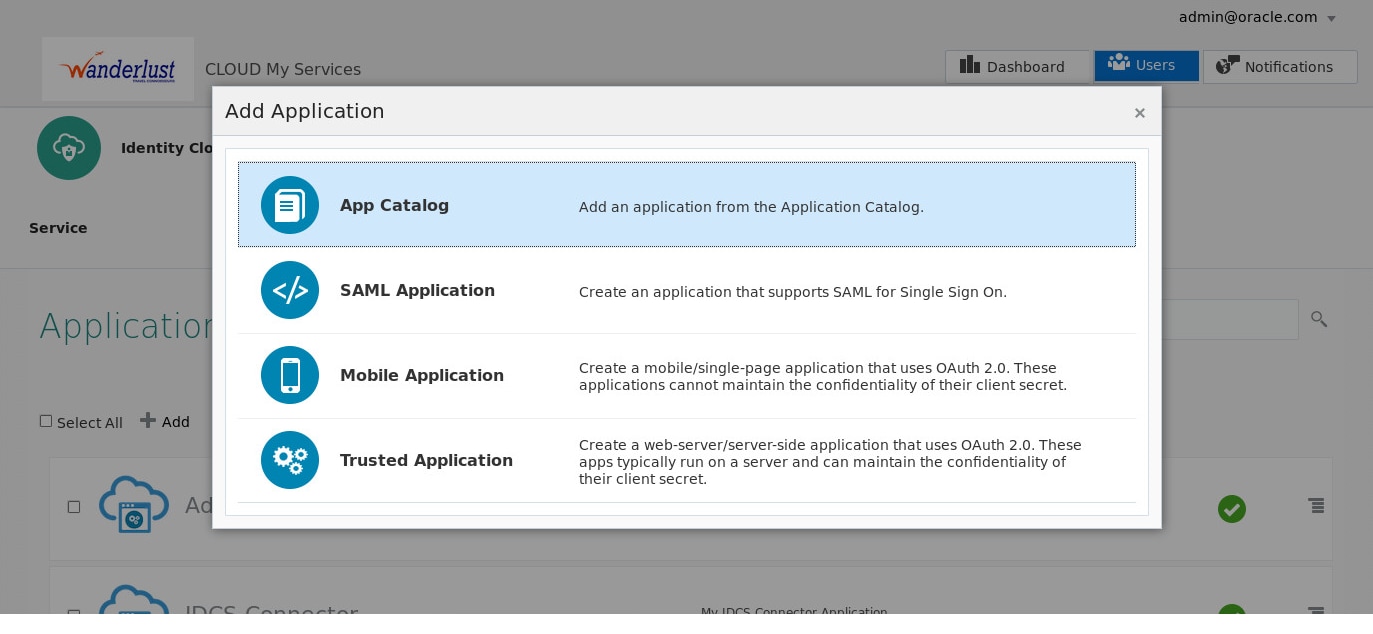
图 4.IDCS 应用向导
即时供应云应用
身份管理中的联合让两个或多个合作伙伴能够协同工作,安全地跨互联网域交换身份信息,提供安全的一次性登录 (SSO)。身份提供商 (IdP) 和服务提提供商(SP) 这两个概念在 SAML 联合中很常见。IdP 是负责验证最终用户身份并向值得信赖的合作伙伴或 SP 断言该用户的可信身份的权威实体,SP 提供应用服务但不充当身份提供商。
要共享某个用户的信息,合作伙伴必须能够识别该用户,即使他们针对这个用户可能使用不同的标识符。这通常需要在服务提供商处创建用户身份,然后用户才可以实际执行联合访问服务。这正是即时 (JIT) 供应可以大显身手的地方,最终用户首次尝试访问服务提供商的服务时,在该服务提供商处供应(创建或更新)最终用户身份,而无需事先在身份提供提供商与服务提供商之间供应身份。
通过 JIT 供应,身份提供商在 SAML 断言中包括服务提供商供应最终用户所需的用户属性。当最终用户在一次性登录操作中访问服务提供商时,身份提供商向服务提供商发送 SAML 断言。如果所提供的用户名没有匹配项,服务提供商就会用 SAML 断言中包含的最终用户属性新建一个帐户。服务提供商还会立即授予这个最终用户访问所请求服务的权限。如果找到匹配项,服务提供商会根据 SAML 断言中的属性信息更新该帐户。
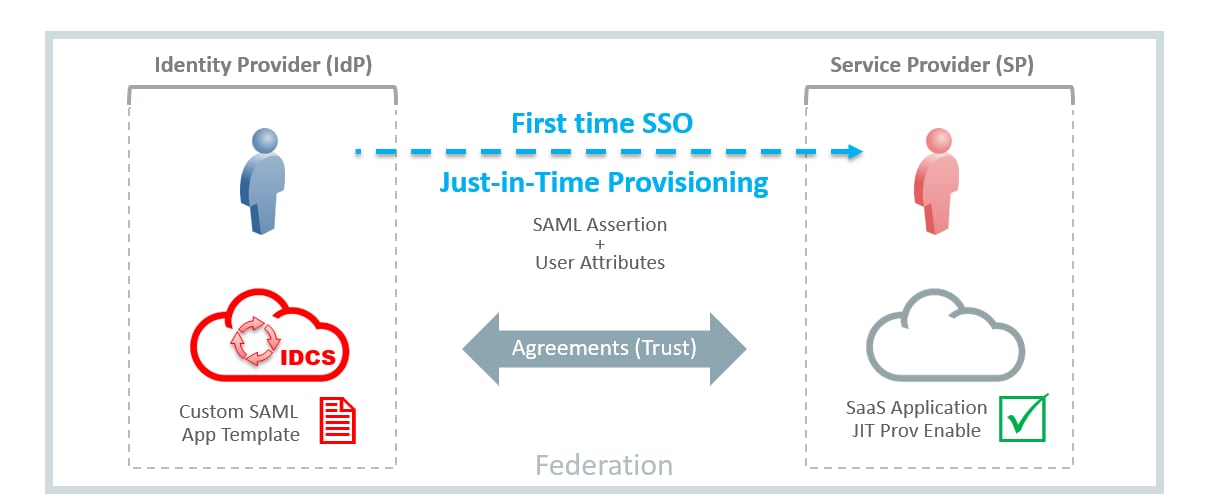
图 5.IDCS 和 JIT 供应云应用
用例示例:Acme Corp
本节重点介绍一个用例示例,其中演示了使用 IDCS 连接器实现的多租户供应,以及使用 IDCS 自定义应用模板实现的联合一次性登录和 JIT 供应。
背景
Acme Corp(一家虚构的公司)有两个子公司:Wanderlust 和 Greenenergy。每个子公司在 Oracle 身份云服务 (IDCS) 中都有自己的租户服务。该公司最近安装了内部部署的 Oracle Identity Manager (OIM),并希望配置 OIM 来整合所有 IDCS 租户。在整合中,他们希望:
- 实现 Wanderlust 和 Greenenergy IDCS 租户中新用户入职流程自动化,这样当 OIM 中供应一个新用户时,目标租户中也会供应一个对应的帐户。
- 通过一次性登录自动向员工提供访问 Salesforce 应用的权限,无需事先在 Salesforce 中供应帐户。
- 通过一次性登录自动向合同工提供访问 ServiceNow 应用的权限,无需事先在 ServiceNow 中供应帐户。
- 将两种解决方案集成到一个混合环境中,同时保持对身份的集中管理和对访问的集中控制。
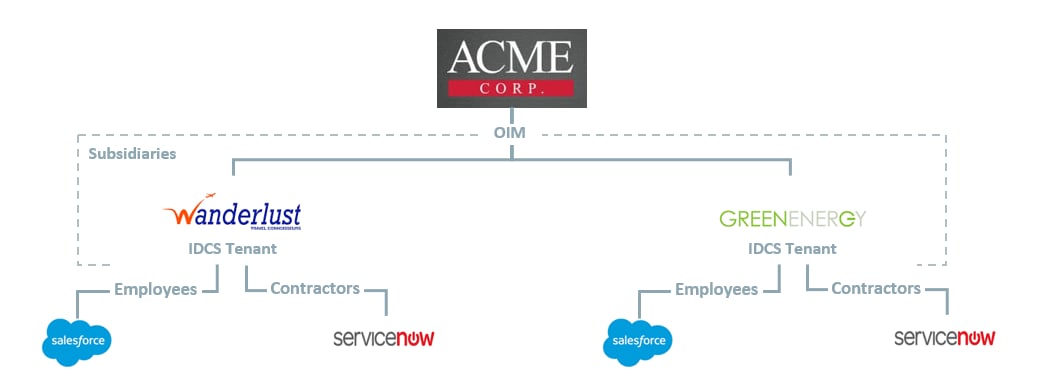
图 6.Acme Corp 期望的状态配置
解决方案概述
以下是组成该解决方案的各个功能的摘要:
- 使用 IDCS 连接器功能为 IDCS 中的多个租户供应帐户。
- 使用 OIM 访问策略和成员规则自动供应用户帐户和权限。
- 使用 IDCS SAML 应用向导和自定义应用模板建立与 Salesforce 和 ServiceNow 应用的联合,IDCS 租户将充当身份提供商。
- 使用应用授权和 IDCS 组启用访问控制。
- 在 Salesforce 和 ServiceNow 应用上配置 JIT 供应。
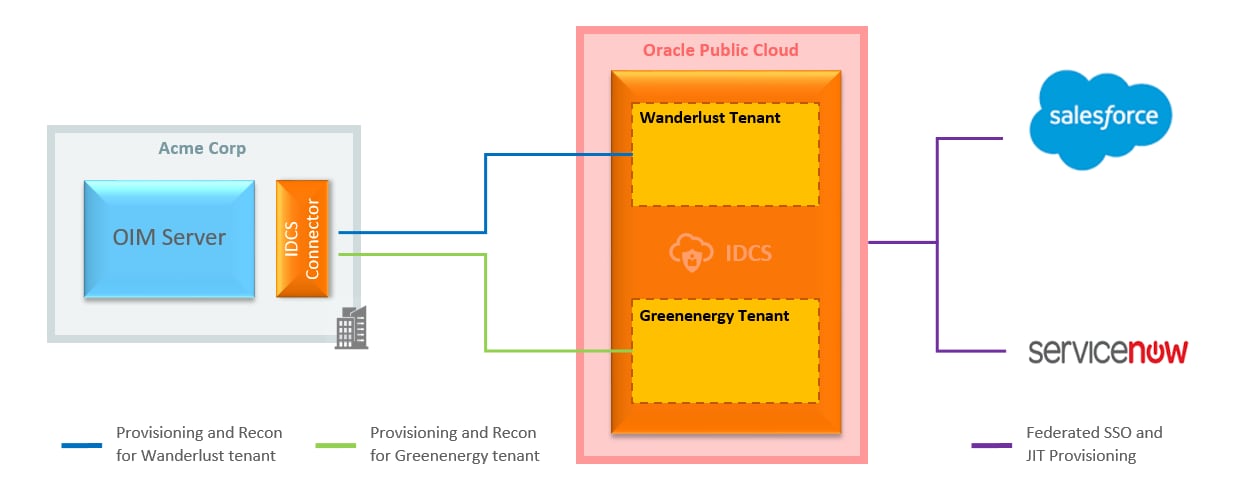
图 7.解决方案概述
假设和前提条件
以下配置步骤假设 Acme Corp 已经在 Linux 服务器上安装了内部部署的 Oracle Identity Manager 或 Oracle Identity Governance Suite 11gR2 PS3,并且在 Oracle 身份云服务中存在针对 Wanderlust 和 Greenenergy 的两个租户服务。此外,还配置了租户域(wanderlust.com 和 greenenergy.com)的电子邮件基础设施,因此 Wanderlust 和 Greenenergy 子公司的用户可以收到电子邮件通知。此演示中使用的 SaaS 应用版本为 Salesforce(开发人员版)和 ServiceNow(Fuji 版)。切记,这些版本中某些配置选项可能略有不同。
配置步骤摘要
配置多租户供应
使用应用模板配置联合
配置 JIT 供应
测试解决方案
配置多租户供应
1.演示 OIM 中的 Acme Corp 配置
- Acme Corp 已经安装 OIM 并将子公司 Wanderlust 和 Greenenergy 配置成子组织。此方法在保持整个组织内身份集中管理的同时,促进了委托管理(图 8)。
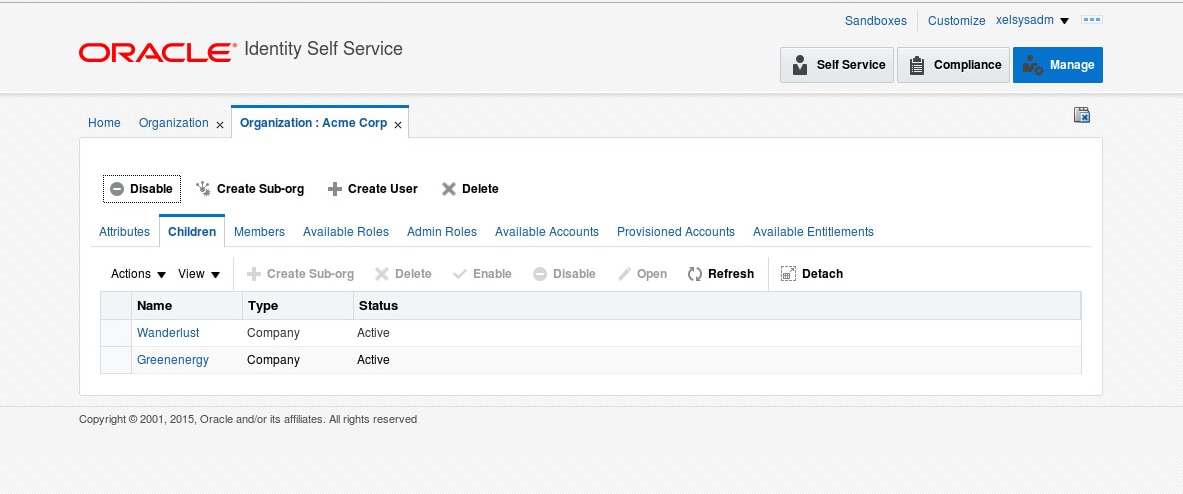
图 8.Acme Corp 子组织 - 使用中 OIM 新增的管理角色功能,定义了三个管理员角色(图 9)以及委托管理员。这些角色稍后将用于测试 OIM 中新用户的供应。
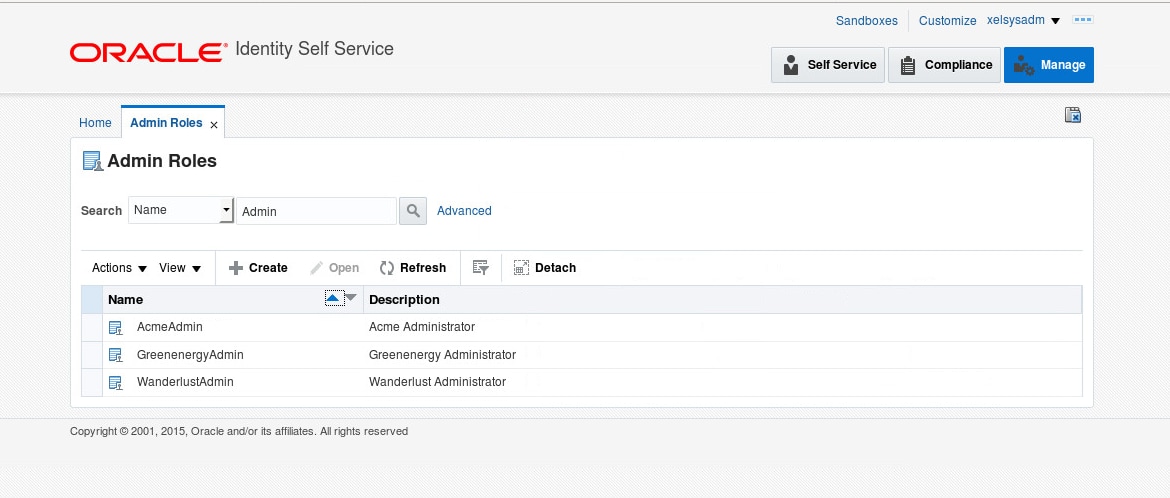
图 9.Acme Corp 管理角色
2.创建 Employees 组和 Contractors 组
- 以管理员身份(如 admin@wanderlust.com)登录 Wanderlust 租户的 IDCS Admin Console。
- 单击 Groups 选项卡,然后单击 Add 新建一个组。
- 输入新组的名称,如
Employees,然后单击 Finish(图 10)。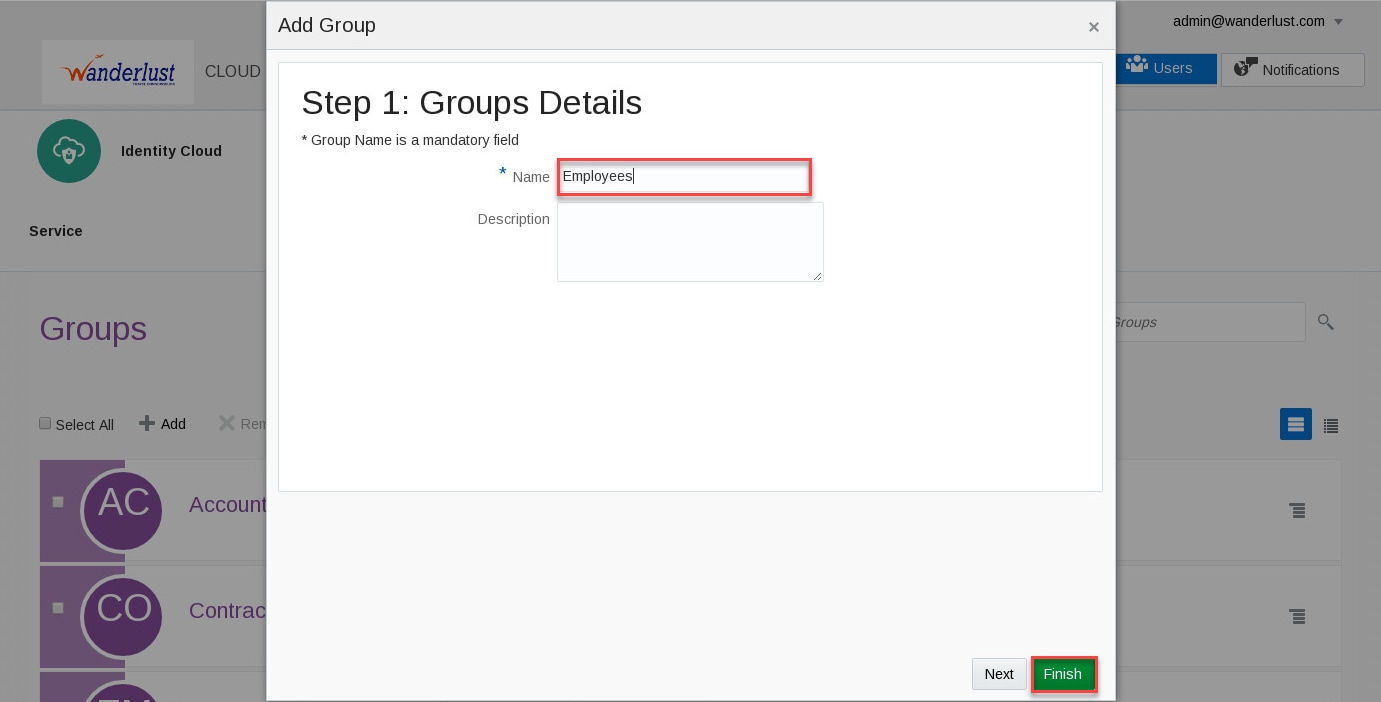
图 10.创建组 - 重复以上步骤,为
Contractors创建一个组。 - 以管理员身份(如 admin@greenenergy.com)登录 Greenenergy 租户的 IDCS Admin Console。
- 重复以上步骤,为
Employees和Contractors创建组
3.创建连接器应用和用户帐户
- 以管理员身份(如 admin@wanderlust.com)登录 Wanderlust 租户的 IDCS Admin Console。
- 单击 Applications 选项卡,然后单击 Add 新建一个应用。
- 在 Add Application 向导中,单击 Trusted Application 并根据需要输入应用详细信息。
例如,为 Wanderlust 连接器应用输入以下值:
Name            : IDCS-Connector
Description : My IDCS Connector Application - 单击 Next,然后在 Authorization 步骤中,选择
Configure this application as a client now。 - 在 Authorization 部分,选择
Resource Owner作为 Allowed Grant Types。 - 在 Accessing APIs from Other Applications 部分,选中
Grant the client access to Identity Cloud Service Admin APIs复选框并选择Identity Domain Administrator和Me角色。 - 单击 Next,然后单击 Finish。
- 记下 Application Added 窗口中的
Client ID和Client Secret值,然后单击 Close。稍后在 OIM 中配置连接器时将需要这些值。 - 在应用详细信息页面中,单击 Activate 激活应用,然后单击 Activate Application 确认(图 11)。
图 11.激活连接器应用 - 单击 Users 选项卡,然后单击 Add 新建一个用户帐户。
例如,为新用户帐户输入以下值:
 First Name      : idcs
 Last Name       : connector
User Name/Email : idcs@wanderlust.com - 单击 Finish 创建新帐户。
- 单击 Settings 选项卡,然后在左侧工具栏中单击 Delegated Administration 打开 Delegated Administration 页面。
- 展开 User Administrator 角色,单击 Add 打开 Add Users to the Administrator Role 窗口。
- 搜索上一步创建的用户,例如
idcs。选择该用户,单击 Add 将它添加到角色。 - 使用电子邮件客户端,打开发送到用户电子邮件地址的通知,按照说明激活帐户并设置密码(例如
Oracle123)。稍后在 OIM 中配置连接器时将需要此值。注意:当通过 Admin Console 创建新的用户帐户时,IDCS 会向用户电子邮件地址发送电子邮件通知以激活帐户。 - 重复以上步骤为租户 Greenenergy 创建应用和用户帐户。
4.安装和配置 IDCS 连接器
- 下载 IDCS 连接器文件 IDCS-11.1.1.5.0.zip,然后将文件解压缩到 ConnectorDefaultDirectory 中,开始在 OIM 服务器中安装连接器。
例如:在 OIM 服务器中以拥有 OIM 安装文件的用户身份运行以下命令:
unzip /tmp/IDCS-11.1.1.5.0.zip /home/oracle/oim-oam-omss/products/identity/
iam/server/ConnectorDefaultDirectory
注:在以上目录中解压缩连接器文件将让连接器显示在用户界面 (OIM Admin Console) 中以供安装。
- 在 OIM 中以 xelsysadm 身份登录 Admin Console。在左侧菜单中,单击 Manage Connector,然后单击 Install 并从连接器列表中选择 Oracle Identity Cloud Service 11.1.1.5.0。
- 单击 Load 安装连接器,然后单击 Continue,安装完成后,再单击 Exit(图 12)
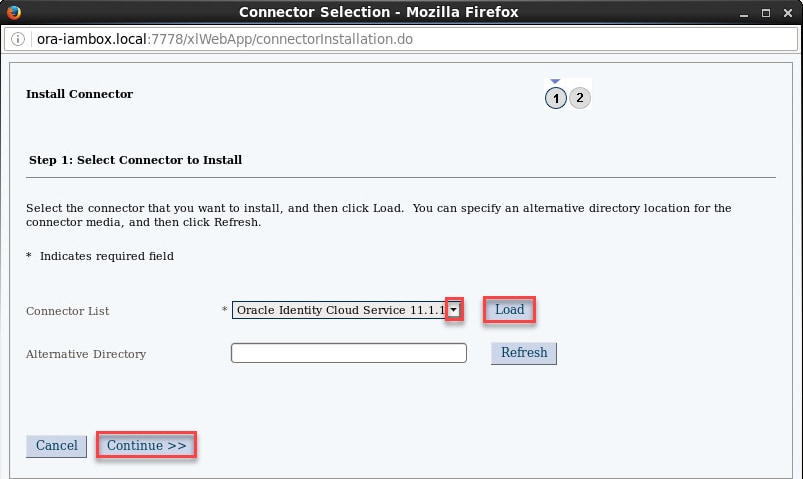
图 12.安装 IDCS 连接器 - 按照 OIM 文档,每次安装新的连接器后,您都必须清理缓存。
例如:在 OIM 服务器中打开一个终端会话,运行以下命令:
 export CLASSPATH=$MW_HOME/oracle_common/modules/oracle.jrf_11.1.1/jrf-api.jar:
  $MW_HOME/oracle_common/modules/oracle.odl_11.1.1/ojdl.jar
 export JAVA_HOME=/usr/java/jdk1.7.0_80
 export OIM_ORACLE_HOME=/home/oracle/oim-oam-omss/products/identity/iam
 export MW_HOME=/home/oracle/oim-oam-omss/products/identity
 export WL_HOME=/home/oracle/oim-oam-omss/products/identity/wlserver_10.3
 export APP_SERVER=weblogic
 export DOMAIN_HOME=/home/oracle/oim-oam-omss/config/domains/IAMGovernanceDomain
 cd $OIM_ORACLE_HOME/server/bin
./PurgeCache.sh All注:PurgeCache.sh 脚本将提示输入 OIM 管理员用户/密码和服务器 URL(例如 t3://ora-iambox.local:14000)
- 使用 IDCS 在目标租户中创建连接器应用过程中生成的 Client ID 和 Client Secret 创建一个 Base64 编码的字符串。在配置 IDCS 连接器的后续步骤中将用到此编码字符串。
例如:使用 Wanderlust 租户中生成的 Client ID 和 Client Secret 运行以下命令:
echo -n "6939393047e241b08269d2c475a0e90c:39d89f20-76b6-4cdf-b4b8-989afca446bf" | base64注:在上述命令中,双引号之间的值必须用冒号分隔:“<client_id>:<client_secret>”。在后续步骤中将使用结果值。
- 此配置将使用多租户供应模型部署具有多个 IT 资源的 IDCS 连接器,每个租户一个IT 资源。默认情况下,连接器安装时会创建一个 IT 资源,因此我们将创建两个新的 IT 资源,然后可以选择删除默认值(本配置中不需要)。在 OIM 中以 xelsysadm 身份登录 admin console。
- 在左侧菜单中,单击 IT Resource,然后单击 Create IT Resource。根据需要提供 IT 资源信息。
例如:输入以下值:
IT Resource Name : Wanderlust IDCS
IT Resource Type : Identity Cloud Services - 单击 Continue,根据目标 IDCS 租户的情况输入资源参数值。
例如,为 Wanderlust 租户输入以下值:
 acceptType              = application/json
 authenticationServerUrl = https://wanderlust.idcs.internal.oracle.com:8943/oauth2/v1/token
 baseURI                 = /admin/v1
 Configuration Lookup    = Lookup.IDCS.Configuration
 Connector Server Name   = [empty]
 contentType             = application/json
 customAuthHeaders       = Authorization=Basic <base64_string_for_connector_app_wanderlust>
 grantType               = password
 host                    = wanderlust.idcs.internal.oracle.com
 password                = Oracle123
 port                    = 8943
 scope                   = urn:opc:idm:__myscopes__
 sslEnable               = true
 username                = idcs@wanderlust.com
注:customAuthHeaders 参数的值是一个字符串,包含值“Authorization=Basic”和一个使用连接器应用的 Client ID 和 Client Secret 创建的 Base64 编码的字符串。username 和 password 参数对应于在 IDCS 中为目标租户创建的用户帐户。
- 单击 Continue 设置访问权限,接受默认角色和权限,然后单击 Continue。
- 验证 IT 资源详细信息(图 13)并单击 Continue。
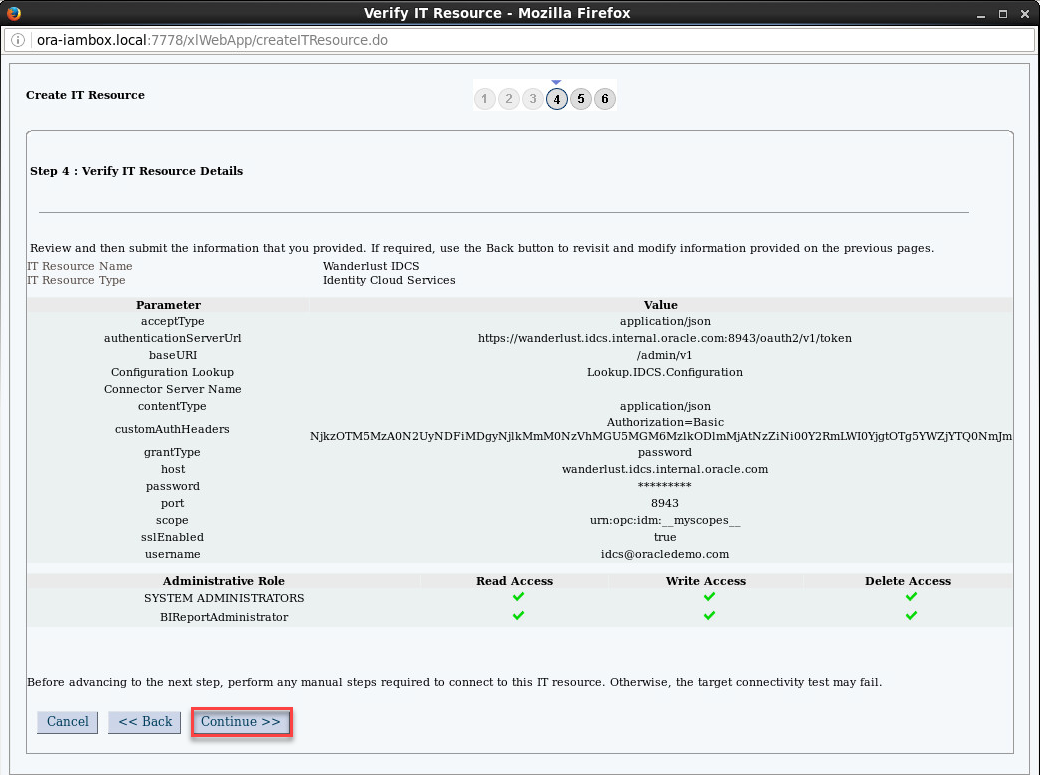
图 13.IT 资源详细信息 - 在 IT 资源连接结果页面中,单击 Continue 创建 IT 资源,然后单击 Finish 关闭窗口。
- 重复以上步骤为 Greenenergy 创建一个 IT 资源。
例如:使用以下值作为 IT 资源信息:
IT Resource Name : Greenenergy IDCS
  IT Resource Type : Identity Cloud Services
例如,使用以下值作为资源参数:
  acceptType              = application/json
  authenticationServerUrl = https://greenenergy.idcs.internal.oracle.com:8943/oauth2/v1/token
  baseURI                 = /admin/v1
  Configuration Lookup    = Lookup.IDCS.Configuration
  Connector Server Name   = [empty]
  contentType             = application/json
  customAuthHeaders       = Authorization=Basic <base64_string_for_connector_app_greenenergy>
  grantType               = password
  host                    = greenenergy.idcs.internal.oracle.com
  password                = Oracle123
  port                    = 8943
  scope                   = urn:opc:idm:__myscopes__
  sslEnable               = true
username = idcs@greenenergy.com - 一旦创建了 Wanderlust 和 Greenenergy 的两个资源,您就可以选择删除连接器安装期间创建的默认 IT 资源 (Identity Cloud Service),因为本配置中不需要它。
- 继续创建 IDCS 用户表单和应用实例,在 OIM 中单击 Admin Console 右上角的 Sandboxes。在 Manage Sandboxes 选项卡中,单击 Create Sandbox 并输入一个名称,如
IDCS,单击 Save and Close,然后单击 OK 确认。 - 在左侧菜单中,单击 Form Designer 打开表单设计器页面,然后单击 Create 并根据需要输入表单详细信息。
例如:输入以下值为 Wanderlust 创建用户表单:
  Resource Type   : IDCS User
Name : WanderlustUserForm - 单击 Create 创建用户表单。
- 重复以上步骤为 Greenenergy 创建用户表单。
例如:使用以下值:
  Resource Type   : IDCS User
Name : GreenenergyUserForm - 创建用户表单之后,单击 Application Instances 打开应用实例页面,然后单击 Create 并根据需要输入应用详细信息。
例如:输入以下值为 Wanderlust 创建应用实例:
  Name                    : WanderlustIDCS
  Display Name            : Wanderlust Identity Cloud Service
  Description             : Wanderlust Application Instance for Identity Cloud Service
  Resource Object         : IDCS User
  IT Resource Instance    : Wanderlust IDCS
Form : WanderlustUserForm - 单击 Save 创建应用实例。创建应用实例之后,确保编辑该实例以分配相应的组织。例如,为应用实例 Wanderlust Identity Cloud Service 分配组织 Wanderlust。
- 重复以上步骤为 Greenenergy 创建应用实例。
例如,使用以下值作为实例详细信息:
  Name                    : GreenenergyIDCS
  Display Name            : Greenenergy Identity Cloud Service
  Description             : Greenenergy Application Instance for Identity Cloud Service
  Resource Object         : IDCS User
  IT Resource Instance    : Greenenergy IDCS
Form : GreenenergyUserForm - 返回 Manage Sandboxes 选项卡,选择活动的沙盒(如
IDCS)并单击 Publish Sandbox,如果系统提示您确认操作,请单击 OK。 - 采集授权并与同步 OIM 目录。在 OIM 中以 xelsysadm 身份登录 Admin Console。在左侧菜单中单击 Scheduler,在打开的窗口中选择 Scheduler 选项卡并搜索
IDCS Group Lookup Reconciliation。编辑作业,并根据目标租户的需要更新相应的参数。例如,为 Wanderlust 输入以下值:
IT Resource Name : Wanderlust IDCS - 单击 Run Now(图 14)运行作业,等待执行完成。
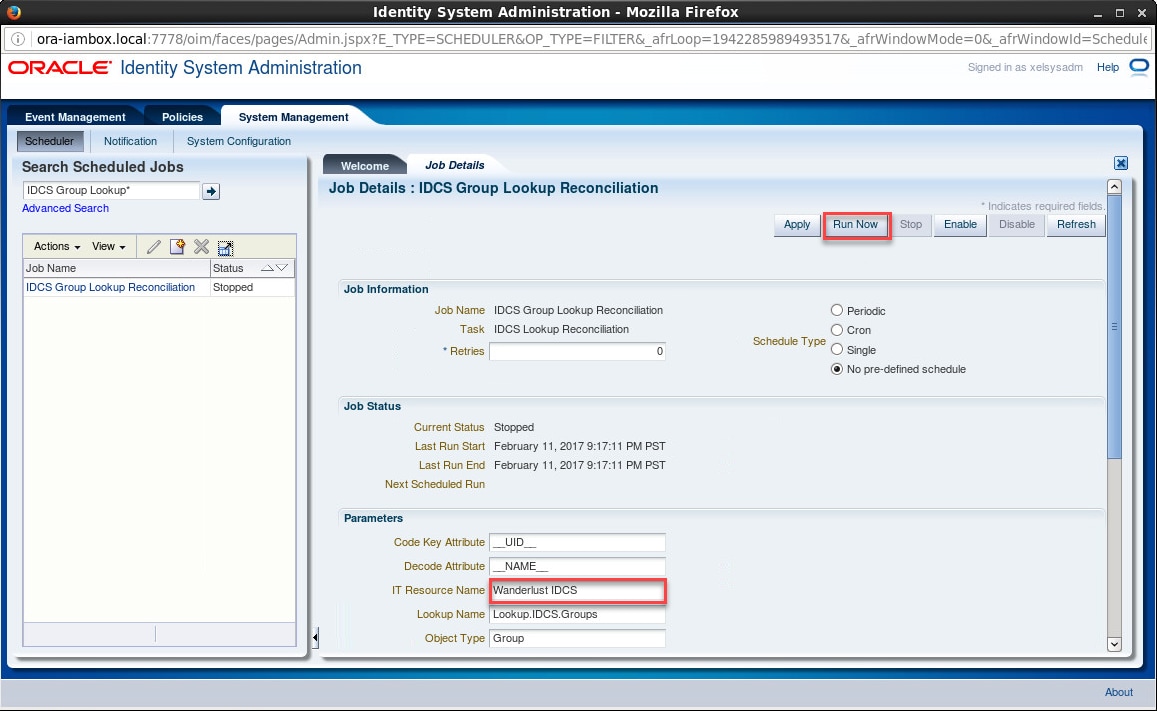
图 14.计划作业 - 继续运行同样的作业,但这次针对 Greenenergy 租户。
例如,对 Greenenergy 使用以下值:
IT Resource Name : Greenenergy IDCS - 在 Scheduler 选项卡中,搜索
IDCS Manager Lookup Reconciliation。和以上步骤一样,对每个目标租户运行此作业,相应地更新 IT Resource Name 参数。 - 然后,继续搜索并运行以下作业:
Entitlement List和Catalog Synchronization Job,对于这些作业,无需更新参数。
5.创建访问策略
- 在 OIM 中以 xelsysadm 身份登录 Admin Console。
- 在左侧菜单中,单击 Access Policies,然后单击 Create Access Policy
- 在 create access policy 窗口中,根据需要输入参数创建一个新策略。
例如,为 Wanderlust 员工策略输入以下值:
  Access Policy Name          : Wanderlust Employees
  Access Policy Description   : Access Policy for Employees
  Policy Owner                : User
Policy Owner's Value : XELSYSADMIN - 单击 Continue 打开 Select Resources 页面,选择
IDCS User并单击 Add 将其移至所选窗口,然后单击 Continue。 - 在下一个页面中,确保列出了
IDCS User,然后再次单击 Continue。 - 在
IDCS Server域中搜索并选择 Wanderlust IDCS,然后单击 Set Additional Data。 - 搜索 Wanderlust IDCS~Employees 组,单击 Add 将该组添加为选定组值,然后单击 Continue。
- 在 Revoke or Disable Flag 页面中,为
IDCS User选中 Revoke if not longer applies 并单击 Continue,然后再次单击 Continue。 - 在 Verify Access Policy Information 页面中,确保一切正确,然后单击 Create Access Policy(图 15)。
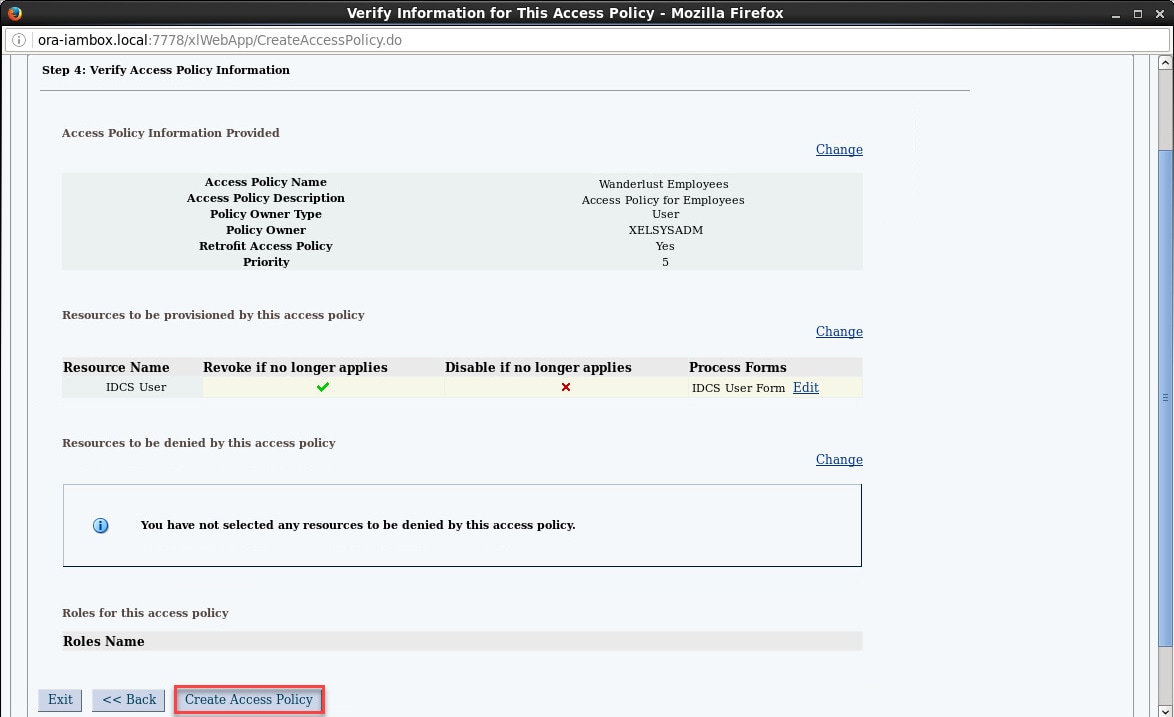
图 15.访问策略 - 重复上述步骤为 Wanderlust 和 Greenenergy 创建其余的访问策略。
例如,对其余策略使用以下值:
  Access Policy Name          : Wanderlust Contractors
  Access Policy Description   : Access Policy for Contractors
  IDCS Server                 : Wanderlust IDCS
  Group                       : Wanderlust IDCS~Contractors

  Access Policy Name          : Greenenergy Employees
  Access Policy Description   : Access Policy for Employees
  IDCS Server                 : Greenenergy IDCS
  Group                       : Greenenergy IDCS~Employees

  Access Policy Name          : Greenenergy Contractors
  Access Policy Description   : Access Policy for Contractors
  IDCS Server                 : Greenenergy IDCS
Group : Greenenergy IDCS~Contractors - 创建所有策略之后,从 OIM Admin Console 注销
6.创建角色成员规则
- 在 OIM 中以 xelsysadm 身份登录 Self Service Console。
- 单击 Manage 选项卡,然后单击 Roles 标签打开 Roles 页面,单击 Create。
- 在 Create Role 选项卡中,输入值创建一个新角色。
例如,为 Wanderlust 员工角色输入以下值:
  Name                : Wanderlust Employees
  Display Name        : Wanderlust Employees
  Role Description    : Employees role for all Wanderlust users
Risk Level : Low Risk - 单击 Next 打开 Define Roles Hierarchies 页面,单击 Next。
- 在 Select Access Policy 页面中单击 Add Access Policies,在 Add Access Policies 窗口中搜索并选择 Wanderlust Employees,单击 Add Selected,然后选择 Select。
- 确保列出该策略,单击 Next。
- 在 Add Role Membership 页面中单击 Create Membership Rule,在 Build Expression 选项卡中确保创建以下规则:((User Type = "Emp") AND (Organization = "Wanderlust")),然后单击 Save。
- 验证列出了新规则,单击 Next(图 16)。
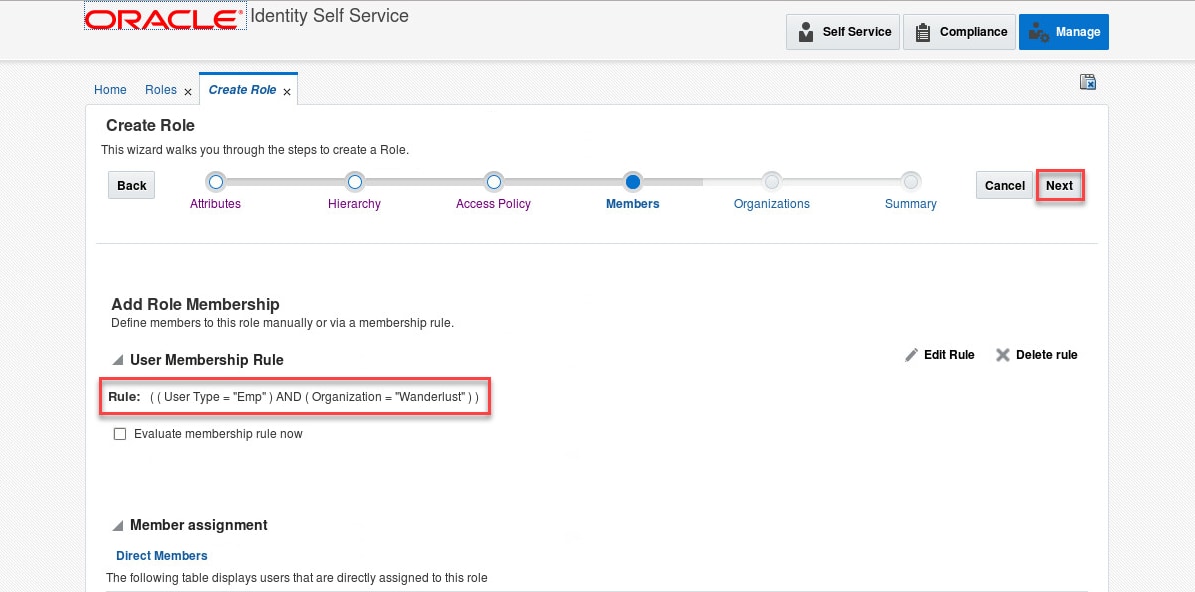
图 16.成员规则 - 在 Publish Role to Organizations 页面中单击 Add Organizations,在 Add Organizations 窗口中搜索并选择 Wanderlust,依次单击 Add Selected 和 Select。
- 确保列出该组织,单击 Next。
- 在 Role Definition Summary 页面中,验证所有信息并单击 Finish。
- 重复以上步骤为 Wanderlust 和 Greenenergy 创建其余角色和成员规则。
例如,对其余角色使用以下值:
  Name                : Wanderlust Contractors
  Role Description    : Contractors role for all Wanderlust users
  Risk Level          : Low Risk
  Access Policy       : Wanderlust Contractors
  Membership Rule     : ((User Type = "Contractor") AND (Organization = "Wanderlust"))
  Organization        : Wanderlust

  Name                : Greenenergy Employees
  Role Description    : Employees role for all Greenenergy users
  Risk Level          : Low Risk
  Access Policy       : Greenenergy Employees
  Membership Rule     : ((User Type = "Emp") AND (Organization = "Greenenergy"))
  Organization        : Greenenergy


  Name                : Greenenergy Contractors
  Role Description    : Contractors role for all Greenenergy users
  Risk Level          : Low Risk
  Access Policy       : Greenenergy Contractors
  Membership Rule     : (User Type = "Contractor") AND (Organization = "Greenenergy"))
Organization : Greenenergy - 从 OIM Self Service Console 注销
使用应用模板配置联合
1.配置与 Salesforce 的联合
IDCS 配置设置
- 以管理员身份(例如 admin@wanderlust.com)登录 Wanderlust 租户的 IDCS Admin Console。
- 单击 Applications 选项卡,然后单击 Add 新建一个应用。
- 在 Add Application 向导中,单击 SAML Application 并根据需要输入应用详细信息。
例如,为 Salesforce 应用输入以下值:
  Name                : Salesforce
  Description         : Federated SSO and JIT Provisioning with Salesforce Application
  Upload icon         : [optional]
  Application URL     : https://login.salesforce.com?so=00D41670000ePKP
Display in My Apps : [checked]注:Application URL 参数的值是在 Salesforce 应用中配置 Single Sign-On Settings 期间生成的
Salesforce Login URL。您可以为此参数输入一个临时值,稍后在 Salesforce 中配置完成时更新此值。 - 单击 Next,然后展开 General 部分,提供所需的详细信息。
例如,输入以下一般详细信息:
  Entity ID               : https://saml.salesforce.com
  Assertion Consumer URL  : https://login.salesforce.com?so=00D41670000ePKP
  NameID format           : Unspecified
NameID Value : Primary Email注:Assertion Consumer URL 参数的值与 Application URL 相同。
- 展开 Advance Settings 部分,提供所需的设置。
例如,输入以下高级设置:
  Signed SSO                                  : Assertion
  Include Signing Certificate in Signature    : [unchecked]
  Signature Hashing Algorithm                 : SHA-1


  Enable Single Logout                        : [checked]
  Logout Binding                              : Redirect
  Single Logout URL                           : https://na35.salesforce.com/secur/logout.jsp
  Logout Response URL                         : https://na35.salesforce.com/secur/logout.jsp

Encrypt Assertion : [unchecked]注:Single Logout URL 和 Logout Response URL 参数的值可以从 Salesforce 应用中的 URL 地址获取。仅替换主机名部分(例如
na35.salesforce.com)。 - 展开 Attribute Configuration 部分,根据需要添加用户属性。
例如,添加以下用户属性:
   Name                        Format          User Attribute (IDCS)
   --------------------------  --------------  ---------------------
   User.FirstName              Unspecified     First Name
   User.LastName               Unspecified     Last Name
   User.Email                  Unspecified     Primary Email
   User.Username               Unspecified     Primary Email
   User.FederationIdentifier   Unspecified     User Name
   federationId                Unspecified     User Name
注:这些属性是最低要求,将包含在 SAML 断言中,以对 Salesforce 启用 JIT 供应。
- 单击 Download IDCS Certificate 下载 IDCS 租户证书。例如,将文件保存为
IDCS-Wanderlust-Certificate.pem - 单击 Finish,然后单击 Activate 激活应用(图 17)。
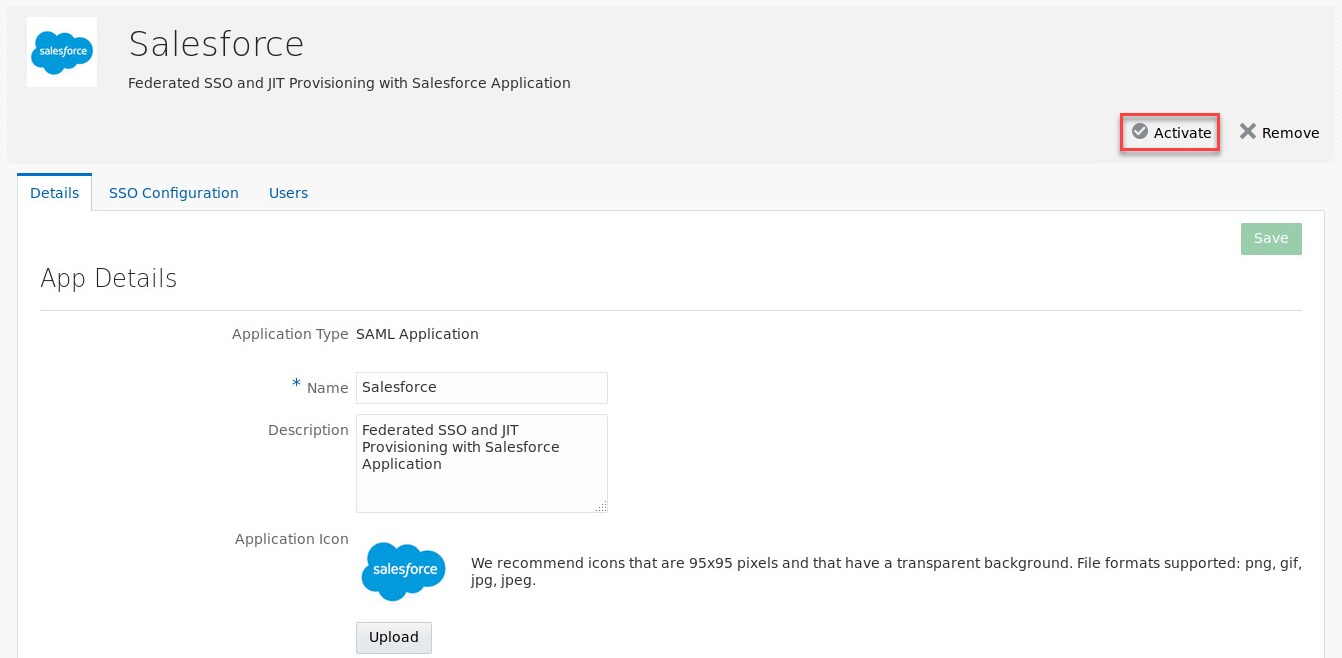
图 17.激活 Salesforce 应用 - 重复以上步骤为租户 Greenenergy 创建 Salesforce 应用。
Salesforce 配置设置
- 以管理员(例如 admin@acme.com)身份登录 Salesforce Admin Console。
- 在左侧 Administer 菜单中,展开 Security Controls 并单击 Single Sign-On Settings。
- 在 Single Sign-On Settings 页面中,确保选中 Federated Single Sign-On using SAML 部分下的 SAML Enabled。
- 单击 New 添加一个新的身份提供商,根据需要输入详细信息。
例如,输入以下详细信息为 Wanderlust 租户定义 IdP:
 Name                                : WANDERLUST
 SAML Version                        : 2.0
 Issuer                              : https://wanderlust.idcs.internal.oracle.com:8943/fed

 Identity Provider Certificate       : IDCS-Wanderlust-Certificate.pem
 Request Signing Certificate         : [SelfSignedCert...]
 Request Signature Method            : [RSA-SHA1]
 Assertion Decryption Certificate    : [Assertion not encrypted]


 SAML Identity Type                  : [Assertion contains the User's Salesforce username]
 SAML Identity Location              : [Identity is in the NameIdentifier element of the
                                        Subject statement]

 Identity Provider Login URL         : [empty]
 Identity Provider Logout URL        : https://wanderlust.idcs.internal.oracle.com:8943/oauth2/v1/
                                       userlogout

 API Name                            : WANDERLUST
 Entity ID                           : https://saml.salesforce.com
注:提供在前面配置中下载的 IDCS 证书的文件名作为 Identity Provider Certificate 参数值。
- 单击 Save 创建新定义(图 18)。
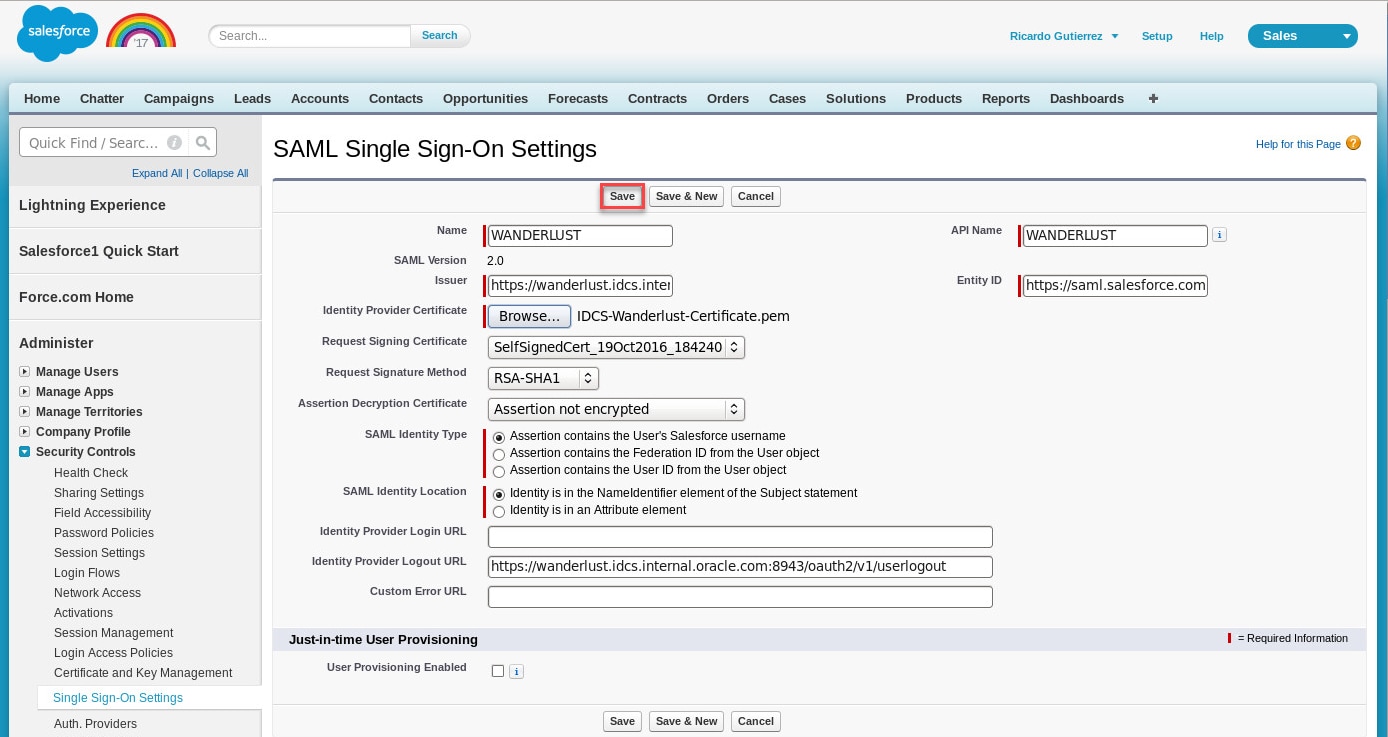
图 18.Salesforce SAML SSO 设置 - Single Sign-On Settings 页面中列出新定义之后,单击名称(例如
WANDERLUST)显示配置设置。 - 记下 Endpoints 部分的
Salesforce Login URL值。在 IDCS 租户中配置 Salesforce 应用时将需要此值。 - 注意,我们尚未启用或配置 JIT 供应,此任务将在下文中介绍。
- 重复上述步骤为租户 Greenenergy 创建身份提供商。
2.配置与 ServiceNow 的联合
IDCS 配置设置
- 以管理员身份(例如 admin@wanderlust.com)登录 Wanderlust 租户的 IDCS Admin Console。
- 单击 Applications 选项卡,然后单击 Add 新建一个应用。
- 在 Add Application 向导中,单击 SAML Application 并根据需要输入应用详细信息。
例如,为 ServiceNow 应用输入以下值:
   Name                : ServiceNow
   Description         : Federated SSO and JIT Provisioning with ServiceNow Application
   Upload icon         : [optional]
   Application URL     : https://dev16759.service-now.com
Display in My Apps : [checked]注:Application URL 参数的值可以从 ServiceNow 应用中的 URL 地址获取。
- 单击 Next,然后展开 General 部分,提供所需的详细信息。
例如,输入以下一般详细信息:
   Entity ID               : https://dev16759.service-now.com
   Assertion Consumer URL  : https://dev16759.service-now.com/navpage.do
   NameID format           : Unspecified
   NameID Value            : User Name
注:用从 ServiceNow 应用中的 URL 地址获取的值替换 Entity ID 和 Assertion Consumer URL 参数中的主机名。
- 展开 Advance Settings 部分,提供所需的设置。
例如,输入以下高级设置:
   Signed SSO                                  : Assertion
   Include Signing Certificate in Signature    : [unchecked]
   Signature Hashing Algorithm                 : SHA-1


   Enable Single Logout                        : [checked]
   Logout Binding                              : Redirect
   Single Logout URL                           : https://dev16759.service-now.com/logout.do
   Logout Response URL                         : https://dev16759.service-now.com/logout.do

   Encrypt Assertion                           : [unchecked]
注:用从 ServiceNow 应用中的 URL 地址获取的值替换 Single Logout URL 和 Logout Response URL 参数中的主机名。
- 展开 Attribute Configuration 部分,根据需要添加用户属性。
例如,添加以下用户属性:
   Name                Format      User Attribute (IDCS)
   -----------------   ----------  ---------------------
   First Name          Basic       First Name
   Last Name           Basic       Last Name
   Email               Basic       Primary Email
   User Name           Basic       User Name
注:这些属性只是最低要求,将包含在 SAML 断言中,以对 ServiceNow 启用 JIT 供应。
- 单击 Download IDCS Metadata 下载设置与 ServiceNow 的联合所需的元数据文件。例如,将文件保存为
IDCS-Wanderlust-Metadata.xml - 单击 Finish,然后单击 Activate 激活应用(图 19)。
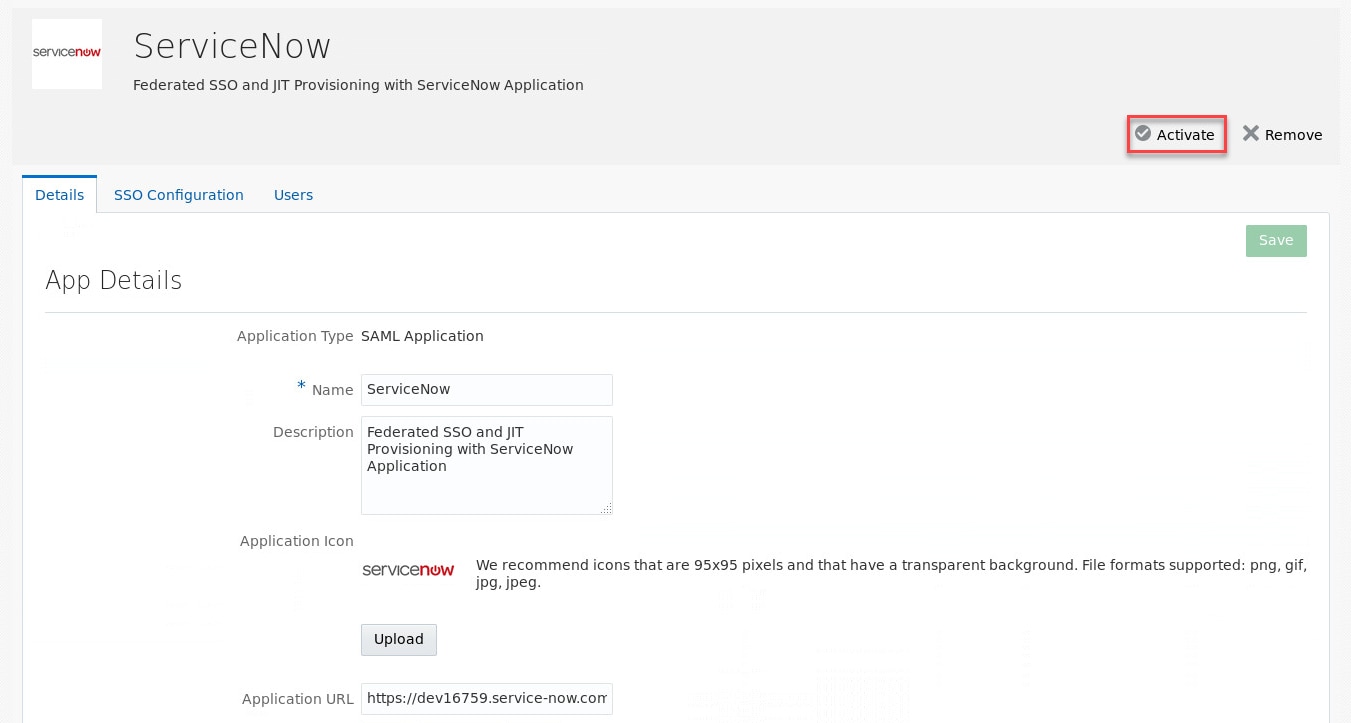
图 19.激活 ServiceNow 应用 - 重复上述步骤为租户 Greenenergy 创建 ServiceNow 应用。
ServiceNow 配置设置
- 以管理员(例如 admin)身份登录 ServiceNow Admin Console。
- 在左侧菜单中,展开 Multi-Provider SSO 并单击 Identity Providers。注:此步骤假定在 ServiceNow 中已启用多提供商 SSO 插件,否则此菜单选项不可用(有关如何激活插件的说明,请参见激活多供应商一次性登录)
- 单击 New,针对问题 What kind of SSO are you trying to create? 选择
SAML2 Update1 - 在 Import Identity Provide Metadata 窗口中,单击 XML 并粘贴先前从 IDCS 租户下载的
IDCS-Wanderlust-Metadata.xml文件的内容。 - 单击 Import。导入任务将填充某些属性值,继续查看并根据需要更新值。
例如,更新以下属性:
   Name                                    : WANDERLUST
   Active                                  : [checked]
   Default                                 : [checked]
   User field                              : user_name


   Protocol Binding for the IDP's
   SingleLogoutRequest                     : urn:oasis:names:tc:SAML:2.0:bindings:HTTP-Redirect
   NameID Policy                           : urn:oasis:names:tc:SAML:1.1:nameid-format:unspecified
注:仅当定义多个提供商之后,才能选中 Default 参数。
例如,查看其余属性:
 Identity Provider URL                   : https://wanderlust.idcs.internal.oracle.com:8943/fed
 Identity Provider's AuthnRequest        : https://wanderlust.idcs.internal.oracle.com:8943/fed/
                                            v1/idp/sso
 Identity Provider's SingleLogoutRequest : https://wanderlust.idcs.internal.oracle.com:8943/oauth2/
                                            v1/userlogout
 Failed Requirement Redirect             : [empty]
 ServiceNow Homepage                     : https://dev16759.service-now.com/navpage.do
 Entity ID / Issuer                      : https://dev16759.service-now.com
 Audience URI                            : https://dev16759.service-now.com

 Protocol Binding for the IDP's
 SingleLogoutRequest                     : urn:oasis:names:tc:SAML:2.0:bindings:HTTP-Redirect
 NameID Policy                           : urn:oasis:names:tc:SAML:1.1:nameid-format:unspecified
 NameID Attribute                        : [empty]
 Create AuthnContextClass                : [unchecked]
 AuthnContextClassRef Method             : urn:oasis:names:tc:SAML:2.0:ac:classes:
                                              PasswordProtectedTransport
 External logout redirect                : https://wanderlust.idcs.internal.oracle.com:8943/ui/
                                           v1/myconsole
      ...

 Signing Signature Algorithm             : http://www.w3.org/2000/09/xmldsig#rsa-sha1
 Single Sign-On Script                   : MultiSSO_SAML2_Update1
x509 Certificate : https://wanderlust.idcs.internal.oracle.com:8943/fed_1注:ServiceNow Homepage、Entity ID / Issuer 和 Audience URI 是 ServiceNow 应用特定的,由 ServiceNow 自动填充。
- 单击 Update 更新配置(图 20)。注:无需导入 IDCS 证书,因为已经用 IDCS URL 地址更新属性
x509 Certificate,以便自动导入证书。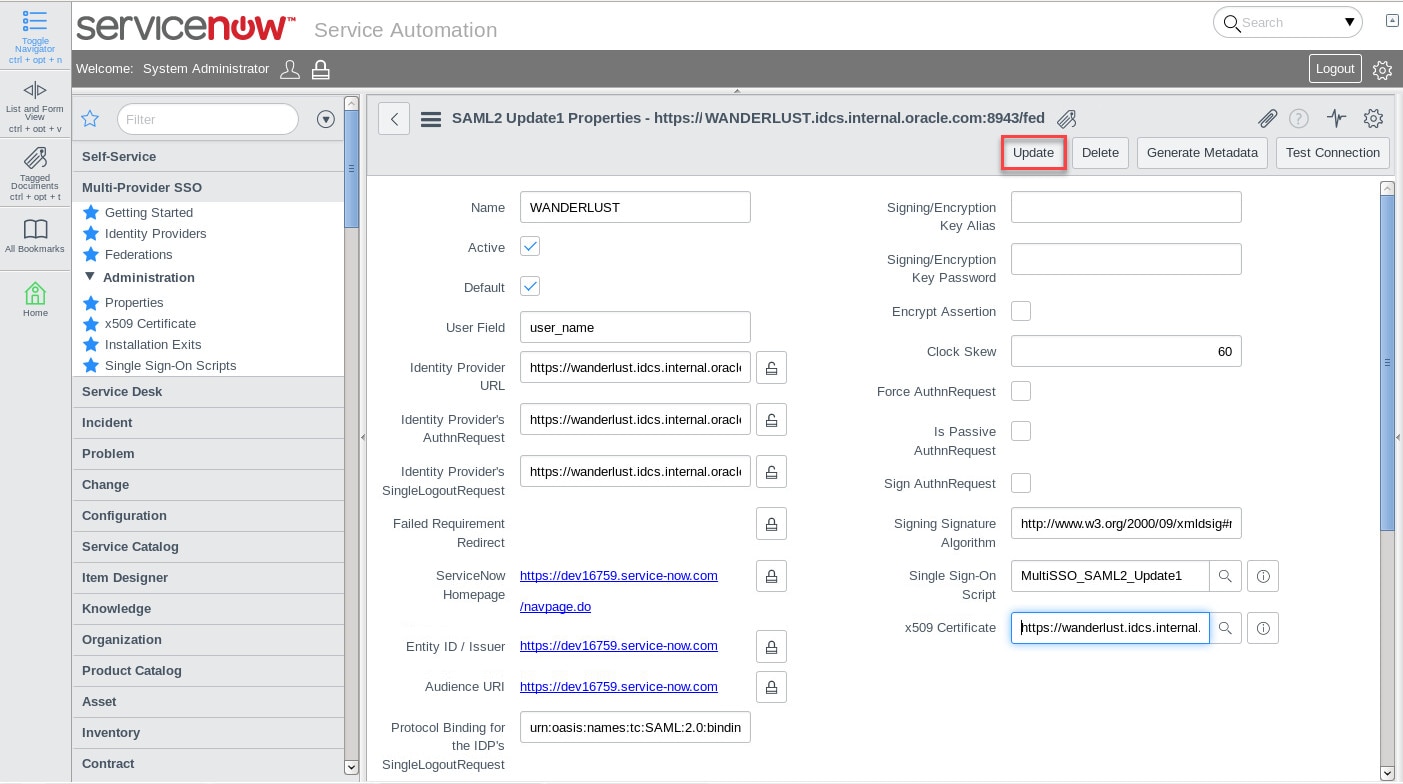
图 20.ServiceNow SAML2 配置 - 注意,我们尚未配置 JIT 供应,此任务将在下文中介绍。
- 重复上述步骤为租户 Greenenergy 创建配置。使用元数据文件
IDCS-Greenenergy-Metadata.xml。
3.配置应用授权
- 以管理员身份(例如 admin@wanderlust.com)登录 Wanderlust 租户的 IDCS Admin Console。
- 单击 Applications 选项卡,然后单击 Salesforce 应用打开应用详细信息页。
- 单击 Groups 选项卡,单击 Assign 打开分配组窗口,搜索并选择
Employees组,然后单击 OK。 - 再次单击 Applications 选项卡,为 ServiceNow 应用分配 Contractors 组。
- 从 IDCS Admin Console 注销
- 对租户 Greenenergy 重复上述步骤。
配置 JIT 供应
1.配置 Salesforce 的 JIT 供应
- 以管理员(例如 admin@acme.com)身份登录 Salesforce Admin Console。
- 在左侧 Administer 菜单中,展开 Security Controls 并单击 Single Sign-On Settings。
- 单击 Edit 编辑 Wanderlust 租户的身份提供商配置(例如
WANDERLUST),更新 JIT 供应所需属性。例如,更新以下属性:
 SAML Identity Type             : [Assertion contains the Federation ID from the User object]
 SAML Identity Location         : [Identity is in an Attribute element]
Attribute Name : federationId - 选中 Just-in-time User Provisioning 部分下的
User Provisioning Enabled复选框。 - 提示选择供应类型时,请选择
Custom SAML JIT with Apex handler并单击 Automatically create a SAML JIT handler template,选择以具有管理员权限的 Salesforce 用户身份执行处理程序。 - 单击 Save 保存更新。
- 自定义自动生成的 SAML JIT Handler,返回 Security Controls 并单击 Single Sign-On Settings。
- 单击 Edit 编辑 Wanderlust 租户的身份提供商配置,然后单击自动生成的 SAML JIT Handler 属性名称,例如
AutocreatedRegHandler1485929908670。 - 在 Apex Class Detail 页面中,单击 Edit 编辑类处理程序。注:Salesforce 要求在供应新用户时设置默认配置文件和用户许可,因此以下代码更改将会完成次任务。
例如,找到以下代码段:
  if(attributes.containsKey('User.ProfileId')) {
       String profileId = attributes.get('User.ProfileId');
       Profile p = [SELECT Id FROM Profile WHERE Id=:profileId];
       u.ProfileId = p.Id;
  }
替换为以下代码:
  /*** My changes begin here***/
  if(attributes.containsKey('User.ProfileId')) {
      String profileId = attributes.get('User.ProfileId');
      Profile p = [SELECT Id FROM Profile WHERE Id=:profileId];
      u.ProfileId = p.Id;
  } else {
      String profileName = 'Standard User';
      Profile p = [SELECT Id, Name FROM Profile WHERE Name=:profileName];
      String licenseName = 'Salesforce';
      p.UserLicense = [SELECT Id, Name FROM UserLicense WHERE Name=:licenseName];
      u.Profile = p;
      u.ProfileId = p.Id;
  }
  /*** My changes end here***/
注:注意,Salesforce 开发人员版的一个 Salesforce 许可证仅允许一个标准用户,因此尝试创建多个标准用户时将触发错误。非开发人员版的 Salesforce 不应出现这种情况。您还可以使用
Chatter Free User作为 profile name 值,使用Chatter Free作为 license 值。- 单击 Save 保存更改。
- 返回 Security Controls,单击 Single Sign-On Settings,然后重复上述步骤为 Greenenergy 租户启用 JIT 供应。注:此时不要选择自动生成 SAML JIT Handler,而是要选择在上述步骤中生成的处理程序。
2.配置 ServiceNow 的 JIT 供应
- 以管理员(例如 admin)身份登录 ServiceNow Admin Console。
- 在左侧菜单中,展开 Multi-Provider SSO 并单击 Single Sign-On Scripts。
- 创建两个脚本(每次单击 New 创建一个新脚本)。
例如,使用以下值作为脚本名称和作用域:
   Name    : MultiSSO_SAML2_UserProvisioning
   Scope   : All application scopes


   Name    : MultiSSO_SAML2_ImportSetUtilExtended
   Scope   : All application scopes
例如,复制以下代码作为 MultiSSO_SAML2_UserProvisioning 脚本:
   var MultiSSO_SAML2_UserProvisioning = Class.create();
   MultiSSO_SAML2_UserProvisioning.prototype = {

       initialize: function(samlResponse) {
          this.saml = new XMLDocument(samlResponse, false);
          this.tableName = "u_imp_saml_user";
          //hardcoded since import set table and transform are already pointing to this table
          this.attributeStatementNode = "//Response/Assertion/AttributeStatement";
          this.attributeNodeName = gs.getProperty
 ("glide.authenticate.sso.saml2.attribute_node_name", "Name");

          //XML doc used for building XML as expected
          //format for loading into Import Set
          this.xmldoc = new XMLDocument();
          this.xmldoc.setCurrent(this.xmldoc.createElement(this.tableName));
       },
             //Process the XML and extract/prepare the attribute-value pairs
       //in the right format to be able to load into import set
      process: function() {
           var attributes = this.saml.getNodes(this.attributeStatementNode + "/*");

           for (i=0; i < attributes.getLength(); i++) {
               var attributeNum = i + 1;
                //Default position where the "Name" attribute is normally found, just in case...
               var attributeNamePosition = 0;
                var AttributeStatement =
 this.attributeStatementNode + "/Attribute[" + attributeNum +
   "]";
                //Some IdPs provide the AttributeStatement in a different non-standard format
                //use this line instead of the above.
                //var AttributeStatement = attributeStatementNode + "[" + attributeNum +
  "]/Attribute";

                //Lookup the attribute name and get its position in the element, if found
                var attributeNode = this.saml.getNode(AttributeStatement).getAttributes();
                for (j=0; j < attributeNode.getLength(); j++) {
                   if(attributeNode.item(j).getNodeName() == this.attributeNodeName) {
                    attributeNamePosition = j;
                    break;
                  }
                }
               var attributeName = this.saml.getNode(AttributeStatement).getAttributes().item
  (attributeNamePosition).getNodeValue() + "";
              var attributeValue = this.saml.getNodeText(AttributeStatement +
 "/AttributeValue");
              //Build elements
              this.xmldoc.createElement("u_" + this._escapeAttribute(attributeName),
 attributeValue);
            }
              //Use the saml:issuer element to set the source
           this.xmldoc.createElement("source", "saml:" + this.saml.getNodeText
 ("//Response/Issuer"));
           },

           //Load the XML into an Import Set
           loadImportSet: function() {
               var isetUtil = new MultiSSO_SAML2_ImportSetUtilExtended();
               var recordID = isetUtil.loadImportSetFromXML("//" + this.tableName +
 "/*", this.xmldoc,
 this.tableName);
               return recordID;
           },

           //Return the value for a given Attribute found in the AttributeStatement
          getAttributeValue: function(attributeName) {
          return this.xmldoc.getNodeText("//" + this.tableName + "/u_" +
  this._escapeAttribute(attributeName));
           },

           //Escape the attributes in a format that ServiceNow can
           //create columns - some attributes contain space, colons and dots
           _escapeAttribute : function (attribute) {
               var _attribute = attribute;
               //if using claims, sometimes the name may contain a url
               //example: http://schemas.xmlsoap.org/ws/2005/05/identity/claims/emailaddress
               if(_attribute.indexOf("/")) {
                   var name = _attribute.split("/");
                   _attribute = name.pop() + '';
              }
               return _attribute.replace(/[ :.]/g,"_");
           },

           type: 'MultiSSO_SAML2_UserProvisioning' };
例如,复制以下代码作为 MultiSSO_SAML2_ImportSetUtilExtended 脚本:
  var MultiSSO_SAML2_ImportSetUtilExtended = Class.create();
  MultiSSO_SAML2_ImportSetUtilExtended.prototype = Object.extendsObject(ImportSetUtil, {

        initialize : function() {
        },

                 loadImportSetFromXML : function (xpath_root_node, xmlDoc, tableName) {
                    var attrs = new Packages.java.util.HashMap();
                    var nodeList = xmlDoc.getNodes(xpath_root_node);
                    this._iterateNodeList(nodeList, null, attrs);

                    // create or update the table schema
                    var tc = new GlideTableCreator(tableName, tableName);
                    tc.setExtends("sys_import_set_row");
                    tc.setColumnAttributes(attrs);
                    tc.update();

                    // second pass insert row
                    var gr = new GlideRecord(tableName);
                    gr.initialize();
                    var nodeList = xmlDoc.getNodes(xpath_root_node);
                    this._iterateNodeList(nodeList, null, null, gr);
                    gr.setWorkflow(true); //Important, otherwise Import SET will not be created!
                    return gr.insert();
                  },

                  type: 'MultiSSO_SAML2_ImportSetUtilExtended'
}); - 返回 Multi-Provider SSO,单击 Single Sign-On Scripts。编辑脚本 MultiSSO_SAML2_Update1,在三个不同部分做一些更改。注:这是 Fuji 版本附带的现成脚本,以前版本中的脚本名可能不同。
例如,第 1 部分:找到以下代码段:
initialize: function() {
            },
替换为以下代码:
 initialize: function() {
    /*Auto Provisioning changes */
    this.nameIdOverride =
gs.getProperty("glide.authenticate.sso.saml2.nameid_policy_override", "");
    /*Auto Provisioning changes */
 },
例如,第 2 部分:找到以下代码段:
 SNC.SecurityEventSender.sendSAMLRedirectReceivedEventData("", eventLogParm2);
    if (!this.SAML2.validateLoginResponse(samlResponseObject, inResponseTo)) {
    this.logError("Could not validate SAMLResponse");
    SNC.SecurityEventSender.sendSAMLLoginFailureEventData("", eventLogParm2);
    return "failed_authentication";
 }
替换为以下代码:
SNC.SecurityEventSender.sendSAMLRedirectReceivedEventData("", eventLogParm2);
   if (!this.SAML2.validateLoginResponse(samlResponseObject, inResponseTo)) {
   this.logError("Could not validate SAMLResponse");
   SNC.SecurityEventSender.sendSAMLLoginFailureEventData("", eventLogParm2);
   return "failed_authentication";
 }

  /*Auto Provisioning changes */
  var sup = new MultiSSO_SAML2_UserProvisioning
(this.SAML2.getDecodedSAMLResponse(request) + "");
 //If NameID override is set, then use it
 var nameId = this.nameIdOverride == "" ? this.SAML2.getSubjectNameID() :
sup.getAttributeValue(this.nameIdOverride);
 /*Auto Provisioning changes */
例如,第 3 部分:找到以下代码段:
if(!SSO_Helper.isTestSAMLConnection()) {   request.getSession().setAttribute
("glide.saml2.session_index", sessionIndex);
  request.getSession().setAttribute("glide.saml2.session_id", nameId);
  request.getSession().setAttribute("glide.multiSSO.logout_url", this.logoutURL);
  request.getSession().setAttribute("glide.multiSSO.service_url", this.serviceURL);
 }
替换为以下代码:
if(!SSO_Helper.isTestSAMLConnection()) {
    request.getSession().setAttribute("glide.saml2.session_index", sessionIndex);
    request.getSession().setAttribute("glide.saml2.session_id", nameId);
    request.getSession().setAttribute("glide.multiSSO.logout_url", this.logoutURL);
    request.getSession().setAttribute("glide.multiSSO.service_url", this.serviceURL);
 }

 /*Auto Provisioning changes */
  this._action = action;
  sup.loadImportSet(); action = this._action;
/*Auto Provisioning changes */ - 单击 Update 保存更改。
- 由于这些脚本的性质,必须对现有 ServiceNow 用户进行 SAML 身份验证,才能在 ServiceNow 中创建一个导入集表,此操作只需执行一次,对两个租户均有效。要执行 SAML 身份验证,请在 Wanderlust 租户和 ServiceNow 中创建一个用户。
例如,对每个用户使用以下值:
Wanderlust tenant
First Name  : John
Last Name   : Thomas
User Name   : JTHOMAS
Email       : john.thomas@wanderlust.com

ServiceNow
User ID     : JTHOMAS
First name  : John
Last name   : Thomas
Email : john.thomas@wanderlust.com - 创建用户之后,按照发送到
john.thomas@wanderlust.com的电子邮件通知中的说明激活 Wanderlust 用户帐户。 - 以管理员身份(例如 admin@wanderlust.com)登录 Wanderlust 租户的 IDCS Admin Console。
- 单击 Applications 选项卡,然后单击 ServiceNow 打开应用详细信息页,单击 Users 选项卡开始分配用户
John Thomas。 - 现在,以 JTHOMAS 用户身份登录 Wanderlust 租户的 IDCS User Console。ServiceNow 应用应列在 My Apps 门户页面中,单击应用图标启动与 ServiceNow 的 SAML 身份验证。如果您能够访问 ServiceNow 应用,请继续后续步骤,否则请检查配置。
- 从 IDCS User Console 注销。
- 以管理员(例如 admin)身份登录 ServiceNow Admin Console。注:如果 SAML 身份验证成功,应已创建导入集表,我们将使用此表定义转换映射。
- 在左侧菜单中,展开 System Import Sets 并单击 Create Transform Map,根据需要输入值以创建转换映射。
例如,输入以下值:
Name                : Import SAML User
Source Table        : Imp Saml User (u_imp_saml_user)

Active              : [checked]
Run Business Rules  : [unchecked]
Enforce Man Field   : No
Copy Empty Fields   : [unchecked]
Target Table        : User (sys_user)
Order               : 100
Run Script          : [checked]
注:对于参数 Source Table,您应该可以选择
Imp Saml User表,该表是导入集表。例如,在 Script 域中复制以下代码:
 //This is important for the first ever login, otherwise an empty user may be created until
 //a Field Map is defined below
 //It's recommended to use the same field for coalescing
 //as defined in System Property: glide.authenticate.sso.saml2.user_field

        if(action == "insert") {
            //if no coalesce is set, then ignore insert
                 if(!coalesceIsSet()) {
                 ignore = true;

                      } else {
                      //Set random password for new users
                          var newPass = Math.random().toString(36).substr(2,16);
                          target.user_password = newPass;
                      }
          }

 //Returns true is coalesce field has been set for this transform map, false otherwise
          function coalesceIsSet() {
              var fieldMap = new GlideRecord("sys_transform_entry");
              fieldMap.addQuery("map.name", "Import SAML User");
              fieldMap.addQuery("coalesce", true);
              fieldMap.query();
              return fieldMap.hasNext();
} - 单击 Submit 创建转换映射。返回 System Import Sets,编辑转换映射(例如
Import SAML User)添加字段映射。例如,添加以下字段映射:
Source Field    Target Field    Coalesce
--------------  --------------  ------------
u_First_Name    First Name
u_Last_Name     Last Name
u_Email         Email
u_User_Name User ID [checked] - 单击 Update 保存更改。
- 从 ServiceNow Admin Console 注销。
测试解决方案
为了测试解决方案,我们将办理两个新 Acme 用户入职,一个是在 Wanderlust 子公司工作的员工,另一个是分配给 Greenenergy 的合同工。稍后,这些新用户将登录 IDCS,测试能否通过联合一次性登录访问相应的云应用。
1.在 OIM 中为用户办理入职
- 在 OIM 中以 Wanderlust 子公司委托管理员身份(例如 wanderlustadmin)登录 Self Service Console。
- 单击 Manage 选项卡,然后单击 Users 打开 Users 页面,单击 Create,输入详细信息创建新用户。
例如,输入以下值办理一个新员工入职:
First Name      : Peter
Last Name       : Collins
Email           : peter.collins@wanderlust.com
Organization    : Wanderlust
User Type       : Employee
Display Name    : Peter Collins
User Login      : PCOLLINS
Password : Oracle123 - 单击 Submit 创建新用户(图 21)。然后,从 Self Service Console 注销。
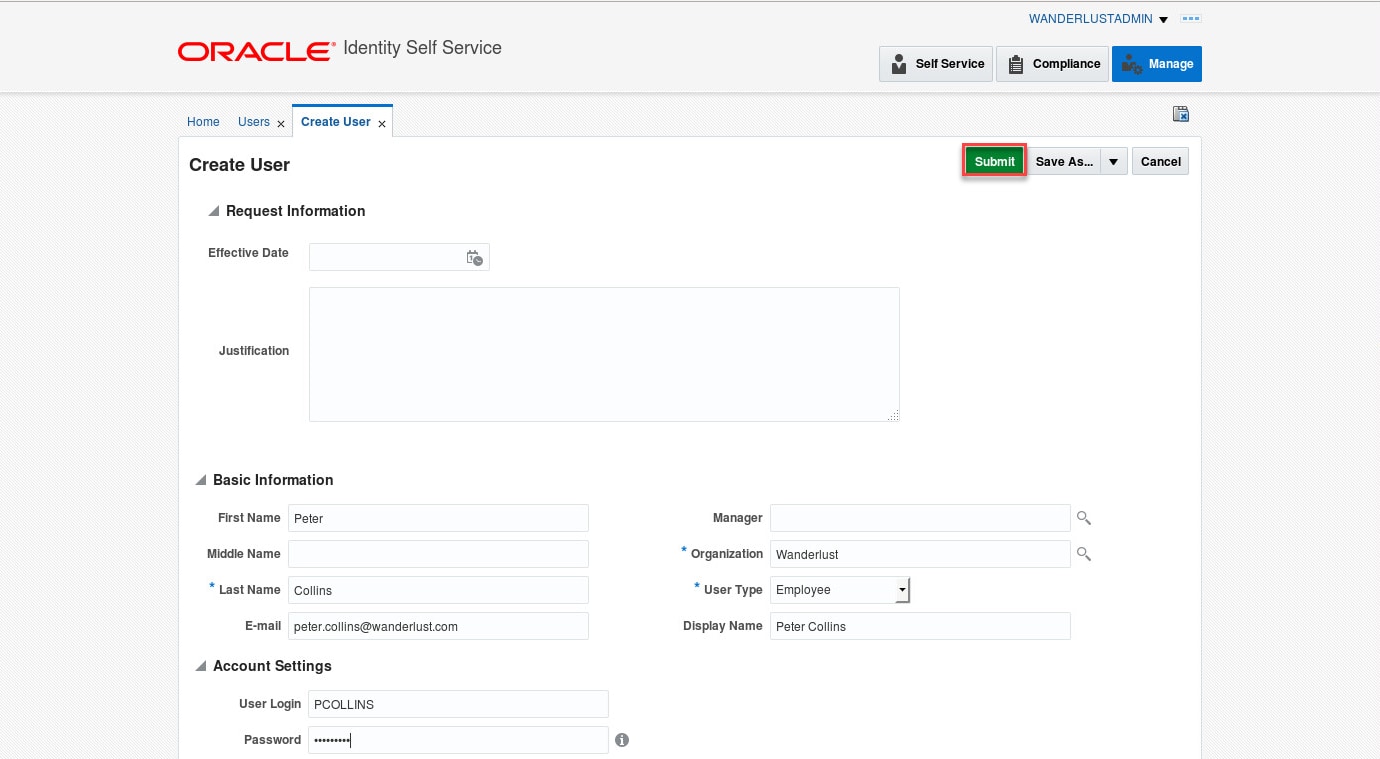
图 21.办理新用户入职 - 在 OIM 中以 Greenenergy 子公司委托管理员身份(例如 greenenergyadmin)登录 Self Service Console。
- 单击 Manage 选项卡,然后单击 Users 打开 Users 页面,单击 Create,输入详细信息创建新用户。
例如,输入以下值办理一个新的合同工入职:
First Name      : Olivia
Last Name       : Jackson
Email           : olivia.jackson@greenenergy.com
Organization    : Greenenergy
User Type       : Contractor
Display Name    : Olivia Jackson
User Login      : OJACKSON
Password : Oracle123 - 单击 Submit 创建新用户。
- 从 Self Service Console 注销。
2.通知和用户帐户激活
- 上述步骤中的两个 OIM 用户入职应分别触发每个 IDCS 租户上的用户帐户供应。
- 使用电子邮件客户端,打开发送到每个用户电子邮件地址的通知,按照说明激活帐户并设置密码(图 22)。
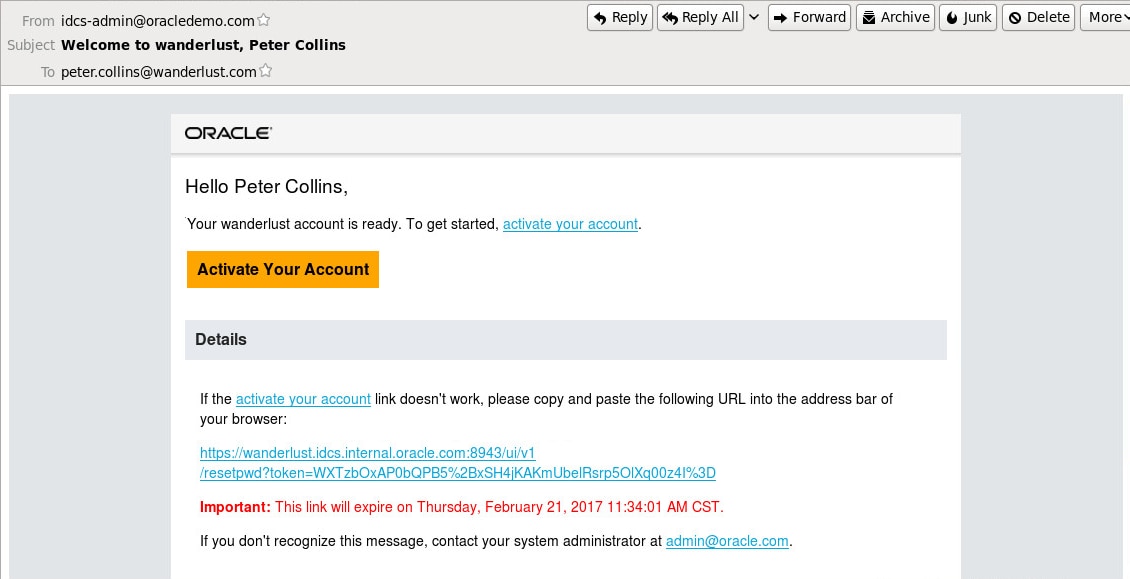
图 22.通知和帐户激活
3.登录 IDCS 并访问云应用
- 以 PCOLLINS 用户身份登录 Wanderlust 的 IDCS User Console
- 由于用户 Peter Collins 是一名员工,他已经在入职流程的自动供应中被添加到 IDCS 中的 Employees 组,因此可以访问 Salesforce 应用(图 23)。
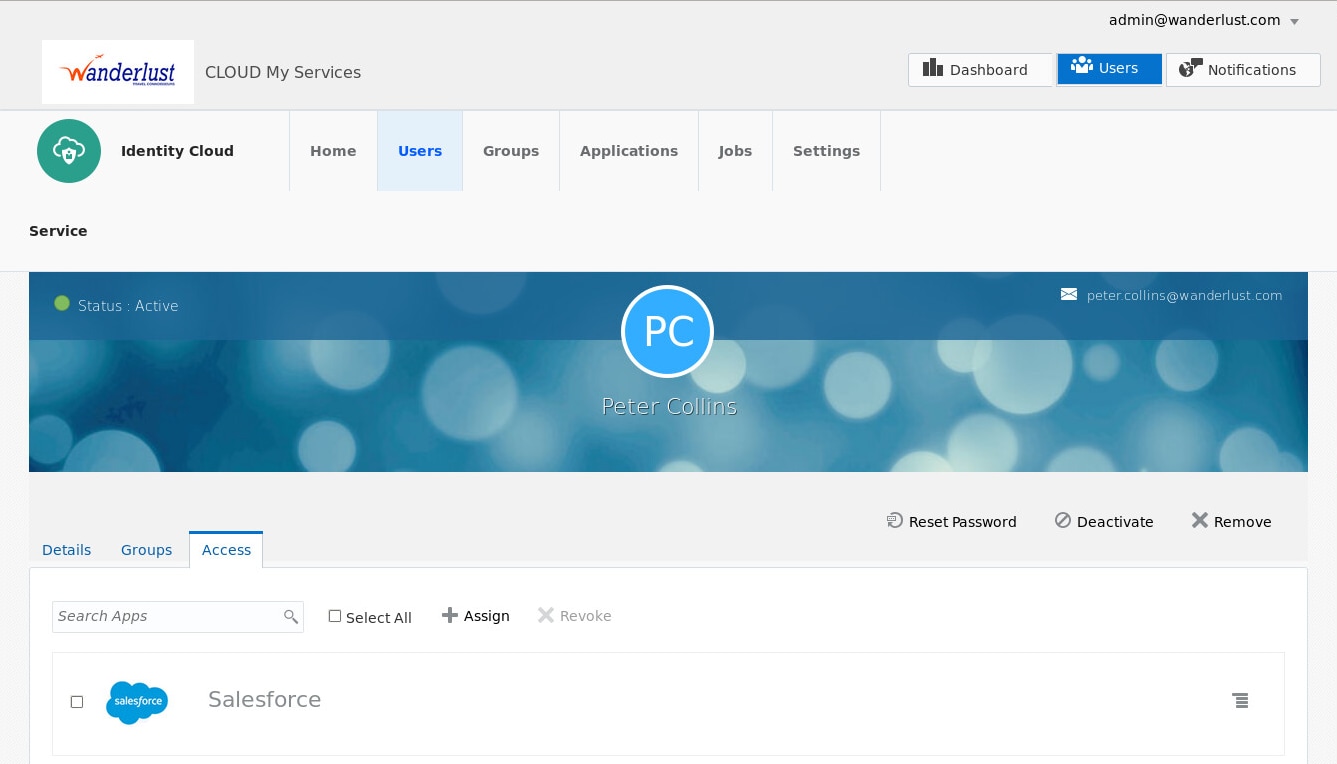
图 23.应用访问 - 在 My Apps 页面中,单击 Salesforce 访问应用。借助 SAML 联合和 JIT 供应,他可以访问应用而不必被提示输入凭证,也不必事先在 Salesforce 中创建一个帐户(图 24)。从 IDCS User Console 注销,这将同时从 Salesforce 注销。
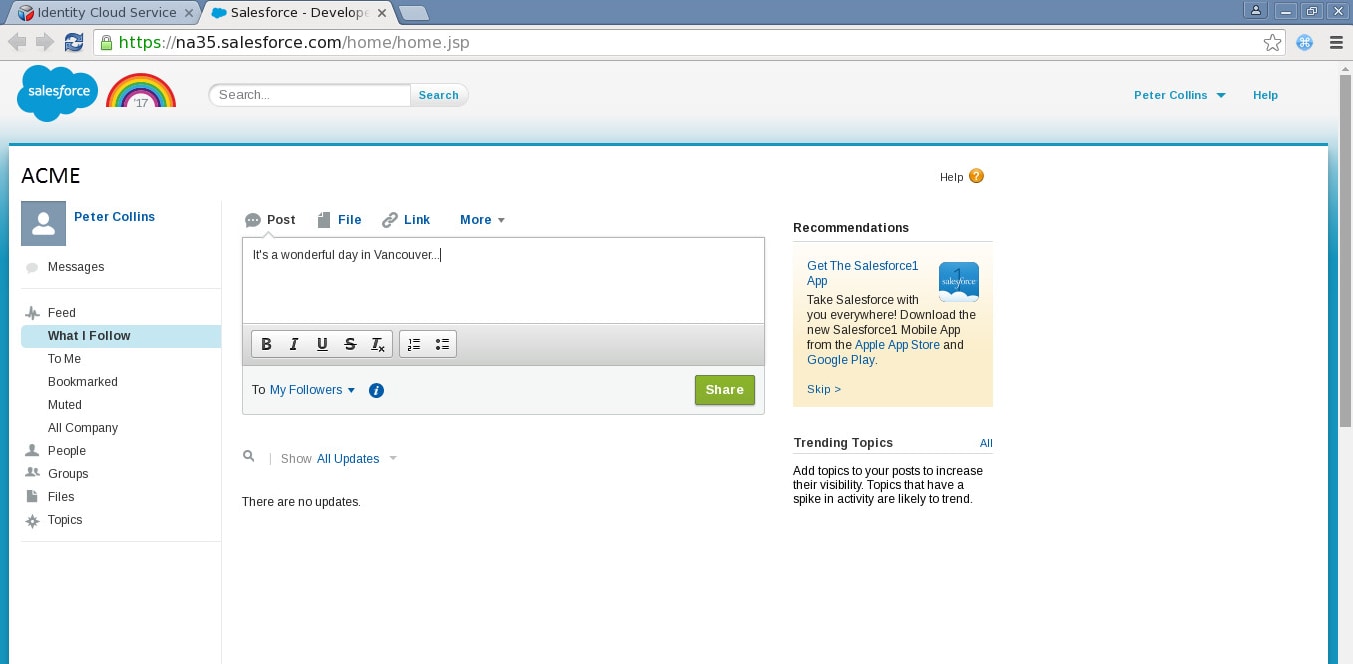
图 24.访问 Salesforce 应用 - 以 OJACKSON 用户身份登录 Greenenergy 的 IDCS User Console
- 由于用户 Olivia Jackson 是一名合同工,她已经在入职流程的自动供应中被添加到 IDCS 中的 Contractors 组,因此可以访问 ServiceNow 应用。
- 在 My Apps 页面中,单击 ServiceNow 访问应用。借助 SAML 联合和 JIT 供应,她可以访问应用而不必被提示输入凭证,也不必事先在 ServiceNow 中创建一个帐户(图 25)。
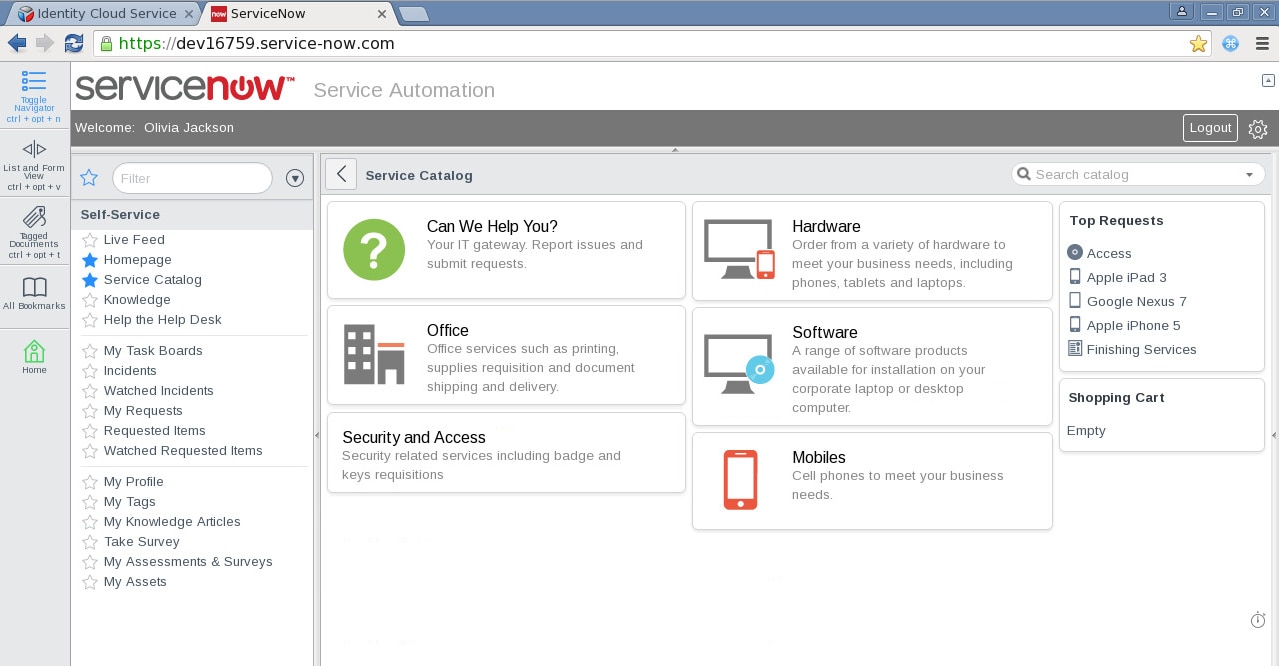
图 25.访问 ServiceNow 应用 - 从 IDCS User Console 注销,这将同时从 ServiceNow 注销。
总结
Oracle 身份云服务是基于多租户、微服务架构的解决方案,使用 OpenID Connect、OAuth 2.0、SAML 和 SCIM 等开放标准实现以云身份服务形式提供的核心身份和访问管理功能。在本文中,我们了解了混合环境中的一些供应功能以及与云应用的集成。
在未来几篇文章中,我将介绍 IDCS 的其他特性。这些特性让 IDCS 成为强大的多功能身份解决方案,面向希望实现可扩展业务、同时还在采用云的道路上支持创新的客户。
有关本文中所提到的产品和特性的其他参考资料,请参见以下链接:
- 了解更多有关 Identity Connector Framework (ICF) 的信息
- Oracle Identity Manager 连接器文档
- Oracle 身份云服务 REST API 文档
- Salesforce 的 SAML 即时供应
- ServiceNow 的按需登录/用户供应
- 关于 Oracle Identity Management 11g 第 2 版文档
- 关于 Oracle 身份云服务文档
关于作者
Ricardo Gutierrez 是 Oracle 的资深 IT 顾问,致力于 IDaaS、CASB、身份和访问管理、身份分析、身份治理、企业 SSO、联合、特权帐户管理、数据库和应用安全。Ricardo 拥有超过 25 年使用多种技术的经验,最近 12 年从事 IBM、Microsoft 和 Oracle 的全套安全产品的工作。他还是 PMP、CCSP 和 VMware 认证专业人员,发表了一些有关安全和云计算的白皮书、文章和培训材料。
- 单击 Update 更新配置(图 20)。注:无需导入 IDCS 证书,因为已经用 IDCS URL 地址更新属性