 文章
服务器与存储管理
文章
服务器与存储管理
如何安装和配置双节点集群
在 Oracle Solaris 11 上使用 Oracle Solaris Cluster 4.0
作者:Subarna Ganguly 和 Jonathan Mellors,2011 年 12 月
如何快速、轻松地为两个节点安装和配置 Oracle Solaris Cluster 软件,包括配置仲裁设备。
简介
本文逐步介绍使用交互式 scinstall 实用程序为两个节点安装和配置 Oracle Solaris Cluster 软件(包括配置仲裁设备)的过程。不包含配置高度可用的服务。
|
注:有关如何安装和配置其他 Oracle Solaris Cluster 软件配置的更多详细信息,请参见 Oracle Solaris Cluster 软件安装指南。
交互式 scinstall 实用程序是菜单驱动的。菜单通过使用默认值、提示您提供特定于您集群的信息以及标识无效条目,有助于降低出错可能性并促进最佳实践。
scinstall 实用程序还通过针对新集群实现仲裁设备配置自动化,无需手动配置仲裁设备。
注:本文参考 Oracle Solaris Cluster 4.0 版本。有关最新 Oracle Solaris Cluster 版本的更多信息,请参见版本说明。
前提条件、假设和默认设置
本节讨论适用于双节点集群的一些先决条件、假设和默认设置。
配置假设
本文假设满足以下条件:
- 您在 Oracle Solaris 11 上进行安装并且具备基本系统管理技能。
- 您要安装 Oracle Solaris Cluster 4.0 软件。
- 集群硬件支持 Oracle Solaris Cluster 4.0 软件。(请参见 Oracle Solaris Cluster 系统要求。)
- 安装了双节点 x86 集群。不过,安装过程也适用于 SPARC 集群。
- 每个节点有两个用作专用互连(也称为传输)的空闲网络接口,以及至少一个连接到公共网络的网络接口。
- SCSI 共享存储连接到两个节点。
- 您的配置与图 1 类似,但您可能具有更少或更多的设备,具体取决于您的系统或网络配置。
注:建议(但非必需)您在集群安装过程中通过控制台访问节点。
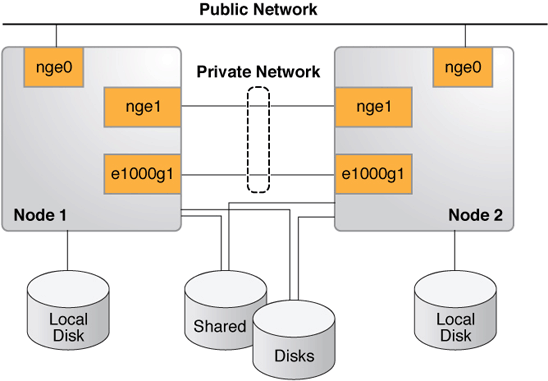
图 1. Oracle Solaris Cluster 硬件配置
每个系统的先决条件
本文假设在两个系统上都安装了 Oracle Solaris 11。
公共 IP 地址和逻辑主机名称的初始准备
您必须具有将配置为集群的节点的逻辑名称(主机名称)和 IP 地址。将这些条目添加到每个节点的 /etc/inet/hosts 文件,或添加到命名服务(如果使用 DNS、NIS 或 NIS+ 映射等命名服务)。
本文中的示例使用 NIS 服务和表 1 所示的配置。
表 1. 配置| 组件 | 名称 | 接口 | IP 地址 |
|---|---|---|---|
| 集群名称 | phys-schost | — | — |
| 节点 1 | phys-schost-1 | nge0 | 1.2.3.4 |
| 节点 2 | phys-schost-2 | nge0 | 1.2.3.5 |
默认设置
scinstall 交互式实用程序以 Typical 模式安装 Oracle Solaris Cluster 软件,并使用以下默认设置:
- 专用网络地址 172.16.0.0
- 专用网络掩码 255.255.248.0
- 集群传输交换机
switch1和switch2
本文中的示例没有集群传输交换机,而是使用背对背电缆解决专用网络连接。
在本文的示例中,两个集群节点上的专用互连的接口都是 nge1 和 e1000g1。
安装前检查
执行以下步骤。
- 针对集群节点上的
root临时启用rsh或ssh访问。 - 登录到要安装 Oracle Solaris Cluster 软件的集群节点并成为超级用户。
- 在每个节点上,验证
/etc/inet/hosts文件条目。如果未提供任何其他名称解析服务,则将另一个节点的名称和 IP 地址添加到此文件。在我们的示例(使用 NIS 服务)中,
/etc/inet/hosts文件如下所示。在节点 1 上:
# Internet host table
#
::1 phys-schost-1 localhost
127.0.0.1 phys-schost-1 localhost loghost
在节点 2 上:
# Internet host table
#
::1 phys-schost-2 localhost
127.0.0.1 phys-schost-2 localhost loghost
- 在每个节点上,验证至少有一个共享存储磁盘,如清单 1 所示。
在我们的示例中,在两个节点之间共享两个磁盘:
c0t600A0B800026FD7C000019B149CCCFAEd0c0t600A0B800026FD7C000019D549D0A500d0
清单 1. 验证存在共享存储# format Searching for disks...done AVAILABLE DISK SELECTIONS: 0. c4t0d0 <FUJITSU-MBB2073RCSUN72G-0505 cyl 8921 alt 2 hd 255 sec 63> /pci@7b,0/pci1022,7458@11/pci1000,3060@2/sd@0,0 /dev/chassis/SYS/HD0/disk 1. c4t1d0 <SUN72G cyl 14084 alt 2 hd 24 sec 424> /pci@7b,0/pci1022,7458@11/pci1000,3060@2/sd@1,0 /dev/chassis/SYS/HD1/disk 2. c0t600A0B800026FD7C000019B149CCCFAEd0 <SUN-CSM200_R-0660 cyl 2607 alt 2 hd 255 sec 63> /scsi_vhci/disk@g600a0b800026fd7c000019b149cccfae 3. c0t600A0B800026FD7C000019D549D0A500d0 <SUN-CSM200_R-0660 cyl 2607 alt 2 hd 255 sec 63> /scsi_vhci/disk@g600a0b800026fdb600001a0449d0a6d3 - 在每个节点上,确保安装了正确的操作系统版本:
# more /etc/release Oracle Solaris 11 11/11 X86 Copyright (c) 1983, 2011, Oracle and/or its affiliates. All rights reserved. Assembled 26 September 2011 - 确保网络接口配置为静态 IP 地址(而不是 DHCP 或
addrconf类型,如命令ipadm show-addr -o all所显示的)。如果节点配置为静态,则继续到配置 Oracle Solaris Cluster 发布者一节。否则,继续此过程并执行以下操作:
- 如果网络接口未配置为静态 IP 地址,则在每个节点上运行清单 2 所示的命令以取消所有网络接口和服务配置。
清单 2. 取消网络接口和服务配置# netadm enable -p ncp defaultfixed Enabling ncp 'DefaultFixed' phys-schost-1: Sep 27 08:19:19 phys-schost-1 in.ndpd[1038]: Interface net0 has been removed from kernel. in.ndpd will no longer use it Sep 27 08:19:19 phys-schost-1 in.ndpd[1038]: Interface net1 has been removed from kernel . in.ndpd will no longer use it Sep 27 08:19:19 phys-schost-1 in.ndpd[1038]: Interface net2 has been removed from kernel . in.ndpd will no longer use it Sep 27 08:19:20 phys-schost-1 in.ndpd[1038]: Interface net3 has been removed from kernel . in.ndpd will no longer use it Sep 27 08:19:20 phys-schost-1 in.ndpd[1038]: Interface net4 has been removed from kernel . in.ndpd will no longer use it Sep 27 08:19:20 phys-schost-1 in.ndpd[1038]: Interface net5 has been removed from kernel . in.ndpd will no longer use it
- 然后,在每个节点上运行清单 3 所示的命令。
清单 3. 在两个节点上运行的命令# svccfg -s svc:/network/nis/domain setprop config/domainname = hostname: nisdomain.example.com # svccfg -s svc:/network/nis/domain:default refresh # svcadm enable svc:/network/nis/domain:default # svcadm enable svc:/network/nis/client:default # /usr/sbin/svccfg -s svc:/system/name-service/switch setprop config/host = astring: \"files nis\" # /usr/sbin/svccfg -s svc:/system/name-service/switch setprop config/netmask = astring: \"files nis\" # /usr/sbin/svccfg -s svc:/system/name-service/switch setprop config/automount = astring: \"files nis\" # /usr/sbin/svcadm refresh svc:/system/name-service/switch
- 在每个节点上,重新绑定到 NIS 服务器:
# ypinit -c
- 重新启动每个节点以确保新的网络配置运行正常。
- 如果网络接口未配置为静态 IP 地址,则在每个节点上运行清单 2 所示的命令以取消所有网络接口和服务配置。
- (可选)在每个节点上,创建一个不包含集群软件的引导环境 (BE) 作为集群前备份 BE,例如:
# beadm create Pre-Cluster-s11

# beadm list

BE                     Active Mountpoint Space   Policy  Created
--                     ------ ---------- -----   ------  -------
Pre-Cluster-s11         -      -         179.0K  static  2011-09-27 08:51
s11                     NR     /          4.06G  static  2011-09-26 08:50
配置 Oracle Solaris Cluster 发布者
可通过两种主要方法访问 Oracle Solaris Cluster 软件包信息库,具体取决于集群节点是否可直接访问(或通过 Web 代理访问)互联网:
使用 pkg.oracle.com 上托管的信息库
要访问 Oracle Cluster Solaris 版本信息库或支持信息库,按如下所示获得 SSL 公钥和私钥:
- 转到 http://pkg-register.oracle.com(需要登录)。
- 选择 Oracle Solaris Cluster 版本信息库或支持信息库。
- 接受许可。
- 选择 Oracle Solaris Cluster 软件并提交请求,请求新证书。(将显示一个认证页面,其中包含密钥和证书的下载按钮。)
- 下载密钥和证书并进行安装,如认证页面所述。
- 通过已下载的 SSL 密钥配置
ha-cluster发布者,使其指向 pkg.oracle.com 上的选定信息库 URL。以下示例使用版本信息库:# pkg set-publisher \ -k /var/pkg/ssl/Oracle_Solaris_Cluster_4.0.key.pem \ -c /var/pkg/ssl/Oracle_Solaris_Cluster_4.0.certificate.pem \ -g https://pkg.oracle.com/ha-cluster/release/ ha-cluster
使用信息库的本地副本
要访问 Oracle Solaris Cluster 版本信息库或支持信息库的本地副本,按如下所示下载信息库映像。
- 从以下网站之一下载信息库映像:
- Oracle 技术网
- Oracle 软件交付云(需要登录)
- 在 Media Pack Search 页面中,选择 Oracle Solaris 作为 Product Pack,单击 Go。
- 选择 Oracle Solaris Cluster 4.0 Media Pack,下载此文件。
- 挂载信息库映像并将数据复制到所有集群节点均可访问的共享文件系统。
# lofiadm -a /tmp/osc4.0-repo-full.iso
/dev/lofi/1
# mount -F hsfs /dev/lofi/1 /mnt
# rsync -aP /mnt/repo /export
# share /export/repo
- 配置
ha-cluster发布者。以下示例使用节点 1 作为共享信息库本地副本的系统:# pkg set-publisher -g file:///net/phys-schost-1/export/repo ha-cluster
安装 Oracle Solaris Cluster 软件包
- 在每个节点上,确保发布了正确的 Oracle Solaris 软件包信息库。如果不正确,则取消不正确发布者的设置,并设置正确的发布者。如果
ha-cluster软件包无法访问 Oracle Solaris 发布者,则此软件包的安装可能失败。# pkg publisher PUBLISHER TYPE STATUS URI solaris origin online <solaris repository> ha-cluster origin online <ha-cluster repository>
- 在每个集群节点上,安装
ha-cluster-full软件包组,如清单 4 所示。
清单 4. 安装软件包组# pkg install ha-cluster-full Packages to install: 68 Create boot environment: No Create backup boot environment: Yes Services to change: 1 DOWNLOAD PKGS FILES XFER (MB) Completed 68/68 6456/6456 48.5/48.5$<3> PHASE ACTIONS Install Phase 8928/8928 PHASE ITEMS Package State Update Phase 68/68 Image State Update Phase 2/2 Loading smf(5) service descriptions: 9/9 Loading smf(5) service descriptions: 57/57
配置 Oracle Solaris Cluster 软件
- 在每个集群节点上,识别将用于专用互连的网络接口,例如:
在节点 1 上,运行以下命令。
# dladm show-phys

LINK              MEDIA                STATE      SPEED  DUPLEX    DEVICE
net3              Ethernet             unknown    0      unknown   e1000g1
net0              Ethernet             up         1000   full      nge0
net4              Ethernet             unknown    0      unknown   e1000g2
net2              Ethernet             unknown    0      unknown   e1000g0
net1              Ethernet             unknown    0      unknown   nge1
net5              Ethernet             unknown    0      unknown   e1000g3
在节点 2 上,运行以下命令。
# dladm show-phys

LINK              MEDIA                STATE      SPEED  DUPLEX    DEVICE
net3              Ethernet             unknown    0      unknown   e1000g1
net0              Ethernet             up         1000   full      nge0
net4              Ethernet             unknown    0      unknown   e1000g2
net2              Ethernet             unknown    0      unknown   e1000g0
net1              Ethernet             unknown    0      unknown   nge1
net5              Ethernet             unknown    0      unknown   e1000g3
在我们的示例中,将在每个节点上使用
net1和net3作为专用互连。 - 在两个节点上,确保 SMF 服务未被禁用。
# svcs -x
- 在每个节点上,确保服务
network/rpc/bind:default将其local_only配置设置为false。# svcprop network/rpc/bind:default | grep local_only config/local_only boolean false
如果未设置为
false,则按如下方式设置:# svccfg svc:> select network/rpc/bind svc:/network/rpc/bind> setprop config/local_only=false svc:/network/rpc/bind> quit # svcadm refresh network/rpc/bind:default # svcprop network/rpc/bind:default | grep local_only config/local_only boolean false
- 从一个节点,通过运行
scinstall命令启动 Oracle Solaris Cluster 配置实用程序(也可在另一个节点上运行此命令来配置软件),然后在主菜单键入 1 选择创建新的集群或添加集群节点。在清单 5 所示的示例中,此命令在第二个节点
清单 5. 运行phys-schost-2上运行。scinstall命令# /usr/cluster/bin/scinstall *** Main Menu *** Please select from one of the following (*) options: * 1) Create a new cluster or add a cluster node * 2) Print release information for this cluster node * ?) Help with menu options * q) Quit Option: 1 - 在清单 6 所示的 Create a New Cluster 屏幕中,回答 yes,然后按 Enter。
清单 6. 创建新集群*** Create a New Cluster *** This option creates and configures a new cluster. Press Control-D at any time to return to the Main Menu. Do you want to continue (yes/no) [yes]? Checking the value of property "local_only" of service svc:/network/rpc/bind ... Property "local_only" of service svc:/network/rpc/bind is already correctly set to "false" on this node. Press Enter to continue: - 在安装模式选择屏幕中,选择默认选项 (Typical),如清单 7 所示。
清单 7. 选择安装模式>>> Typical or Custom Mode <<< This tool supports two modes of operation, Typical mode and Custom mode. For most clusters, you can use Typical mode. However, you might need to select the Custom mode option if not all of the Typical mode defaults can be applied to your cluster. For more information about the differences between Typical and Custom modes, select the Help option from the menu. Please select from one of the following options: 1) Typical 2) Custom ?) Help q) Return to the Main Menu Option [1]: 1 - 提供集群的名称(在我们的示例中,为
phys-schost)。>>> Cluster Name <<< Each cluster has a name assigned to it. The name can be made up of any characters other than whitespace. Each cluster name should be unique within the namespace of your enterprise. What is the name of the cluster you want to establish? phys-schost - 提供另一个节点的名称(在我们的示例中,为
phys-schost-1),按 Control-D 完成节点列表,回答 yes 确认节点列表,如清单 8 所示。
清单 8. 确认节点列表>>> Cluster Nodes <<< This Oracle Solaris Cluster release supports a total of up to 16 nodes. List the names of the other nodes planned for the initial cluster configuration. List one node name per line. When finished, type Control-D: Node name (Control-D to finish): phys-schost-1 Node name (Control-D to finish): ^D This is the complete list of nodes: phys-schost-2 phys-schost-1 Is it correct (yes/no) [yes]? - 下一个屏幕将配置集群的专用互连,也称为传输适配器。在我们的示例中,将选择接口
net1和net3,这是先前所确定的。如果工具在这些接口上发现网络流量,则要求进行确认以便以任何方式使用它们。确保这些接口未连接到任何其他网络,然后确认将它们用作传输适配器,如清单 9 所示。
清单 9. 选择传输适配器>>> Cluster Transport Adapters and Cables <<< You must identify the cluster transport adapters which attach this node to the private cluster interconnect. Select the first cluster transport adapter: 1) net1 2) net2 3) net3 4) net4 5) net5 6) Other Option: 1 Searching for any unexpected network traffic on "net1" ... done Unexpected network traffic was seen on "net1". "net1" may be cabled to a public network. Do you want to use "net1" anyway (yes/no) [no]? yes Select the second cluster transport adapter: 1) net1 2) net2 3) net3 4) net4 5) net5 6) Other Option: 3 Searching for any unexpected network traffic on "net3" ... done Unexpected network traffic was seen on "net3". "net3" may be cabled to a public network. Do you want to use "net3" anyway (yes/no) [no]? yes - 接下来,通过选择以下默认答案来配置仲裁设备,如清单 10 所示:
- 回答 no,禁用自动仲裁设备选择。
- 回答 yes,确认可以创建新集群。
- 当询问是否因集群检查错误而中断集群创建时,回答 no。
清单 10. 配置仲裁设备>>> Quorum Configuration <<< Every two-node cluster requires at least one quorum device. By default, scinstall selects and configures a shared disk quorum device for you. This screen allows you to disable the automatic selection and configuration of a quorum device. You have chosen to turn on the global fencing. If your shared storage devices do not support SCSI, such as Serial Advanced Technology Attachment (SATA) disks, or if your shared disks do not support SCSI-2, you must disable this feature. If you disable automatic quorum device selection now, or if you intend to use a quorum device that is not a shared disk, you must instead use clsetup(1M) to manually configure quorum once both nodes have joined the cluster for the first time. Do you want to disable automatic quorum device selection (yes/no) [no]? Is it okay to create the new cluster (yes/no) [yes]? During the cluster creation process, cluster check is run on each of the new cluster nodes. If cluster check detects problems, you can either interrupt the process or check the log files after the cluster has been established. Interrupt cluster creation for cluster check errors (yes/no) [no]?清单 11 显示最终输出,指明了节点配置和安装日志文件名称。然后,实用程序以集群模式重新启动每个节点。
清单 11. 节点配置详情Cluster Creation Log file - /var/cluster/logs/install/scinstall.log.3386 Configuring global device using lofi on phys-schost-1: done Starting discovery of the cluster transport configuration. The following connections were discovered: phys-schost-2:net1 switch1 phys-schost-1:net1 phys-schost-2:net3 switch2 phys-schost-1:net3 Completed discovery of the cluster transport configuration. Started cluster check on "phys-schost-2". Started cluster check on "phys-schost-1". . . . Refer to the log file for details. The name of the log file is /var/cluster/logs/install/scinstall.log.3386. Configuring "phys-schost-1" ... done Rebooting "phys-schost-1" ... Configuring "phys-schost-2" ... Rebooting "phys-schost-2" ... Log file - /var/cluster/logs/install/scinstall.log.3386
scinstall实用程序完成时,基本 Oracle Solaris Cluster 软件的安装和配置便会完成。现在,集群已就绪,您可以配置将用于支持高度可用的应用程序的组件。这些集群组件可以包括设备组、集群文件系统、高度可用的本地文件系统以及各个数据服务和区域集群。要配置这些组件,请参阅文档库。- 在每个节点上,验证 Oracle Solaris 服务管理工具 (SMF) 的多用户服务已联机。还应确保 Oracle Solaris Cluster 添加的新服务全部已联机。
# svcs -x
# svcs multi-user-server
STATE          STIME    FMRI
online          9:58:44 svc:/milestone/multi-user-server:default
- 从一个节点验证两个节点都已加入集群,如清单 12 所示。
清单 12. 验证两个节点都已加入集群# cluster status === Cluster Nodes === --- Node Status --- Node Name Status --------- ------ phys-schost-1 Online phys-schost-2 Online === Cluster Transport Paths === Endpoint1 Endpoint2 Status --------- -------- ------ phys-schost-1:net3 phys-schost-2:net3 Path online phys-schost-1:net1 phys-schost-2:net1 Path online === Cluster Quorum === --- Quorum Votes Summary from (latest node reconfiguration) --- Needed Present Possible ------ ------- -------- 2 3 3 --- Quorum Votes by Node (current status) --- Node Name Present Possible Status --------- ------- -------- ------ phys-schost-1 1 1 Online phys-schost-2 1 1 Online --- Quorum Votes by Device (current status) --- Device Name Present Possible Status ----------- ------- -------- ------ d1 1 1 Online === Cluster Device Groups === --- Device Group Status --- Device Group Name Primary Secondary Status ----------------- ------- --------- ------ --- Spare, Inactive, and In Transition Nodes --- Device Group Name Spare Nodes Inactive Nodes In Transition Nodes ----------------- ----------- -------------- -------------------- --- Multi-owner Device Group Status --- Device Group Name Node Name Status ----------------- --------- ------ === Cluster Resource Groups === Group Name Node Name Suspended State ---------- --------- --------- ----- === Cluster Resources === Resource Name Node Name State Status Message ------------- --------- ----- -------------- === Cluster DID Devices === Device Instance Node Status --------------- ---- ------ /dev/did/rdsk/d1 phys-schost-1 Ok phys-schost-2 Ok /dev/did/rdsk/d2 phys-schost-1 Ok phys-schost-2 Ok /dev/did/rdsk/d3 phys-schost-1 Ok /dev/did/rdsk/d4 phys-schost-1 Ok /dev/did/rdsk/d5 phys-schost-2 Ok /dev/did/rdsk/d6 phys-schost-2 Ok === Zone Clusters === --- Zone Cluster Status --- Name Node Name Zone HostName Status Zone Status ---- --------- ------------- ------ -----------
验证(可选)
现在,我们将创建一个故障切换资源组,其中包含高度可用的网络资源的 LogicalHostname 资源以及 zpool 资源中高度可用的 ZFS 文件系统的 HAStoragePlus 资源。
- 识别将用于此目的的网络地址并将其添加到节点上的
/etc/inet/hosts文件。在以下示例中,使用
schost-lh作为资源组的逻辑主机名称。此资源的类型为SUNW.LogicalHostname,这是一种预先注册的资源类型。在节点 1 上:
# Internet host table
#
::1 localhost
127.0.0.1 localhost loghost
1.2.3.4   phys-schost-1 # Cluster Node
1.2.3.5   phys-schost-2 # Cluster Node
1.2.3.6   schost-lh
在节点 2 上:
# Internet host table
#
::1 localhost
127.0.0.1 localhost loghost
1.2.3.4   phys-schost-1 # Cluster Node
1.2.3.5   phys-schost-2 # Cluster Node
1.2.3.6   schost-lh
- 从一个节点创建一个 zpool,包含两个共享存储磁盘:
/dev/did/rdsk/d1s0和/dev/did/rdsk/d2s0。在我们的示例中,已经使用format实用程序将整个磁盘分配给磁盘的分片 0。# zpool create -m /zfs1 pool1 mirror /dev/did/dsk/d1s0 /dev/did/dsk/d2s0 # df -k /zfs1 Filesystem 1024-blocks Used Available Capacity Mounted on pool1 20514816 31 20514722 1% /zfs1
现在,zpool 将放在高度可用的资源组中,作为
SUNW.HAStoragePlus类型的资源。此资源类型必须先注册,然后才能进行首次使用。 - 创建一个高度可用的资源组来存储资源,为此在一个节点上执行以下操作:
# /usr/cluster/bin/clrg create test-rg
- 然后将网络资源添加到组:
# /usr/cluster/bin/clrslh create -g test-rg -h schost-lh schost-lhres
- 注册存储资源类型:
# /usr/cluster/bin/clrt register SUNW.HAStoragePlus
- 将 zpool 添加到组:
# /usr/cluster/bin/clrs create -g test-rg -t SUNW.HAStoragePlus -p \ zpools=pool1 hasp-res
- 使组联机:
# /usr/cluster/bin/clrg online -eM test-rg
- 检查组和资源的状态,如清单 13 所示。
清单 13. 检查组和资源状态# /usr/cluster/bin/clrg status === Cluster Resource Groups === Group Name Node Name Suspended Status ---------- -------- --------- ------ test-rg phys-schost-1 No Online phys-schost-2 No Offline # /usr/cluster/bin/clrs status === Cluster Resources === Resource Name Node Name State Status Message ------------- --------- ----- -------------- hasp-res phys-schost-1 Online Online phys-schost-2 Offline Offline schost-lhres phys-schost-1 Online Online - LogicalHostname online. phys-schost-2 Offline Offline通过上面的状态,我们看到节点 1 上的资源和组已联机。
- 要验证可用性,将资源组切换到节点 2 并检查资源和组的状态,如清单 14 所示。
清单 14. 将资源组切换到节点 2# /usr/cluster/bin/clrg switch -n phys-schost-2 test-rg # /usr/cluster/bin/clrg status === Cluster Resource Groups === Group Name Node Name Suspended Status ---------- --------- --------- ------ test-rg phys-schost-1 No Offline phys-schost-2 No Online # /usr/cluster/bin/clrs status === Cluster Resources === Resource Name Node Name State Status Message ------------- --------- ----- -------------- hasp-res phys-schost-1 Offline Offline phys-schost-2 Online Online schost-lhres phys-schost-1 Offline Offline - LogicalHostname offline. phys-schost-2 Online Online - LogicalHostname online.
总结
本文介绍了如何在 Oracle Solaris 11 上使用 Oracle Solaris Cluster 4.0 安装和配置双节点集群。本文还介绍了如何通过在一个节点上创建并运行两个资源,然后将这些资源切换到第二个节点来验证集群运行正常。
更多信息
有关如何配置 Oracle Solaris Cluster 组件的更多信息,请参见表 2 列出的资源。
表 2. 资源| 资源 | URL |
|---|---|
| Oracle Solaris Cluster 4.0 文档库 | http://www.oracle.com/pls/topic/lookup?ctx=E23623 |
| Oracle Solaris Cluster 软件安装指南 | http://www.oracle.com/pls/topic/lookup?ctx=E23623&id=CLIST |
| Oracle Solaris Cluster 数据服务规划和管理指南 | http://www.oracle.com/pls/topic/lookup?ctx=E23623&id=CLDAG |
| Oracle Solaris Cluster 4.0 版本说明 | http://www.oracle.com/pls/topic/lookup?ctx=E23623&id=CLREL |
| Oracle Solaris Cluster 培训 | http://www.oracle.com/technetwork/cn/server-storage/solaris-cluster/training/index.html |
| Oracle Solaris Cluster 下载 | http://www.oracle.com/technetwork/cn/server-storage/solaris-cluster/downloads/index.html |
| 修订版 1.0,2011 年 12 月 2 日 |