 文章
文章
开发人员:Java
|
||||||||||||||||||||||||||||||||||||||||||||||
| 缓存类型 |
描述 |
|
分布模式 |
定义一个将数据存储在整个集群节点中的分布式缓存 |
|
复制模式 |
定义一个在所有集群节点之间复制缓存项的缓存 |
|
读取-写入-备份-映射模式 |
定义一个映射,用于提供持久存储(如关系数据库)的缓存 |
|
外部模式 |
定义一个外部缓存(如磁盘) |
|
类模式 |
定义一个自定义缓存实施,要求其实施 java.util.Map 接口 |
现在,让我们进入练习,学习使用 Oracle JDeveloper 来创建和配置 Coherence 缓存。
前提条件
Oracle Coherence 3.3.1(有关完整安装过程的信息,请参阅 文档)
Oracle 数据库
Oracle JDeveloper 11g (截至本文撰写之日,使用的是技术预览版)
项目配置
下载 Oracle Coherence 3.3.1 版 — 纯 Java,并将 zip 文件解压缩到一个目录下。
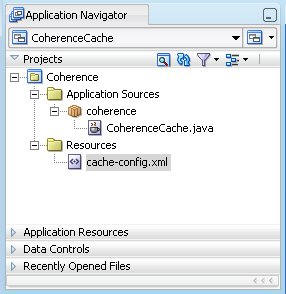
下载 Coherecne 并将 zip 文件解压缩到一个目录下,然后在 Oracle JDeveloper 中创建一个应用程序和项目。将 Java 类 CoherenceCache.java 添加到该项目中。在此 Java 类中将创建一个 Coherence 缓存。添加 XML 文档 cache-config.xml 作为缓存配置部署描述符。
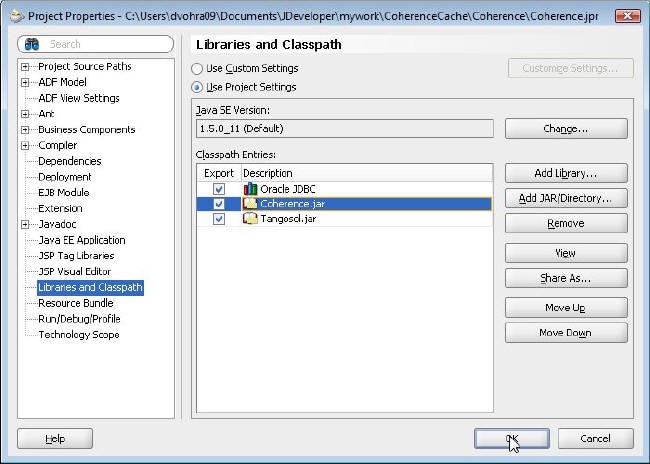
将 Coherence JAR 文件 coherence.jar 和 tangosol.jar 添加到项目库中。Coherence JAR 文件位于 Oracle Coherence 安装的 \coherence\lib 目录下。还要添加数据库访问项目库所需的 Oracle JDBC 库。
运行配置
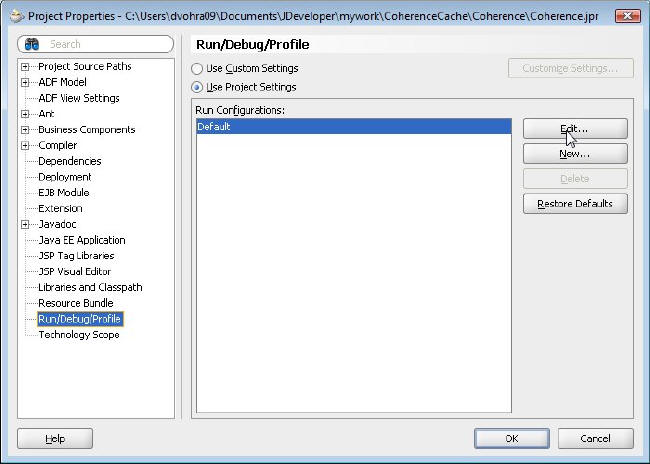
接下来,修改应用程序的运行配置,将缓存配置文件作为一个运行时 Java 选项进行添加。选择项目节点,然后选择 Tools -> Project Properties。在 Project Properties 窗口中,选择 Run/Debug/Profile。默认情况下, Run Configuration Default 处于选中状态。单击 Edit,编辑 Default 配置。
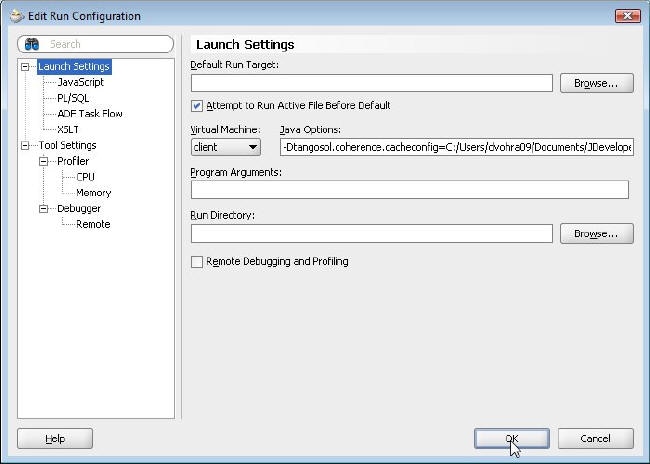
在 Edit Run Configuration 窗口中,选择 Launch Settings。在 Java Options 域中,使用
-Dtangosol.coherence.cacheconfig=[path-to-cache-config-file]/cache-config.xml 指定缓存配置文件 (cache-config.xml)。
针对我们创建的 Oracle Coherence 应用程序,在 Java Options 域中指定以下内容(到 cache-config.xml 的路径可能会不同)并单击 OK。
-Dtangosol.coherence.cacheconfig=C:/Users/dvohra09/Documents/Jdeveloper/mywork/CoherenceCache/Coherence/cache-config.xml
在 Project Properties -> Run/Debug/Profile 窗口中,单击 OK。该缓存配置文件即作为一个运行时 Java 选项添加到了 Coherence Java 应用程序中。
缓存配置
在该缓存配置文件中,在 caching-scheme-mapping 元素中通过 cache-mapping 元素定义缓存名称和命名模式的映射。指定到缓存类型 default-replicated 的默认映射,并将缓存名称 VirtualCache 映射到缓存类型 default-distributed。使用 DistributedCache 服务定义具有 distributed-scheme 元素的分布式缓存模式。下面列出的缓存配置文件将复制到 Oracle JDeveloper 中的 cache-config.xml 文件中。
<?xml version="1.0"?>
<!DOCTYPE cache-config SYSTEM "cache-config.dtd">
<cache-config>
    <caching-scheme-mapping>

        <cache-mapping>
            <cache-name>VirtualCache</cache-name>
            <scheme-name>default-distributed</scheme-name>
        </cache-mapping>
    </caching-scheme-mapping>
    <caching-schemes>
        <!--
        Default Distributed caching scheme.
        -->
        <distributed-scheme>
            <scheme-name>default-distributed</scheme-name>
            <service-name>DistributedCache</service-name>
            <backing-map-scheme>
                <class-scheme>
                    <scheme-ref>default-backing-map</scheme-ref>
                </class-scheme>
            </backing-map-scheme>
        </distributed-scheme>
  <class-scheme>
            <scheme-name>default-backing-map</scheme-name>
            <class-name>com.tangosol.util.SafeHashMap</class-name>
            </class-scheme>
 <caching-schemes>
</cache-config>
缓存应用程序
接下来,在该 Java 类中创建缓存。导入 CacheFactory 类和 NamedCache 接口。
import com.tangosol.net.CacheFactory;
import com.tangosol.net.NamedCache;
从 CacheFactory 类中创建了一个缓存实例。使用 CacheFactory 类的 getCache() 方法创建一个 NamedCache。使用一个映射到分布式缓存模式的缓存名称 VirtualCache。
Named cache = CacheFactory.getCache ( "VirtualCache");
NamedCache 是一个保存整个集群中的节点所共享的资源的 java.util.Map。使用 put() 方法添加缓存项。
cache.put (key, "Hello Cache");
可以使用 get() 方法检索缓存项。
System.out.println((String)cache.get("hello"));
将下面列出的 Java 类复制到 Oracle JDeveloper 中的 CoherenceCache 应用程序中。
package coherence;
import com.tangosol.net.CacheFactory;
import com.tangosol.net.NamedCache;

public class CoherenceCache {
    NamedCache cache;
    public CoherenceCache() {
    }

   public void putCache(){
        cache = CacheFactory.getCache ( "VirtualCache");
       String key = "hello";
       cache.put (key, "Hello Cache");

   }

   public void retrieveCache(){

       System.out.println((String)cache.get("hello"));

   }

    public static void main (String [] args) {
    CoherenceCache cache = new CoherenceCache();
    cache.putCache();
    cache.retrieveCache();
    }
}
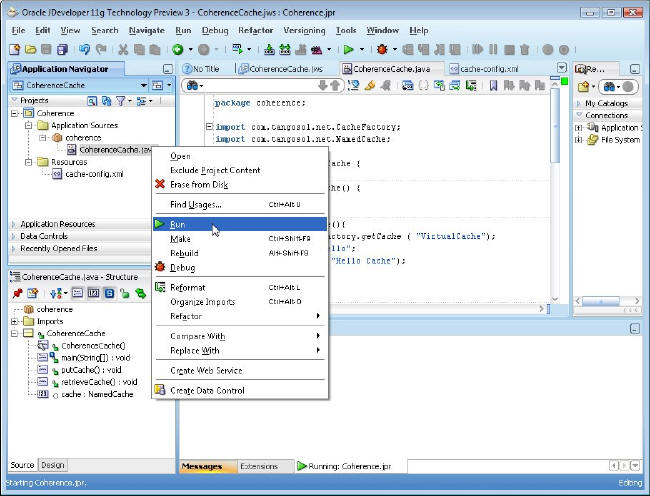
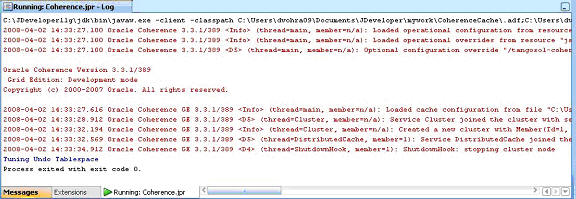
右键单击 Oracle Coherence 应用程序并选择 Run。
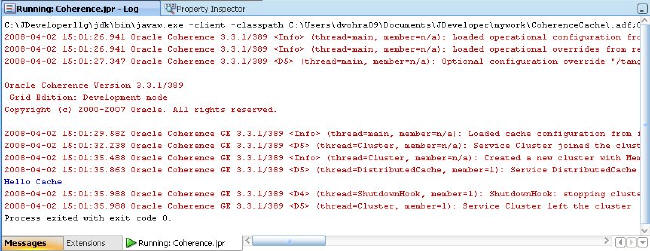
Oracle Coherence 应用程序运行,并在 Log 窗口中显示输出。该输出显示从 tangosol-coherence.xml 加载了操作配置,从 cache-config.xml 加载了缓存配置,新建了集群,并且 DistributedCache 服务联接到集群。操作部署描述符 tangosol-coherence.xml 将指定 Coherence 在提供集群、通信和数据管理服务时所采用的操作和运行时设置。
创建 Oracle 数据库缓存
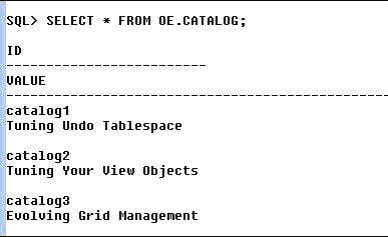
在本节中,您将创建一个 Oracle 数据库缓存,该缓存由 Oracle 数据库提供支持。首先,使用以下 SQL 脚本创建一个 Oracle 数据库表。
CREATE TABLE OE.CATALOG(id VARCHAR(25)
PRIMARY KEY, value VARCHAR(96));
INSERT INTO OE.CATALOG VALUES('catalog1', 'Tuning Undo Tablespace');
INSERT INTO OE.CATALOG VALUES('catalog2', 'Tuning Your View Objects');
在 Oracle JDeveloper 中为数据库缓存创建一个 Java 类 DatabaseCache.java,并添加 createCache()、addEntry()、retrieveEntry()、eraseEntry() 和 queryCache() 方法。
自定义 CacheStore
要将缓存连接到后端数据库,需要缓存配置文件 (cache-config.xml) 元素 cachestore-scheme。必须对 cachestore-scheme 元素进行配置,使其具有一个能实施 com.tangosol.net.cache.CacheLoader 或 com.tangosol.net.cache.CacheStore 接口的自定义类。下面列出了实施 CacheStore 接口的自定义类。
package coherence;

import com.tangosol.net.cache.CacheStore;
import com.tangosol.util.Base;

import java.sql.DriverManager;
import java.sql.Connection;
import java.sql.PreparedStatement;
import java.sql.ResultSet;
import java.sql.SQLException;
import java.util.Collection;
import java.util.Iterator;
import java.util.LinkedList;
import java.util.List;
import java.util.Map;

public class DBCacheStore
        extends Base
        implements CacheStore {

    public DBCacheStore(String sTableName)
        {
        m_sTableName = sTableName;
        configureConnection();
        }
        protected void configureConnection()
                {
                try
                        {
                        Class.forName("oracle.jdbc.OracleDriver");
                        m_con = DriverManager.getConnection(DB_URL, DB_USERNAME, DB_PASSWORD);
                        m_con.setAutoCommit(true);
                        }
                catch (Exception e)
                        {
                        throw ensureRuntimeException(e, "Connection failed");
                        }
                }

    public String getTableName()
        {
        return m_sTableName;
        }

    public Connection getConnection()
        {
        return m_con;
        }

    public Object load(Object oKey)
        {
        Object     oValue = null;
        Connection con    = getConnection();
        String     sSQL   = "SELECT id, value FROM " + getTableName()
                    + " WHERE id = ?";
        try
            {
            PreparedStatement stmt = con.prepareStatement(sSQL);

            stmt.setString(1, String.valueOf(oKey));

            ResultSet rslt = stmt.executeQuery();
            if (rslt.next())
                {
                oValue = rslt.getString(2);
                if (rslt.next())
                    {
                    throw new SQLException("Not a unique key: " + oKey);
                    }
                }
            stmt.close();
            }
        catch (SQLException e)
            {
            throw ensureRuntimeException(e, "Load failed: key=" + oKey);
            }
        return oValue;
        }

      public void store(Object oKey, Object oValue)
        {
        Connection con     = getConnection();
        String     sTable  = getTableName();
                String     sSQL;

                if (load(oKey) != null)
                        {

                        sSQL = "UPDATE " + sTable + " SET value = ? where id = ?";
                        }
                else
                        {

                        sSQL = "INSERT INTO " + sTable + " (value, id) VALUES (?,?)";
                        }
                try
                        {
                        PreparedStatement stmt = con.prepareStatement(sSQL);
                        int i = 0;
                        stmt.setString(++i, String.valueOf(oValue));
                        stmt.setString(++i, String.valueOf(oKey));
                        stmt.executeUpdate();
                        stmt.close();
                        }
                catch (SQLException e)
                        {
                        throw ensureRuntimeException(e, "Store failed: key=" + oKey);
                        }
        }
    public void erase(Object oKey)
        {
        Connection con  = getConnection();
        String     sSQL = "DELETE FROM " + getTableName() + " WHERE id=?";
        try
            {
            PreparedStatement stmt = con.prepareStatement(sSQL);

            stmt.setString(1, String.valueOf(oKey));
            stmt.executeUpdate();
            stmt.close();
            }
        catch (SQLException e)
            {
            throw ensureRuntimeException(e, "Erase failed: key=" + oKey);
            }
        }
        public void eraseAll(Collection colKeys)
                {
                throw new UnsupportedOperationException();
                }


        public Map loadAll(Collection colKeys)
                {
                throw new UnsupportedOperationException();
                }

        public void storeAll(Map mapEntries)
                {
                throw new UnsupportedOperationException();
                }

    public Iterator keys()
        {
        Connection con  = getConnection();
        String     sSQL = "SELECT id FROM " + getTableName();
        List       list = new LinkedList();

        try
            {
            PreparedStatement stmt = con.prepareStatement(sSQL);
            ResultSet         rslt = stmt.executeQuery();
            while (rslt.next())
                {
                Object oKey = rslt.getString(1);
                list.add(oKey);
                }
            stmt.close();
            }
        catch (SQLException e)
            {
            throw ensureRuntimeException(e, "Iterator failed");
            }

        return list.iterator();
        }

    protected Connection m_con;
    protected String m_sTableName;
    private static final String DB_DRIVER   = "oracle.jdbc.OracleDriver";


        private static final String DB_URL      = "jdbc:oracle:thin:@localhost:1521:ORCL";
        private static final String DB_USERNAME = "OE";
        private static final String DB_PASSWORD = "pw";
    }
在 Oracle JDeveloper 中创建一个 Java 类 DBCacheStore,并将 DBCacheStore.java 清单复制到 Oracle JDeveloper 中。DBCacheStore 应用程序使用 JDBC 访问 Oracle 数据库,但也可以使用其他机制(如 Hibernate 或 JDO)。
现在为数据库缓存创建一个缓存配置文件。定义一个映射到分布式缓存模式 distributed-db-backed 的缓存名称模式 DBBacked*。使用实施 CacheStore 接口的类 coherence.DBCacheStore 在分布式模式中指定 cachestore 模式。应该为 DBCacheStore 类指定一个数据库表(处于缓存后端)的初始参数。在 init-param 元素中指定表名称。DBCacheStore 类执行数据库操作,如读取和写入缓存项。Coherence 支持数据源的读写缓存,该数据源使用读取-写入-备份-映射模式。读取-写入-备份-映射模式定义一个备份映射,为持久存储提供一个大小受限的缓存。Oracle Coherence 支持以下四种类型的读写缓存:
- 通读 — 需要时将缓存项从数据库读入缓存,并可供某个应用程序使用
- 直写 — 缓存项的更新与数据库同步(无延迟)
- 先行刷新 — 定期刷新缓存项
- 后写入 — 一段延迟时间后将缓存项更新异步写入数据库,延迟时间在缓存配置文件的 write-delay-seconds 元素中指定
此处您将使用直写机制。在 Oracle JDeveloper 中将以下数据库缓存的缓存配置文件复制到 cache-config.xml 文件中。
<cache-config>
 <caching-scheme-mapping>
  <!--
    Caches with names that start with 'DBBacked' will be created
    as distributed-db-backed.
    -->
  <cache-mapping>
   <cache-name>DBBacked*</cache-name>
   <scheme-name>distributed-db-backed</scheme-name>
  </cache-mapping>
 </caching-scheme-mapping>
 <caching-schemes>
  <!--
    DB Backed Distributed caching scheme.
    -->
  <distributed-scheme>
   <scheme-name>distributed-db-backed</scheme-name>
   <service-name>DistributedCache</service-name>
   <backing-map-scheme>
    <read-write-backing-map-scheme>
     <internal-cache-scheme>
      <class-scheme>
       <class-name>com.tangosol.util.ObservableHashMap</class-name>
      </class-scheme>
     </internal-cache-scheme>
     <cachestore-scheme>
      <class-scheme>
       <class-name>coherence.DBCacheStore</class-name>
       <init-params>
        <init-param>
         <param-type>java.lang.String</param-type>
         <param-value>CATALOG</param-value>
        </init-param>
       </init-params>
      </class-scheme>
     </cachestore-scheme>
     <read-only>false</read-only>
     <!--
        To make this a write-through cache just change the value below to 0 (zero)
        -->
     <write-delay-seconds>0</write-delay-seconds>
    </read-write-backing-map-scheme>
   </backing-map-scheme>
   <listener<//>
<autostart>true</autostart>
</distributed-scheme>
</caching-schemes>
</cache-config>
添加缓存项
在 DatabaseCache.java 应用程序的 addEntry() 方法中,使用 CacheFactory 类的 getCache() 方法创建一个 NamedCache 对象。
NamedCache cache = CacheFactory.getCache("DBBackedCache");
DBBackedCache 与缓存模式 DBBacked* 相匹配,因此将其映射到 cache-config.xml 文件中的分布式缓存模式 distributed-db-backed。使用 NamedCache 对象的 put() 方法添加缓存项。
cache.put(new String("catalog3"), new String("Evolving Grid Management"));
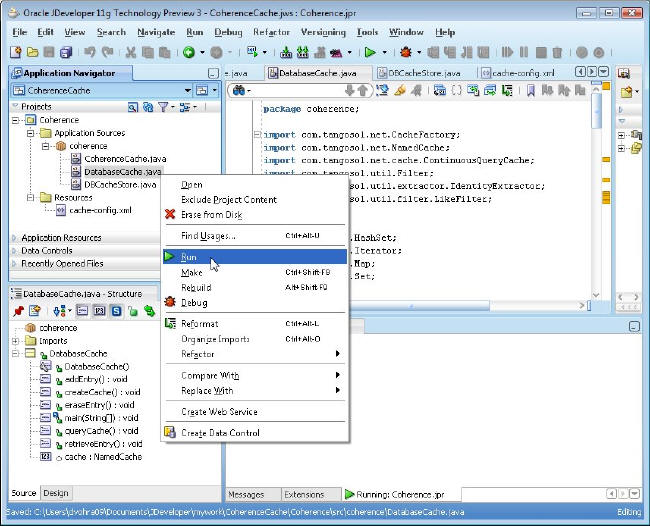
由于使用直写机制,新的缓存项也与数据库同步,所以 CATALOG 表中添加了新行。除 createCache() 和 addEntry() 方法外,为其余所有方法加上注释符号。在 Oracle JDeveloper 中,右键单击 DatabaseCache.java 应用程序并选择 Run 来添加新的缓存项。
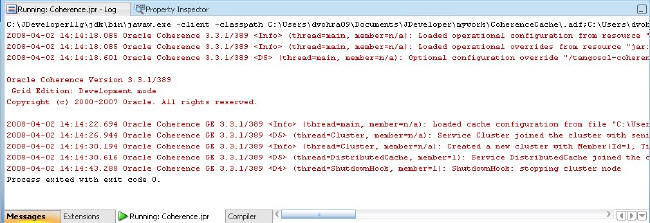
调用 put() 方法时会调用 DBCacheStore 类中的 store() 方法,该方法使用 JDBC 将新的缓存项映射到数据库表 CATALOG。 Log 窗口中会显示 Oracle Coherence 应用程序的输出,新的缓存项添加成功。该输出显示操作配置部署描述符已加载,缓存配置已加载,新集群已创建,并且 DistributedCache 服务联接到集群。
由于我们使用的是直写缓存,因此数据库表也进行了更新。
使用 NamedCache 对象的 remove() 方法可以删除新的缓存项。
cache.remove(new String("catalog3"));
使用 putAll() 方法可以批量上载缓存项。
检索缓存项
使用 NamedCache 对象的 get() 方法可以检索缓存项。例如,为 id catalog1 检索缓存项。
System.out.println((String) cache.get("catalog1"));
调用 get() 方法时会调用 DBCacheStore 类中的 load() 方法,该方法使用 JDBC 检索数据库表数据。下面显示的是取消对 createCache() 和 retrieveEntry() 方法的注释以检索 Oracle Jdeveloper 中的缓存项时,运行 Oracle Coherence 应用程序得到的输出。
使用 NamedCache 对象的 getAll() 方法可以执行批量检索。
查询数据库缓存
Oracle Coherence 支持使用过滤器根据搜索条件搜索缓存项。com.tangosol.util.filter 程序包中提供了 Coherence 过滤器。在 Oracle Coherence 企业版和网格版中,可以将索引添加到 Coherence 缓存中以改善性能。我们可以使用能够将缓存项与指定模式进行匹配的 LikeFilter 过滤器来查询数据库缓存。
要查询数据库缓存,需要在查询前创建缓存项;在可能要执行使用过滤器的查询之前,必须使用 get() 或 getAll() 方法将缓存项检索至缓存中。因此,使用 getAll() 方法检索数据库数据并创建一个缓存项集合。
HashSet hashSet=new HashSet();
hashSet.add(new String("catalog1"));
hashSet.add(new String("catalog2"));
hashSet.add(new String("catalog3"));
Map map=cache.getAll(hashSet);
创建 LikeFilter 过滤器搜索以“Tuning”开头的缓存项。
Filter filter = new LikeFilter(IdentityExtractor.INSTANCE, "Tuning%", '\\', true);
通过 LikeFilter 过滤器使用 entrySet() 方法查询数据库缓存。
Set results = cache.entrySet(filter);
将查询结果迭代输出至检索的缓存项。
for (Iterator i = results.iterator(); i.hasNext();)
{
Map.Entry e = (Map.Entry) i.next();
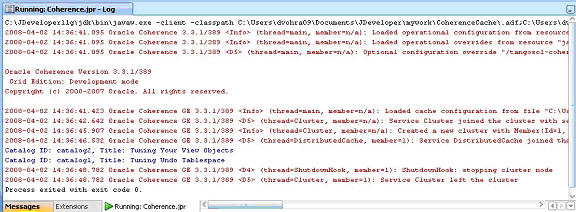
System.out.println("Catalog ID: "+e.getKey() + ", Title: "+e.getValue());
}
要运行数据库缓存查询,右键单击只取消了对 createCache() 和 queryCache() 方法的注释的 DatabaseCache.java 应用程序,然后选择 Run。检索了与“Tuning%”模式相匹配的缓存项,并在 Log 窗口中输出。
Oracle Coherence 支持使用 ContinuousQueryCache 类进行连续查询。 连续查询 是一个使用连续查询缓存保持内容为最新的查询。在连续查询缓存中,通过对可能导致查询结果发生变化的事件使用事件监听器来保持查询结果始终为最新。
使用 NamedCache 对象和 LikeFilter 对象创建 ContinuousQueryCache 对象。
ContinuousQueryCache queryCache = new ContinuousQueryCache(cache, filter );
现在,使用 entrySet() 方法创建一个结果集。
Set results = queryCache.entrySet(filter);
使用连续查询缓存来运行数据库缓存 Coherence 应用程序。输出与使用不连续缓存的输出相同。但是如果更新缓存项,连续查询结果也会进行更新。
下面显示的是数据库缓存应用程序 DatabaseCache.java。
package coherence;

import com.tangosol.net.CacheFactory;
import com.tangosol.net.NamedCache;
import com.tangosol.net.cache.ContinuousQueryCache;
import com.tangosol.util.Filter;
import com.tangosol.util.extractor.IdentityExtractor;
import com.tangosol.util.filter.LikeFilter;


import java.util.HashSet;
import java.util.Iterator;
import java.util.Map;
import java.util.Set;


public class DatabaseCache {
    NamedCache cache;
    public DatabaseCache() {
    }

    public void createCache() {
         cache = CacheFactory.getCache("DBBackedCache");

    }

    public void addEntry() {

    cache.put(new String("catalog3"), new String("Evolving Grid Management"));

    }

    public void retrieveEntry() {
    System.out.println((String) cache.get( "catalog1"));
    }

    public void eraseEntry() {
    cache.remove(new String("catalog3"));
    }

    public void queryCache() {
        Filter filter = new LikeFilter(IdentityExtractor.INSTANCE, "Tuning%", '\\', true);
        HashSet hashSet=new HashSet();
        hashSet.add(new String("catalog1"));
        hashSet.add(new String("catalog2"));
        hashSet.add(new String("catalog3"));

        Map map=cache.getAll(hashSet);
        ContinuousQueryCache queryCache = new ContinuousQueryCache(cache, filter);
        Set results = queryCache.entrySet(filter);
       /* Set results = cache.entrySet(filter);*/

        if(results.isEmpty())
        System.out.println("Result Set Empty");
            for (Iterator i = results.iterator(); i.hasNext();)
                {
                Map.Entry e = (Map.Entry) i.next();
                System.out.println("Catalog ID: "+e.getKey() + ", Title: "+e.getValue());
                }
    }


    public static void main(String[] args) {
        DatabaseCache databaseCache = new DatabaseCache();
        databaseCache.createCache();
       /*databaseCache.addEntry();
        databaseCache.retrieveEntry();
        databaseCache.eraseEntry();*/
        databaseCache.queryCache();
    }
}
恭喜,您已经成功创建了一个经过配置的 Oracle Coherence 缓存!
Deepak Vohra 是一名 Oracle 认证初级人员(Oracle 数据库 10g)和 Sun 认证 Java 程序员。