 Articles
Server and Storage Development
Articles
Server and Storage Development
How to Import Large Application Projects into Oracle Developer Studio
by Alexander Simon, July 2012 (updated by Alexander Simon, June 2016)
How to select the best method for importing large enterprise-level code bases into the Oracle Developer Studio IDE.
Introduction
Downloading and Building Sample Source Code
Creating an IDE Project for a Component of a Large Application
Creating an IDE Project that Includes All Application Sources
Improving Code Assistance in an Existing IDE Project
See Also
About the Author
This document is a quick start guide for developers who want to use the Oracle Developer Studio IDE to work on large code projects, a common occurrence in enterprise development. The document is designed for you to actively perform the tasks described from beginning to end.
Introduction
The IDE provides several different ways to create new projects by importing existing code. You should choose a method to create the IDE project based on how the code is built outside the IDE and whether you want to work on the complete set of source code or only some portions of it.
You can learn how you can use the IDE for the following enterprise application development scenarios:
- A large application with many components, and you want to work on development of some, but not all, of the components.
- An application that is set up to use a
configurescript to automatically create a makefile that is tailored to a developer's build system. The IDE can run theconfigurescript when it creates a project, or you can run theconfigurescript first outside the IDE before creating an IDE project. - An application that was built from the command line without debugging information. An IDE project is best created from sources that have been built with debugging information, but the IDE can also create a project without debug information, because it has multiple ways to obtain information about include paths and user-defined macros.
- An application that has already been imported into the IDE and needs to be updated to reflect changes. An IDE project for code that is managed in a version control system can be updated easily after you pull changes from a repository into the project.
This document uses open source code to demonstrate how to create IDE projects.
Downloading and Building Sample Source Code
The open source project called International Components for Unicode (ICU) is useful for demonstrating how to create a project from a large code base. The project website, http://site.icu-project.org, describes ICU as follows:
"ICU is a mature, widely used set of C/C++ and Java libraries providing Unicode and Globalization support for software applications. ICU is widely portable and gives applications the same results on all platforms and between C/C++ and Java software."
This section describes downloading and building the ICU code so you can use it to follow the demonstrations in this article.
How to Download and Build the Project
In this task, you download the ICU project's C language source files and build them to generate binaries with debugging information that you can use to create an IDE project.
- Download the compressed tar file of the sources for the ICU project.
You can click the following link to immediately download a compressed tar file in your browser: http://download.icu-project.org/files/icu4c/4.8.1.1/icu4c-4_8_1_1-src.tgz.
- Extract the compressed tar file to a writable location, such as your home directory.
If your browser does not automatically extract the files, you can go to the command line and move the
icu4c-4_8_1_1-src.tgzfile to the location where you want to unpack the ICU source, and then use the following command:# tar -xzf icu4c-4_8_1_1-src.tgz
If your operating system does not support the
zoption for thetarcommand, use the following command:# gunzip < icu4c-4_8_1_1-src.tgz | tar xvf -
- Run the
configurescript for the ICU application from the command line.
The example in Listing 1 uses the default path to the compilers for Oracle Solaris and shows sample output when the
configurescript is run on an Intel-based system running Oracle Solaris 11. Be sure to use the correct paths to the Oracle Developer Studio compilers on your system.% cd icu/source % ./configure CC=/opt/developerstudio12.5/bin/cc CXX=/opt/developerstudio12.5/bin/CC \ CFLAGS=-g CXXFLAGS=-g checking for ICU version numbers... release 4.8.1.1, library 48.1.1, unicode version 6.0 checking build system type... i386-pc-solaris2.11 checking host system type... i386-pc-solaris2.11 checking target system type... i386-pc-solaris2.11 checking whether to build debug libraries... no checking whether to build release libraries... yes checking for gcc... /opt/developerstudio12.5/bin/cc checking whether the C compiler works... yes checking for C compiler default output file name... a.out checking for suffix of executables... checking whether we are cross compiling... no checking for suffix of object files... o checking whether we are using the GNU C compiler... no ... (lots of output about checking and config.status) ... config.status: creating samples/layout/Makefile config.status: creating common/unicode/platform.h config.status: creating common/icucfg.h ICU for C/C++ 4.8.1.1 is ready to be built. === Important Notes: === Data Packaging: library This means: ICU data will be linked with ICU. A shared data library will be built. To locate data: ICU will use the linked data library. If linked with the stub library located in stubdata/, the application can use udata_setCommonData() or set a data path to override. Building ICU: Use a GNU make such as /usr/bin/gmake to build ICU. checking the version of "/usr/bin/gmake"... 3.81 (we wanted at least 3.80) ok %Listing 1. Sample Output from Running the
configureScriptNotice the message about building ICU. You must use
gmaketo build this code.At the end of this process, you have a makefile that is configured to use the Oracle Developer Studio
ccandCCcompilers with the options for debugging information. - Build the
cleantarget of the generated makefile using the GNU make utility,gmake.
The sample output in Listing 2 shows the beginning and the end of the output of this command.
% gmake -f Makefile clean

gmake clean-recursive LOCAL_SUBDIRS='tools stubdata common i18n layout
layoutex data io extra samples test'
gmake[1]: Entering directory `/export1/sside/icu/source'
gmake[1]: Making `clean' in `tools'
gmake[2]: Entering directory `/export1/sside/icu/source/tools'
.
.
.
rm -rf ./config/icu-uc.pc ./config/icu-i18n.pc ./config/icu-io.pc
     ./config/icu-le.pc ./config/icu-lx.pc
rm -rf Doxyfile doc icu-docs.zip
%
Listing 2. Sample Output from
gmake - Build the application, as shown in Listing 3.
% gmake -f Makefile
rebuilding config/icucross.mk
cd ./config; \
                gmake -f pkgdataMakefile
gmake[1]: Entering directory `/export1/sside/icu/source/config'
rm -rf pkgdata.inc
gmake[1]: Leaving directory `/export1/sside/icu/source/config'
rm -rf config/icu-config
/usr/bin/ginstall -c ./config/icu-config-top config/icu-config
chmod u+w config/icu-config
LC_ALL=C sed -f ./config/make2sh.sed < ./config/Makefile.inc |
      grep -v '#M#' | uniq >> config/icu-config
LC_ALL=C sed -f ./config/make2sh.sed < ./config/mh-solaris |
      grep -v '#M#' | uniq >> config/icu-config
cat ./config/icu-config-bottom >> config/icu-config
.
.
.
gmake[0]: Making `all' in `test'
gmake[1]: Entering directory `/export1/sside/icu/source/test'
gmake[1]: Nothing to be done for `all'.
gmake[1]: Leaving directory `/export1/sside/icu/source/test'
gmake[1]: Entering directory `/export1/sside/icu/source'
gmake[1]: Nothing to be done for `all-local'.
gmake[1]: Leaving directory `/export1/sside/icu/source'
%
Listing 3. Building the Application
- When the build is complete, explore some of the content of the
icu/sourcedirectory.
In particular, notice that the directory
icu/source/bincontains executable files and the directoryicu/source/libcontains shared libraries that are needed by the executables.
Creating an IDE Project for a Component of a Large Application
Large complex applications, such as enterprise applications, are typically built on a server with a complicated build script. The IDE probably cannot build the application using that build script. However, there are some things you can do to import the application sources into the IDE and build the application or a component of the application.
When you build the complete application outside the IDE with options that generate debug information, the IDE can create a project from a binary file by using the debug information to get the compilation units' paths, user-defined macros, included headers, and so on.
To build the application with debugging information, you can use the -g flag for Oracle Developer Studio compilers or -g3 -gdwarf-2 for GNU compilers.
If you are interested in only some components of the application, the best way to create the IDE project is to use the New Project template, C/C++/Fortran Project from Binary, as described below.
How to Create an IDE Project from a Binary
In this task, you create an IDE project from a binary in the ICU open source code that you built in the previous procedure, "Downloading and Building Sample Source Code."
Suppose that you are interested in working on just one of the ICU components. You can create an IDE project that contains compilation units from which the component was built. In this section, you create an IDE project for the ICU component genrb.
- In the Oracle Developer Studio IDE, choose File -> New Project and select C/C++/Fortran Project from Binary File.
- Click Next and then use the Browse button to navigate to the
icu/source/bindirectory. - Select the
genrbbinary and click Select. Leave the other options at their default values.
The IDE lists the shared libraries and the paths used to build the
genrbbinary, as shown in the Figure 1.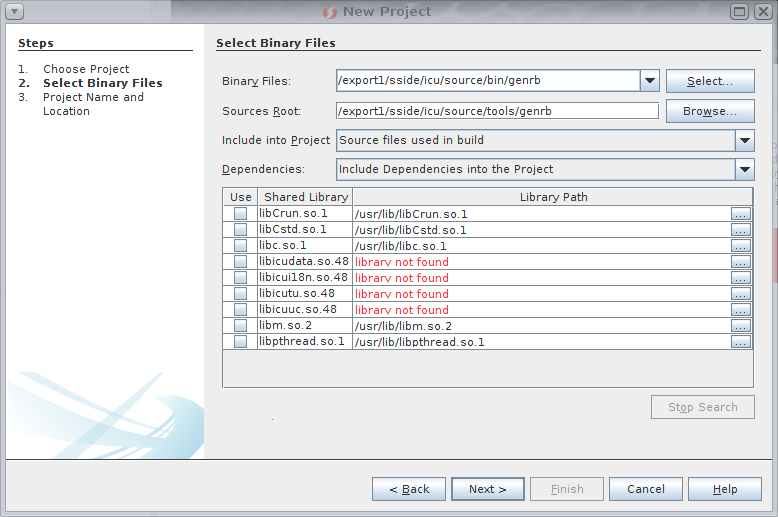
Figure 1. Select Binary File Screen in New Project Wizard
The libraries that are shown in red are ICU shared libraries that cannot be found by the IDE because the executable file does not contain relative links to the shared libraries. Even if you run the
lddutility on the executable to list the dynamic dependencies, you see the same result. - Click the browse buttons next to the unresolved library paths, navigate to the
icu/source/libdirectory for each ICU shared library, and select the appropriate.sofile.
The paths shown in the dialog box must be the absolute paths for the libraries, not the relative paths.
- Select the checkbox for each ICU library to include the libraries in the project, as shown in Figure 2.
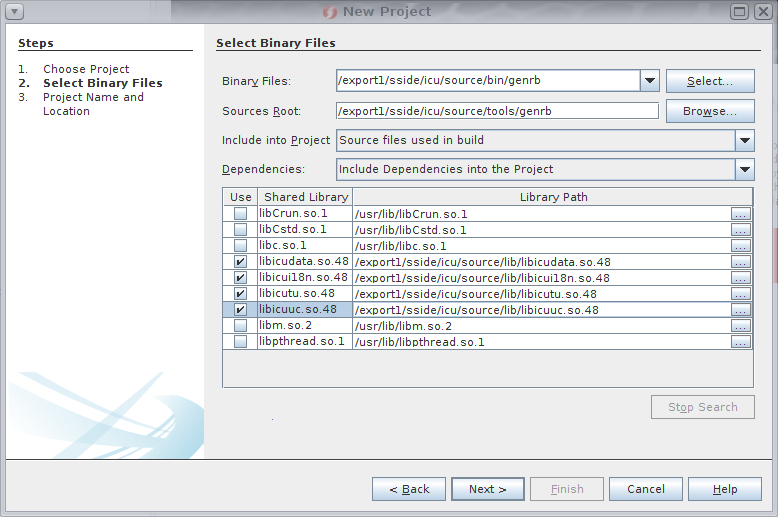
Figure 2. Select Binary File Screen with ICU Libraries Selected
Make sure only the ICU libraries are selected, because you do not want to include all the system libraries in your project.
- Click Next and then click Finish.
The IDE analyzes the binary and creates a project named
genrb_1that contains compilation units that are used for buildinggenrband four shared libraries.The IDE then opens the
mainmethod of thegenrb.csource file in the editor, as shown in Figure 3.
Figure 3. New
genrbProject in the IDENote that for some projects, you might be able to build and run the project without any further changes. However, ICU has some specific issues that you must address before you can compile and run in the IDE. If you are interested in getting this particular project to build and run, continue on to the next section.


Change Project Properties to Build and Run in the IDE
Before you can use the IDE to build a project from the ICU code, you must make a change to the tool collection, because the ICU code's makefile must be built using gmake instead of the Oracle Developer Studio dmake utility.
You must also modify the default run command to run the project from the IDE. The genrb program requires runtime access to the ICU libraries that you previously included in the project. This procedure shows how to do these tasks.
- Right-click the project and select Properties at the bottom of the menu.
The Project Properties dialog box opens.
- Click the Build node in the Categories panel of the Project Properties dialog box, and then click the button next to the Tool Collection option.
The Tool Collection Manager dialog box opens. You are going to create a new tool collection so you can modify the make command required for this project without affecting other projects that use the default tool collection.
- Select the OracleDeveloperStudio_12.5 tool collection and click Duplicate.
- In the Duplicate Tool Collection dialog box, type
gmake_OracleDeveloperStudioin the Tool Collection Name field at the bottom of the dialog box. - Click OK in the Duplicate Tool Collection dialog box, change Make Command field to /usr/bin/gmake, and click OK in the Tool Collection Manager dialog box.
You should now be back at the Project Properties dialog box, with the new
gmake_OracleDeveloperStudiocollection already selected for the tool collection. - If the new tool collection is not selected, you must select gmake_OracleDeveloperStudio for the tool collection so
gmakeis used to build the project.
All projects that you create from the ICU code in this document should use this tool collection.
- Click the Run node in the Categories panel of the Project Properties dialog box.
- Modify the value for Run Command by changing the existing value to the following, which adds the libraries to the library path and adds the
-Voption:
sh -c "LD_LIBRARY_PATH=$LD_LIBRARY_PATH:../lib ${OUTPUT_PATH} -V"
The
genrbcommand will display version information and exit, so you can see that the command ran successfully. - Click OK in the Project Properties dialog box.
The project is now ready to build and run in the IDE.
- Right-click the project and choose Clean and Build.
The Output window should show the same output as when you built the project from the command line previously.
- When the build is finished, right-click the project and choose Run.
The Output window should show output similar to the following:
/export1/sside/icu/source/bin/genrb version 3.3 (ICU version 4.8.1.1).
 Copyright (C) 2011, International Business Machines Corporation and others.
All Rights Reserved.

RUN SUCCESSFUL (total time: 219ms)
Now you should be able to work on the
genrbcode, build, and run in the IDE. See the next section, "Tips for Creating a Project from a Binary," for additional information about creating a project from a binary.
Tips for Creating a Project from a Binary
Here are some useful tips for creating a project from a binary.
Specifying Files to Include in the Project
When you create a project from a binary, the New Project wizard enables you to determine how to handle the dependencies and how much of the source code to bring into the project.
The wizard's Select Binary File step includes the Dependencies options, shown in the Figure 4.

Figure 4. Options in the Dependencies List
The Dependencies option enables you to include needed shared libraries or exclude unneeded shared libraries in the IDE project. The choices are defined as follows:
- Include Dependencies into the Project: The IDE includes all shared libraries that belong to the application. This is the default option.
- Do not Include Dependencies: The IDE creates a project for the binary only and no libraries are included.
- Create Separate Projects for Dependencies: The IDE creates projects for each selected shared library.
The New Project wizard also provides the option Include into Project, shown in Figure 5.

Figure 5. Options in the Include into Project List
The Include into Project option enables you to specify the source code to include. If you select All Files Under Source Root, the IDE adds all the sources to the project. The default choice is Source Files Used in Build, which creates a project that contains only the sources needed to build the particular component and libraries.
Alternate Ways to Create an IDE Project from a Binary
In addition to going through the New Project wizard to create an IDE project from a binary file, the IDE provides two shortcuts to create a project:
- Drag and Drop a Binary to Create a Project: The IDE can create a project through drag-and-drop of a binary. You can drag a binary file from your desktop file manager or the IDE's Favorites window and drop it on the IDE editor area. The IDE opens the Create Project dialog box, where you can change some options for creating the project, if you want, and then click the Create Project button. The IDE creates a project from the binary and opens the project.
- Use a Command to Create a Project from a Binary: You can create a project from a binary from a terminal window using the
devstudiocommand with the-openoption to specify the path to the binary. For example, to create a project for the ICU binarygenrb, you could use the following command:
% /opt/developerstudio12.5/bin/devstudio --open icu/source/bin/genrb
The Create Project dialog box opens immediately after the IDE opens, enabling you to create a project from the binary by clicking the Create Project button.
Creating an IDE Project that Includes All Application Sources
If you want to work on all components of the application, the best way to create the IDE project is to use the New Project template, C/C++/Fortran Project with Existing Sources.
This section shows three different ways to create IDE projects from existing code projects:
- "How to Create a Project After Building Source"
- "How to Create a Project Without Building Source First"
- "How to Create a Project from Code Built Without Debugging Information"
How to Create a Project After Building Source
In this task, you use the ICU open source project again. You build the binaries with debugging information outside the IDE, but this time the IDE pulls all the source files into the project.
- Download and build the ICU project if you have not already done so. See "Downloading and Building Sample Source Code" for instructions.
- In the Oracle Developer Studio IDE, choose File -> New Project and select C/C++/Fortran Project with Existing Sources.
- Click Next and then use the Browse button to navigate to the
icu/sourcedirectory. - At the Select Configuration Mode prompt, select Custom and click Next.
Figure 6 shows Custom mode selected.
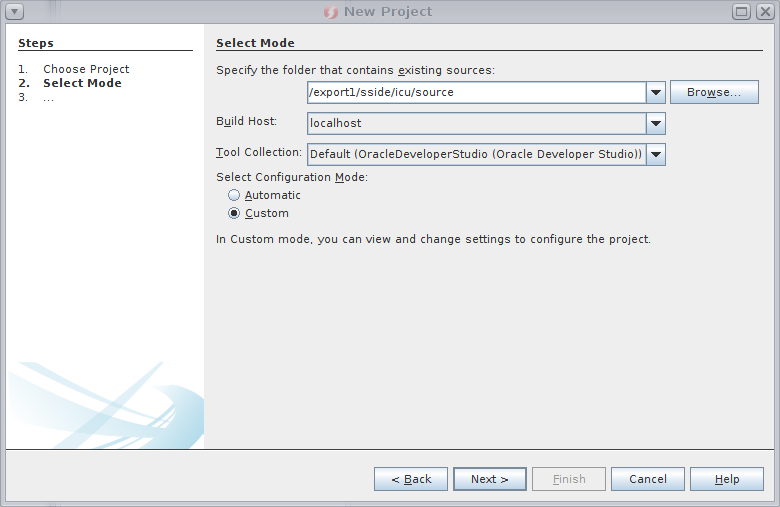
Figure 6. New Project Wizard with Custom Configuration Mode Selected
The Build Tool step of the wizard should have Using an Existing Makefile already selected, and you should leave it selected.
- Deselect the checkbox for Pre-Build Step is Required, as shown in Figure 7.1.

Figure 7.1. Pre-Build Action Screen with Deselected Checkbox for Pre-Build Step is Required
- Deselect the checkbox for Clean and Build after Finish.
The screen should look similar to Figure 7.2.
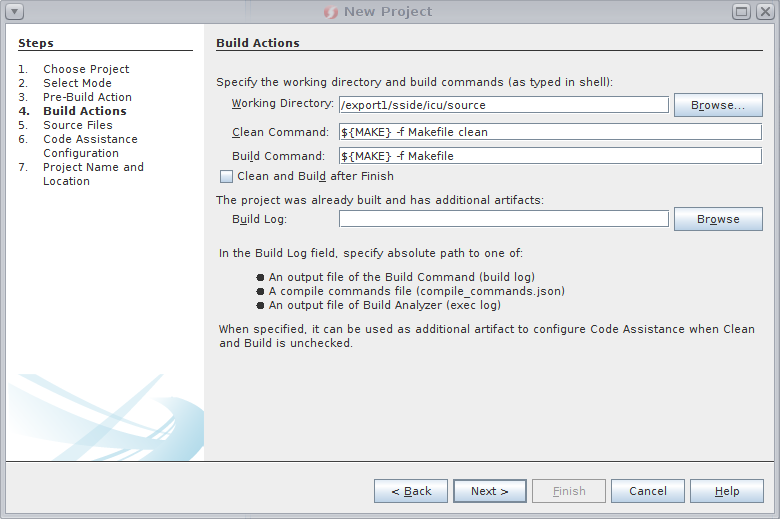
Figure 7.2. Build Actions Screen with Deselected Checkbox for Clean and Build after Finish
- Click Next in each step as you continue through the New Project wizard to accept all the default choices.
- Click Finish in the Project Name and Location step.
You need to wait a few moments until the IDE successfully analyzes binary files and parses the ICU application. When the IDE displays "Configuring project for code assistance is complete," the project is ready to use.
Note: If you want to build the project, you need to use
gmake. If you created a tool collection withgmake, as described in "Change Project Properties to Build and Run in the IDE," you can select that tool collection for this project and then build. You cannot run the project because there are many binaries, and each binary's run command would need to be configured so the IDE could run it.


How to Create a Project Without Building Source First
In this task, you can explore how the IDE can create a project from existing sources without requiring you to first build the sources outside the IDE. This approach can be used for sources that include a configure script.
You use the ICU source code again for this project.
- Extract the previously downloaded
icu4c-4_8_1_1-src.tgzfile to a new location.
For example, move the
icu4c-4_8_1_1-src.tgzfile to the location where you want to unpack the ICU source, and then use the following command:# tar -xzf icu4c-4_8_1_1-src.tgz
If your operating system does not support the
zoption for thetarcommand, use the following command:# gunzip < icu4c-4_8_1_1-src.tgz | tar xvf -
- In the Oracle Developer Studio IDE, choose File -> New Project and click the C/C++/Fortran category in the Choose Project step.
- Select C/C++/Fortran Project with Existing Sources and click Next.
- In the Select Mode step, use the Browse button to navigate to the
icu/sourcedirectory.
In this step, the configuration mode should already be set to Automatic. Figure 8 shows the path to the
icu/sourcedirectory and Automatic configuration mode selected. Notice that the path to theconfigurescript is displayed next to the Automatic option.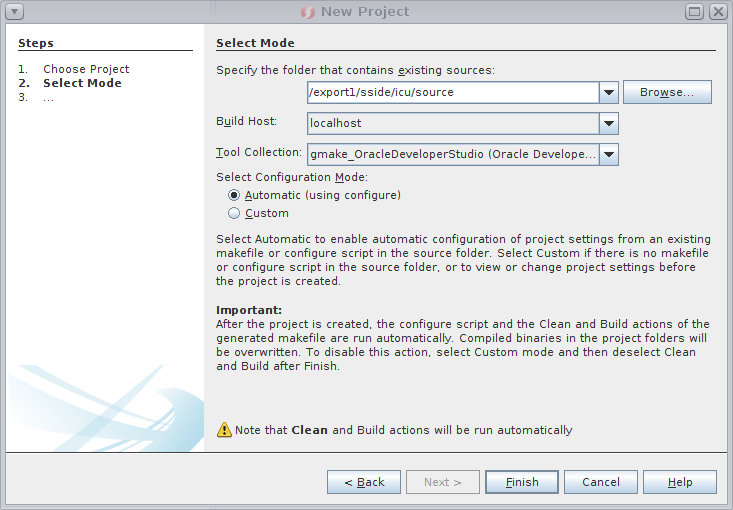
Figure 8. New Project Wizard with Automatic Configuration Mode Selected
- Select gmake_OracleDeveloperStudio from the Tool Collection list.
As explained previously, the ICU project must be built with
gmake. If the collection does not exist, you can create it using the instructions in the previous "Change Project Properties to Build and Run in the IDE" section. - Click Finish.
The IDE runs the
configurescript to create the makefile, and then it runs the makefile with themakecommand configured for the tool collection. The IDE creates the project by tracing compiler invocations.Wait until IDE successfully configures, cleans, builds, and parses the ICU project. When it is finished, you should see output similar Figure 9.
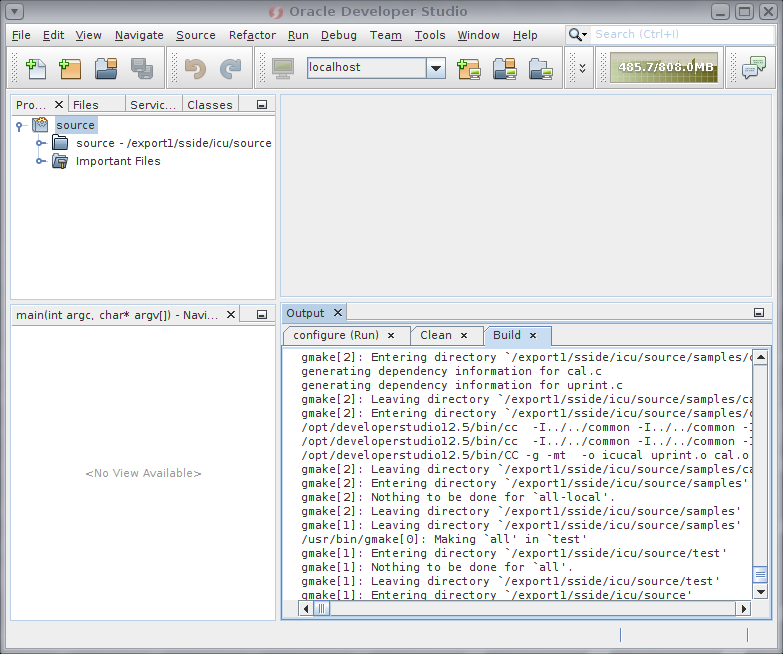
Figure 9. IDE Showing Output After Generating the Project from Existing Source
The project tree includes all files in the
sourcefolder, and some of the files are marked as excluded from code assistance.Compare the project tree with the
genrbproject tree created from a binary. Thegenrbproject tree contains only files from the binary, as shown in Figure 10.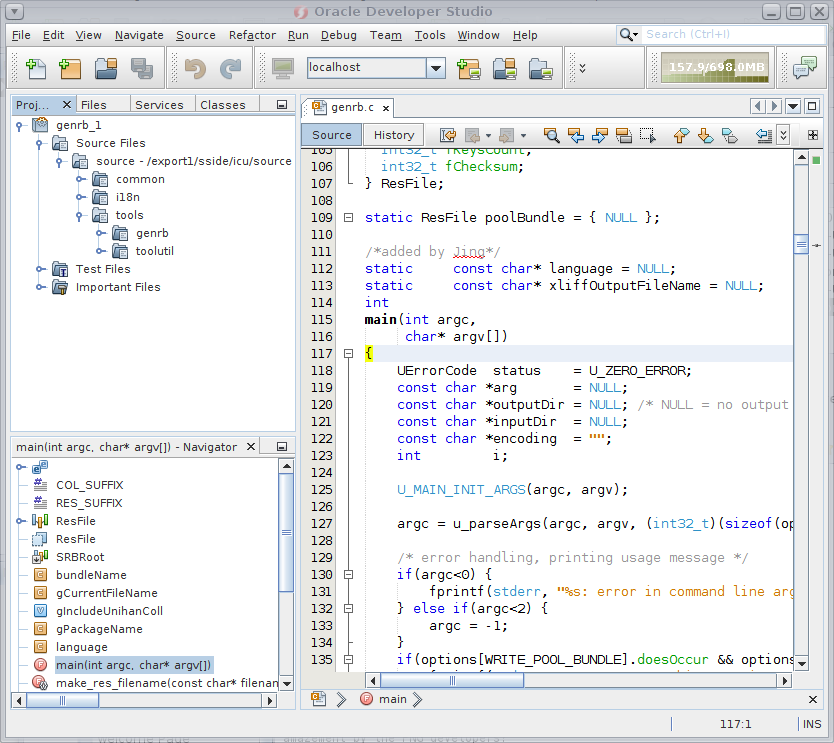
Figure 10. New
genrbProject in the IDE


How to Create a Project from Code Built Without Debugging Information
In this task, you create an IDE project from an application that was built without debugging information.
For example, suppose you are working with a team on a code project using the GNU tool collection, and the project is built with the -g flag. With GNU compilers, the IDE needs debugging information produced with the -g3 -gdwaf-2 flags to gather the code assistance information, but you might not be able to change the compiler options in the build procedure. This task shows you how you can create a useful IDE project for the source code even if you cannot build with the necessary compiler options.
You extract another copy of the ICU source, configure the ICU project without the Oracle Developer Studio -g or GNU -g3 -gdwaf-2 options, and then create a project from the source built without debugging information. You should be able to see that information is missing from the project when it is created this way.
Later you will use the IDE to automatically fix the problems with this project.
- Extract the previously downloaded
icu4c-4_8_1_1-src.tgzfile to a new location. - Run the
configurescript for the ICU application from the command line.
Use the
CCandCXXoptions to specify the paths to the Oracle Developer Studio compilers on your system. Do not use theCCFLAGSandCXXFLAGSoptions.The example in Listing 4 uses the default path to the compilers for Oracle Solaris and shows sample output when the
configurescript is run on an Intel-based system running Oracle Solaris 11.% cd icu/source % ./configure CC=/opt/developerstudio12.5/bin/cc CXX=/opt/developerstudio12.5/bin/CC checking for ICU version numbers... release 4.8.1.1, library 48.1.1, unicode version 6.0 ... (lots of output about checking and config.status) ... ICU for C/C++ 4.8.1.1 is ready to be built. === Important Notes: === Data Packaging: library This means: ICU data will be linked with ICU. A shared data library will be built. To locate data: ICU will use the linked data library. If linked with the stub library located in stubdata/, the application can use udata_setCommonData() or set a data path to override. Building ICU: Use a GNU make such as /usr/bin/gmake to build ICU. checking the version of "/usr/bin/gmake"... 3.81 (we wanted at least 3.80) ok %Listing 4. Sample Output from Running the
configureScriptAt the end of this process, you have a makefile that is configured to use the Oracle Developer Studio
ccandCCcompilers without debugging options. - Build the
cleantarget of the generated makefile using the GNU make utilitygmake.
The sample output in Listing 5 shows the beginning and the end of the output of this command.
% gmake -f Makefile clean

gmake clean-recursive LOCAL_SUBDIRS='tools stubdata common i18n layout
.
.
.
rm -rf ./config/icu-uc.pc ./config/icu-i18n.pc ./config/icu-io.pc
     ./config/icu-le.pc ./config/icu-lx.pc
rm -rf Doxyfile doc icu-docs.zip
%
Listing 5. Building the Target
- Build the application.
The sample output in Listing 6 shows the beginning and the end of the output of this command.
% gmake -f Makefile
rebuilding config/icucross.mk
cd ./config; \
                gmake -f pkgdataMakefile
gmake[1]: Entering directory `/export1/sside/icu/source/config'
.
.
.
gmake[0]: Making `all' in `test'
gmake[1]: Entering directory `/export1/sside/icu/source/test'
gmake[1]: Nothing to be done for `all'.
gmake[1]: Leaving directory `/export1/sside/icu/source/test'
gmake[1]: Entering directory `/export1/sside/icu/source'
gmake[1]: Nothing to be done for `all-local'.
gmake[1]: Leaving directory `/export1/sside/icu/source'
%
Listing 6. Output from Building Script
- In the Oracle Developer Studio IDE, choose File -> New Project and select C/C++/Fortran Project with Existing Sources.
The New Project wizard opens.
- Click Next and in the Select Mode step, use the Browse button to navigate to the
icu/sourcedirectory.
You can also type the full path in the field if you prefer.
- At the Select Configuration Mode prompt, select Custom and click Next.
Figure 11 shows the Custom mode selected.

Figure 11. Select Mode Step with the Source Path and Custom Mode Selected
The Build Tool step of the wizard should have Using an Existing Makefile already selected, and you should leave it selected.
- Deselect the checkbox for Pre-Build Step is Required and click Next.
- Deselect Clean and Build after Finish and click Next.
- Click Next for each step until you reach Step 6, Code Assistance Configuration.
- In Step 6, Code Assistance Configuration, select Manual Configuration and click Next.
Figure 12 shows this step.

Figure 12. Manual Configuration Selected
- Click Finish in the final step.
The IDE creates the project based on file system information.
Wait until the IDE parses the ICU application. Although the build is successful, the IDE probably cannot resolve some include directives, does not know user-defined macros, and might include source files for another platform.
- Rename the project to
source2fixby right-clicking the project and choosing Rename.
Do not rename the project folder; just rename the project name.
You use this imperfectly configured project in another task later in this document.


Improving Code Assistance in an Existing IDE Project
Sometimes an existing IDE project might have inaccuracies that affect the code assistance features. This might happen if the project was created from existing sources without help from debugging information or if, for example, the source files included new libraries since the IDE project was created. If the IDE cannot resolve directives in the project, a small question mark is displayed on the project folder. If you hold the mouse cursor over the project folder, a tooltip displays more information, as shown in Figure 13.
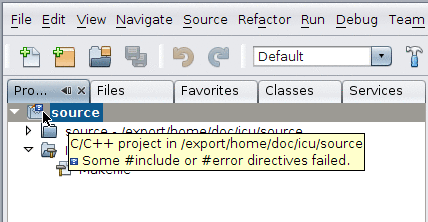
Figure 13. Tooltip for Failed Include Directives
If you right-click the project and select Code Assistance -> Failed #include/#error directives, you can see more information about the problems.
Refining Code Assistance in Source-Controlled Projects
Suppose your application source code is managed with a version control system (VCS) such as Mercurial, and you create an IDE project from the source code. If you open the IDE project in the IDE and pull in changes from the VCS, you should build the IDE project so it is up to date with the modifications.
After you build your project in the IDE, the project is automatically updated by the IDE in the following ways:
- New compilation units are added to the IDE project.
- Existing compilation units are modified with new or changed user-defined includes and macros.
- Compilation units that are excluded from building are not excluded from code assistance.
The IDE uses its "build analyzer" feature to gather information from the build, using an interposing technique to catch system library exec* calls on Oracle Solaris and Linux platforms. By default, the analyzer is used when you create a project with existing sources and when you manually run Configure Code Assistance. If the analyzer is not used, the output log of the build is used to capture information.
If you do not want the IDE to perform the project updates, you can disable the build analyzer as follows:
- Choose Tools-> Options.
- Click the C/C++ button, and then click the Project Options tab.
- Deselect the Use Build Analyzer to Configure Code Assistance option.
Tip: For source code projects that set up their own environment at build time, the build analyzer might not always work well. If a build fails when the Use Build Analyzer to Configure Code Assistance option is selected, you should check your build script to see if you have unset the LD_LIBRARY_PATH environment variable. If LD_LIBRARY_PATH is unset, you should also unset LD_PRELOAD. When these two variables are unset, the build analyzer is automatically disabled. If you cannot modify the build script, you can disable the build analyzer as described above, and the IDE can use the output log for build information.
How to Reconfigure Code Assistance After Building a Project
If you are able to clean and build your project successfully in the IDE, you can refine the project to enable better code assistance.
In the section "How to Create a Project from Code Built Without Debugging Information," you created a project that built successfully. The project had some failed directives because no debugging information was included when building, so the IDE had to rely on file system information.
In this task, you can see how to use the IDE to reconfigure your project. This task uses the previously created project to show you how to reconfigure code assistance for a project that does not have debugging information.
- Open the project named
source2fixthat you created previously.
The project was created in the section "How to Create a Project from Code Built Without Debugging Information."
- Right-click the project and choose Code Assistance -> Failed #include/#error directives.
Figure 14 shows the Failed #include/#error Directives dialog box. If you double-click the
<windows.h>preprocessor directive in this dialog box, the Navigator window shows more information, and theGDIFontInstance.cppsource file that includes the<windows.h>directive opens in the editor.This file should be excluded from code assistance because it is used only on Microsoft Windows platforms, and the project was built on Oracle Solaris.
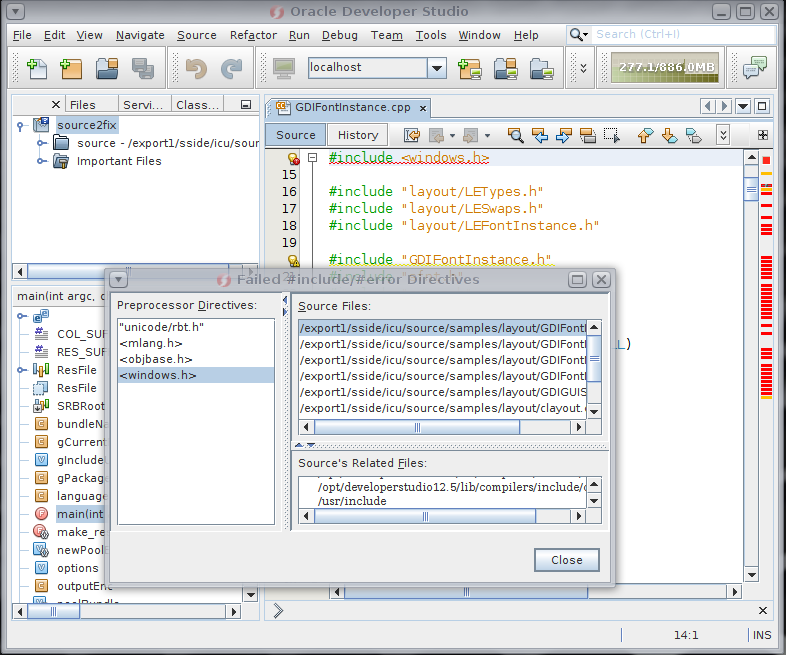
Figure 14. Failed Include Directives Dialog Box
Notice that the source file contains small icons over the line numbers where there are problems. If you mouse over the icons, you can see more information.
You could improve the project by manually editing its properties, but it is much easier to fix automatically in the IDE.
- Clean and build the project to perform a full build.
A full build is needed because an incremental build would only add new sources and update modified sources. To fix deleted or unused sources, you need to do a Clean and Build to generate a full build.
The project should build correctly, but the problem of the failed includes should remain because the makefile that was created when you ran the
configurescript did not use the debugging options for the compilers. - Click the Reconfigure button.
Figure 15 shows the Reconfigure button in the margin of the Output window.
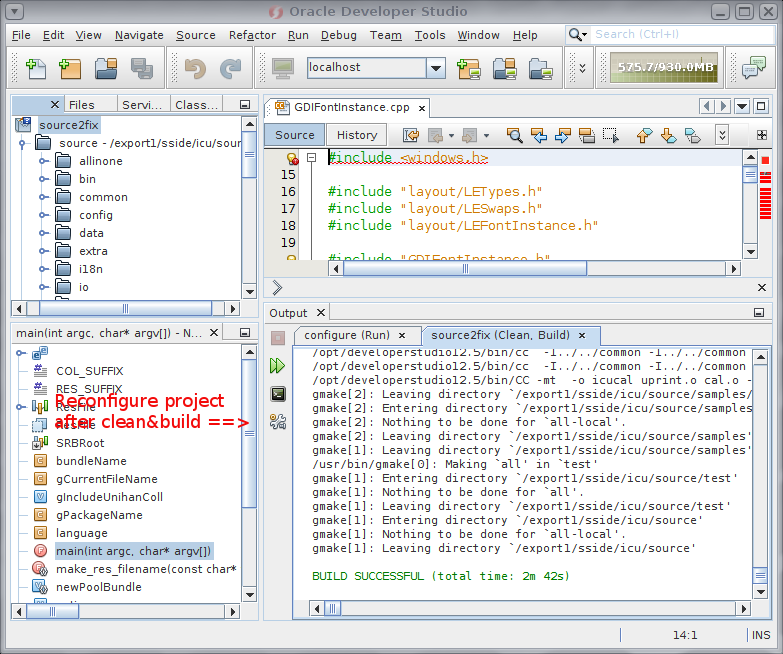
Figure 15. IDE Window with Pointer to the Reconfigure Button
- Click Yes in the confirmation window.
Figure 16 shows the message in the confirmation window.
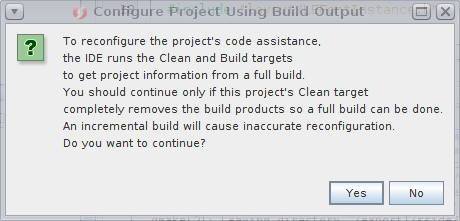
Figure 16. Confirmation Prompt for Reconfiguring the Project
Note that this prompt should not cause concern unless you have modified the
cleantarget of your project to be ignored or to not remove the build products. To reconfigure the project's code assistance, the IDE runs the Clean and Build targets and then runs the build analyzer if it's enabled or examines the output log to get project information from a full build. If existing build products are not cleaned out before building, the build is an incremental build and only the rebuilt components are shown in the output log. Incremental builds cause reconfiguration to be inaccurate.After you click Yes, the IDE cleans, builds, and reparses the ICU application.
- Open the file properties of the
GDIFontInstance.cppfile by right-clicking the file in the Projects tab and choosing Properties.
In Figure 17, you can see that the file is excluded from code assistance because it was not built on Oracle Solaris or Linux.
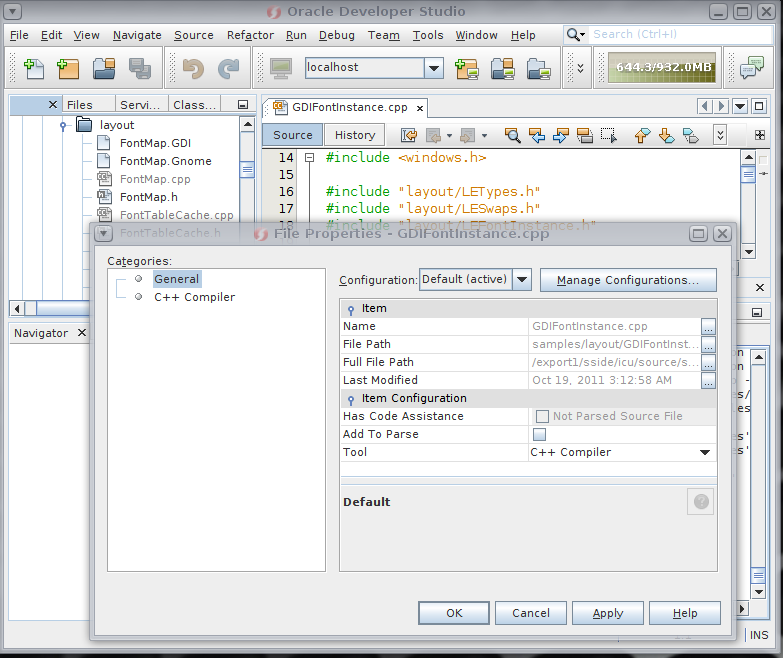
Figure 17. Exclude from Code Assistance Selected in the File Properties Dialog Box
You can use this method to improve code assistance in any project that can be built but has unresolved include directives.


Refining Code Assistance Without Building the Project
If you cannot build from the IDE, you obviously cannot use the build to invoke the build analyzer feature to correct the failures in code assistance.
An alternative is to use the Configure Code Assistance wizard. To use the wizard, right-click the project and choose Code Assistance -> Configure Code Assistance. Follow the steps of the wizard to enable the IDE to update code assistance. Click the Help button to get information about each step.
See Also
See the following resources for more information:
- The Help menu in the IDE, which provides access to extensive information about using the IDE
- The IDE Quick Start Tutorial, which provides basic information about using the IDE, in the Oracle Developer Studio documentation library
- "Performance Tips for the Oracle Developer Studio IDE" and other articles in the Topics page of the Oracle Developer Studio portal
- Oracle Developer Studio on Facebook and Twitter
About the Author
Alexander Simon has been working in IT for over 29 years. Before joining Sun (now Oracle) in 2006, he worked for Togethersoft and Borland, participating in the development of enterprise-level systems and modern IDEs. Simon is currently a principal software engineer for Oracle in St. Petersburg, Russia developing the Oracle Developer Studio IDE. His responsibilities include developing IDE modules for the tool collection, project creation, and the editor.
| Revision 1.1, June 2016 |
| Revision 1.0, July 2012 |