Oracle AI Database(オンプレミス)向け.NETアプリケーションの開発
これらのチュートリアルでは、Oracle Data Provider for .NET Coreを使用して、コマンドラインおよびVisual Studio環境で.NETアプリケーションをOracle AI Database(オンプレミス)に接続する方法を紹介します。また、Visual StudioとOracle Data Provider for .NET、 Managed Driverを使用して、.NET FrameworkアプリケーションをOracle AI Database(オンプレミス)に接続する方法についても説明します。Oracle Autonomous AI Databaseを使用したチュートリアルについては、Oracle Autonomous AI Databaseのための.NETアプリケーションの開発を参照してください。
1. Oracle AI Databaseをインストールする
Oracle AI Databaseにまだアクセスできない場合は、以下のリンクをクリックしてOracle AI Database Freeをインストールしてください。代わりにAlways Free Oracle Autonomous Databaseを使用する場合は、Developing .NET Applications for Oracle Autonomous Databaseチュートリアルを参照してください。
- こちらの手順に従って、Oracle AI Database Freeをダウンロードしてインストールします。
- Oracle AI Database 26ai FreeをWindowsにインストールし、基本的な管理を行う方法を動画でご紹介します。
- Windows向けOracle AI Database Freeインストレーション・ガイド
- Linux向けOracle AI Database Freeのインストレーション・ガイド
2. .NET SDKのインストール
- .NET SDKをダウンロードしてインストールします(まだマシンにインストールされていない場合)。
3. データベース・ユーザーの作成(オプション)
このアプリケーションには、新しいデータベース・ユーザーを使用することをお勧めします。新しいユーザーのスキーマに「To Do」表を格納します。ユーザーの作成と権限の割り当てに慣れていない場合は、以下の[Create User ODP.NET Core]アプリを実行してください。このアプリは、データベース管理者に代わってコマンドラインから新しいデータベース・ユーザーを作成します。このツールは、オンプレミス・データベースまたは TCP 接続のクラウド・データベースを対象としています。これには.NETランタイムが必要です。
また、新しいユーザーを作成したくない場合は、既存のユーザースキーマからステップ4のサンプルコードを実行することもできます。
- コマンドラインから、Create Userアプリ用に新しいディレクトリを作成し、そのディレクトリに移動します。
- dotnet 実行ファイルを使用して新しいプロジェクトを作成します(以下の例のコードボックスの右下隅にあるコピーボタンをクリックして、内容をコピーして貼り付けます)。
dotnet new console - ODP.NET Coreをプロジェクトに追加します。
dotnet add package Oracle.ManagedDataAccess.Core - テキスト・エディタでProgram.csを開きます。
- Program.csファイルの内容を次のコードに置き換えます。
using System; using Oracle.ManagedDataAccess.Client; namespace Create_User { class Program { //Set the net service name, Easy Connect, or connect descriptor of the pluggable DB, // such as "localhost/FREEPDB1" for Oracle AI Database 26ai Free public static string db = "<localhost/FREEPDB1>"; //Provide the DBA's user id, password, and role to create the demo user //If admin has no role, then set to empty string public static string sysUser = "<SYS>"; public static string sysPwd = "<Admin PASSWORD>"; public static string role = "<SYSDBA>"; //Set the demo user id, such as DEMODOTNET and password public static string user = "<DEMODOTNET>"; public static string pwd = "<PASSWORD>"; static void Main() { //Create connection string. Check whether DBA Privilege is required. string conStringDBA; if (role == "") conStringDBA = "User Id=" + sysUser + ";Password=" + sysPwd + ";Data Source=" + db + ";"; else conStringDBA = "User Id=" + sysUser + ";Password=" + sysPwd + ";DBA Privilege=" + role + ";Data Source=" + db + ";"; using (OracleConnection con = new OracleConnection(conStringDBA)) { using (OracleCommand cmd = con.CreateCommand()) { try { con.Open(); Console.WriteLine("Successfully connected to Oracle AI Database"); Console.WriteLine(); //Modify the anonymous PL/SQL GRANT command if you wish to modify the privileges granted cmd.CommandText = "BEGIN " + "EXECUTE IMMEDIATE ('CREATE USER " + user + " IDENTIFIED BY " + pwd + " DEFAULT TABLESPACE USERS QUOTA UNLIMITED ON USERS'); " + "EXECUTE IMMEDIATE ('GRANT CREATE SESSION, CREATE VIEW, CREATE SEQUENCE, CREATE PROCEDURE, " + "CREATE TABLE, CREATE TRIGGER, CREATE TYPE, CREATE MATERIALIZED VIEW TO " + user + "'); " + "END;"; cmd.ExecuteNonQuery(); Console.WriteLine(user + " user created"); Console.WriteLine(); } catch (Exception ex) { Console.WriteLine(ex.Message); } } } } } } - Program.csを変更して、DB接続情報を含めます。
- データソース: プラガブル・データベースに接続するためのネットサービス名、Easy Connectまたは接続記述子を入力します。Oracle AI Database Freeがローカル・マシン上にある場合は、Easy Connect「localhost/FreePDB1」をデータ・ソースとして使用します。
- 管理者ユーザ ID: ユーザを作成し、SYSDBA などの権限を割り当てる権限を持つ管理者ユーザ名を入力します。
- 管理者パスワード: 管理者のパスワードを入力します。
- 管理者ロール: 管理者のロール(SYSDBA など)を入力します。割り当てるロールがない場合は空白のままにします。
- ユーザー ID: DEMODOTNET など、「To Do」表を保存するユーザー名を入力します
- パスワード: ユーザーのパスワードを入力します。
- Program.csに変更を保存します。
- アプリケーションを実行します。
dotnet run - データベースに接続し、新しいユーザーが作成されたというメッセージが表示されます。
4. .NETアプリケーションの構築と実行
- コマンド行から、アプリケーション用に新しいディレクトリを作成し、そのディレクトリに移動します。
- dotnet 実行ファイルを使用して新しいプロジェクトを作成します(以下の例のコードボックスの右下隅にあるコピーボタンをクリックして、内容をコピーして貼り付けます)。
dotnet new console - ODP.NET Coreをプロジェクトに追加します。
dotnet add package Oracle.ManagedDataAccess.Core - テキスト・エディタでProgram.csを開きます。
- Program.csファイルの内容を次のコードに置き換えます。
using System; using System.Data; using Oracle.ManagedDataAccess.Client; namespace ODP.NET_Core_Get_Started { class GettingStarted { //Prerequisite: This app assumes the user has already been created with the // necessary privileges //Set the demo user id, such as DEMODOTNET and password public static string user = "<DEMODOTNET>"; public static string pwd = "<PASSWORD>"; //Set the net service name, Easy Connect, or connect descriptor of the pluggable DB, // such as "localhost/FREEPDB1" for Oracle AI Database 26ai Free public static string db = "<localhost/FREEPDB1>"; static void Main() { string conStringUser = "User Id=" + user + ";Password=" + pwd + ";Data Source=" + db + ";"; using (OracleConnection con = new OracleConnection(conStringUser)) { using (OracleCommand cmd = con.CreateCommand()) { try { con.Open(); Console.WriteLine("Successfully connected to Oracle AI Database as " + user); Console.WriteLine(); //Create the sample table. Checks if table already exists cmd.CommandText = "DECLARE tableExists INTEGER; " + "BEGIN " + "SELECT count(*) into tableExists FROM user_tables where table_name = 'TODOITEM';" + "IF (tableExists = 0) THEN " + "EXECUTE IMMEDIATE ('CREATE TABLE todoitem (id NUMBER GENERATED ALWAYS AS IDENTITY, " + "description VARCHAR2(4000), creation_ts TIMESTAMP WITH TIME ZONE DEFAULT CURRENT_TIMESTAMP, " + "done NUMBER(1, 0), PRIMARY KEY(id))'); " + "END IF; END;"; cmd.ExecuteNonQuery(); //Insert sample data String[] description = { "Task 1", "Task 2", "Task 3", "Task 4", "Task 5" }; int[] done = new int[5] { 0, 0, 1, 0, 1 }; cmd.CommandText = "INSERT INTO todoitem (description, done) VALUES(:descrip, :done)"; cmd.ArrayBindCount = 5; cmd.BindByName = true; OracleParameter descripParam = new OracleParameter("descrip", OracleDbType.Varchar2); descripParam.Direction = ParameterDirection.Input; descripParam.Value = description; cmd.Parameters.Add(descripParam); OracleParameter doneParam = new OracleParameter("done", OracleDbType.Int16); doneParam.Direction = ParameterDirection.Input; doneParam.Value = done; cmd.Parameters.Add(doneParam); cmd.ExecuteNonQuery(); Console.WriteLine("{0} Rows Inserted", cmd.ArrayBindCount); Console.WriteLine(); //Retrieve sample data cmd.CommandText = "SELECT description, done FROM todoitem"; OracleDataReader reader = cmd.ExecuteReader(); while (reader.Read()) { if (reader.GetBoolean(1)) Console.WriteLine(reader.GetString(0) + " is done."); else Console.WriteLine(reader.GetString(0) + " is NOT done."); } descripParam.Dispose(); doneParam.Dispose(); reader.Dispose(); } catch (Exception ex) { Console.WriteLine(ex.Message); } } } } } } - Program.csを変更して、DB接続情報を含めます。
- ユーザー ID: DEMODOTNET など、「To Do」表を保存するユーザー名を入力します
- パスワード: ユーザーのパスワードを入力します。
- データソース: プラガブル・データベースに接続するためのネットサービス名、Easy Connectまたは接続記述子を入力します。Oracle AI Database Freeがローカル・マシン上にある場合は、データ・ソースとしてEasy Connect「localhost/FreePDB1」を使用します。
- Program.csに変更を保存します。
- アプリケーションを実行します。
dotnet run - データベースに接続し、5つの行が挿入され、各タスクの完了ステータスを含むタスクリストがコンソールに返されたというメッセージが表示されるはずです。おめでとうございます。Oracle AI Databaseへの問合せが正常に完了しました。
簡単なデータベース・スキーマをセットアップしてデータを追加し、.NETアプリを使って表から結果を選択する準備が整いました。基本的な作業予定リストアプリを作成します。作業予定品目は、タスクのリストおよびタスクの完了を追跡するデータベース表に格納されます。
.NETコマンドライン
すべて開く すべて閉じるこのチュートリアルでは、Oracle Data Provider for .NET(ODP.NET)Coreを使用して、コマンドラインから.NETアプリケーションをOracle AI Databaseに接続する方法について説明します。以下の手順に従ってください。
1. Oracle AI Databaseをインストールする
Oracle AI Databaseへのアクセス権をまだお持ちでない場合は、以下のリンクをクリックしてOracle AI Database Freeをインストールしてください。(代わりにAlways Free Oracle Autonomous Databaseを使用する場合は、Developing .NET Applications for Oracle Autonomous Databaseチュートリアルを参照してください。)
- こちらの手順に従って、Oracle AI Database Freeをダウンロードしてインストールします。
- 動画で、Oracle AI Database FreeをWindowsにインストールし、基本的な管理を行う方法をご紹介します。
- Oracle AI Database Free Windowsインストレーション・ガイド
- Oracle AI Database Freeインストレーション・ガイドfor Linux
2. Oracle Developer Tools For Visual Studioのインストール
- インストールがまだの場合、Visual Studio 2026をインストールします。
- Visual Studioのメニューから拡張機能>拡張機能の管理を選択します。「参照」タブで、検索ボックスに「Oracle」と入力します。「Oracle Developer Tools for Visual Studio」を見つけて、インストールを選択します。
- ダウンロードが完了したら、Visual Studioを閉じます。
- Visual Studioが終了すると、拡張機能のインストールが開始されます。インストールが完了したら、Visual Studio 2026を再度起動します。
3. データベース・ユーザーの作成(オプション)
このウォークスルーで作成するアプリケーションで、新しいデータベース・ユーザーを使用することをお薦めします。新しいユーザーのスキーマに「To Do」表を格納します。ユーザーの作成と権限の割り当てに慣れていない場合は、以下の手順に従って、Visual Studioを使用してデータベース管理者としてログインし、新しいデータベース・ユーザーを作成するために必要なSQLを実行してください。
また、新しいユーザーを作成したくない場合は、次のステップ(ステップ4: Oracle AI Databaseへの接続)まで進んで、既存のユーザースキーマを使用することもできます。
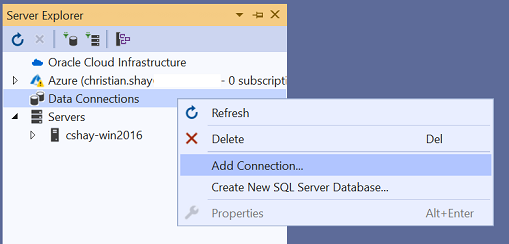
- サーバー・エクスプローラで「Data Connections」ノードを右クリックし、メニューから「Add Connection」を選択します。(Visual Studioでサーバー・エクスプローラが表示されない場合は、Visual Studioメニューから「表示」→「サーバー・エクスプローラ」を選択します。
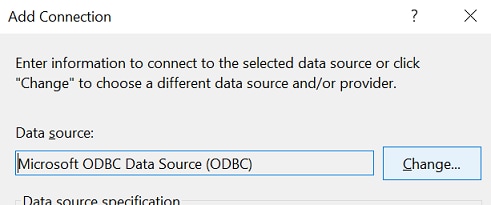
- データソースフィールドがOracle AI Database (ODP.NET、 Managed Driver)に設定されていない場合は、変更ボタンをクリックします。それ以外の場合は、次の箇条書きをスキップします。
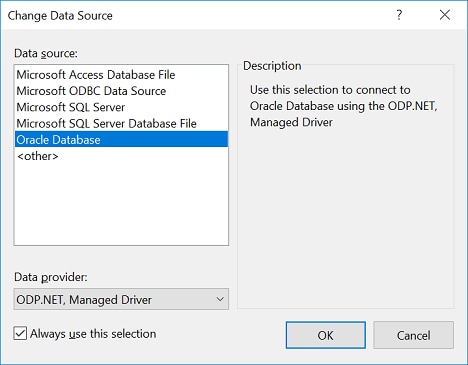
- データソースの変更ダイアログのデータソース:ボックスでOracle AI Databaseを選択し、データプロバイダードロップダウンでODP.NET、 Managed Driverを選択します。(これらのオプションが使用できない場合は、Oracle Developer Tools for Visual Studioが正しくインストールされません)。
- 「接続の追加」が表示されます。接続ダイアログに必要事項を入力します。
- 接続タイプ: ベーシック
- データベース・ホスト名: データベースが存在するホスト名(localhostなど)を入力します。
- ポート番号: Oracle AI Database Freeではデフォルトでポート1521を使用します
- サービス名: サービス名を入力します(例: Oracle Database Freeを使用している場合はFreePDB1)。
- ロール: 「SYSDBA」(管理者)を選択します。
- ユーザー名: SYSと入力します
- パスワード: SYSのパスワードを入力します。
- パスワードの保存: 必要に応じてこのボックスにチェックを入れます。
- 「OK」ボタンをクリックします。
- Server Explorerで、接続ノードをクリックして展開します(SYSと表示)DBName)。次に、ノードを右クリックし、メニューから新規SQLファイルを開くを選択して、SQLおよびPL/SQLファイル・エディタを開きます。
- 次のSQL文をコピーしてSQLおよびPL/SQLファイル・エディタに貼り付けます(次の例のコード・ボックスの右下隅にあるコピー・ボタンをクリックして、内容をコピーして貼り付けます)。
CREATE USER DEMODOTNET IDENTIFIED BY PASSWORD DEFAULT TABLESPACE USERS QUOTA UNLIMITED ON USERS; GRANT CREATE SESSION, CREATE VIEW, CREATE SEQUENCE, CREATE PROCEDURE, CREATE TABLE, CREATE TRIGGER, CREATE TYPE, CREATE MATERIALIZED VIEW TO DEMODOTNET; - このSQLでは、「DEMODOTNET」という名前のユーザーが作成されます。このユーザー名は変更することができます。「PASSWORD」をお好みのパスワードに変更します。データベースがUSERS表領域を使用しない場合、SQL文SELECT TABLESPACE_NAME FROM DBA_TABLESPACES;を含めることで、使用可能な表領域のリストを表示できます。準備ができたら、エディタで右クリックして「Execute All」を選択します。
- 結果を表示して、エラーがなく、両方のSQL文が実行されたことを確認します。
4. Oracle AI Databaseへの接続
- サーバー・エクスプローラで「Data Connections」ノードを右クリックし、メニューから「Add Connection」を選択します。(Visual Studioでサーバー・エクスプローラが表示されない場合は、Visual Studioメニューから「表示」→「サーバー・エクスプローラ」を選択します。
- 「接続の追加」ダイアログで、「データソース」フィールドがOracle Database(ODP.NET、管理対象ドライバー)にまだ設定されていない場合は、「変更」ボタンをクリックします。それ以外の場合は、次の箇条書きをスキップします。
- 「データソースの変更」ダイアログの「データソース: 」ボックスで「Oracle Database」を選択し、「データプロバイダー」ドロップダウンでODP.NET、「管理対象ドライバー」を選択します。(これらのオプションが使用できない場合は、Oracle Developer Tools for Visual Studioが正しくインストールされません)。
- 「接続の追加」が表示されます。接続ダイアログに必要事項を入力します。
- 接続タイプ: ベーシック
- データベース・ホスト名: データベースが存在するホスト名(localhostなど)を入力します。
- ポート番号: Free Databaseでは、デフォルトでポート1521が使用されます
- サービス名: サービス名を入力します(Freeを使用している場合はFreePDB1など)
- ロール: 「管理者以外」を選択します。
- ユーザー名: ユーザー名(DEMODOTNETなど)を入力します
- パスワード: ユーザーのパスワードを入力します。
- パスワードの保存: 必要に応じてこのボックスにチェックを入れます。
- 「OK」ボタンをクリックします。

5. SQL文の実行
- Server Explorerで、接続ノードをクリックして展開します(DEMODOTNETと表示されますDBName)。次に、ノードを右クリックし、メニューからOpen New SQL Fileを選択します。
- 次のSQL文をコピーしてSQL and PL/SQL File Editorに貼り付けます(次の例のコード・ボックスの右下隅にあるコピー・ボタンをクリックして、内容をコピーして貼り付けます)。
CREATE TABLE TODOITEM (id NUMBER GENERATED ALWAYS AS IDENTITY, DESCRIPTION VARCHAR2(4000), CREATION_TS TIMESTAMP WITH TIME ZONE DEFAULT CURRENT_TIMESTAMP, DONE NUMBER(1, 0), PRIMARY KEY(id)); INSERT INTO TODOITEM (DESCRIPTION, DONE) VALUES('Task 1', 0); INSERT INTO TODOITEM (DESCRIPTION, DONE) VALUES('Task 2', 0); INSERT INTO TODOITEM (DESCRIPTION, DONE) VALUES('Task 3', 1); INSERT INTO TODOITEM (DESCRIPTION, DONE) VALUES('Task 4', 0); INSERT INTO TODOITEM (DESCRIPTION, DONE) VALUES('Task 5', 1); COMMIT; SELECT DESCRIPTION, DONE FROM TODOITEM; - すべてのSQL文を選択し、エディタで右クリックして「Execute All」を選択します。
- 結果を表示し、エラーがないかチェックして、すべてのSQL文が実行されたことを確認します。
6. .NET(クロス・プラットフォーム)アプリケーションの構築と実行
- Visual Studioメニューから、「ファイル」→「新規」→「プロジェクト/ソリューション」を選択します。新規プロジェクトの作成ダイアログで、検索フィールドにconsoleと入力します。C#および.NET用にリストされたコンソール・アプリケーションプロジェクト・タイプを選択します。次に、「次へ」ボタンをクリックます。
- 「新規プロジェクトの構成」ダイアログで、プロジェクト名にODP.NET_Core_Get_Startedと入力し、「次へ」ボタンをクリックします。
- 追加情報ダイアログで、.NETバージョンを入力し、作成ボタンを押します。
- 新しいプロジェクトが開いたら、Solution Explorerを表示し、「依存関係」ノードを右クリックし、「NuGetパッケージの管理」を選択します(Solution Explorerが表示されない場合は、Visual Studioメニューに移動して、「表示」→「Solution Explorer」を選択します)。
- Nuget Package Managerで、「参照」をクリックし、「検索」ボックスにoracleと入力します。
- 最新のOracle.ManagedDataAccess.Coreバージョンを選択し、Installボタンをクリックします。「変更のプレビュー」ダイアログが開いたら、「OK」をクリックします。
- Program.csファイルの内容を次のコードに置き換えます。
using System; using System.Data; using Oracle.ManagedDataAccess.Client; namespace ODP.NET_Core_Get_Started { class GettingStarted { //Prerequisite: This app assumes the user has already been created with the // necessary privileges //Set the demo user id, such as DEMODOTNET and password public static string user = "<DEMODOTNET>"; public static string pwd = "<PASSWORD>"; //Set the net service name, Easy Connect, or connect descriptor of the pluggable DB, // such as "localhost/FREEPDB1" for Oracle AI Database 26ai Free public static string db = "<localhost/FREEPDB1>"; static void Main() { string conStringUser = "User Id=" + user + ";Password=" + pwd + ";Data Source=" + db + ";"; using (OracleConnection con = new OracleConnection(conStringUser)) { using (OracleCommand cmd = con.CreateCommand()) { try { con.Open(); Console.WriteLine("Successfully connected to Oracle AI Database as " + user); Console.WriteLine(); //Retrieve sample data cmd.CommandText = "SELECT description, done FROM todoitem"; OracleDataReader reader = cmd.ExecuteReader(); while (reader.Read()) { if (reader.GetBoolean(1)) Console.WriteLine(reader.GetString(0) + " is done."); else Console.WriteLine(reader.GetString(0) + " is NOT done."); } reader.Dispose(); } catch (Exception ex) { Console.WriteLine(ex.Message); } } } } } } - Program.csを変更して、DB接続情報を含めます。
- ユーザーID: DOTNETDEMOと入力します(別のユーザーを使用する場合は、それを入力します)。
- パスワード: ユーザーのパスワードを入力します。
- データ・ソース: プラガブル・データベースに接続するためのEasy Connect 接続文字列 (例「yourhost:yourport/yourdbservice」)、ネットサービス名、または接続記述子を入力します。Oracle AI Database Freeがローカル・マシン上にある場合は、Easy Connect接続文字列「localhost/FreePDB1」をデータ・ソースとして使用します。
- Visual Studioメニューから「デバッグ」→「デバッグの開始」を選択し(またはF5を押して)、アプリケーションを保存、構築および実行します。
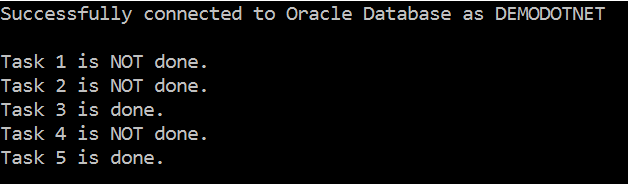
- Oracle AI Databaseに接続したというメッセージと、データベースから返された顧客情報が表示されます。おめでとうございます。Oracle AI Databaseへの問合せが正常に完了しました。
このステップでは、Windows、LinuxおよびmacOSで実行できる.NETコンソール・アプリケーションを構築します。
Visual Studioによる.NET
すべて開く すべて閉じるこのチュートリアルでは、Oracle Data Provider for .NET(ODP.NET)Core、Visual Studio 2026、およびOracle Developer Tools for Visual Studio拡張機能を使用して、.NETアプリケーションをOracle AI Database(オンプレミス)に接続する方法を紹介します。以下の手順に従ってください。
(注: Visual Studioを使用した.NET Frameworkのチュートリアルをすでに完了している場合は、このチュートリアルの最後のステップまでスキップできます。その他のステップは同じです。)
1. Oracle AI Databaseをインストールする
Oracle AI Databaseへのアクセス権をまだお持ちでない場合は、以下のリンクをクリックしてOracle AI Database Freeをインストールしてください。(代わりにAlways Free Oracle Autonomous Databaseを使用する場合は、Developing .NET Applications for Oracle Autonomous Databaseチュートリアルを参照してください。)
- こちらの手順に従って、Oracle AI Database Freeをダウンロードしてインストールします。
- Oracle AI Database FreeをWindowsにインストールし、基本的な管理を行う方法を動画でご紹介します。
- Oracle AI Database Free Windows版インストレーション・ガイド
- Oracle AI Database Freeインストレーション・ガイドfor Linux
2. Oracle Developer Tools For Visual Studioのインストール
- インストールがまだの場合、Visual Studio 2026をインストールします。
- Visual Studioのメニューから、拡張機能>拡張機能の管理を選択します。「参照」タブで、検索ボックスに「Oracle」と入力します。「Oracle Developer Tools for Visual Studio」を見つけて、インストールを選択します。
- ダウンロードが完了したら、Visual Studioを閉じます。
- Visual Studioを閉じると、拡張機能のインストールが開始されます。インストールが完了したら、Visual Studio 2026を再度起動します。
3. データベース・ユーザーの作成(オプション)
このウォークスルーで作成するアプリケーションで、新しいデータベース・ユーザーを使用することをお薦めします。新しいユーザーのスキーマに「To Do」表を格納します。ユーザーの作成と権限の割り当てに慣れていない場合は、以下の手順に従って、Visual Studioを使用してデータベース管理者としてログインし、新しいデータベース・ユーザーを作成するために必要なSQLを実行してください。
また、新しいユーザーを作成したくない場合は、次のステップ(ステップ4: Oracle AI Databaseへの接続)まで進んで、既存のユーザースキーマを使用することもできます。
- サーバー・エクスプローラで「Data Connections」ノードを右クリックし、メニューから「Add Connection」を選択します。(Visual Studioでサーバー・エクスプローラが表示されない場合は、Visual Studioメニューから「表示」→「サーバー・エクスプローラ」を選択します。
- データソースフィールドがOracle AI Database(ODP.NET、管理対象ドライバ)に設定されていない場合は、変更ボタンをクリックします。それ以外の場合は、次の箇条書きをスキップします。
- 「データソースの変更」ダイアログの「データソース: 」ボックスでOracle AI Databaseを選択し、「データプロバイダー」ドロップダウンでODP.NET、 Managed Driverを選択します。(これらのオプションが使用できない場合は、Oracle Developer Tools for Visual Studioが正しくインストールされません)。
- 「接続の追加」が表示されます。接続ダイアログに必要事項を入力します。
- 接続タイプ: ベーシック
- データベース・ホスト名: データベースが存在するホスト名(localhostなど)を入力します。
- ポート番号: Oracle AI Database Freeはデフォルトでポート1521を使用します
- サービス名: サービス名を入力します(Oracle Database Freeを使用している場合は例: FreePDB1)
- ロール: 「SYSDBA」(管理者)を選択します。
- ユーザー名: SYSと入力します
- パスワード: SYSのパスワードを入力します。
- パスワードの保存: 必要に応じてこのボックスにチェックを入れます。
- 「OK」ボタンをクリックします。
- Server Explorerで、接続ノードをクリックして展開します(SYSと表示)DBName)。次に、ノードを右クリックし、メニューから新規SQLファイルを開くを選択して、SQLおよびPL/SQLファイル・エディタを開きます。
- 次のSQL文をコピーしてSQLおよびPL/SQLファイル・エディタに貼り付けます(次の例のコード・ボックスの右下隅にあるコピー・ボタンをクリックして、内容をコピーして貼り付けます)。
CREATE USER DEMODOTNET IDENTIFIED BY PASSWORD DEFAULT TABLESPACE USERS QUOTA UNLIMITED ON USERS; GRANT CREATE SESSION, CREATE VIEW, CREATE SEQUENCE, CREATE PROCEDURE, CREATE TABLE, CREATE TRIGGER, CREATE TYPE, CREATE MATERIALIZED VIEW TO DEMODOTNET; - このSQLでは、「DEMODOTNET」という名前のユーザーが作成されます。このユーザー名は変更することができます。「PASSWORD」をお好みのパスワードに変更します。データベースがUSERS表領域を使用しない場合、SQL文SELECT TABLESPACE_NAME FROM DBA_TABLESPACES;を含めることで、使用可能な表領域のリストを表示できます。準備ができたら、エディタで右クリックして「Execute All」を選択します。
- 結果を表示して、エラーがなく、両方のSQL文が実行されたことを確認します。
4. Oracle AI Databaseへの接続
- サーバー・エクスプローラで「Data Connections」ノードを右クリックし、メニューから「Add Connection」を選択します。(Visual Studioでサーバー・エクスプローラが表示されない場合は、Visual Studioメニューから「表示」→「サーバー・エクスプローラ」を選択します。
- 「接続の追加」ダイアログで、「データソース」フィールドがOracle Database(ODP.NET、管理対象ドライバー)にまだ設定されていない場合は、「変更」ボタンをクリックします。それ以外の場合は、次の箇条書きをスキップします。
- 「データソースの変更」ダイアログの「データソース: 」ボックスで「Oracle Database」を選択し、「データプロバイダー」ドロップダウンでODP.NET、「管理対象ドライバー」を選択します。(これらのオプションが使用できない場合は、Oracle Developer Tools for Visual Studioが正しくインストールされません)。
- 「接続の追加」が表示されます。接続ダイアログに必要事項を入力します。
- 接続タイプ: ベーシック
- データベース・ホスト名: データベースが存在するホスト名(localhostなど)を入力します。
- ポート番号: Free Databaseでは、デフォルトでポート1521が使用されます
- サービス名: サービス名を入力します(Freeを使用している場合はFreePDB1など)
- ロール: 「管理者以外」を選択します。
- ユーザー名: ユーザー名(DEMODOTNETなど)を入力します
- パスワード: ユーザーのパスワードを入力します。
- パスワードの保存: 必要に応じてこのボックスにチェックを入れます。
- 「OK」ボタンをクリックします。
5. SQL文の実行
- Server Explorerで、接続ノードをクリックして展開します(DEMODOTNETと表示されますDBName)。次に、ノードを右クリックし、メニューからOpen New SQL Fileを選択します。
- 次のSQL文をコピーしてSQLおよびPL/SQLファイル・エディタに貼り付けます(次の例のコード・ボックスの右下隅にあるコピー・ボタンをクリックして、内容をコピーして貼り付けます)。
CREATE TABLE TODOITEM (id NUMBER GENERATED ALWAYS AS IDENTITY, DESCRIPTION VARCHAR2(4000), CREATION_TS TIMESTAMP WITH TIME ZONE DEFAULT CURRENT_TIMESTAMP, DONE NUMBER(1, 0), PRIMARY KEY(id)); INSERT INTO TODOITEM (DESCRIPTION, DONE) VALUES('Task 1', 0); INSERT INTO TODOITEM (DESCRIPTION, DONE) VALUES('Task 2', 0); INSERT INTO TODOITEM (DESCRIPTION, DONE) VALUES('Task 3', 1); INSERT INTO TODOITEM (DESCRIPTION, DONE) VALUES('Task 4', 0); INSERT INTO TODOITEM (DESCRIPTION, DONE) VALUES('Task 5', 1); COMMIT; SELECT DESCRIPTION, DONE FROM TODOITEM; - すべてのSQL文を選択し、エディタで右クリックしてExecute Allを選択します。
- 結果を表示し、エラーがないかチェックして、すべてのSQL文が実行されたことを確認します。
6. .NET Frameworkアプリケーションの構築と実行
- Visual Studioメニューから、「ファイル」→「新規」→「プロジェクト/ソリューション」を選択します。「新規プロジェクトの作成」ダイアログで、「検索」フィールドにconsoleと入力します。C#および.NET Framework用にリストされた「コンソール・アプリケーション」プロジェクト・タイプを選択します。次に、「次へ」ボタンをクリックます。
- 新規プロジェクトの構成ダイアログで、プロジェクト名にODP.NET_Framework_Get_Startedと入力します。「フレームワーク」ドロップダウンで、「.NET Framework 4.8」を選択します。(そのバージョンの .NETをお持ちでない場合は、別のバージョンを選択します)。次に、「Create」ボタンをクリックします。
- 新しいプロジェクトが開いたら、ソリューション・エクスプローラを表示し、「参照」ノードを右クリックし、「NuGetパッケージの管理」を選択します(ソリューション・エクスプローラが表示されない場合は、Visual Studioメニューに移動して、「表示」→「ソリューション・エクスプローラ」を選択します)。
- Nuget Package Managerで、「参照」をクリックし、「検索」ボックスにoracleと入力します。
- Oracle.ManagedDataAccessを選択し、「インストール」ボタンをクリックします。
- Program.csファイルの内容を次のコードに置き換えます。
using System; using System.Data; using Oracle.ManagedDataAccess.Client; namespace ODP.NET_Framework_Get_Started { class GettingStarted { //Prerequisite: This app assumes the user has already been created with the // necessary privileges //Set the demo user id, such as DEMODOTNET and password public static string user = "<DEMODOTNET>"; public static string pwd = "<PASSWORD>"; //Set the net service name, Easy Connect, or connect descriptor of the pluggable DB, // such as "localhost/FREEPDB1" for Oracle AI Database 26ai Free public static string db = "<localhost/FREEPDB1>"; static void Main() { string conStringUser = "User Id=" + user + ";Password=" + pwd + ";Data Source=" + db + ";"; using (OracleConnection con = new OracleConnection(conStringUser)) { using (OracleCommand cmd = con.CreateCommand()) { try { con.Open(); Console.WriteLine("Successfully connected to Oracle AI Database as " + user); Console.WriteLine(); //Retrieve sample data cmd.CommandText = "SELECT description, done FROM todoitem"; OracleDataReader reader = cmd.ExecuteReader(); while (reader.Read()) { if (reader.GetBoolean(1)) Console.WriteLine(reader.GetString(0) + " is done."); else Console.WriteLine(reader.GetString(0) + " is NOT done."); } reader.Dispose(); } catch (Exception ex) { Console.WriteLine(ex.Message); } } } } } } - Program.csを変更して、DB接続情報を含めます。
- ユーザーID: DOTNETDEMOと入力します(別のユーザーを使用する場合は、それを入力します)。
- パスワード: ユーザーのパスワードを入力します。
- データ・ソース: プラガブル・データベースに接続するためのEasy Connect 接続文字列 (例「yourhost:yourport/yourdbservice」)、ネットサービス名、または接続記述子を入力します。Oracle AI Database Freeがローカル・マシン上にある場合は、Easy Connect接続文字列「localhost/FreePDB1」をデータ・ソースとして使用します。
- Visual Studioメニューから、「デバッグ」→「デバッグなしで起動」(または[Ctrl]を押しながらF5)を選択して、アプリケーションを保存、構築および実行します。
- Oracle AI Databaseに接続したというメッセージと、データベースから返された顧客情報が表示されます。おめでとうございます。Oracle AI Databaseへの問合せが正常に完了しました。
このステップでは、.NET Frameworkアプリケーションを構築します。
Visual Studioを使用した.NET Framework
すべて開く すべて閉じるこのチュートリアルでは、Oracle Data Provider for .NET(ODP.NET)、Visual Studio 2026、およびOracle Developer Tools for Visual Studio拡張機能を使用して、.NET FrameworkアプリケーションをOracle AI Database(オンプレミス)に接続する方法を説明します。以下の手順に従ってください。
(注: Visual Studioを使用した.NETのチュートリアルをすでに完了している場合は、このチュートリアルの最後のステップまでスキップできます。その他のステップは同じです。)