Quick Start: Developing Python Applications for Oracle Autonomous Database
This tutorial shows you how to connect Python applications to Oracle Autonomous Database (ADB) using the python-oracledb driver. This interface lets you quickly develop applications that execute SQL or PL/SQL statements, allowing you to work with many data types including JSON. Your applications can also use Oracle's document storage SODA calls. Python-oracledb is the new name for Oracle's popular cx_Oracle driver. It conforms to the Python Database API v2.0 Specification with a considerable number of additions and a couple of exclusions.
If you would like to use a local database instead, then see the tutorial Developing Python Applications for Oracle Database.
Python python-oracledb on Windows
Open all Close allThis tutorial shows you how use the Python python-oracledb driver on Windows to connect Python applications to Oracle Autonomous Database (ADB).
-
- 1. Create an ADB Instance
Follow the steps below to walk through the process of creating an ADB instance if you do not already have access to one.
1.1 Create a free Oracle Cloud account.
1.2 Navigate to the Autonomous Database creation pane and click 'Create Autonomous Database':

1.3 Choose a database name, for example PYDB. Select Transaction Processing, Data Warehouse, or JSON on Shared Infrastructure:

1.4 Set the database ADMIN user password:

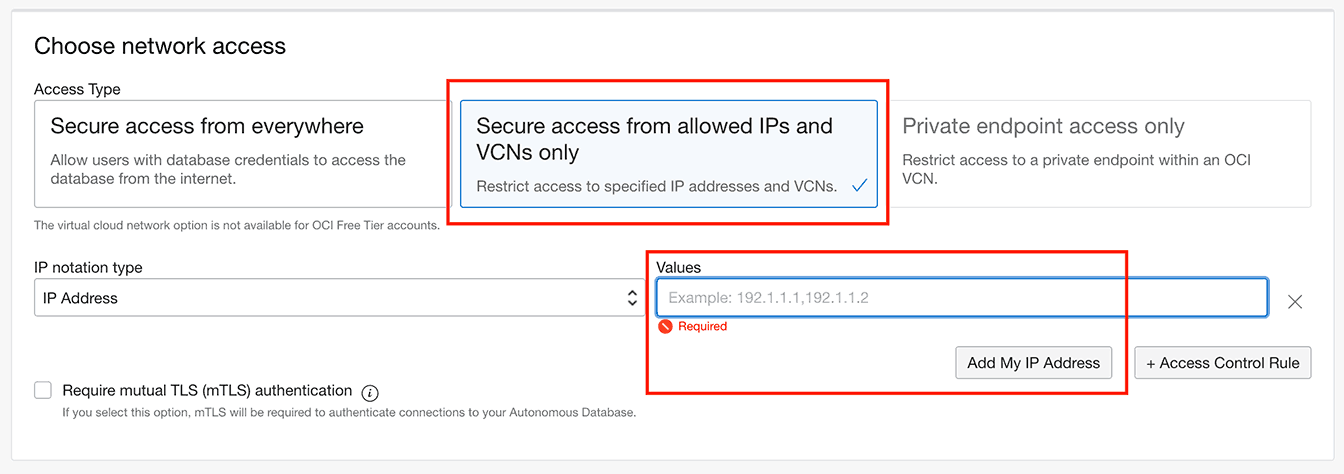
1.5 Allow access from an allowed IP address, and add your IP address:

If your IP address changes in future, you will need to update the database service's access control list.
The 'Secure access from everywhere' option will use mTLS with a wallet which is not covered in this quickstart. Refer to the python-oracledb driver documentation if you need to use it because adding your IP address is not possible.
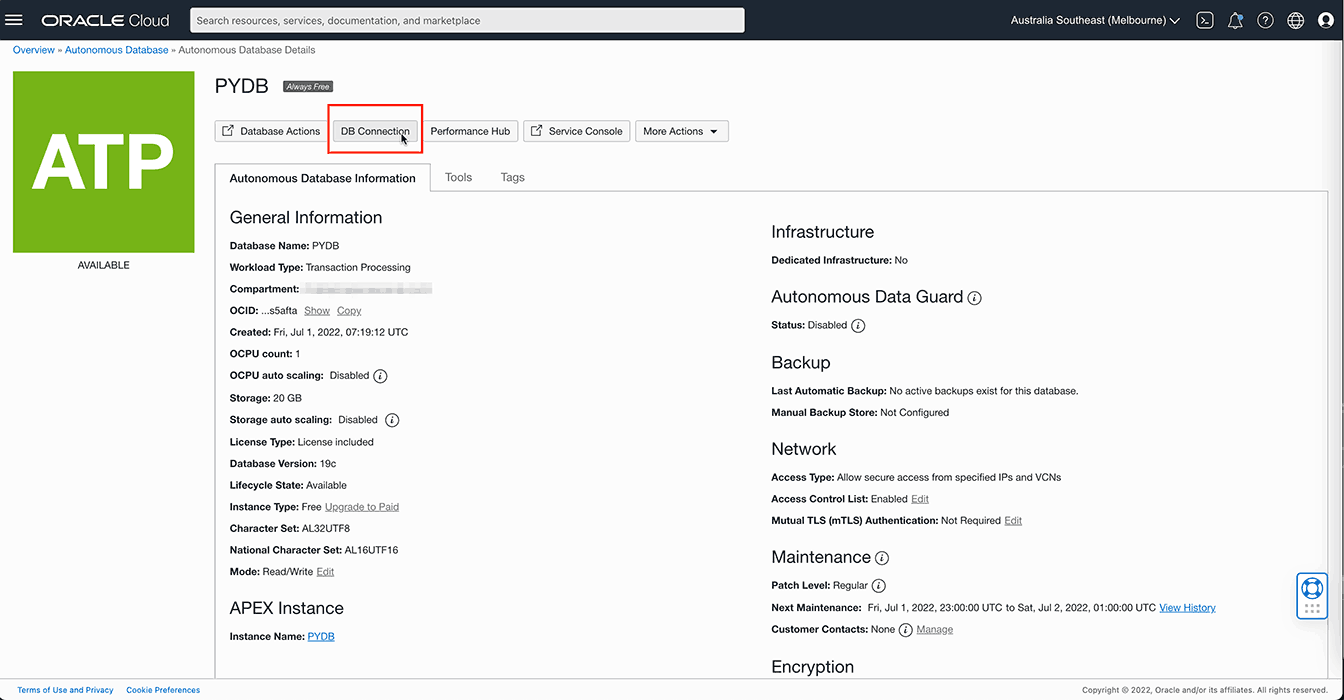
1.6 When the database has been created, select the DB Connection button:

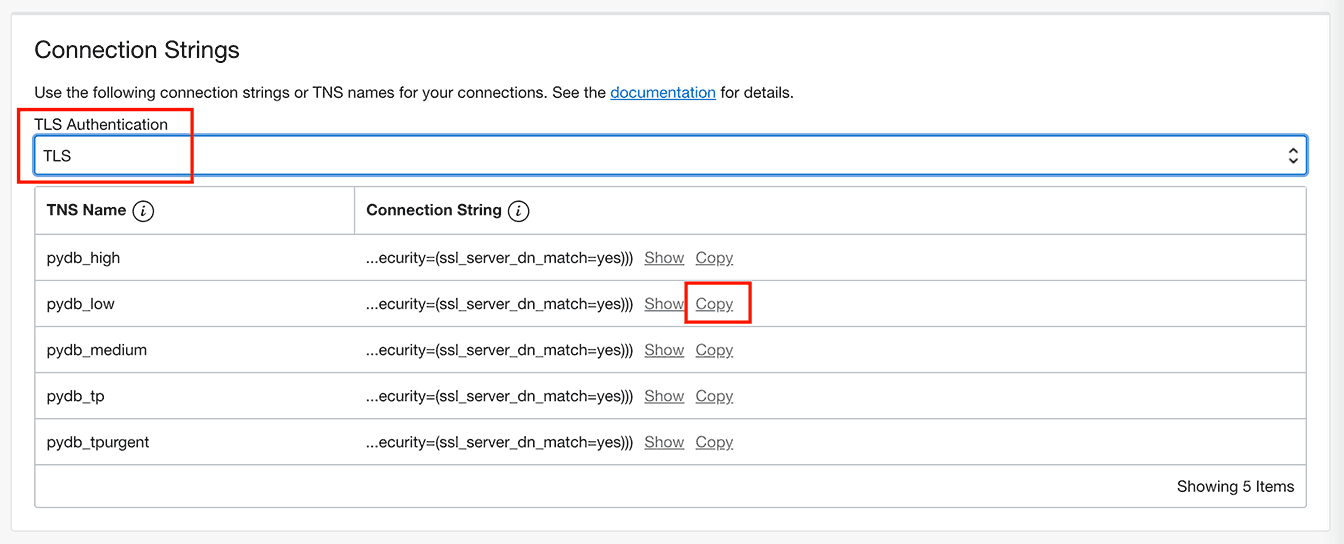
Copy any connection string. Important: Make sure to select "TLS" in the authentication drop down before you copy it.

For example your connection string may be like:
(description= (retry_count=20)(retry_delay=3)(address=(protocol=tcps)(port=1521)(host=adb.abc.oraclecloud.com))(connect_data=(service_name=abc_pydb_low.adb.oraclecloud.com))(security=(ssl_server_dn_match=yes))) - 2. Install Python
Install Python 3.7, or later, for 64-bit or later.
The steps below assume that the executable is called 'python'. In some environments it might be called 'python3'.
- 3. Install python-oracledb
Install python-oracledb:
python -m pip install oracledbAdding the pip
--useroption may useful when you do not have permission to write to system directories. If you are behind an HTTP proxy, you can also add an option like--proxy=http://proxy.example.com:80For further assistance and options, see Installing python-oracledb on Windows.
- 4. Create a Python Application
Using your favorite text editor, create a new Python file example.py in a directory of your choice. It should contain the following code. Make sure the indentation is the same as shown:
import getpass
import oracledb

pw = getpass.getpass("Enter password: ")

connection = oracledb.connect(
    user="admin",
    password=pw,
    dsn="(description=...)")  # the connection string copied from the cloud console

print("Successfully connected to Oracle Database")

# Create a table
with connection.cursor() as cursor:

    cursor.execute("""
        begin
            execute immediate 'drop table todoitem';
            exception when others then if sqlcode <> -942 then raise; end if;
        end;""")

    cursor.execute("""
        create table todoitem (
            id number generated always as identity,
            description varchar2(4000),
            creation_ts timestamp with time zone default current_timestamp,
            done number(1,0),
            primary key (id))""")

    print("Table created")

# Insert some data
with connection.cursor() as cursor:

    rows = [ ("Task 1", 0 ),
             ("Task 2", 0 ),
             ("Task 3", 1 ),
             ("Task 4", 0 ),
             ("Task 5", 1 ) ]

    cursor.executemany("insert into todoitem (description, done) values(:1, :2)", rows)
    print(cursor.rowcount, "Rows Inserted")

connection.commit()

# Now query the rows back
with connection.cursor() as cursor:

    for row in cursor.execute('select description, done from todoitem'):
        if (row[1]):
            print(row[0], "is done")
        else:
            print(row[0], "is NOT done")
Modify example.py to use your database connection information in the oracledb.connect() call:
- User: Use your database username.
- Data Source Name (DSN): Use the connection string copied from the ADB console.
- Save the changes to example.py.
- 5. Run the Python Application
Run the app:
python example.pyAfter entering the user password, you will see the queried rows returned from the database. Congratulations! You have successfully used Oracle Autonomous Database.
Note: If you connect to ADB from behind a firewall, you may need to add a proxy name and port to the
addressclause of the connection string similar to:(description= (retry_count=20)(retry_delay=3)(address=(https_proxy=proxy.example.com)(https_proxy_port=80)(protocol=tcps)(. . .)
Now you have completed this tutorial, you should continue with the full Python and Oracle Database Tutorial or Getting Started with Python and Oracle Database LiveLabs Tutorial to learn more about using python-oracledb.
More information and resources on using python-oracledb are available here.
Python python-oracledb on macOS
Open all Close allThis tutorial shows you how use the Python python-oracledb driver on macOS to connect Python applications to Oracle Autonomous Database (ADB).
-
- 1. Create an ADB Instance
Follow the steps below to walk through the process of creating an ADB instance if you do not already have access to one.
1.1 Create a free Oracle Cloud account.
1.2 Navigate to the Autonomous Database creation pane and click 'Create Autonomous Database':

1.3 Choose a database name, for example PYDB. Select Transaction Processing, Data Warehouse, or JSON on Shared Infrastructure:

1.4 Set the database ADMIN user password:

1.5 Allow access from an allowed IP address, and add your IP address:

If your IP address changes in future, you will need to update the database service's access control list.
The 'Secure access from everywhere' option will use mTLS with a wallet which is not covered in this quickstart. Refer to the python-oracledb driver documentation if you need to use it because adding your IP address is not possible.
1.6 When the database has been created, select the DB Connection button:

Copy any connection string. Make sure to select "TLS" in the authentication drop down before you copy it.

For example your connection string may be like:
(description= (retry_count=20)(retry_delay=3)(address=(protocol=tcps)(port=1521)(host=adb.abc.oraclecloud.com))(connect_data=(service_name=abc_pydb_low.adb.oraclecloud.com))(security=(ssl_server_dn_match=yes))) - 2. Install Python
You may already have Python in
/usr/bin/python3. If so, use the full path and binary name in commands below. Otherwise install Python 3.8 or later.The steps below assume that the executable is called 'python'. In some environments it might be called something like 'python3.8'.
- 3. Install python-oracledb
Install python-oracledb:
python -m pip install oracledbAdding the pip
--useroption may useful when you do not have permission to write to system directories. If you are behind an HTTP proxy, you can also add an option like--proxy=http://proxy.example.com:80For further assistance and options, see Installing python-oracledb on macOS.
- 4. Create a Python Application
Using your favorite text editor, create a new Python file example.py in a directory of your choice. It should contain the following code. Make sure the indentation is the same as shown:
import getpass
import oracledb

pw = getpass.getpass("Enter password: ")

connection = oracledb.connect(
    user="admin",
    password=pw,
    dsn="(description=...)")  # the connection string copied from the cloud console

print("Successfully connected to Oracle Database")

# Create a table
with connection.cursor() as cursor:

    cursor.execute("""
        begin
            execute immediate 'drop table todoitem';
            exception when others then if sqlcode <> -942 then raise; end if;
        end;""")

    cursor.execute("""
        create table todoitem (
            id number generated always as identity,
            description varchar2(4000),
            creation_ts timestamp with time zone default current_timestamp,
            done number(1,0),
            primary key (id))""")

    print("Table created")

# Insert some data
with connection.cursor() as cursor:

    rows = [ ("Task 1", 0 ),
             ("Task 2", 0 ),
             ("Task 3", 1 ),
             ("Task 4", 0 ),
             ("Task 5", 1 ) ]

    cursor.executemany("insert into todoitem (description, done) values(:1, :2)", rows)
    print(cursor.rowcount, "Rows Inserted")

connection.commit()

# Now query the rows back
with connection.cursor() as cursor:

    for row in cursor.execute('select description, done from todoitem'):
        if (row[1]):
            print(row[0], "is done")
        else:
            print(row[0], "is NOT done")
Modify example.py to use your database connection information in the oracledb.connect() call:
- User: Use admin which is the user created by default during the creation of Autonomous Database. (If you created another ADB user, you can use that user instead.)
- Data Source Name (DSN): Use the connection string copied from the ADB console.
- Save the changes to example.py.
- 5. Run the Python Application
Run the app:
python example.pyAfter entering the user password, you will see the queried rows returned from the database. Congratulations! You have successfully used Oracle Autonomous Database.
Note: If you connect to ADB from behind a firewall, you may need to add a proxy name and port to the
addressclause of the connection string similar to:(description= (retry_count=20)(retry_delay=3)(address=(https_proxy=proxy.example.com)(https_proxy_port=80)(protocol=tcps)(. . .)
Now you have completed this tutorial, you should continue with the full Python and Oracle Database Tutorial or Getting Started with Python and Oracle Database LiveLabs Tutorial to learn more about using python-oracledb.
More information and resources on using python-oracledb are available here.
Python python-oracledb on Linux
Open all Close allThis tutorial shows you how use the Python python-oracledb driver on Linux to connect Python applications to Oracle Autonomous Database (ADB). Using a recent version of Linux such as Oracle Linux 8 or 9 is recommended.
-
- 1. Create an ADB Instance
Follow the steps below to walk through the process of creating an ADB instance if you do not already have access to one.
1.1 Create a free Oracle Cloud account.
1.2 Navigate to the Autonomous Database creation pane and click 'Create Autonomous Database':

1.3 Choose a database name, for example PYDB. Select Transaction Processing, Data Warehouse, or JSON on Shared Infrastructure:

1.4 Set the database ADMIN user password:

1.5 Allow access from an allowed IP address, and add your IP address:

If your IP address changes in future, you will need to update the database service's access control list.
The 'Secure access from everywhere' option will use mTLS with a wallet which is not covered in this quickstart. Refer to the python-oracledb driver documentation if you need to use it because adding your IP address is not possible.
1.6 When the database has been created, select the DB Connection button:

Copy any connection string. Important: Make sure to select "TLS" in the authentication drop down before you copy it.

For example your connection string may be like:
(description= (retry_count=20)(retry_delay=3)(address=(protocol=tcps)(port=1521)(host=adb.abc.oraclecloud.com))(connect_data=(service_name=abc_pydb_low.adb.oraclecloud.com))(security=(ssl_server_dn_match=yes))) - 2. Install Python (Optional)
You may already have Python 3 installed. If not, see Python for Oracle Linux.
The steps below assume that the executable is called 'python3'. If you also have Python 2 installed, make sure to use the newer Python 3 binary.
- 3. Install python-oracledb
Upgrade Python's
piputility:python3 -m pip install pipMake sure you use the Python 3 executable.
Adding the pip
--useroption may useful when you do not have permission to write to system directories. If you are behind an HTTP proxy, you can also add an option like--proxy=http://proxy.example.com:80Install python-oracledb:
python3 -m pip install oracledbUse the pip
--useror--proxyoptions again if needed.For further assistance and options, such as for installing behind an HTTP proxy, see Installing python-oracledb on Linux.
- 4. Create a Python Application
Using your favorite text editor, create a new Python file example.py in a directory of your choice. It should contain the following code. Make sure the indentation is the same as shown:
import getpass
import oracledb

pw = getpass.getpass("Enter password: ")

connection = oracledb.connect(
    user="admin",
    password=pw,
    dsn="(description=...)")  # the connection string copied from the cloud console

print("Successfully connected to Oracle Database")

# Create a table
with connection.cursor() as cursor:

    cursor.execute("""
        begin
            execute immediate 'drop table todoitem';
            exception when others then if sqlcode <> -942 then raise; end if;
        end;""")

    cursor.execute("""
        create table todoitem (
            id number generated always as identity,
            description varchar2(4000),
            creation_ts timestamp with time zone default current_timestamp,
            done number(1,0),
            primary key (id))""")

    print("Table created")

# Insert some data
with connection.cursor() as cursor:

    rows = [ ("Task 1", 0 ),
             ("Task 2", 0 ),
             ("Task 3", 1 ),
             ("Task 4", 0 ),
             ("Task 5", 1 ) ]

    cursor.executemany("insert into todoitem (description, done) values(:1, :2)", rows)
    print(cursor.rowcount, "Rows Inserted")

connection.commit()

# Now query the rows back
with connection.cursor() as cursor:

    for row in cursor.execute('select description, done from todoitem'):
        if (row[1]):
            print(row[0], "is done")
        else:
            print(row[0], "is NOT done")
Modify example.py to use your database connection information in the oracledb.connect() call:
- User: Use admin which is the user created by default during the creation of Autonomous Database. (If you created another ADB user, you can use that user instead.)
- Data Source Name (DSN): Use the connection string copied from the ADB console.
- Save the changes to example.py.
- 5. Run the Python Application
Run the app using the Python 3 executable:
python3 example.pyAfter entering the user password, you will see the queried rows returned from the database. Congratulations! You have successfully used Oracle Autonomous Database.
Note: If you connect to ADB from behind a firewall, you will likely encounter a connection timeout error. Update the tnsnames.ora file to use an HTTP proxy. Learn how to do this in this ADB documentation section. Scroll down to the "Connections with an HTTP Proxy" section on the doc page.
Now you have completed this tutorial, you should continue with the full Python and Oracle Database Tutorial or Getting Started with Python and Oracle Database LiveLabs Tutorial to learn more about using python-oracledb.
More information and resources on using python-oracledb are available here.