Oracle Beehive Custom Workflow Tutorial
Oracle Beehive supports user-defined BPEL workflows that can either be invoked automatically from Oracle Beehive through policies or from some external source. You can integrate Oracle Beehive with BPEL Human Tasks so that these tasks show up in Oracle Beehive as task assignments. This tutorial demonstrates how to define a BPEL process that is invoked from Oracle Beehive and leverages task integration.
Notes
- This tutorial includes steps to leverage Oracle Beehive and BPEL task integration. Some steps are not required or slightly different if no tasks are required in your BPEL process.
- The XML data received from Oracle Beehive can be processed in different ways in the BPEL process. This tutorial uses the data type
anyTypeto hold the received data. However, you can instead define a custom schema. This allows you to validate the Xpaths at design time and use the designer user interface. If you useanyType, you have to manually modify the source. - A zip file containing the JDeveloper project, as well as the resulting BPEL Suitecase (jar file) and Oracle Beehive Policy is available as CustomBeehiveWorkflow.zip.
Building the BPEL Workflow Process
Step 1: Create a new BPEL Project
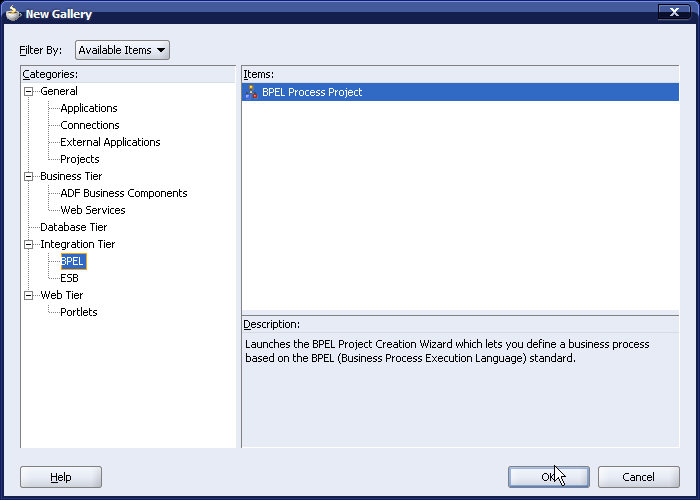
Create a new project in JDeveloper. Use the project template "BPEL Process Project".
Step 2: Specify project settings
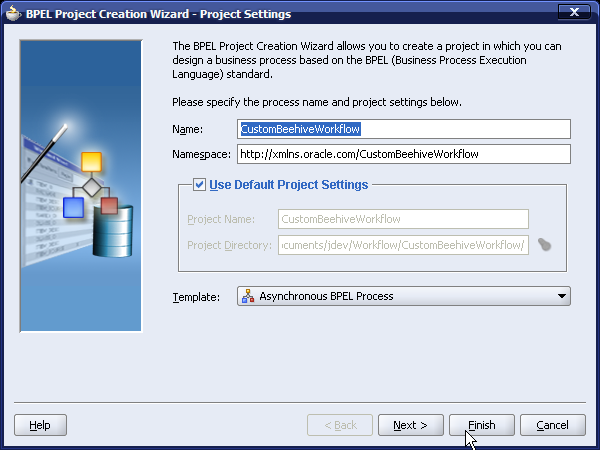
Specify the
Name of the BPEL process you are creating. This tutorial uses the name
CustomBeehiveWorkflow. The
Namespace field will automatically be updated based on the specified name. Do not alter the generated namespace nor the default project settings. For
Template, you must specify
Asynchronous BPEL Process. Click
Finish to accept the remaining default settings and create the project.
Step 3: Add anyType element to schema
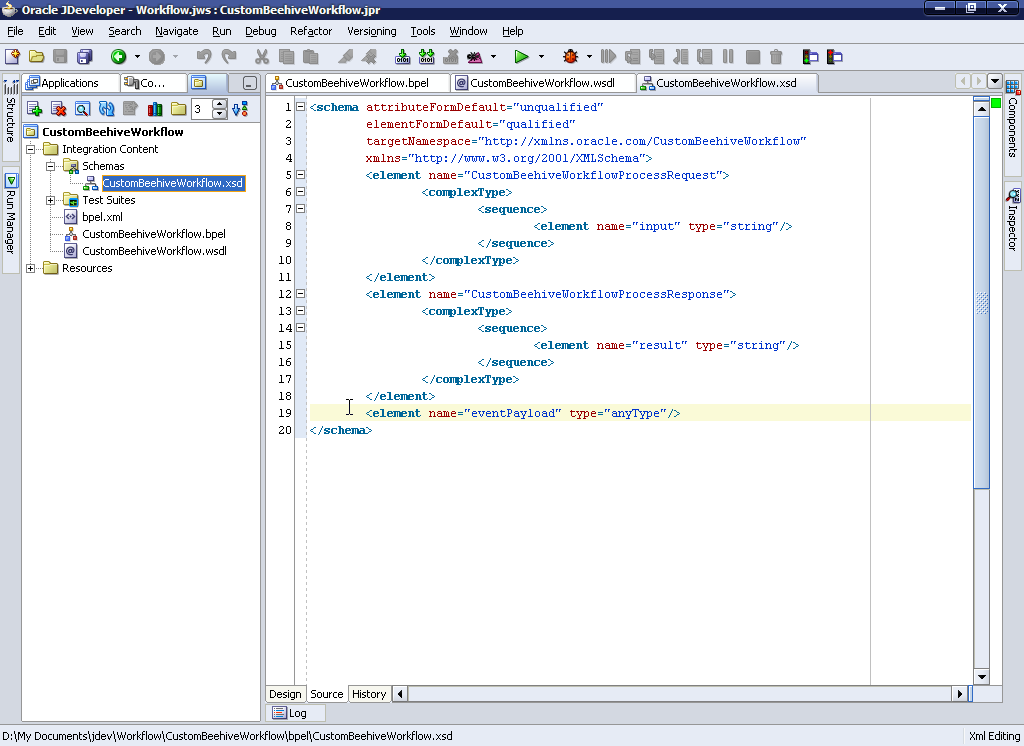
The
anyType element can store data of any type in a variable. This element will be used to hold the converted data received by Oracle Beehive. Since data received by Oracle Beehive is defined in the policy that will trigger the workflow, it can change based on the policy created. Using
anyType allows you to reuse the workflow process with less modifications based on the data received by Oracle Beehive.
Add the following to the CustomBeehiveWorkflow.xsd file:
<element name="eventPayload" type="anyType"/>
Step 4: Add a message type definition

Add a new message type to the process's WSDL file. This message type will be used later to hold the XML input received from Oracle Beehive. Note that this step may not be needed if your process is not invoked from Oracle Beehive.
Add the following to the CustomBeehiveWorkflow.wsdl file:
<message name="BeehiveInputMessage">
        <part name="payload" element="client:eventPayload"/>
    </message>
Step 5: Add Beehive namespace definition

The data sent from Oracle Beehive is XML data, which has its own namespace defined. This namespace must be defined in the BPEL process in order to retrieve it.
Add the following namespace definition to the CustomBeehiveWorkflow.bpel file.
xmlns:bcw="http://xmlns.oracle.com/BeehiveCustomWorkflow"
Step 6: Add required variables

Three variables are needed to ensure proper execution of the workflow process. The state variable will hold state information that will be returned to Beehive at the end of the workflow. The result variable will hold the outcome of the generated task and will also be sent to Beehive at the end of the workflow. The beehiveInput variable will hold the input received from Beehive after it has been converted from string to xml.
Add the following to the CustomBeehiveWorkflow.bpel file:
<variable name="state" type="xsd:string"/>
<variable name="result" type="xsd:string"/>
<variable name="beehiveInput" messageType="client:BeehiveInputMessage"/>
Step 7: Convert the input string to XML

The data received from Oracle Beehive is XML but is received as a string in the BPEL process. Add an Assign activity immediately after the receiveInput activity in the BPEL process. Add a Copy operation in the newly created assign activity. The following will convert the received string into XML and store it in the beehiveInput variable previously created.
Note: the
<from>
line is split into multiple lines for ease of reading only.
<assign name="StringToXML">
  <copy>
    <from expression=
          "ora:parseEscapedXML(
               bpws:getVariableData(
                      'inputVariable',
                      'payload',
                      '/client:CustomBeehiveWorkflowProcessRequest/client:input'
               )
           )"
    />
    <to variable="beehiveInput" part="payload" query="/client:eventPayload"/>
  </copy>
</assign>
If you switch JDeveloper to the Diagram view, your BPEL process should look similar to the following:

Step 8: Add a BPEL Task to the flow

If you did not switch to the visual view, do so now. This step adds a BPEL Human Task to the workflow process and is more easily done in visual mode. From the Process Activities panel, drag the Human Task into the process flow after the StringToXML assign activity as shown.

Once you drop the activity in place, the next window will appear to define the task. Click Create Task Definition as shown.

Specify the Human Task Name. In this tutorial, the name CustomBeehiveWorkflowTask is specified. Click OK.
At this point, the BPEL task will be added to the process and all necessary files will be added.
If the visual view reports an error in the task definition, save all the files, close the CustomBeehiveWorkflowTask.task file, and re-opening it.
Your tasks should be similar to the following:
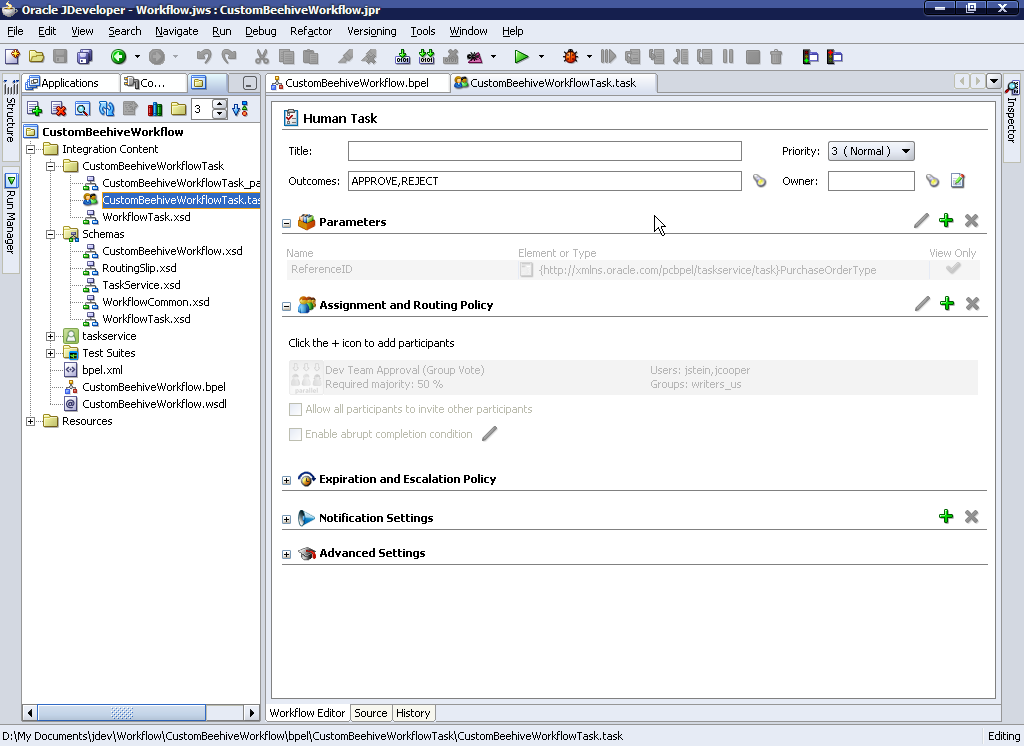
Step 9: Modify BPEL Human Task Global Configuration

The default BPEL task configuration needs modification so that the Beehive<>BPEL Task integration can be leveraged, and also to be able to dynamically define the owner at runtime. The owner is mapped to the Beehive Task Assignee. In the
CustomBeehiveWorkflowTask.task file, replace
<globalConfiguration/> as shown.
<globalConfiguration>
  <owner>/task:task/task:creator</owner>
  <onTaskAssignedCallback type="JAVA">oracle.ocs.workflow.service.isprovider.WorkflowTaskCallbackHandler</onTaskAssignedCallback>
  <onTaskCompletedCallback type="JAVA">oracle.ocs.workflow.service.isprovider.WorkflowTaskCallbackHandler</onTaskCompletedCallback>
  <onTaskUpdatedCallback type="JAVA">oracle.ocs.workflow.service.isprovider.WorkflowTaskCallbackHandler</onTaskUpdatedCallback>
  <onSubTaskUpdatedCallback type="JAVA">oracle.ocs.workflow.service.isprovider.WorkflowTaskCallbackHandler</onSubTaskUpdatedCallback>
</globalConfiguration>
Step 10: Modify BPEL Human Task approvers
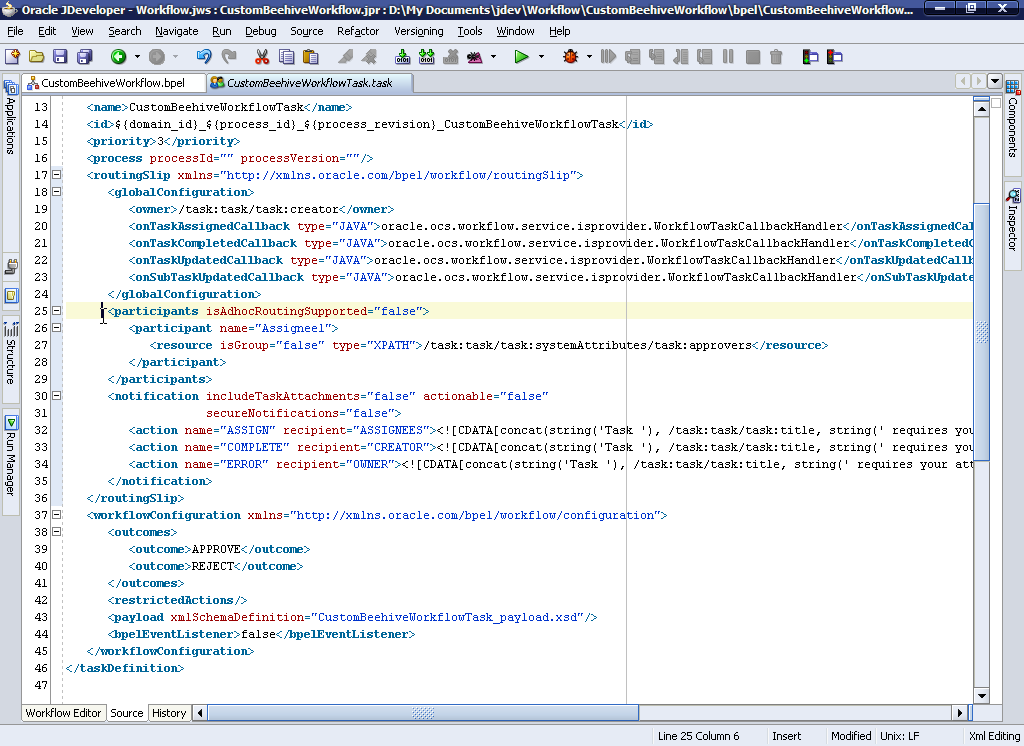
Approvers can be set at runtime by changing the default approver list, which is empty. Alternatively, approvers can statically be defined. In the
CustomBeehiveWorkflowTask.task file, replace
<participants isAdhocRoutingSupported="false"/> as shown.
<participants isAdhocRoutingSupported="false">
  <participant name="Assignee1">
    <resource isGroup="false" type="XPATH">/task:task/task:systemAttributes/task:approvers</resource>
  </participant>
</participants>
Step 11: Define runtime variables required for BPEL<>Beehive Task integration

Define Unique Identifier, Task Owner/Assigner, and Task approver/Assignee in the BPEL process at runtime so that the BPEL Human Task shows up in Oracle Beehive.
Add the following statements into the assignment activity named
CustomBeehiveWorkflowTask_1_AssignTaskAttributes.
<copy>
  <from expression="ora:getConversationId()"/>
  <to variable="initiateTaskInput" part="payload"
      query="/taskservice:initiateTask/task:task/task:identificationKey"/>
</copy>
<copy>
  <from variable="beehiveInput" part="payload"
        query="/client:eventPayload/bcw:EventPayload/bcw:actorLoginId"/>
  <to variable="initiateTaskInput" part="payload"
        query="/taskservice:initiateTask/task:task/task:ownerUser"/>
</copy>
<copy>
  <from variable="beehiveInput" part="payload"
        query="/client:eventPayload/bcw:Preferences/bcw:approvers"/>
  <to variable="initiateTaskInput" part="payload"
        query="/taskservice:initiateTask/task:task/task:systemAttributes/task:approvers"/>
</copy>
Step 12: Define other runtime variables

In addition to the above variables, define the title and contents of the task that will be generated. Add the following statements into
CustomBeehiveWorkflowTask_1_AssignTaskAttributes after the previously added statements.
Note that the concat line is split for easy reading, but it must be all on one line.
<copy>
<from expression='concat("CustomBeehiveWorkflow generated task ",xp20:current-dateTime())'/>
<to variable="initiateTaskInput" part="payload"
query="/taskservice:initiateTask/task:task/task:title"/>
</copy>
<copy>
<from expression="concat('The following input has been received<br/>',
'<br/>ACTORCID: ', bpws:getVariableData('beehiveInput', 'payload', '/client:eventPayload/bcw:EventPayload/bcw:ACTORCID'),
'<br/>CONTAINERCID: ', bpws:getVariableData('beehiveInput', 'payload', '/client:eventPayload/bcw:EventPayload/bcw:CONTAINERCID'),
'<br/>entityId: ', bpws:getVariableData('beehiveInput', 'payload', '/client:eventPayload/bcw:EventPayload/bcw:entityId'),
'<br/>entityName: ', bpws:getVariableData('beehiveInput', 'payload', '/client:eventPayload/bcw:EventPayload/bcw:entityName'),
'<br/>containerName: ', bpws:getVariableData('beehiveInput', 'payload', '/client:eventPayload/bcw:EventPayload/bcw:containerName'),
'<br/>actorLoginId: ', bpws:getVariableData('beehiveInput', 'payload', '/client:eventPayload/bcw:EventPayload/bcw:actorLoginId'),
'<br/>operation: ', bpws:getVariableData('beehiveInput', 'payload', '/client:eventPayload/bcw:EventPayload/bcw:operation'),
'<br/>status: ', bpws:getVariableData('beehiveInput', 'payload', '/client:eventPayload/bcw:EventPayload/bcw:status'),
'<br/>message: ', bpws:getVariableData('beehiveInput', 'payload', '/client:eventPayload/bcw:EventPayload/bcw:message'),
'<br/>eventName: ', bpws:getVariableData('beehiveInput', 'payload', '/client:eventPayload/bcw:EventPayload/bcw:eventName'),
'<br/>logonRecordId: ', bpws:getVariableData('beehiveInput', 'payload', '/client:eventPayload/bcw:EventPayload/bcw:logonRecordId'),
'<br/>eventId: ', bpws:getVariableData('beehiveInput', 'payload', '/client:eventPayload/bcw:EventPayload/bcw:eventId'),
'<br/>approvers: ', bpws:getVariableData('beehiveInput', 'payload', '/client:eventPayload/bcw:Preferences/bcw:approvers'),
'<br/>extraInfo: ', bpws:getVariableData('beehiveInput', 'payload', '/client:eventPayload/bcw:Preferences/bcw:extraInfo'),
)"/>
<to variable="initiateTaskInput" part="payload"
query="/taskservice:initiateTask/task:task/task:systemMessageAttributes/task:textAttribute1"/>
</copy>
The above sets the task title to include the date and time the process was invoked and sets the details of the task to contain name/value pairs of of the data received from Oracle Beehive.
Note that newlines in the body of the task are presented by the HTML tag
<br/>
and represented in the previous XML excerpt as
<br/>
due to character escaping. This enables Oracle Beehive clients to display newlines.
Step 13: Configure BPEL task completion activities
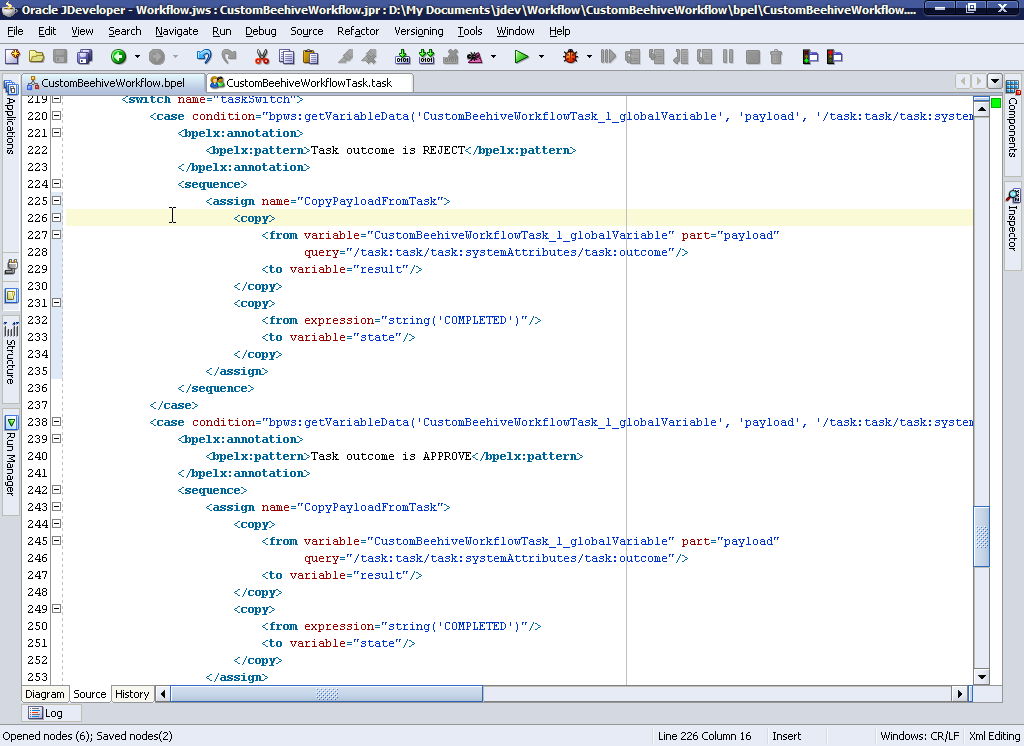
Two of the variables created earlier need to be updated after the task is completed. The integration with Beehive only supports
APPROVE and
REJECT outcomes of the BPEL Human Task. As such, there are 3 cases that need to be handled, approve, reject and the rest. Inside each
case block, replace the
<assign name="CopyPayloadFromTask"/> statment as shown below. This will update the
state and
result variables.
<assign name="CopyPayloadFromTask">
  <copy>
    <from variable="CustomBeehiveWorkflowTask_1_globalVariable" part="payload"
          query="/task:task/task:systemAttributes/task:outcome"/>
    <to variable="result"/>
  </copy>
  <copy>
    <from expression="string('COMPLETED')"/>
    <to variable="state"/>
  </copy>
</assign>
Generally, different actions will take place depending on the outcome of the task. This example process does nothing after the task has been completed, but any actions would be implemented after the assign activity. Also note that updates to tasks in Beehive will only result in the outcomes APPROVE or REJECT. However, if the BPEL Human Task is updated directly, the the other outcomes are possible and this must be accounted for in the process. This would be possible if the BPEL Task is updated in BPEL's Worklist application.
Step 14: Oracle Beehive Callback activity

Update Oracle Beehive to reflect the workflow's status and result. Add a
Java Embedding activity as a last step just before the
callBackClient activity as shown:
<bpelx:exec name="BeehiveCallback" language="java" version="1.3">
            <![CDATA[java.sql.Connection conn = null;
try {
   String eid = (String)getConversationId();
   // Get the status and state from a BPEL Variable
   String result = (String) getVariableData("result");
   String state = (String) getVariableData("state");
   javax.naming.Context ctx = new javax.naming.InitialContext();
   javax.sql.DataSource ds = (javax.sql.DataSource)ctx.lookup("jdbc/BPELServerDataSource");
   conn = ds.getConnection();
   java.sql.CallableStatement cst = conn.prepareCall("begin " +
            "BEE_CODE_WF_BPEL_PKG.updatebpelWorkflow(i_eid => ?," +
            " i_state => ?, i_status => ?); end;");
   cst.setString(1,eid);
   cst.setString(2, state);
   cst.setString(3, result);
   cst.executeUpdate();
} catch(Exception ex) {
   addAuditTrailEntry(ex);
} finally {
   if(conn != null) {
     try {
      conn.close();
     } catch(Exception ex2) {
        ex2.printStackTrace();
     }
   }
}]]>
</bpelx:exec>
Step 15: Build the Project

The BPEL process is now complete. Compile the project and generate the BPEL Suitecase. The Suitecase is a jar file that will later be used to deploy the process into the BPEL Process Manager and register it with Oracle Beehive.
Deploying the BPEL Workflow Process with Oracle Beehive
Step 16: Deploying the BPEL Process

Deploy the BPEL suitecase into the BPEL Process Manager. The BPEL Process Manager is installed with Oracle Beehive, but an external one can be used. The steps for deploying the suitecase are the same in either case. Point your web browser to
http://
<Oracle Beehive host>:
<HTTP port>/BPELConsole
and login as
oc4jadmin using the password for
beeadmin supplied during install. Click on the
Deploy New Process link and follow the instructions.
Step 17: Register the BPEL process with Oracle Beehive
Register the BPEL process with the
beectl command line utility so that Oracle Beehive knows how to initiate it. Copy the generated BPEL suitecase to the server where Oracle Beehive is installed and run the following command. When you copy the suitecase, ensure the file name created is
bpel_CustomBeehiveWorkflow.jar as this will create a registration for a workflow process called
CustomBeehiveWorkflow
. JDeveloper will append the version number to the suitecase but this must not be included when registering it with Beehive. For this tutorial, the suitecase has been copied to the
/tmp directory.
prompt> mv bpel_CustomBeehiveWorkflow_v2008_03_21__56753.jar bpel_CustomBeehiveWorkflow.jar

prompt> beectl add_workflow_schema --file /tmp/bpel_CustomBeehiveWorkflow.jar

Successfully added workflow schema.
Step 18: Define the new Beehive action
Once the workflow is registered with Beehive, a new action must be created so that Beehive policies know how to call it. The name will later be used in when defining the policy, and the action_string is how Beehive knows which workflow to invoke, and therefore must match the BPEL process name used during registration above.
prompt> beectl add_policy_action --name CustomBeehiveWorkflow \
--type JAVA \
--action_string oracle.ocs.management.model.WorkflowService:CustomBeehiveWorkflow \
--description "Invoke the CustomBeehiveWorkflow workflow process"

Successfully created an ACTION object
Note: If you are using Windows, use caret (
^) in place of backslash (
\) to continue the command across several lines.
Automatic Invocation via Policies
Step 19: Define the Policy
A Beehive policy needs to be defined which will determine when the CustomBeehiveWorkflow process will be invoked. The policy used in this example will invoke the process when documents are added to any folder in the Project X team workspace. The policy definition also determines what XML data is sent to the workflow process. The full policy can be found here: CustomBeehiveWorkflow.xml
The <scope> element defines the container in which the policy is configured, in this case the Project X team workspace.
<scope>wksp=Project X,enpr=Oracle</scope>
The <eventTypeName> element defines the business event inside the above mentioned scope that will trigger the policy to be evaluated.
<eventTypeName>DOCUMENT_CREATED</eventTypeName>
The <ActionInfo> element defines the action that will be invoked from the policy. This value corresponds to the action created previously.
<ActionInfo>
  <name>CustomBeehiveWorkflow</name>
</ActionInfo>
The policy also defines the XML data to be sent to the workflow in the <actionPreferenceInfo> element. The CustomBeehiveWorkflow is expecting the following data to be sent and is using this information to determine the task initiator, approver(s) and the task descption/content. The JXPATHS define the event payload to be sent to the workflow. Note that newlines in the <value> element are for ease of reading only.
<actionPreferenceInfo>
  <key>JXPATHS</key>
  <value>
     getCommonAttributes#getEntityId#toCollabId@entityId:
     getCommonAttributes#getEntityId#toCollabId#ASENTITY#getName@entityName:
     getCommonAttributes#getContainer#toCollabId#ASENTITY#getName@containerName:
     getActor#getCollabId#ASENTITY#getPrincipals#iterator#next#getCollabId#ASENTITY#getName@actorLoginId:
     getCommonAttributes#getOperation@operation:getCommonAttributes#getStatus@status:
     getCommonAttributes#getMessage@message:getCommonAttributes#getEventName@eventName:
     getCommonAttributes#getLogonRecordId@logonRecordId:getCommonAttributes#getEventId@eventId
  </value>
</actionPreferenceInfo>
<actionPreferenceInfo>
  <key>approvers</key>
  <value>richard.hall</value>
</actionPreferenceInfo>
<actionPreferenceInfo>
  <key>extraInfo</key>
  <value>Demonstration of what is passed to the workflow</value>
</actionPreferenceInfo>
Step 20: Add the policy
Load the policy into Oracle Beehive with the
beectl command-line tool. This tool is located in
<Oracle home>/beehive/bin
:
prompt> beectl add_policy --file /tmp/CustomBeehiveWorkflow.xml

Successfully added policy.Identifier plcy=CustomBeehiveWorkflow Policy,wksp=Project X,enpr=Oracle.