Developing .NET Applications for Oracle AI Database (On-Premises)
These tutorials show you how to connect .NET applications to Oracle AI Database (On-Premises) using Oracle Data Provider for .NET Core via the command line and with Visual Studio. Also learn how to connect .NET Framework apps to Oracle AI Database (On-Premises) using Visual Studio and Oracle Data Provider for .NET, Managed Driver. Visit Developing .NET Applications for Oracle Autonomous AI Database for a tutorial using Oracle Autonomous AI Database.
1. Install Oracle AI Database
If you do not already have access to an Oracle AI Database, click the links below to install Oracle AI Database Free. If you would like to use the Always Free Oracle Autonomous Database instead, see the Developing .NET Applications for Oracle Autonomous Database tutorial.
- Download and install Oracle AI Database Free following these instructions.
- Video showing how to install Oracle AI Database 26ai Free on Windows and conduct basic administration.
- Oracle AI Database Free Installation Guide for Windows
- Oracle AI Database Free Installation Guide for Linux
2. Install the .NET SDK
- Download and install .NET SDK if you do not already have it installed on your machine.
3. Create the Database User (Optional)
We recommend using a new database user for this app. We will store the To Do table in the new user's schema. If you are not familiar with creating a user and assigning privileges, run the Create User ODP.NET Core app below. This app creates a new database user on behalf of a database administrator from the command line. This tool is intended for on-premises databases or cloud databases with TCP connections. It requires .NET runtime.
Alternatively, you may run the sample code in Step 4 from an existing user schema if you do not wish to create a new user.
- From a command line, create a new directory for the Create User app and change into that directory.
- Use the dotnet executable to create a new project (click the copy button in the lower right corner of the code box in the examples below to copy and paste the contents):
dotnet new console - Add ODP.NET Core to the project:
dotnet add package Oracle.ManagedDataAccess.Core - Open Program.cs in a text editor.
- Replace the contents of the Program.cs file with the following code:
using System; using Oracle.ManagedDataAccess.Client; namespace Create_User { class Program { //Set the net service name, Easy Connect, or connect descriptor of the pluggable DB, // such as "localhost/FREEPDB1" for Oracle AI Database 26ai Free public static string db = "<localhost/FREEPDB1>"; //Provide the DBA's user id, password, and role to create the demo user //If admin has no role, then set to empty string public static string sysUser = "<SYS>"; public static string sysPwd = "<Admin PASSWORD>"; public static string role = "<SYSDBA>"; //Set the demo user id, such as DEMODOTNET and password public static string user = "<DEMODOTNET>"; public static string pwd = "<PASSWORD>"; static void Main() { //Create connection string. Check whether DBA Privilege is required. string conStringDBA; if (role == "") conStringDBA = "User Id=" + sysUser + ";Password=" + sysPwd + ";Data Source=" + db + ";"; else conStringDBA = "User Id=" + sysUser + ";Password=" + sysPwd + ";DBA Privilege=" + role + ";Data Source=" + db + ";"; using (OracleConnection con = new OracleConnection(conStringDBA)) { using (OracleCommand cmd = con.CreateCommand()) { try { con.Open(); Console.WriteLine("Successfully connected to Oracle AI Database"); Console.WriteLine(); //Modify the anonymous PL/SQL GRANT command if you wish to modify the privileges granted cmd.CommandText = "BEGIN " + "EXECUTE IMMEDIATE ('CREATE USER " + user + " IDENTIFIED BY " + pwd + " DEFAULT TABLESPACE USERS QUOTA UNLIMITED ON USERS'); " + "EXECUTE IMMEDIATE ('GRANT CREATE SESSION, CREATE VIEW, CREATE SEQUENCE, CREATE PROCEDURE, " + "CREATE TABLE, CREATE TRIGGER, CREATE TYPE, CREATE MATERIALIZED VIEW TO " + user + "'); " + "END;"; cmd.ExecuteNonQuery(); Console.WriteLine(user + " user created"); Console.WriteLine(); } catch (Exception ex) { Console.WriteLine(ex.Message); } } } } } } - Modify Program.cs to include your DB connection information:
- Data Source: Enter the net service name, Easy Connect, or connect descriptor to connect to the pluggable database. If Oracle AI Database Freeis on your local machine, use the Easy Connect "localhost/FreePDB1 as the Data Source.
- Administrator User Id: Enter the administrator username with privileges to create an user and assign privileges, such as SYSDBA.
- Administrator Password: Enter the administrator's password.
- Administrator Role: Enter the administrator's role, such as SYSDBA. Leave blank if there is no role to assign.
- User Id: Enter the username that will store the To Do table, such as DEMODOTNET.
- Password: Enter the user's password.
- Save changes to Program.cs.
- Run the app:
dotnet run - You should see a message that you connected to the database and a new user was created.
4. Build and Run a .NET Application
- From a command line, create a new directory for your application and change into that directory.
- Use the dotnet executable to create a new project (click the copy button in the lower right corner of the code box in the examples below to copy and paste the contents):
dotnet new console - Add ODP.NET Core to the project:
dotnet add package Oracle.ManagedDataAccess.Core - Open Program.cs in a text editor.
- Replace the contents of the Program.cs file with the following code:
using System; using System.Data; using Oracle.ManagedDataAccess.Client; namespace ODP.NET_Core_Get_Started { class GettingStarted { //Prerequisite: This app assumes the user has already been created with the // necessary privileges //Set the demo user id, such as DEMODOTNET and password public static string user = "<DEMODOTNET>"; public static string pwd = "<PASSWORD>"; //Set the net service name, Easy Connect, or connect descriptor of the pluggable DB, // such as "localhost/FREEPDB1" for Oracle AI Database 26ai Free public static string db = "<localhost/FREEPDB1>"; static void Main() { string conStringUser = "User Id=" + user + ";Password=" + pwd + ";Data Source=" + db + ";"; using (OracleConnection con = new OracleConnection(conStringUser)) { using (OracleCommand cmd = con.CreateCommand()) { try { con.Open(); Console.WriteLine("Successfully connected to Oracle AI Database as " + user); Console.WriteLine(); //Create the sample table. Checks if table already exists cmd.CommandText = "DECLARE tableExists INTEGER; " + "BEGIN " + "SELECT count(*) into tableExists FROM user_tables where table_name = 'TODOITEM';" + "IF (tableExists = 0) THEN " + "EXECUTE IMMEDIATE ('CREATE TABLE todoitem (id NUMBER GENERATED ALWAYS AS IDENTITY, " + "description VARCHAR2(4000), creation_ts TIMESTAMP WITH TIME ZONE DEFAULT CURRENT_TIMESTAMP, " + "done NUMBER(1, 0), PRIMARY KEY(id))'); " + "END IF; END;"; cmd.ExecuteNonQuery(); //Insert sample data String[] description = { "Task 1", "Task 2", "Task 3", "Task 4", "Task 5" }; int[] done = new int[5] { 0, 0, 1, 0, 1 }; cmd.CommandText = "INSERT INTO todoitem (description, done) VALUES(:descrip, :done)"; cmd.ArrayBindCount = 5; cmd.BindByName = true; OracleParameter descripParam = new OracleParameter("descrip", OracleDbType.Varchar2); descripParam.Direction = ParameterDirection.Input; descripParam.Value = description; cmd.Parameters.Add(descripParam); OracleParameter doneParam = new OracleParameter("done", OracleDbType.Int16); doneParam.Direction = ParameterDirection.Input; doneParam.Value = done; cmd.Parameters.Add(doneParam); cmd.ExecuteNonQuery(); Console.WriteLine("{0} Rows Inserted", cmd.ArrayBindCount); Console.WriteLine(); //Retrieve sample data cmd.CommandText = "SELECT description, done FROM todoitem"; OracleDataReader reader = cmd.ExecuteReader(); while (reader.Read()) { if (reader.GetBoolean(1)) Console.WriteLine(reader.GetString(0) + " is done."); else Console.WriteLine(reader.GetString(0) + " is NOT done."); } descripParam.Dispose(); doneParam.Dispose(); reader.Dispose(); } catch (Exception ex) { Console.WriteLine(ex.Message); } } } } } } - Modify Program.cs to include your DB connection information:
- User Id: Enter the username that will store the To Do table, such as DEMODOTNET.
- Password: Enter the user's password.
- Data Source: Enter the net service name, Easy Connect, or connect descriptor to connect to the pluggable database. If Oracle AI Database Freeis on your local machine, use the Easy Connect "localhost/FreePDB1 as the Data Source.
- Save changes to Program.cs.
- Run the app:
dotnet run - You should see a message that you connected to the database, five rows were inserted, and the task list with each task's completion status returned to the console. Congratulations! You have successfully queried the Oracle AI Database.
We are ready to setup a simple database schema, add data, and then use a .NET app to select results from a table. We will create a basic To Do list app. The To Do items will be stored in a database table that will track a task list and task completion status.
.NET Command Line
Open all Close allThis tutorial shows you how use the command line to connect .NET applications to Oracle AI Database using Oracle Data Provider for .NET (ODP.NET) Core. Follow the steps below:
1. Install Oracle AI Database
If you do not already have access to an Oracle AI Database, click the links below to install Oracle AI Database Free. (If you would like to use the Always Free Oracle Autonomous Database instead, see the Developing .NET Applications for Oracle Autonomous Database tutorial).
- Download and install Oracle AI Database Free following these instructions.
- Video showing how to install Oracle AI Database Free on Windows and conduct basic administration.
- Oracle AI Database FreeInstallation Guide for Windows
- Oracle AI Database FreeInstallation Guide for Linux
2. Install Oracle Developer Tools For Visual Studio
- Install Visual Studio 2026 if you do not already have it.
- From the Visual Studio menu select Extensions > Manage Extensions. In the Browse tab, enter "Oracle" in the search box. Locate "Oracle Developer Tools for Visual Studio" and select Install.
- After the download completes, close Visual Studio.
- The installation of the extension will begin once Visual Studio closes. Once the installation is complete, launch Visual Studio 2026 again.
3. Create the Database User (Optional)
We recommend using a new database user with the app we will create in this walkthrough. We will store a "To Do" table in the new user's schema. If you are not familiar with creating a user and assigning privileges, follow the steps below to use Visual Studio to log in as a database administrator and execute the SQL needed to create a new database user.
Alternatively, you may skip to the next step (Step 4: Connect to Oracle AI Database) and use an existing user schema if you do not wish to create a new user.
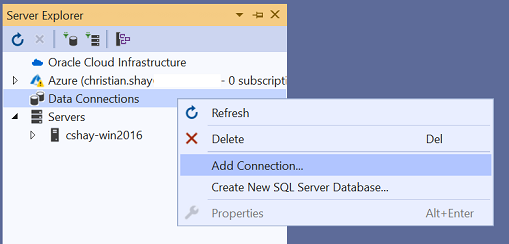
- Right click on the Data Connections node in Server Explorer and select Add Connection from the menu. (If Server Explorer is not visible in Visual Studio, select View->Server Explorer from the Visual Studio menu.
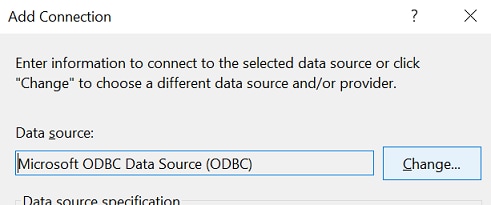
- If the Data Source field is not already set to Oracle AI Database (ODP.NET, Managed Driver), click the Change button. Otherwise, skip the next bullet point.
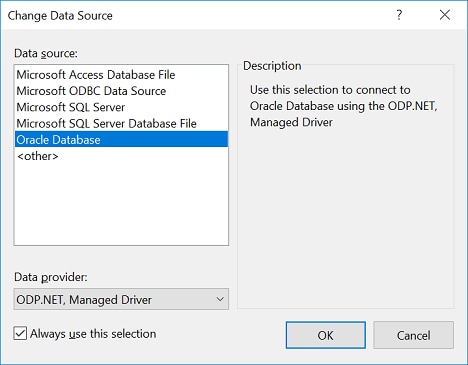
- In the Change Data Source dialog, in the Data Source: box, select Oracle AI Database and in the Data Provider drop down select ODP.NET, Managed Driver. (If these options are not available then Oracle Developer Tools for Visual Studio is not installed properly).
- The Add Connection will appear. Fill in the connection dialog:
- Connection Type: Basic
- Database host name: Enter the hostname where your database is located (eg. localhost)
- Port number : Oracle AI Database Free uses port 1521 by default
- Service name : Enter the service name (eg. FreePDB1 if using Oracle Database Free)
- Role: select SYSDBA (Administrator)
- User name: Enter SYS
- Password: Enter the password for SYS.
- Save password: Check this box if desired
- Click the OK button.
- In Server Explorer, click on the connection node to expand it (labeled SYS.DBName). Then, right click on the node and from the menu select Open New SQL File to open the SQL and PL/SQL File Editor
- Copy and paste the following SQL statements into the SQL and PL/SQL File Editor (click the copy button in the lower right corner of the code box in the examples below to copy and paste the contents):
CREATE USER DEMODOTNET IDENTIFIED BY PASSWORD DEFAULT TABLESPACE USERS QUOTA UNLIMITED ON USERS; GRANT CREATE SESSION, CREATE VIEW, CREATE SEQUENCE, CREATE PROCEDURE, CREATE TABLE, CREATE TRIGGER, CREATE TYPE, CREATE MATERIALIZED VIEW TO DEMODOTNET; - This SQL will create a user named "DEMODOTNET". You can modify this user name if you choose. Change "PASSWORD" to the password of your choice. If your database does not use a USERS tablespace, you can include the SQL statement SELECT TABLESPACE_NAME FROM DBA_TABLESPACES; to see the list of available tablespaces. When ready, right click in the editor and choose Execute All.
- View the results to make sure there were no errors and that both SQL statements were executed.
4. Connect to Oracle AI Database
- Right click on the Data Connections node in Server Explorer and select Add Connection from the menu. (If Server Explorer is not visible in Visual Studio, select View->Server Explorer from the Visual Studio menu.
- In the Add Connection dialog if the Data Source field is not already set to Oracle Database (ODP.NET, Managed Driver), click the Change button. Otherwise, skip the next bullet point.
- In the Change Data Source dialog, in the Data Source: box, select Oracle Database and in the Data Provider drop down select ODP.NET, Managed Driver. (If these options are not available then Oracle Developer Tools for Visual Studio is not installed properly).
- The Add Connection will appear. Fill in the connection dialog:
- Connection Type: Basic
- Database host name: Enter the hostname where your database is located (eg. localhost)
- Port number : Free Database uses port 1521 by default
- Service name : Enter the service name (eg. FreePDB1 if using Free)
- Role: select Non-Administrator
- User name: Enter the user name (eg. DEMODOTNET)
- Password: Enter the password for the user.
- Save password: Check this box if desired
- Click the OK button.

5. Execute SQL Statements
- In Server Explorer, click on the connection node to expand it (labeled DEMODOTNET.DBName). Then, right click on the node and from the menu select Open New SQL File
- Copy and paste the following SQL statements into the SQL and PL/SQL File Editor (click the copy button in the lower right corner of the code box in the examples below to copy and paste the contents):
CREATE TABLE TODOITEM (id NUMBER GENERATED ALWAYS AS IDENTITY, DESCRIPTION VARCHAR2(4000), CREATION_TS TIMESTAMP WITH TIME ZONE DEFAULT CURRENT_TIMESTAMP, DONE NUMBER(1, 0), PRIMARY KEY(id)); INSERT INTO TODOITEM (DESCRIPTION, DONE) VALUES('Task 1', 0); INSERT INTO TODOITEM (DESCRIPTION, DONE) VALUES('Task 2', 0); INSERT INTO TODOITEM (DESCRIPTION, DONE) VALUES('Task 3', 1); INSERT INTO TODOITEM (DESCRIPTION, DONE) VALUES('Task 4', 0); INSERT INTO TODOITEM (DESCRIPTION, DONE) VALUES('Task 5', 1); COMMIT; SELECT DESCRIPTION, DONE FROM TODOITEM; - Select all of the SQL statements then right click in the editor and choose Execute All.
- View the results and check for errors, making sure that all SQL statements were executed.
6. Build and Run a .NET (Cross Platform) Application
- From the Visual Studio menu choose File->New->Project/Solution. In the Create a new project dialog, enter console into the Search field. Select the Console Application project type listed for C# and .NET. Then press the Next button.
- In the Configure your new project dialog enter ODP.NET_Core_Get_Started for the Project Name and then press the Next button.
- In the Additional Information dialog, enter a .NET version and then press the Create button.
- After the new project opens, view Solution Explorer, right click on the Dependencies node and select Manage NuGet Packages (If you don't see Solution Explorer, go to the Visual Studio menu and select View->Solution Explorer)
- In Nuget Package Manager, click Browse, then in the Search box, enter oracle.
- Select the latest Oracle.ManagedDataAccess.Core version, and then click the Install button. When the Preview Changes dialog opens click OK.
- Replace the contents of the Program.cs file with the following code:
using System; using System.Data; using Oracle.ManagedDataAccess.Client; namespace ODP.NET_Core_Get_Started { class GettingStarted { //Prerequisite: This app assumes the user has already been created with the // necessary privileges //Set the demo user id, such as DEMODOTNET and password public static string user = "<DEMODOTNET>"; public static string pwd = "<PASSWORD>"; //Set the net service name, Easy Connect, or connect descriptor of the pluggable DB, // such as "localhost/FREEPDB1" for Oracle AI Database 26ai Free public static string db = "<localhost/FREEPDB1>"; static void Main() { string conStringUser = "User Id=" + user + ";Password=" + pwd + ";Data Source=" + db + ";"; using (OracleConnection con = new OracleConnection(conStringUser)) { using (OracleCommand cmd = con.CreateCommand()) { try { con.Open(); Console.WriteLine("Successfully connected to Oracle AI Database as " + user); Console.WriteLine(); //Retrieve sample data cmd.CommandText = "SELECT description, done FROM todoitem"; OracleDataReader reader = cmd.ExecuteReader(); while (reader.Read()) { if (reader.GetBoolean(1)) Console.WriteLine(reader.GetString(0) + " is done."); else Console.WriteLine(reader.GetString(0) + " is NOT done."); } reader.Dispose(); } catch (Exception ex) { Console.WriteLine(ex.Message); } } } } } } - Modify Program.cs to include your DB connection information:
- User Id: Enter DOTNETDEMO (If you wish to use another user, you can enter it instead.)
- Password: Enter the user's password.
- Data Source: Enter the Easy Connect connect string (eg "yourhost:yourport/yourdbservice"), the net service name, or connect descriptor to connect to the pluggable database. If Oracle AI Database Freeis on your local machine, use the Easy Connect connect string "localhost/FreePDB1" as the Data Source.
- From the Visual Studio menu choose Debug->Start Debugging (or press F5) to save, build and then run the application.
- You should see a message that you connected to Oracle AI Database and customer information returned from the database. Congratulations! You have successfully queried the Oracle AI Database.

In this step you will build a .NET console application that can run on Windows, Linux, and macOS.
.NET with Visual Studio
Open all Close allThis tutorial shows you how to connect .NET applications to Oracle AI Database (on-premises) using Oracle Data Provider for .NET (ODP.NET) Core, Visual Studio 2026, and the Oracle Developer Tools for Visual Studio extension. Follow the steps below.
(Note: If you have already completed the tutorial for .NET Framework with Visual Studio, you can skip to the last step of this tutorial. The other steps are identical.)


1. Install Oracle AI Database
If you do not already have access to an Oracle AI Database, click the links below to install Oracle AI Database Free. (If you would like to use the Always Free Oracle Autonomous Database instead, see the Developing .NET Applications for Oracle Autonomous Database tutorial).
- Download and install Oracle AI Database Free following these instructions.
- Video showing how to install Oracle AI Database Free on Windows and conduct basic administration.
- Oracle AI Database FreeInstallation Guide for Windows
- Oracle AI Database FreeInstallation Guide for Linux
2. Install Oracle Developer Tools For Visual Studio
- Install Visual Studio 2026 if you do not already have it.
- From the Visual Studio menu select Extensions > Manage Extensions. In the Browse tab, enter "Oracle" in the search box. Locate "Oracle Developer Tools for Visual Studio" and select Install.
- After the download completes, close Visual Studio.
- The installation of the extension will begin once Visual Studio closes. Once the installation is complete, launch Visual Studio 2026 again.
3. Create the Database User (Optional)
We recommend using a new database user with the app we will create in this walkthrough. We will store a "To Do" table in the new user's schema. If you are not familiar with creating a user and assigning privileges, follow the steps below to use Visual Studio to log in as a database administrator and execute the SQL needed to create a new database user.
Alternatively, you may skip to the next step (Step 4: Connect to Oracle AI Database) and use an existing user schema if you do not wish to create a new user.
- Right click on the Data Connections node in Server Explorer and select Add Connection from the menu. (If Server Explorer is not visible in Visual Studio, select View->Server Explorer from the Visual Studio menu.
- If the Data Source field is not already set to Oracle AI Database (ODP.NET, Managed Driver), click the Change button. Otherwise, skip the next bullet point.
- In the Change Data Source dialog, in the Data Source: box, select Oracle AI Database and in the Data Provider drop down select ODP.NET, Managed Driver. (If these options are not available then Oracle Developer Tools for Visual Studio is not installed properly).
- The Add Connection will appear. Fill in the connection dialog:
- Connection Type: Basic
- Database host name: Enter the hostname where your database is located (eg. localhost)
- Port number : Oracle AI Database Free uses port 1521 by default
- Service name : Enter the service name (eg. FreePDB1 if using Oracle Database Free)
- Role: select SYSDBA (Administrator)
- User name: Enter SYS
- Password: Enter the password for SYS.
- Save password: Check this box if desired
- Click the OK button.
- In Server Explorer, click on the connection node to expand it (labeled SYS.DBName). Then, right click on the node and from the menu select Open New SQL File to open the SQL and PL/SQL File Editor
- Copy and paste the following SQL statements into the SQL and PL/SQL File Editor (click the copy button in the lower right corner of the code box in the examples below to copy and paste the contents):
CREATE USER DEMODOTNET IDENTIFIED BY PASSWORD DEFAULT TABLESPACE USERS QUOTA UNLIMITED ON USERS; GRANT CREATE SESSION, CREATE VIEW, CREATE SEQUENCE, CREATE PROCEDURE, CREATE TABLE, CREATE TRIGGER, CREATE TYPE, CREATE MATERIALIZED VIEW TO DEMODOTNET; - This SQL will create a user named "DEMODOTNET". You can modify this user name if you choose. Change "PASSWORD" to the password of your choice. If your database does not use a USERS tablespace, you can include the SQL statement SELECT TABLESPACE_NAME FROM DBA_TABLESPACES; to see the list of available tablespaces. When ready, right click in the editor and choose Execute All.
- View the results to make sure there were no errors and that both SQL statements were executed.
4. Connect to Oracle AI Database
- Right click on the Data Connections node in Server Explorer and select Add Connection from the menu. (If Server Explorer is not visible in Visual Studio, select View->Server Explorer from the Visual Studio menu.
- In the Add Connection dialog if the Data Source field is not already set to Oracle Database (ODP.NET, Managed Driver), click the Change button. Otherwise, skip the next bullet point.
- In the Change Data Source dialog, in the Data Source: box, select Oracle Database and in the Data Provider drop down select ODP.NET, Managed Driver. (If these options are not available then Oracle Developer Tools for Visual Studio is not installed properly).
- The Add Connection will appear. Fill in the connection dialog:
- Connection Type: Basic
- Database host name: Enter the hostname where your database is located (eg. localhost)
- Port number : Free Database uses port 1521 by default
- Service name : Enter the service name (eg. FreePDB1 if using Free)
- Role: select Non-Administrator
- User name: Enter the user name (eg. DEMODOTNET)
- Password: Enter the password for the user.
- Save password: Check this box if desired
- Click the OK button.
5. Execute SQL Statements
- In Server Explorer, click on the connection node to expand it (labeled DEMODOTNET.DBName). Then, right click on the node and from the menu select Open New SQL File
- Copy and paste the following SQL statements into the SQL and PL/SQL File Editor (click the copy button in the lower right corner of the code box in the examples below to copy and paste the contents):
CREATE TABLE TODOITEM (id NUMBER GENERATED ALWAYS AS IDENTITY, DESCRIPTION VARCHAR2(4000), CREATION_TS TIMESTAMP WITH TIME ZONE DEFAULT CURRENT_TIMESTAMP, DONE NUMBER(1, 0), PRIMARY KEY(id)); INSERT INTO TODOITEM (DESCRIPTION, DONE) VALUES('Task 1', 0); INSERT INTO TODOITEM (DESCRIPTION, DONE) VALUES('Task 2', 0); INSERT INTO TODOITEM (DESCRIPTION, DONE) VALUES('Task 3', 1); INSERT INTO TODOITEM (DESCRIPTION, DONE) VALUES('Task 4', 0); INSERT INTO TODOITEM (DESCRIPTION, DONE) VALUES('Task 5', 1); COMMIT; SELECT DESCRIPTION, DONE FROM TODOITEM; - Select all of the SQL statements then right click in the editor and choose Execute All.
- View the results and check for errors, making sure that all SQL statements were executed.
6. Build and Run a .NET Framework Application
- From the Visual Studio menu choose File->New->Project/Solution. In the Create a new project dialog, enter console into the Search field. Select the Console Application project type listed for C# and .NET Framework. Then press the Next button.
- In the Configure your new project dialog enter ODP.NET_Framework_Get_Started for the Project Name. In the Framework dropdown choose .NET Framework 4.8. (If you don't have that version of .NET available, select another version). Then press the Create button.
- After the new project opens, view Solution Explorer, right click on the References node and select Manage NuGet Packages (If you don't see Solution Explorer, go to the Visual Studio menu and select View->Solution Explorer)
- In Nuget Package Manager, click Browse, then in the Search box, enter oracle.
- Select Oracle.ManagedDataAccess and then click the Install button.
- Replace the contents of the Program.cs file with the following code:
using System; using System.Data; using Oracle.ManagedDataAccess.Client; namespace ODP.NET_Framework_Get_Started { class GettingStarted { //Prerequisite: This app assumes the user has already been created with the // necessary privileges //Set the demo user id, such as DEMODOTNET and password public static string user = "<DEMODOTNET>"; public static string pwd = "<PASSWORD>"; //Set the net service name, Easy Connect, or connect descriptor of the pluggable DB, // such as "localhost/FREEPDB1" for Oracle AI Database 26ai Free public static string db = "<localhost/FREEPDB1>"; static void Main() { string conStringUser = "User Id=" + user + ";Password=" + pwd + ";Data Source=" + db + ";"; using (OracleConnection con = new OracleConnection(conStringUser)) { using (OracleCommand cmd = con.CreateCommand()) { try { con.Open(); Console.WriteLine("Successfully connected to Oracle AI Database as " + user); Console.WriteLine(); //Retrieve sample data cmd.CommandText = "SELECT description, done FROM todoitem"; OracleDataReader reader = cmd.ExecuteReader(); while (reader.Read()) { if (reader.GetBoolean(1)) Console.WriteLine(reader.GetString(0) + " is done."); else Console.WriteLine(reader.GetString(0) + " is NOT done."); } reader.Dispose(); } catch (Exception ex) { Console.WriteLine(ex.Message); } } } } } } - Modify Program.cs to include your DB connection information:
- User Id: Enter DOTNETDEMO (If you wish to use another user, you can enter it instead.)
- Password: Enter the user's password.
- Data Source: Enter the Easy Connect connect string (eg "yourhost:yourport/yourdbservice"), the net service name, or connect descriptor to connect to the pluggable database. If Oracle AI Database Freeis on your local machine, use the Easy Connect connect string "localhost/FreePDB1" as the Data Source.
- From the Visual Studio menu choose Debug->Start Without Debugging (or press Control-F5) to save, build and then run the application.
- You should see a message that you connected to Oracle AI Database and customer information returned from the database. Congratulations! You have successfully queried the Oracle AI Database.
In this step you will build a .NET Framework application.
.NET Framework with Visual Studio
Open all Close allThis tutorial shows you how to connect .NET Framework applications to Oracle AI Database (on-premises) using Oracle Data Provider for .NET (ODP.NET), Visual Studio 2026, and the Oracle Developer Tools for Visual Studio extension. Follow the steps below.
(Note: If you have already completed the tutorial for .NET with Visual Studio, you can skip to the last step of this tutorial. The other steps are identical.)