Connection Dialog Help
This page features step by step instructions showing how to use the connection dialog in Oracle Developer Tools for VS Code to connect to Oracle Database and Oracle Autonomous Database. For detailed information about the connection dialog, view the connection dialog documentation. For additional help, visit the Oracle Developer Tools for VS Code Quickstart.
Visit Troubleshooting Connection Issues Caused By Network Configuration Files to learn more about confusing errors that can occur when network config files are unexpectedly used.
Note: When expanding the sections below, if images seem truncated or cut off, please reload this web page.
How to: Connect to Oracle Database Express Edition (XE)
If you wish to connect to Oracle Database Express Edition, fill in the connection dialog like so:
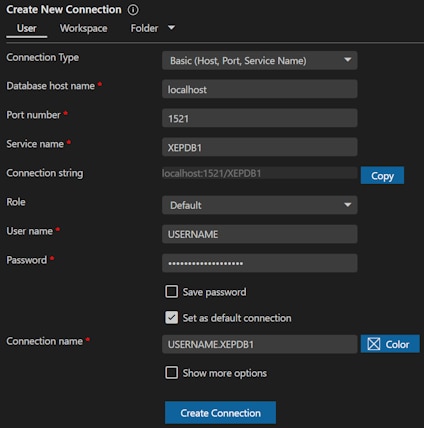
Connection Type: Basic (Host, Port, Service Name)
Database host name: localhost, your local machine hostname, or your local machine IP address
Port number: 1521
Service Name: XEPDB1
Role: Default (for ordinary use) or SYSDBA (if you need to do DBA tasks like creating a user)
Username: User name (or SYS if you need to do DBA tasks like creating a user)
Password: Password (If user SYS, use the password you provided during installation)
Save Password: Check this box if you do not wish to enter the password each time
How to: Connect to Oracle Database using Host Name/IP address, Port Number, and Service Name
If you wish to connect to an Oracle Database using a host name/IP address, port number, and service name, fill in the connection dialog like so:
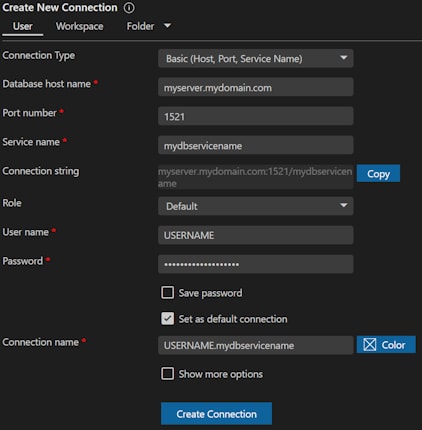
Connection Type: Basic (Host, Port, Service Name)
Database host name: localhost, the machine hostname, or the machine IP address
Port number: the port number (usually 1521)
Service Name: The database service name (This is usually the same name as the pluggable database name)
Role: Default (for ordinary use) or SYSDBA (if you need to do DBA tasks like creating a user)
Username: Username (or SYS if you need to do DBA tasks like creating a user)
Password: Password
Save Password: Check this box if you do not wish to enter the password each time
How to: Connect to Oracle Database using a TNSNAMES.ORA file
If you wish to connect to an Oracle Database using an alias contained in a TNSNAMES.ORA file, fill in the connection dialog like so:
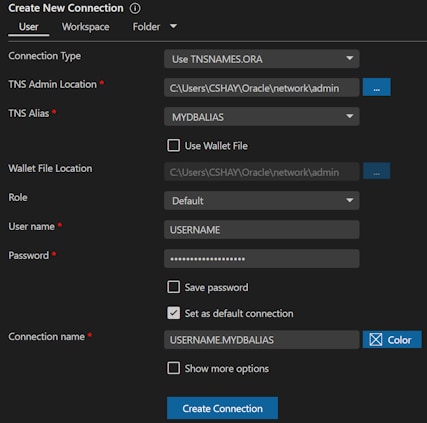
Connect Type: Use TNSNAMES.ORA
TNS Admin Location: Select the path to the directory containing your TNSNAMES.ORA file (Visit the extension settings to set a default location)
TNS Alias: Select the alias you wish to connect to
Use Wallet File: Uncheck this (unless using a wallet)
Role: Default (for ordinary use) or SYSDBA (if you need to do DBA tasks like creating a user)
Username: Username (or SYS if you need to do DBA tasks like creating a user)
Password: Password (If user SYS, use the password you provided during installation)
Save Password: Check this box if you do not wish to enter the password each time
How to: Connect to Oracle Database using a Directory Server (LDAP)
If you wish to connect to an Oracle Database using a Directory Server (LDAP), fill in the connection dialog like so:
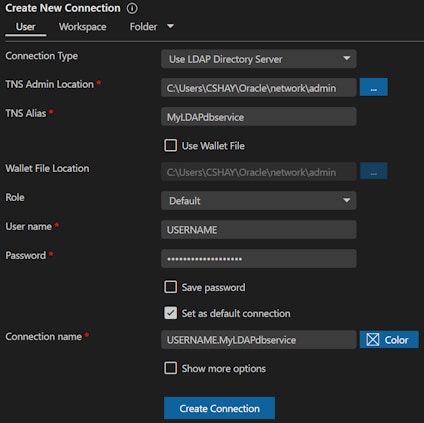
Connect Type: Use LDAP Directory Server
TNS Admin Location: Select the path to your LDAP.ORA and SQLNET.ORA files (Visit the extension settings to set a default location)
TNS Alias: Type in the database service name
Use Wallet File: Uncheck this (unless using a wallet)
Role: Default (for ordinary use) or SYSDBA (if you need to do DBA tasks like creating a user)
Username: Username (or SYS if you need to do DBA tasks like creating a user)
Password: Password (If user SYS, use the password you provided during installation)
Save Password: Check this box if you do not wish to enter the password each time
How to: Connect to Oracle Database using Kerberos Authentication
Note: Kerberos authentication requires Oracle Developer Tools for VS code version 21.9.0 or later.
Before connecting using Kerberos, server and client side configuration is required. In the Oracle Data Provider for .NET Developer's Guide, in Features of Oracle Data Provider for .NET Chapter, Using Kerberos section, please see File Based Credential Cache and MSLSA as well as Configuring Kerberos Authentication with ODP.NET sections for instructions on how to configure Kerberos.
Please note:* Oracle Developer Tools for VS Code includes Kerberos.NET. MIT Kerberos does not need to be installed.
* If using File Based Credential Cache instead of MSLSA, the full Oracle client will need to be installed on the system where the credential file is generated in order to obtain the executables okinit.exe, oklist.exe and okdstry.exe.
The full Oracle client can be found here:
Windows: Oracle Database 21c Client (21.3) for Microsoft Windows x64 (64-bit)
Linux: Oracle Database 21c Client (21.3) for Linux x86-64* The instructions in the documentation above assume a Windows KDC. If using a Linux KDC, please view this alternate documentation.
Once Kerberos is configured, fill in the connection dialog like so:
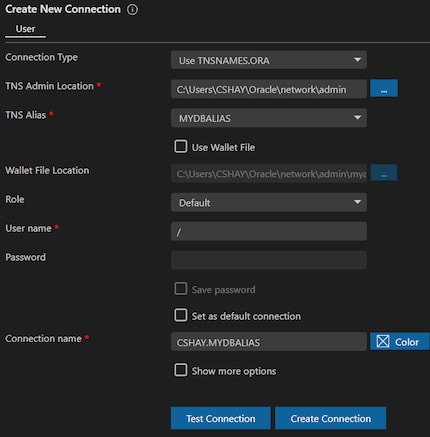
Connect Type: Use TNSNAMES.ORA
TNS Admin Location: Select the path to the directory containing your TNSNAMES.ORA and SQLNET.ORA files (Visit the extension settings to set a default location)
TNS Alias: Select the alias you wish to connect to
Use Wallet File: Uncheck this (unless using a wallet)
Role: Default (for ordinary use) or SYSDBA (if you need to do DBA tasks like creating a user)
Username: Enter "/" (forward slash)
Password: Leave blank
Save Password: Check this box if you do not wish to enter the password each time
(If using a proxy connection, please see How to: Connect to Oracle Database using a Proxy Username and Password)
How to: Connect to Oracle Database using a Proxy Username and Password
In other tools, you may have connected using this format: proxyusername[username]/ [proxypassword]
To connect using a proxy user, use any of the connection methods provided elsewhere on this web page. In addition, change the following fields in the dialog:
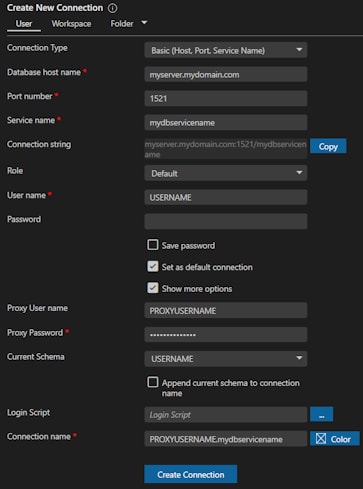
Username: Enter database username. ("/" (forward slash) is not allowed with proxy connections).
Password: Enter the database password. Leave blank for single-session proxy. Password is required for two-session proxy.
Show more options: Check this box
Proxy Username: The proxy username. (Other tools use the format proxyusername[username]/ [proxypassword]). Use "/" (forward slash) if using external authentication (i.e. OS/Kerberos/Certificate) or if using SEPS wallet for database username and password.
Proxy Password: The proxy password. (Other tools use the format proxyusername[username]/ [proxypassword]). Leave blank if Proxy Username field is "/" (forward slash) .
How to: Connect to Oracle Autonomous Database (Cloud) without using Credentials Files (Walletless)
This section shows how to connect to Oracle Autonomous Database without using a wallet. Note that it may be easier to establish this connection via the Oracle Cloud Explorer Create Connection in Database Explorer menu item. For more information on how to do that and for instructions how to configure your Autonomous Database for walletless access, see the Oracle Developer Tools for VS Code Quickstart.
Before proceeding with the steps below, you will need to obtain the connection string for your Oracle Autonomous Database and you may need to configure the database for walletless connections.
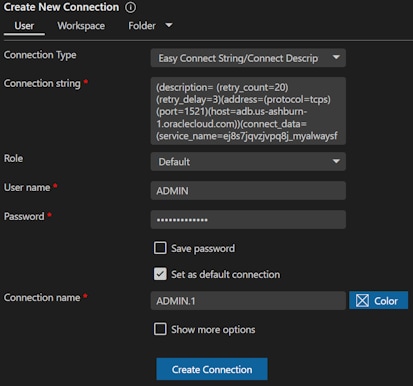
Connection Type: Easy Connect String/Connect Descriptor
Connection string: Enter the connection string
Role: Default
Username: Username (usually "ADMIN")
Password: Password
Save Password: Check this box if you do not wish to enter the password each time
How to: Connect to Oracle Autonomous Database (Cloud) using Credentials Files (using a Wallet)
This section shows how to connect to Oracle Autonomous Database using Credentials Files. Note that it may be easier to establish this connection via the Oracle Cloud Explorer Create Connection in Database Explorer menu item. For more information on how to do that, see the Oracle Developer Tools for VS Code Quickstart.
Before proceeding with the steps below, you will need to obtain and unzip your credentials files into a directory.
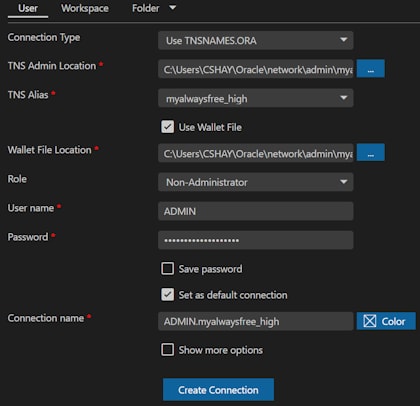
Connection Type: Use TNSNAMES.ORA
TNS Admin Location: Select the path to the directory containing your credentials files (Visit the extension settings to set a default location)
TNS Alias: Select the alias you wish to connect to
Use Wallet File: Check this
Wallet File Location: Select the path to the directory containing your credentials files (Visit the extension settings to set a default location)
Role: Default
Username: Username (usually "ADMIN")
Password: The password
Save Password: Check this box if you do not wish to enter the password each time


