Quick Start: Developing Node.js Applications for Oracle Autonomous Database
This tutorial shows you how to connect Node.js applications to Oracle Autonomous Database (ADB) using the node-oracledb module. This module lets you quickly develop applications that execute SQL or PL/SQL statements. Your applications can also use Oracle's document storage SODA calls. Node-oracledb can be used with TypeScript or directly with Node.js.
If you would like to use a local database instead, then see the Developing Node.js Applications for Oracle Database tutorial.
Node.js node-oracledb on Windows
Open all Close allThis tutorial shows you how use the Node.js node-oracledb interface on Windows to connect applications to Oracle Autonomous Database (ADB). Follow the steps below.
-
1. Provision an ADB Instance
Click on the links below to walk through these steps if you have not yet provisioned an ADB instance. Remember the database name and password. You will use them to connect Node.js applications to Oracle ADB.
You may select the 'Always Free' option to use the Always Free Oracle ADB. This will setup your Oracle ADB Shared Infrastructure (ADB-S) database instance.
-
2. Enable access to the ADB instance
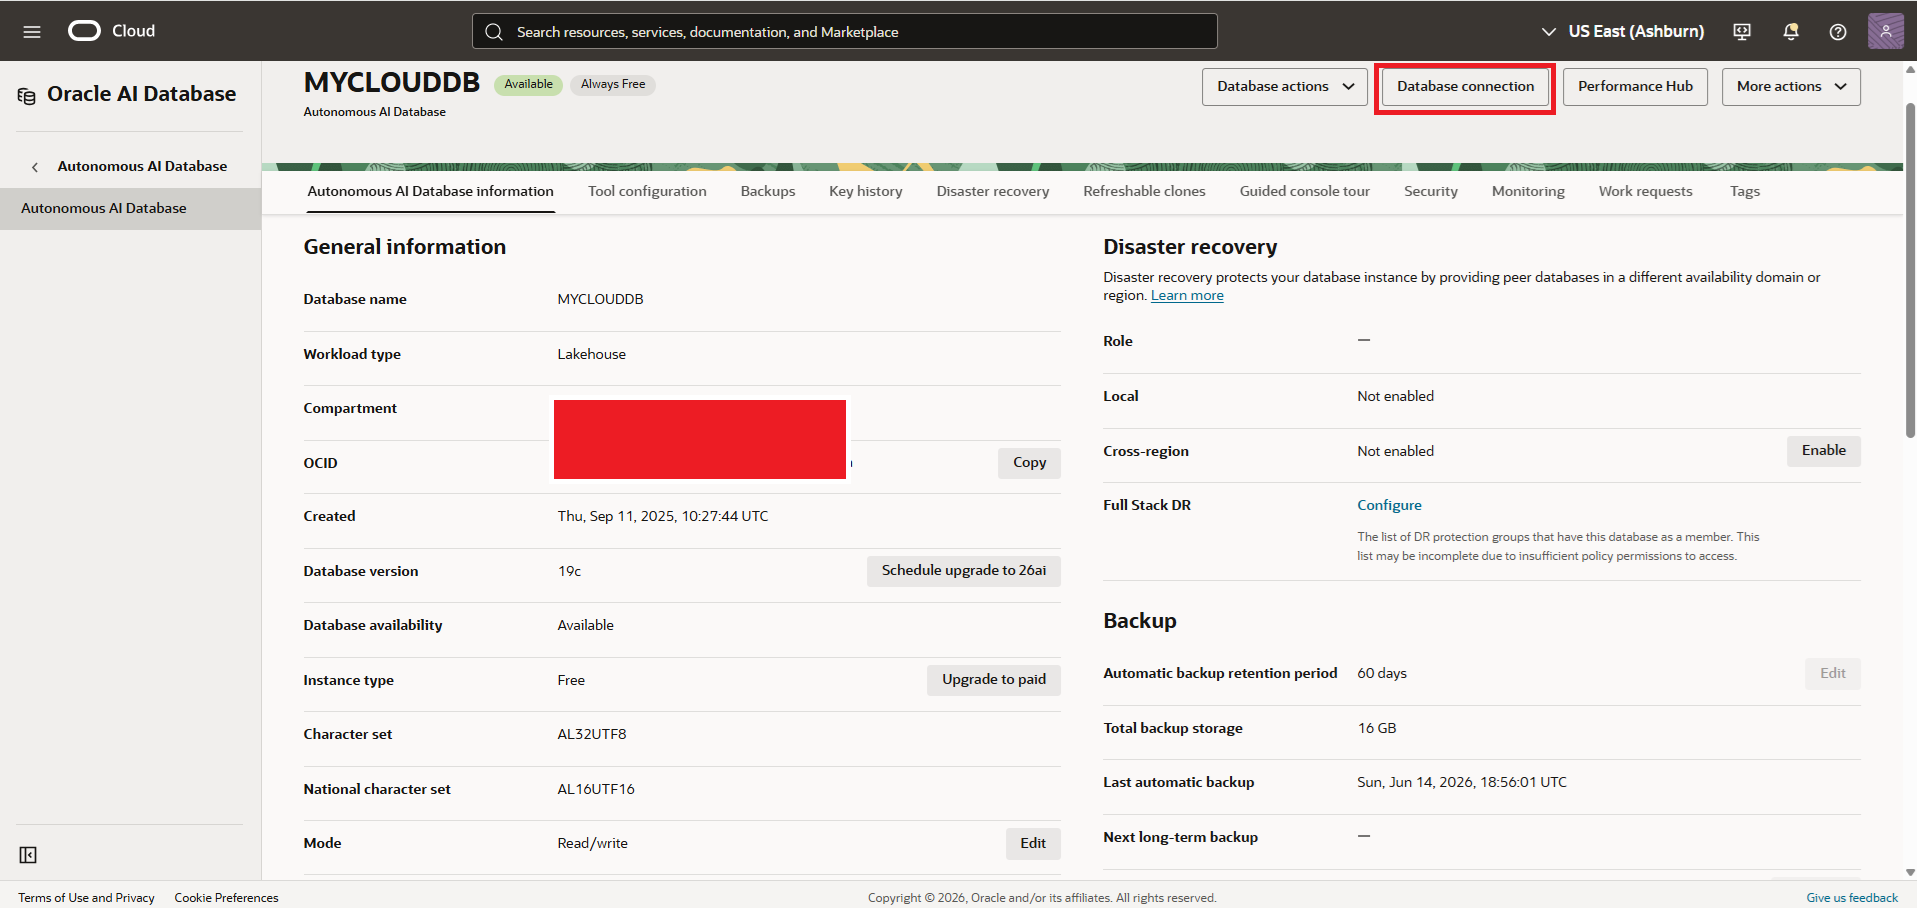
Once you login to your Oracle Cloud account, navigate to the ADB-S instance details page for the Autonomous Database created in Step 1.
When the database has been created, select the 'Database Connection' button:
Copy any connection string.
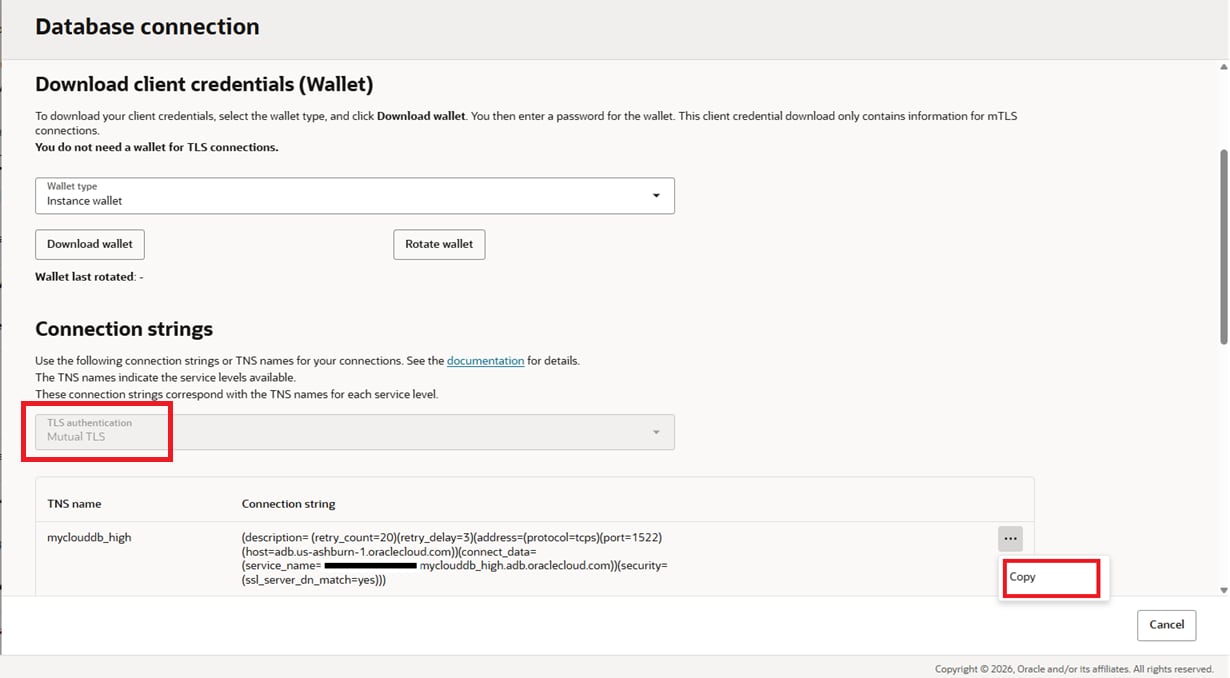
For example your connection string may be like:
(description= (retry_count=20)(retry_delay=3)(address=(protocol=tcps)(port=1521)(host=adb.abc.oraclecloud.com))(connect_data=(service_name=myclouddb_low.adb.oraclecloud.com))(security=(ssl_server_dn_match=yes)))Now paste and store the connection string in any file, say connstring.txt.
-
3. Install Node.js
Install Node.js (14.17 or later versions) by downloading the MSI package, clicking it, and following the prompts.
Restart terminal windows, if necessary, so that the new Node.js binary is found.
-
4. Install node-oracledb
Using your favorite editor, create a new file package.json in a directory of your choice. It should contain:
{
  "name": "Demo",
  "version": "1.0.0",
  "private": true,
  "description": "Demo app",
  "keywords": [
    "myapp"
  ],
  "author": "You",
  "license": "MIT",
  "dependencies": {
    "oracledb": "^7.0"
  }
}
Install node-oracledb:
npm installFor further assistance and options, such as for installing behind an HTTP proxy, see Node-oracledb Installation on Microsoft Windows.
-
5. Create a Node.js Application
-
Use your editor to create a new Node.js file example.js in the same directory as package.json:
const oracledb = require('oracledb'); async function runApp() { let connection; try { // Use the connection string copied from the cloud console // and stored in connstring.txt file from Step 2 of this tutorial connection = await oracledb.getConnection({ user: "admin", password: "XXXX", connectionString: "(description=...)" }); // Create a table await connection.execute(`begin execute immediate 'drop table nodetab'; exception when others then if sqlcode <> -942 then raise; end if; end;`); await connection.execute(`create table nodetab (id number, data varchar2(20))`); // Insert some rows const sql = `INSERT INTO nodetab VALUES (:1, :2)`; const binds = [ [1, "First" ], [2, "Second" ], [3, "Third" ], [4, "Fourth" ], [5, "Fifth" ], [6, "Sixth" ], [7, "Seventh" ] ]; await connection.executeMany(sql, binds); // connection.commit(); // uncomment to make data persistent // Now query the rows back const result = await connection.execute(`SELECT * FROM nodetab`); console.dir(result.rows, { depth: null }); } catch (err) { console.error(err); } finally { if (connection) { try { await connection.close(); } catch (err) { console.error(err); } } } } runApp(); - Modify example.js to use your ADB connection information in the oracledb.getConnection() call:
- User: Use admin which is the user created by default during the creation of Autonomous Database. (If you created another ADB user, you can use that user instead.)
- Password: Use the database user's password. If connecting as the admin user, set this to the password you chose during the Create Autonomous Database step while provisioning Autonomous Database.
- Connection String: Use the connection string copied from the ADB-S cloud console and stored in the connstring.txt file during Step 2 of this tutorial.
- Save the changes to example.js.
-
6. Run the Node.js Application
Run the app:
node example.jsYou will see the queried rows returned from the database. Congratulations! You have successfully used Oracle Autonomous Database.
Note: If you connect to ADB from behind a firewall, you will likely encounter a connection timeout error. Update the connection string to use an HTTP proxy. Learn how to do this in the ADB documentation section. Scroll down to the "Connections with an HTTP Proxy" section on the doc page.
More information and resources on using node-oracledb are available here.
Node.js node-oracledb on macOS
Open all Close allThis tutorial shows you how use the Node.js node-oracledb interface on macOS to connect applications to Oracle Autonomous Database (ADB). Follow the steps below.
-
1. Provision an ADB Instance
Click on the links below to walk through these steps if you have not yet provisioned an ADB instance. Remember the database name and password. You will use them to connect Node.js applications to Oracle ADB.
You may select the 'Always Free' option to use the Always Free Oracle ADB. This will setup your Oracle ADB Shared Infrastructure (ADB-S) database instance.
-
2. Enable access to the ADB instance
Once you login to your Oracle Cloud account, navigate to the ADB-S instance details page for the Autonomous Database created in Step 1.
When the database has been created, select the 'Database Connection' button:
Copy any connection string.
For example your connection string may be like:
(description= (retry_count=20)(retry_delay=3)(address=(protocol=tcps)(port=1521)(host=adb.abc.oraclecloud.com))(connect_data=(service_name=myclouddb_low.adb.oraclecloud.com))(security=(ssl_server_dn_match=yes)))Now paste and store the connection string in any file, say connstring.txt.
3. Install Node.js
Install Node.js (14.17 or later versions) by downloading and installing the macOS installer package.-
4. Install node-oracledb
Using your favorite editor, create a new file package.json in a directory of your choice. It should contain:{ "name": "Demo", "version": "1.0.0", "private": true, "description": "Demo app", "keywords": [ "myapp" ], "author": "You", "license": "MIT", "dependencies": { "oracledb": "^7.0" } }Install node-oracledb:
npm installFor further assistance and options, such as for installing behind an HTTP proxy, see Node-oracledb Installation on Apple macOS.
5. Create a Node.js Application
-
Use your editor to create a new Node.js file example.js in the same directory as package.json:
const oracledb = require('oracledb'); async function runApp() { let connection; try { // Use the connection string copied from the cloud console // and stored in connstring.txt file from Step 2 of this tutorial connection = await oracledb.getConnection({ user: "admin", password: "XXXX", connectionString: "(description=...)" }); // Create a table await connection.execute(`begin execute immediate 'drop table nodetab'; exception when others then if sqlcode <> -942 then raise; end if; end;`); await connection.execute(`create table nodetab (id number, data varchar2(20))`); // Insert some rows const sql = `INSERT INTO nodetab VALUES (:1, :2)`; const binds = [ [1, "First" ], [2, "Second" ], [3, "Third" ], [4, "Fourth" ], [5, "Fifth" ], [6, "Sixth" ], [7, "Seventh" ] ]; await connection.executeMany(sql, binds); // connection.commit(); // uncomment to make data persistent // Now query the rows back const result = await connection.execute(`SELECT * FROM nodetab`); console.dir(result.rows, { depth: null }); } catch (err) { console.error(err); } finally { if (connection) { try { await connection.close(); } catch (err) { console.error(err); } } } } runApp(); - Modify the oracledb.getConnection() call in example.js to use your ADB connection information:
- User: Use admin which is the user created by default during the creation of Autonomous Database. (If you created another ADB user, you can use that user instead.)
- Password: Use the database user's password. If connecting as the admin user, set this to the password you chose during the Create Autonomous Database step while provisioning Autonomous Database.
- Connection String: Use the connection string copied from the ADB-S cloud console and stored in the connstring.txt file during Step 2 of this tutorial.
- Save the changes to example.js.
-
6. Run the Node.js Application
Run the app:
node example.jsYou will see the queried rows returned from the database. Congratulations! You have successfully used Oracle Autonomous Database.
Note: If you connect to ADB from behind a firewall, you will likely encounter a connection timeout error. Update the connection string to use an HTTP proxy. Learn how to do this in this ADB documentation section. Scroll down to the "Connections with an HTTP Proxy" section on the doc page.
More information and resources on using node-oracledb are available here.
Node.js node-oracledb on Linux
Open all Close allThis tutorial shows you how use the Node.js node-oracledb interface on Linux to connect applications to Oracle Autonomous Database (ADB). Follow the steps below.
-
1. Provision an ADB Instance
Click on the links below to walk through these steps if you have not yet provisioned an ADB instance. Remember the database name and password. You will use them to connect Node.js applications to Oracle ADB.
You may select the 'Always Free' option to use the Always Free Oracle ADB. This will setup your Oracle ADB Shared Infrastructure (ADB-S) database instance.
-
2. Enable access to the ADB instance
Once you login to your Oracle Cloud account, navigate to the ADB-S instance details page for the Autonomous Database created in Step 1.
When the database has been created, select the 'Database Connection' button:
Copy any connection string.
For example your connection string may be like:
(description= (retry_count=20)(retry_delay=3)(address=(protocol=tcps)(port=1521)(host=adb.abc.oraclecloud.com))(connect_data=(service_name=myclouddb_low.adb.oraclecloud.com))(security=(ssl_server_dn_match=yes)))Now paste and store the connection string in any file, say connstring.txt.
3. Install Node.js
Install Node.js version 14.17 or later. For example, on Oracle Linux 8:
sudo dnf install oracle-nodejs-release-el8

sudo dnf install nodejs
For generic installation steps, see Node.js Downloads.
-
4. Install node-oracledb
Using your favorite editor, create a new file package.json in a directory of your choice. It should contain:{ "name": "Demo", "version": "1.0.0", "private": true, "description": "Demo app", "keywords": [ "myapp" ], "author": "You", "license": "MIT", "dependencies": { "oracledb": "^7.0" } }Install node-oracledb:
npm installFor further assistance and options, such as for installing behind an HTTP proxy, see Node-oracledb Installation on Linux.
5. Create a Node.js Application
-
Use your editor to create a new Node.js file example.js in the same directory as package.json:
const oracledb = require('oracledb'); async function runApp() { let connection; try { // Use the connection string copied from the cloud console // and stored in connstring.txt file from Step 2 of this tutorial connection = await oracledb.getConnection({ user: "admin", password: "XXXX", connectionString: "(description=...)" }); // Create a table await connection.execute(`begin execute immediate 'drop table nodetab'; exception when others then if sqlcode <> -942 then raise; end if; end;`); await connection.execute(`create table nodetab (id number, data varchar2(20))`); // Insert some rows const sql = `INSERT INTO nodetab VALUES (:1, :2)`; const binds = [ [1, "First" ], [2, "Second" ], [3, "Third" ], [4, "Fourth" ], [5, "Fifth" ], [6, "Sixth" ], [7, "Seventh" ] ]; await connection.executeMany(sql, binds); // connection.commit(); // uncomment to make data persistent // Now query the rows back const result = await connection.execute(`SELECT * FROM nodetab`); console.dir(result.rows, { depth: null }); } catch (err) { console.error(err); } finally { if (connection) { try { await connection.close(); } catch (err) { console.error(err); } } } } runApp(); - Modify example.js to use your ADB connection information in the oracledb.getConnection() call:
- User: Use admin which is the user created by default during the creation of Autonomous Database. (If you created another ADB user, you can use that user instead.)
- Password: Use the user's password. If connecting as the admin user, set this to the password you chose during the Create Autonomous Database step while provisioning Autonomous Database.
- Connection String: Use the connection string copied from the ADB-S cloud console and stored in the connstring.txt file during Step 2 of this tutorial.
- Save the changes to example.js.
-
6. Run the Node.js Application
Run the app:
node example.jsYou will see the queried rows returned from the database. Congratulations! You have successfully used Oracle Autonomous Database.
Note: If you connect to ADB from behind a firewall, you will likely encounter a connection timeout error. Update the connection string to use an HTTP proxy. Learn how to do this in the ADB documentation section. Scroll down to the "Connections with an HTTP Proxy" section on the doc page.
More information and resources on using node-oracledb are available here.