Setup: Oracle SOA Suite and Oracle Database XE
Go Back to main article, "Invoice Processing in a Service-Oriented Environment"
Before getting started, make sure you have Oracle SOA Suite (which includes Oracle JDeveloper) and Oracle Database 10g Express Edition (Oracle Database XE) installed and configured. Follow the steps below to complete this setup.
- Install Oracle Database XE 10g Release 2 (10.2.0.1) or later ( download page).
- Install Oracle SOA Suite 10g Release 3 (10.1.3.1) or later, along with Oracle JDeveloper 10g Release 3 (10.1.3.1) or later. These products, with installation and configuration instructions, are available at the Oracle SOA Suite download page. When installing Oracle SOA Suite, be sure that the ESB component installs (it should be installed by default). Also note the SOA application Oracle Application Server Containers for Java Platform, Enterprise Edition (OC4J) instance name specified by the installer, because you will need it in the next step when configuring an Oracle Application Server connection.
Preliminary Setup: Oracle Database
- Use the scripts from the
project files zip (located in the InvoiceDemo/InvoiceESB/resources/scripts directory) to create the database user INVOICE_DEMO, the invoice tables, and the database sequences. Run the following scripts in Oracle SQL Developer, SQL*Plus, or another tool:
- Connect as user with system privileges—for example, SYSTEM.
- Run the script create_user.sql. This will create the INVOICE_DEMO schema in the database.
- Connect as user
INVOICE_DEMO. - Create the invoice tables INVOICES and INVOICE_LINES by running the script create_tables.sql. Create the database sequences INVOICES_SEQ and INVOICE_LINES_SEQ by running the create_sequences.sql script.
- Test the outcome of these steps
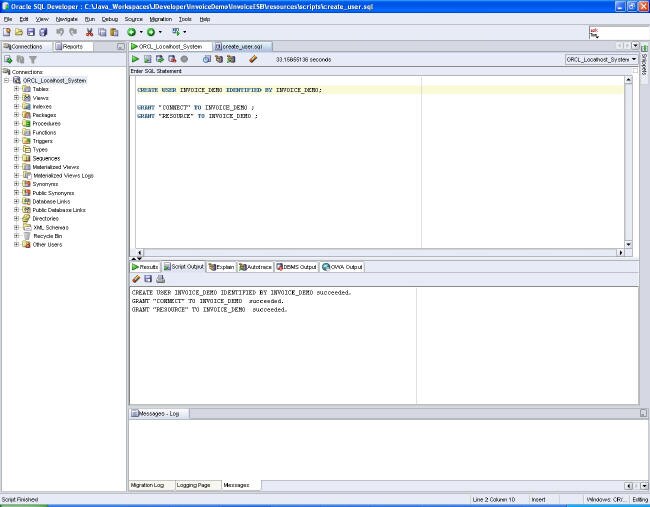
Figure 1 Running SQL scripts from Oracle SQL Developer
Note that if you run these scripts for the first time, you can ignore all errors concerning “table or view does not exist” or “sequence does not exist”.
The picture below models the invoice tables that are created during this step.
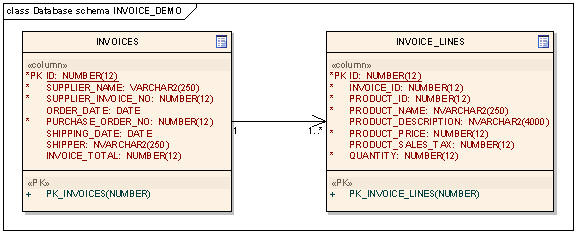
Figure 2 Invoice tables
- Set up a database connection in Oracle JDeveloper to the newly created database user. Start JDeveloper, open the
Connections Navigator tab, and double-click
Database to launch the
Create Database Connection wizard. Use the following settings:
- Step 1: Connection Name:
invoiceDemo. - Step 1: Connection Type: Oracle (JDBC).
- Step 2: Username:
INVOICE_DEMO. - Step 2: Password:
INVOICE_DEMO. - Step 2: Leave Role empty.
- Step 2: Select Deploy Password.
- Step 3: Driver: thin.
- Step 3: Host Name: host on which your database is running—for example,
localhost. - Step 3: JDBC Port: listener port of your database—for example, 1521.
- Step 3: SID/Service Name: fill in either your database SID or service name—for example, SID:
ORCL. - Step 4: Test Connection: should return Success.
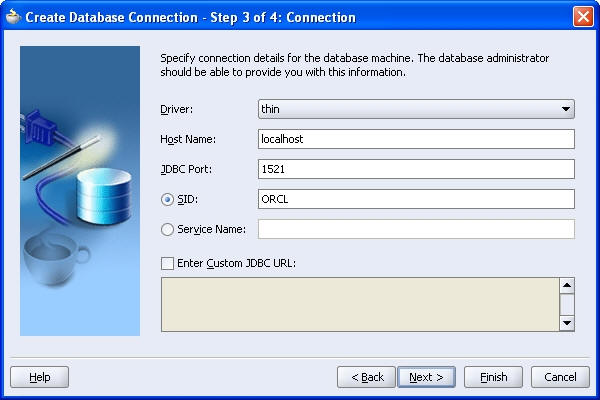
Figure 3 Creating a database connection in Oracle JDeveloper
Select the newly created connection and drill down to the invoice tables you created in the previous step.
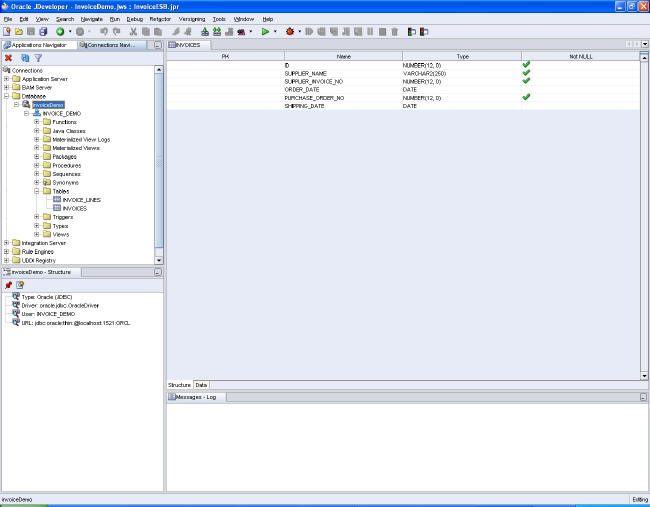
Figure 4 The database connection to INVOICE_DEMO
- Step 1: Connection Name:


Preliminary Setup: Oracle SOA Suite
- In Oracle JDeveloper, set up an Oracle Application Server connection to the newly installed Oracle SOA Suite components. Open the
Connections Navigator tab, and double-click
Application Server to launch the
Create Application Server Connection wizard. Use the following settings:
- Step 1: Connection Name:
OAS_SOA_Suite_10g. - Step 1: Connection Type: Oracle Application Server 10g 10.1.3.
- Step 2: Username:
oc4jadmin. - Step 2: Password:
oc4jadminpassword entered during the Oracle SOA Suite installation. - Step 2: Select Deploy Password.
- Step 3: Connect To: Single Instance.
- Step 3: Host Name: host on which your Oracle Application Server is running—for example,
localhost. - Step 3: OPMN Port: OPMN request port—for example, 6004. Log in to Oracle Application Server Enterprise Manager and navigate to Cluster Topology → Runtime Ports → OPMN → Request to see its value.
- Step 3: OC4J Instance Name: name of OC4J container in which Oracle SOA Suite is installed. For a basic install, this is home; the
default for an advanced installation is
oc4j_soa.This might, however, be different from what you’ve chosen. - Step 4: Test Connection: should return Success.
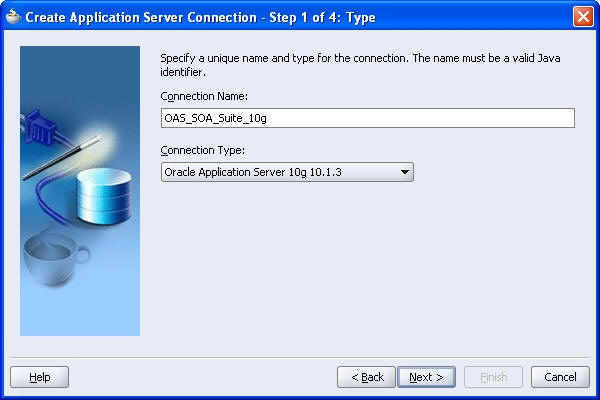
Figure 5 Creating an Application Server connection in Oracle JDeveloper
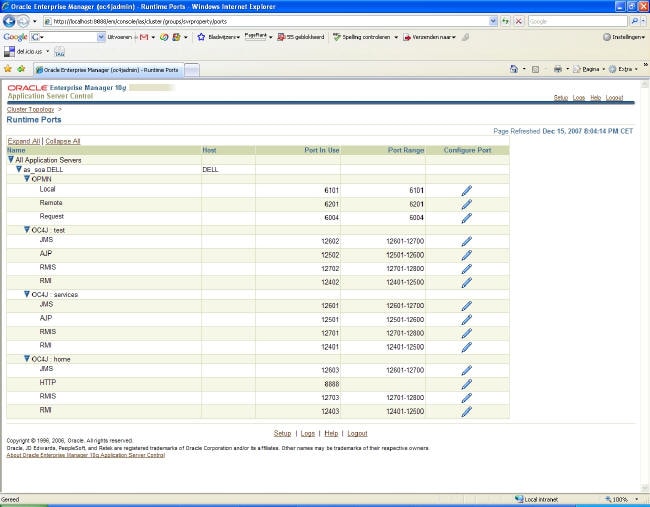
Figure 6 The Runtime Ports overview in Oracle Application Server Enterprise Manager

Figure 7 The Application Server connection to Oracle SOA Suite
- Step 1: Connection Name:
- In Oracle JDeveloper, set up an Oracle Integration Server connection to the newly installed Oracle SOA Suite components. Open the
Connections Navigator tab, and double-click
Integration Server to launch the
Create Integration Server Connection wizard. Use the following settings:
- Step 1: Connection Name:
IS_SOA_Suite_10g. - Step 2: Application Server: select the Application Server connection
OAS_SOA_Suite_10gcreated in the previous step. - Step 2: Host Name: host on which your Oracle Application Server is running—for example,
localhost. - Step 2: Port Number: HTTP port—for example, 8888. Log in to Oracle Application Server Enterprise Manager and navigate to Cluster Topology → Runtime Ports → OC4J → HTTP to see its value.
- Step 2: Select Add host name to the list of proxy exceptions if you use a proxy.
- Step 3: Test Connection: should return OK for Oracle Application Server, Oracle BPEL Process Manager Server, and Oracle ESB Server.
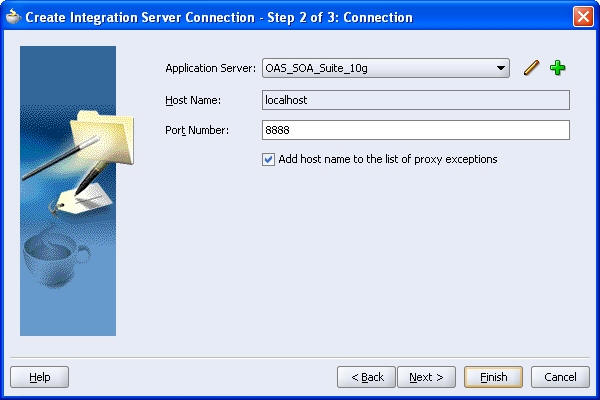
Figure 8 Creating an Integration Server connection in Oracle Jdeveloper
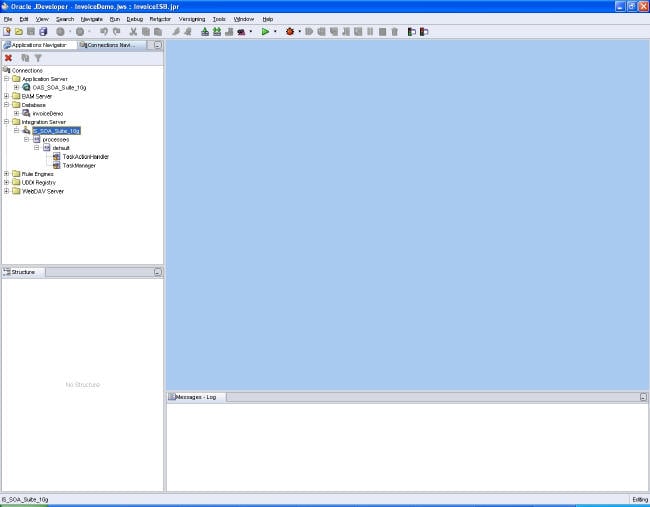
Figure 9 The Integration Server connection to Oracle SOA Suite
- Step 1: Connection Name:


Preliminary Setup: Database Adapter
Configure a database adapter, which can be used by our ESB flow to perform database-related operations such as insert s and deletes. A database adapter uses a datasource that in turn uses a connection pool to the database.
- Open Oracle Application Server Enterprise Manager by selecting Start → Programs → Oracle – <SOA Suite instance name> → Oracle Application Server Control. This will open the Enterprise Manager in a browser window.
- Navigate to the OC4J instance in which the ESB is deployed. Navigate to
Administration → JDBC Resources. Create a connection pool for the newly created INVOICE_DEMO user via the following steps:
- Click Create in the Connection Pools area.
- Step 1: Application: default.
- Step 1: Select New Connection Pool.
- Step 2: Name:
invoiceDemoConnectionPool. - Step 2: Select Generate URL from Connection Information and enter your database information.
- Step 2: Credentials/Username:
INVOICE_DEMO. - Step 2: Credentials/Use Cleartext Password:
INVOICE_DEMO. - Step 2: Test the connection by selecting Test Connection. This will open a test window. Accept the defaults and test the connection pool.
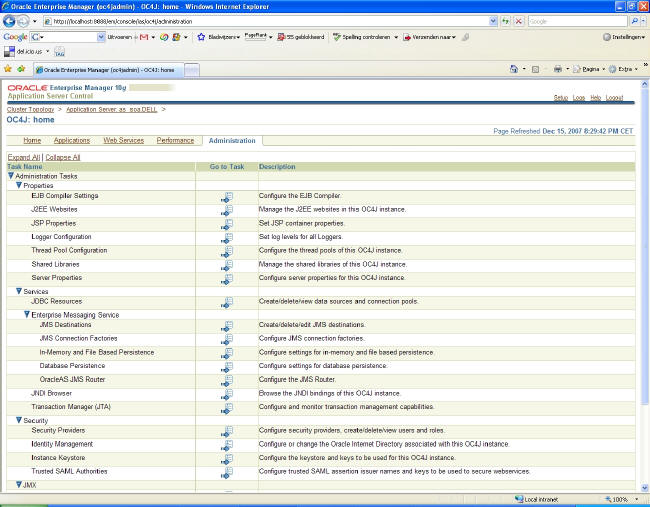
Figure 10 The Administration overview in Oracle Application Server Enterprise Manager
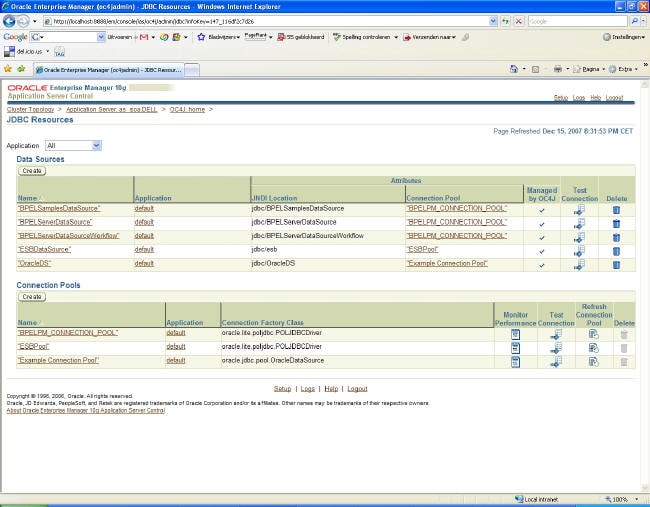
Figure 11 The JDBC Resources overview in Oracle Application Server Enterprise Manager

Figure 12 Creating a connection pool in Oracle Application Server Enterprise Manager
- Create a new datasource based on the connection pool from the previous step. Navigate to
Administration → JDBC Resources and perform the following steps:
- Click Create in the Data Sources area.
- Step 1: Application: default.
- Step 1: Data Source Type: Managed Data Source.
- Step 2: Name:
invoiceDemoDataSource. - Step 2: JNDI Location:
jdbc/invoiceDemoDataSource. - Step 2: Transaction Level: Global & Local Transactions.
- Step 2: Connection Pool:
invoiceDemoConnectionPool. - Step 2: Login Timeout (seconds): 0.
- Step 2: Do not enter credentials.
Test the datasource by selecting Test Connection in the Data Sources part of the JDBC Resources screen.
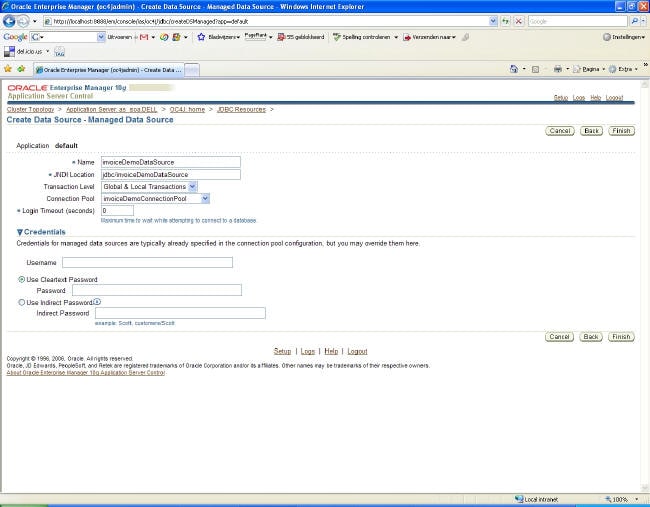
Figure 13 Creating a managed datasource in Oracle Application Server Enterprise Manager
- Configure the database adapter. In Oracle Application Server Enterprise Manager, navigate to
Cluster Topology → OC4J in which SOA Suite is installed → Applications → default → Modules → DbAdapter → Connection Factories. Create a new connection factory by performing the following steps:
- Click Create.
- Step 1: Accept the default interface class.
- Step 2: JNDI Location:
eis/DB/invoiceDemo. - Step 2: xADataSourceName:
jdbc/invoiceDemoDataSource(the previously created datasource). - Step 2: usesNativeSequencing: true. (Important: This enables the use of database sequences.)
- Step 2: sequencePreallocationSize: 1. (Important: This value must be equal to the increment by value of the database sequences you created previously.)
- Step 2: Accept all other defaults.
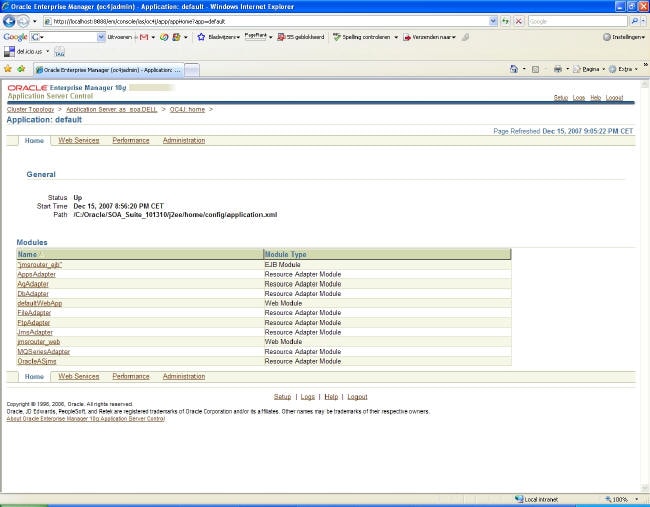
Figure 14 The Adapters overview in Oracle Application Server Enterprise Manager
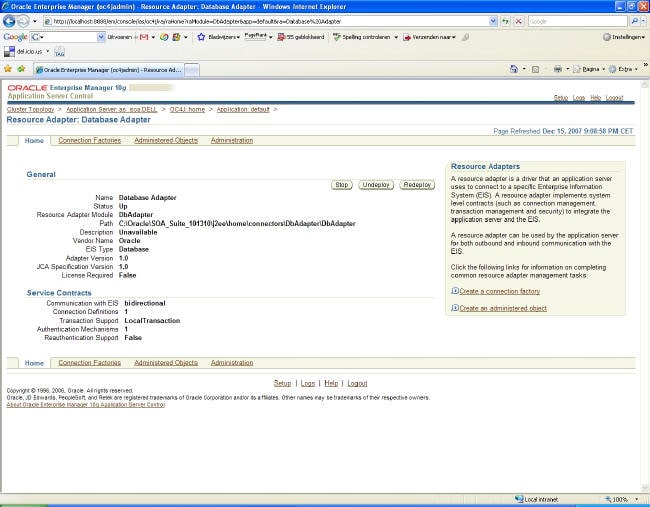
Figure 15 The Database Adapter overview in Oracle Application Server Enterprise Manager
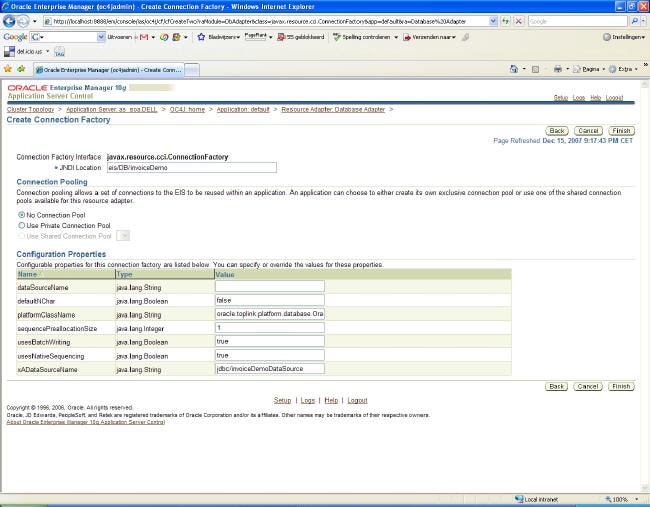
Figure 16 Creating a database adapter connection factory in Oracle Application Server Enterprise Manager


