Overview
With Oracle Autonomous Data Warehouse Benchmark Kit you can run a benchmark derived from TPC-DS version 2.13 against Oracle Autonomous Data Warehouse Serverless. This lightweight utility executes all 99 TPC-DS queries in a single-user session (i.e. sequentially), using the order as defined in stream 0 of the TPC benchmark specification. A single-user run demonstrates the ability of a database to focus all of its available resources to minimize the response time of each of the queries. The queries for this kit were generated with dsqgen from the TPC benchmark-provided templates using qgen's default SEED. The results presented in this benchmark are not official TPC results and, therefore, cannot be compared to published TPC benchmark results.
The kit consists of two parts:
- A driver - installs the TPC-DS schema and collects all of the runtime information for a benchmark run.
- A graphical user interface - analyzes the results. (The graphical user interface is not supported on mobile devices.)
The kit requires access to an Autonomous Data Warehouse to run the queries. The kit itself is supported on Linux (X64) and MacOS (X64, ARM).
The kit supports the following TPC-DS configuration:
- TPC-DS Scale Factor 1000
- Power runs only
Install
Task 1: Make Sure the Client Pre-installation Requirements Are Met
-
If you install on Oracle Cloud Infrastructure (OCI), make sure your tenancy has an ingress role defined to allow incoming traffic.
- Open the navigation menu, under Core Infrastructure, go to Networking and click Virtual Cloud Networks.
- Click the VCN you want.
- Under Resources, click Security Lists.
-
You can add an ingress rule in the default list. Add ingress rule with the following attributes:
- stateless: no
- source: 0.0.0.0/0
- IP Protocol: TCP
- Source Port Range: All
- Destination Port Range: 8001
- Type and Code; Empty
-
Open port 8001 in firewall (These instructions are for Linux OS images)
- sudo firewall-cmd --zone=public --add-port=8001/tcp --permanent
- sudo systemctl stop firewalld.service
- sudo systemctl start firewalld.service
-
Ensure proper egress rules.
- Allow ICMP outbound traffic to all ports.
- If you install the kit on a local client machine, ensure that your machine can connect to the Autonomous Data Warehouse you are planning to use for the benchmark kit.
-
Make sure your Autonomous Data Warehouse meets the pre-installation requirements.
-
Provision or adjust your Autonomous Data Warehouse instance according to the following matrix. The kit will enforce the following minimum configuration to ensure a proper run.
Database Resource Scale Factor=1000 Minimum number of base compute 8 OCPUs or 32 ECPUs Minimum provisioned storage 2TB - The usage of autoscale is optional. If you choose to use autoscale, then the benchmark kit will take advantage of all existing CPUs, including the additional CPUs provided by autoscale.
-
Provision or adjust your Autonomous Data Warehouse instance according to the following matrix. The kit will enforce the following minimum configuration to ensure a proper run.
- Download the wallet of your Autonomous Data Warehouse to your client system and extract it into a directory of your choice. You need to manually modify the wallet location in the file 'sqlnet.ora' to point to the directory where you have extracted the wallet. Make sure that you can connect to your autonomous database, using either SQL*Plus or SQLcl. Note that none of these tools are required to run the kit.
Note: It is not advised to use a regional wallet but to instead use an instance wallet. An instance wallet ensures that the kit knows exactly which autonomous database to connect. Using a regional wallet will prompt the kit to ask you for more specific information about your chosen autonomous data warehouse for running the kit.
After you have met the pre-requirements, you are ready to install the Oracle Autonomous Data Warehouse Benchmark Kit.
Task 2: Download the Autonomous Data Warehouse Benchmark Kit
- Download the Autonomous Data Warehouse Benchmark Kit for your platform
- Untar the kit. You will have a subdirectory named 'bench_dss' in the place where you extract the kit.
- If desired, you can rename the directory prior to the installation. Anything installed as part of the kit is self-contained in this directory.
- While the kit is self-contained within the directory you choose, the installation and any benchmark run will create information within this directory that relies on the location chosen at installation time. Renaming or moving the directory after installation will cause unexpected behavior.
- Change into main benchmark kit directory you decided on, e.g. /home/opc/bench_dss for installation. Be prepared to manually download additional 3rd party components not provided by this kit in a separate window.
-
Run
install.sh
and follow the on-screen instructions.
-
The installation will ask you to download the following additional Oracle and 3rd party components:
- Javax-json.jar from https://repo1.maven.org/maven2/org/glassfish/javax.json
- Oracle jdbc driver from https://www.oracle.com/database/technologies/appdev/jdbc-downloads.html
- Java JDK from https://www.oracle.com/java/technologies/javase-jdk11-downloads.html
- nodejs from https://nodejs.org/
- After successful installation of the Data Warehouse Benchmark Kit and the required 3rd party components, you have to provide the name of a configuration file, which will be placed in subdirectory 'config/sut' within your chosen installation directory. This configuration file holds the information of your chosen autonomous data warehouse environment. You will refer to a specific configuration file whenever you are running the kit.
-
The installation will ask you to download the following additional Oracle and 3rd party components:
Note:
- If you have errors at installation time, you can simply delete the complete directory tree you have created and start over after fixing the errors you encountered while installing the kit. You can also always contact the Oracle Autonomous Database team on stackoverflow.
- The UI of the benchmark kit was tested for proper keystroke control using the Chrome browser. It is advised to use Chrome if you are relying on keystroke controls.
After successful installation you are ready to run the Data Warehouse Benchmark Kit and to analyze the results of your runs.
Use the Kit
You are ready to use the kit. The benchmark kit needs to issue several administrative tasks in the database environment used for the benchmark kit that may impact your production environment. For example, to guarantee deterministic behavior, result cache information of the database is flushed prior to running the benchmark. It is not recommended to use this benchmark kit in any production environment.
Task 1: First Time Set Up
The first time you run the kit, you need to provide the following information:- Directory location for extracted wallet
Use the directory location you previously created and tested.
The kit expects the directory to contain the entries for a single Autonomous Data Warehouse (instance wallet) with default tnsnames.ora entries of either [ high | medium | low ], as provided by your Autonomous Data Warehouse. Non-conformat entries can lead to failures. - Name of your chosen Autonomous Data Warehouse (if you are using a regional wallet)
With multiple entries in the tnsnames.ora file, the kit is unable to identify the database you have chosen. - Admin database password for your chosen Autonomous Data Warehouse
The benchmark kit will install a separate schema which owns the generated data for the TPC-DS schema using an Oracle-provided bucket. This newly created user is named TPCDS_1000G_TEXTC. It will also be used to run the TPC-DS queries. ADMIN user is mandatory for the installation.
Other users will not be able to setup the TPCDS schema and run the benchmark kit. - Service for admin operations if you are using a regional wallet
Admin operations are schema and table creation for running the kit. You need to choose the LOW service of your chosen database. - Service for benchmark query operations if you are using a regional wallet
<
You need to choose the MEDIUM service of your chosen database.
Task 2: Run the Kit
Follow these steps on the command line to run the kit.- Change to the directory where you installed the benchmark kit.
cd /home/opc/bench_dss - Set the environment variables to run the kit. It will change your working directory to
./bin
source ./env.sh - Start the run.
./run -n <configName>
where <configName> is the filename (without .config extension) you provided during the installation of the kit. The default names are: oracle_<hostName> .config
Note:
- If you have not run the benchmark kit on your Autonomous Data Warehouse before, the kit will install and load the TPC-DS tables in a newly created schema. This will take approximately 1:20 hours for SF1000. After the installation of the TPCDS schema, the benchmark kit starts executing the queries.
- You can run the kit as often as you like against different Autonomous Data Warehouses, with different sizes beyond the minimum requirements. In case the kit finds a properly pre-installed TPC-DS schema, it will not re-install it, but instead will start the query workload right away.
Task 3: Optionally Remove the Schema Created by the Benchmark Kit
- Issue the following SQL command to remove the schema created.
drop user TPCDS_1000G_TEXTC cascade
View Results
To view results of the Oracle Autonomous Data Warehouse Benchmark Kit, use the graphical UI to analyze your
benchmark runs. An Ojet webserver needs to be started on the client machine where you installed the kit and
executed benchmark runs. This is usually done as part of the installation process, but in case it is not
started or it was stopped manually, you must start it manually.
Note:
- By default the web server is configured for local access only on the client machine where you have installed the benchmark kit, using port 8001. You can also configure the webserver to enable remote access, or to change the assigned port. See the Administer section below.
- For people relying on keystroke access, the verified browser is Chrome. Other browsers were not tested.
Task 1: Start your ojet Server
- Change into the directory where you installed the benchmark kit.
cd /home/opc/bench_dss - Set the necessary environment variables.
source ./env.sh - Start the ojet webserver on the command line.
./ojet_serve.sh
Note:- 8001 is the default port.
- The default for the webserver is locally on the client from where you ran the benchmark kit.
- See Start/Stop NodeJs Ojet webserver instructions in the Administer section below for details of how to start, stop, or configure the Ojet server.
- On some hosts, a default browser window will open automatically when you start the webserver.
- Remote browsing from another host requires you to set up the Ojet server for remote access. Setting up the Ojet server for remote access requires you to register certificates for secure SSL communication. You can use self-signed certificates, automatically generated by Ojet. Choosing this option will ensure secure communication but may raise a browser warning about the certificate not coming from an official authoritative institution.
- Open your browser.
- For local ojet configuration, open your browser pointing to your local machine:
http://<your local machine running the kit>:8001 - For remote access ojet configuration, open your browser pointing to your remote machine where
the kit is installed:
https://<your remote machine running the kit>:8001
- For local ojet configuration, open your browser pointing to your local machine:
Note: If you are accessing a remote Ojet webserver you need to supply the password you have configured initially for safe remote access, after accepting that the certificate is not coming from an official institution.
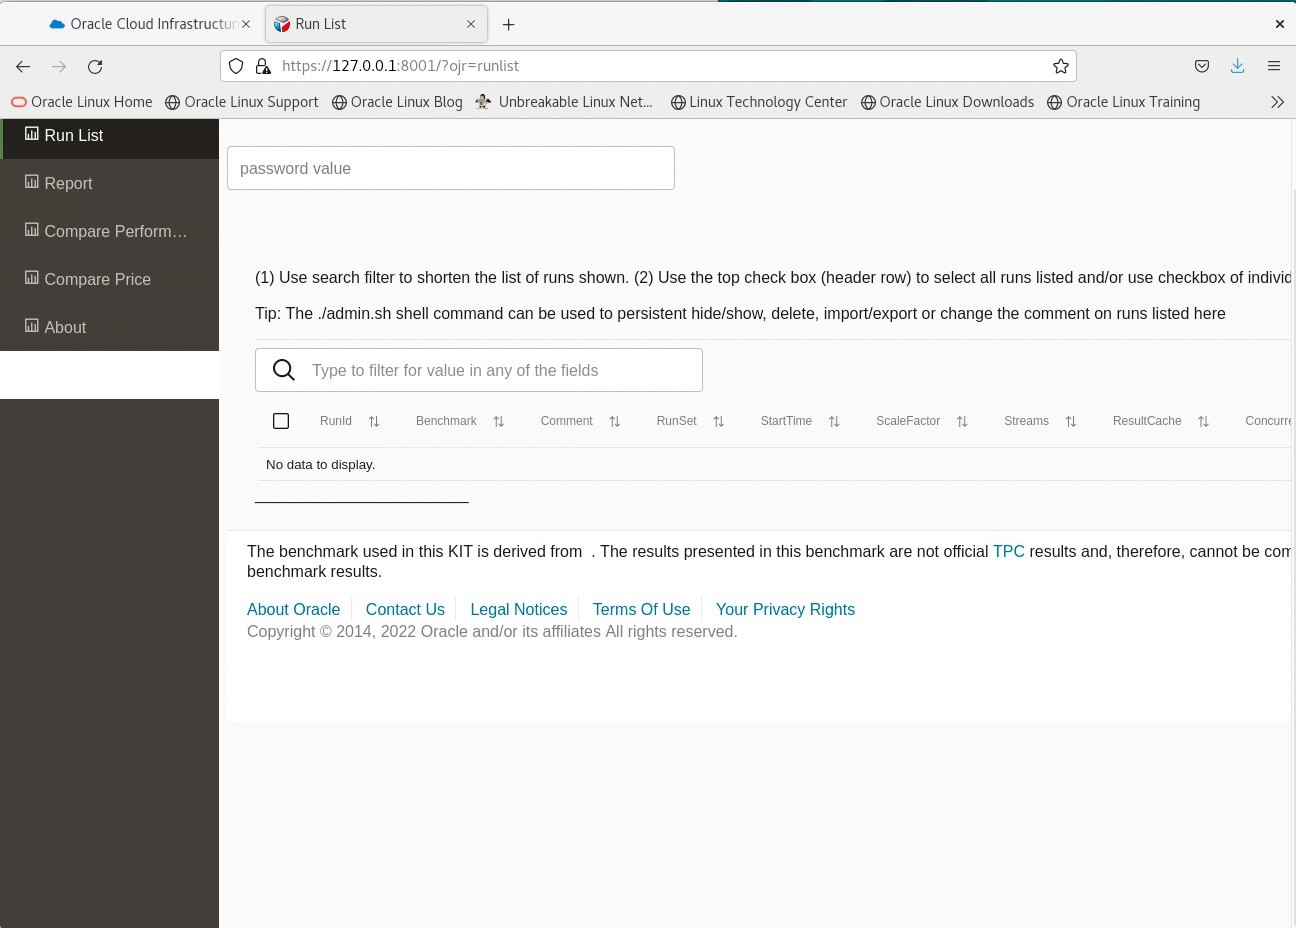
After successful authentication you will be able to analyze your benchmark runs. The main page shows you the list of the various benchmark runs you have run from your client machine. You can use the same benchmark kit installation to run the kit against different Autonomous Data Warehouses with different shapes, in different regions.
Task 2: Understand the Components of the Autonomous Data Warehouse Benchmark Kit Results
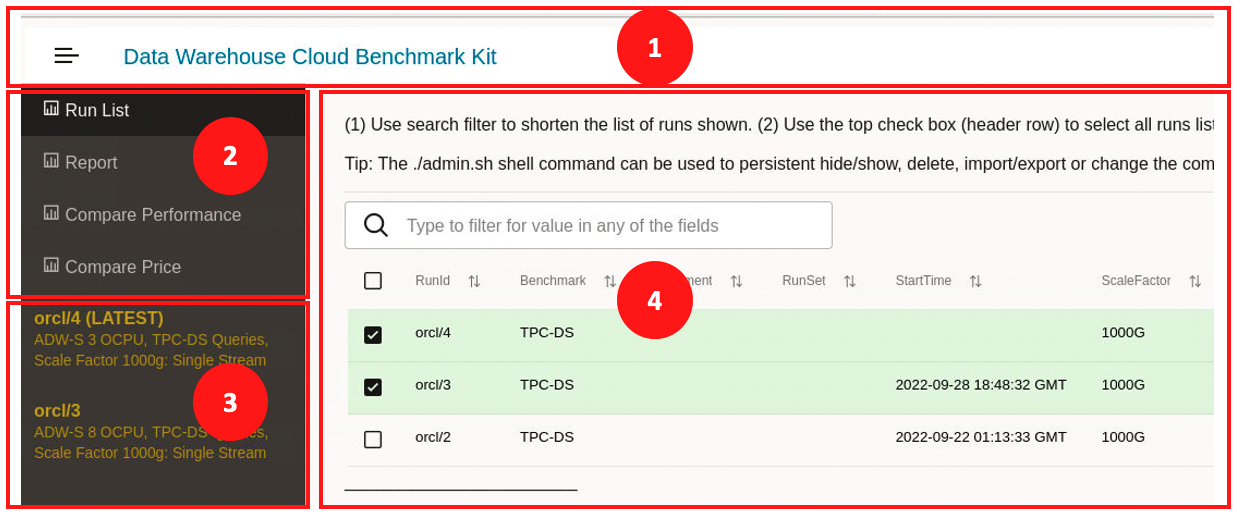
The Autonomous Data Warehouse Benchmark Kit consists of four main elements to navigate and drill down into various topics related to individual or multiple benchmark runs. The following describes the main purpose of each of those elements.
-
Main toolbar.
Allows to toggle the left hand menu on and off. -
Main menu options.
The Oracle Autonomous Data Warehouse Benchmark Kit offers various insights into individual runs and offers comparative views of those.- Report: Choose from the list of shown runs (in yellow) to drill down into details of a specific run. By default, the latest run will be shown.
- Run list: Shows the list of all runs you have executed with the Autonomous Data Warehouse Benchmark Kit, including runs-in-progress. You can also select a subset of runs on this screen to drill down into performance and cost comparisons of individual runs. Whenever you explicitly select individual runs, the list of selected benchmark runs will be updated to reflect your selection.
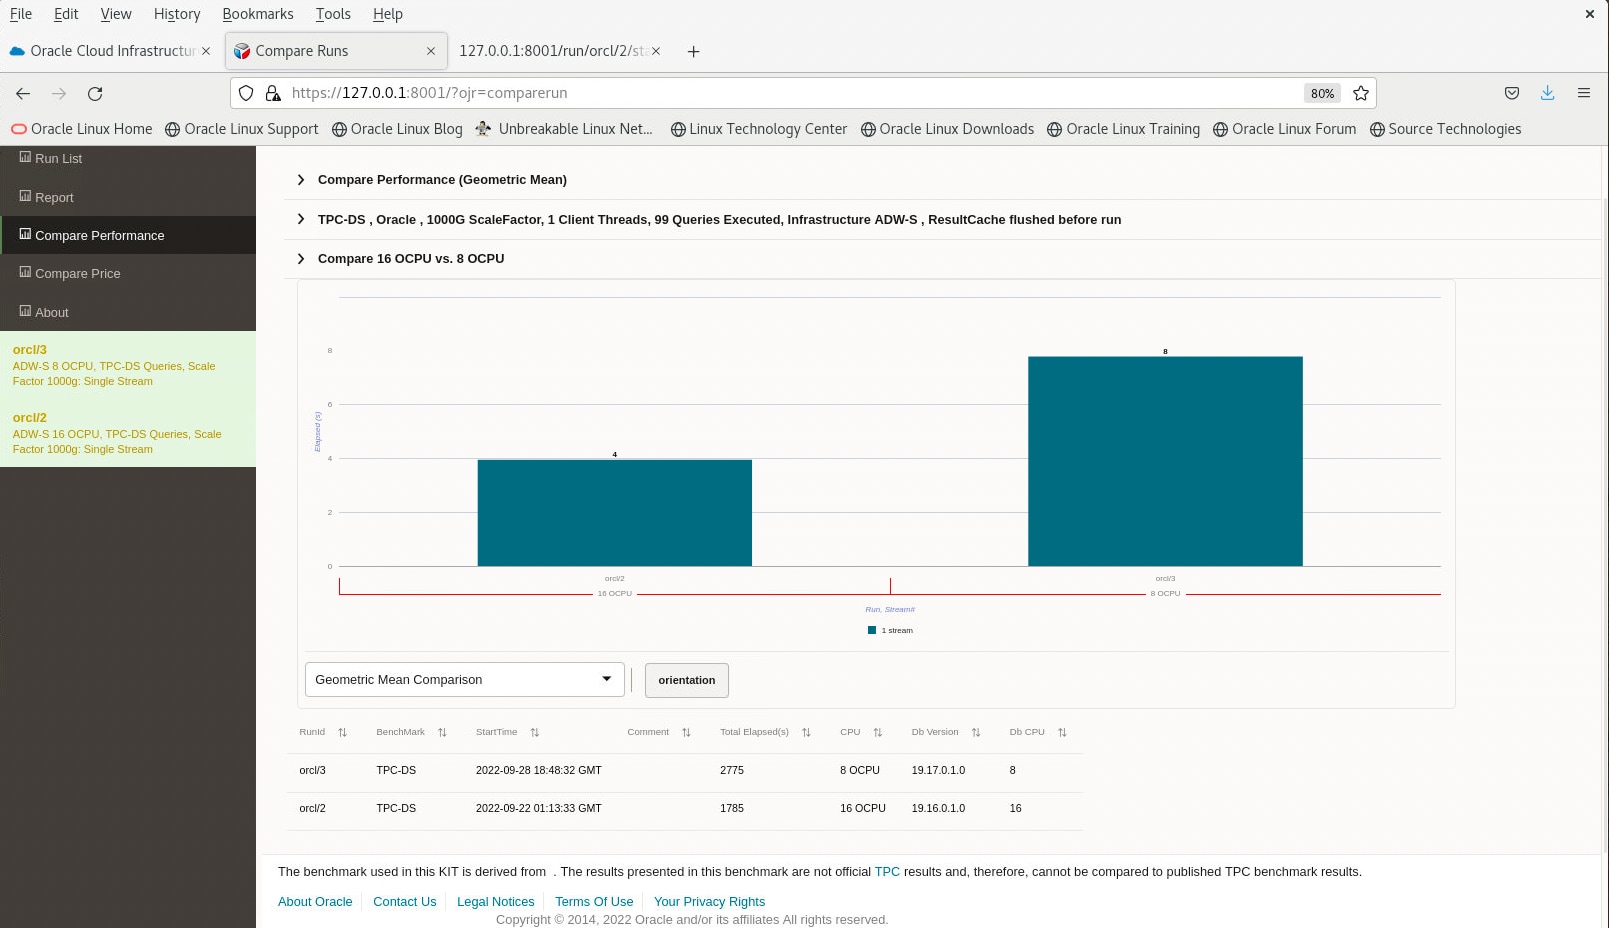
- Compare Performance: You can choose several benchmark runs with different configurations and compare their performance, based on metrics like geometric mean of the stream of queries. Select the runs you are interested in from the left-hand menu of your selected benchmark runs. All selected runs will be highlighted and shown in comparison.
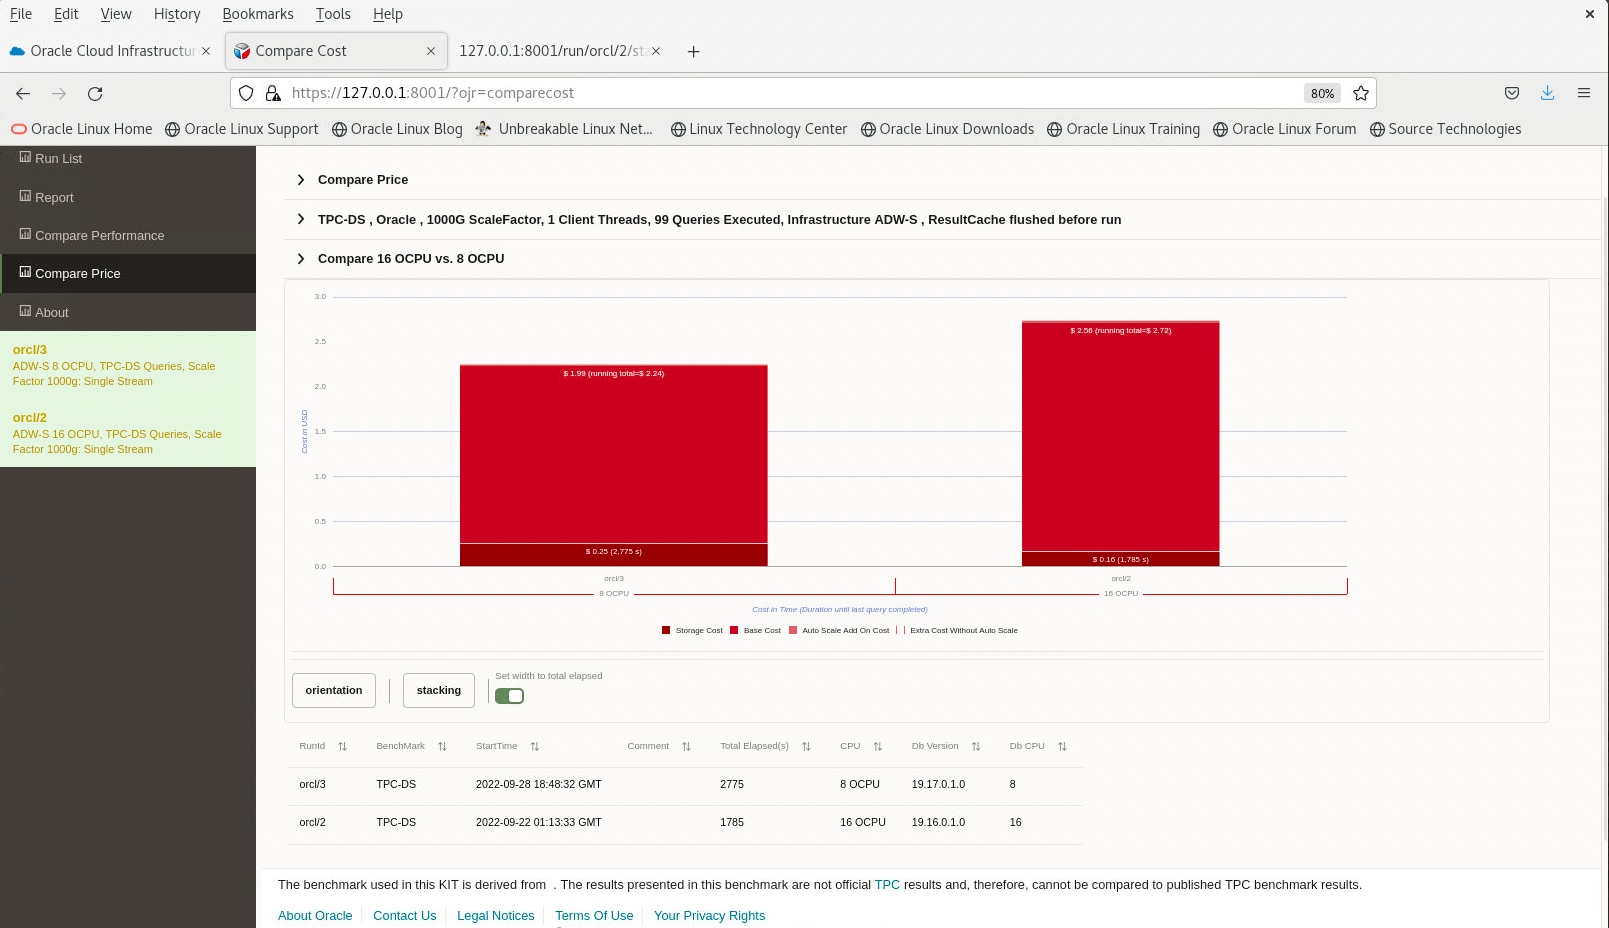
- Compare Price: You can choose several benchmark runs with different configurations and compare their calculated price by the minute. Select the runs you are interested in from the left-hand menu of your selected benchmark runs. All selected runs will be highlighted and shown in comparison.
-
Selected work (benchmark) run list.
The list of benchmark runs you have selected. You can look into details for a run or compare runs with each other. If you do not explicitly select or de-select any benchmarks on the run list, all of your runs will show in the left hand menu. -
Context-driven detail screen for chosen menu option.
You will see context-sensitive detail information for your chosen menu option. For example, the screenshot above shows the detail list of all benchmark runs you have where you can select or de-select the benchmark runs that will show up in the selected benchmark run list in the left-hand menu.
With the exception of adjusting the price for individual runs in the report section of an individual benchmark run, the whole application is read only. You cannot cause any harm or impact either your database or your benchmark results, so you are encouraged to explore the information and to provide feedback to the Oracle Autonomous Database team on stackoverflow.
The following section provides a high level introduction of the various sections.
The Reports Sections
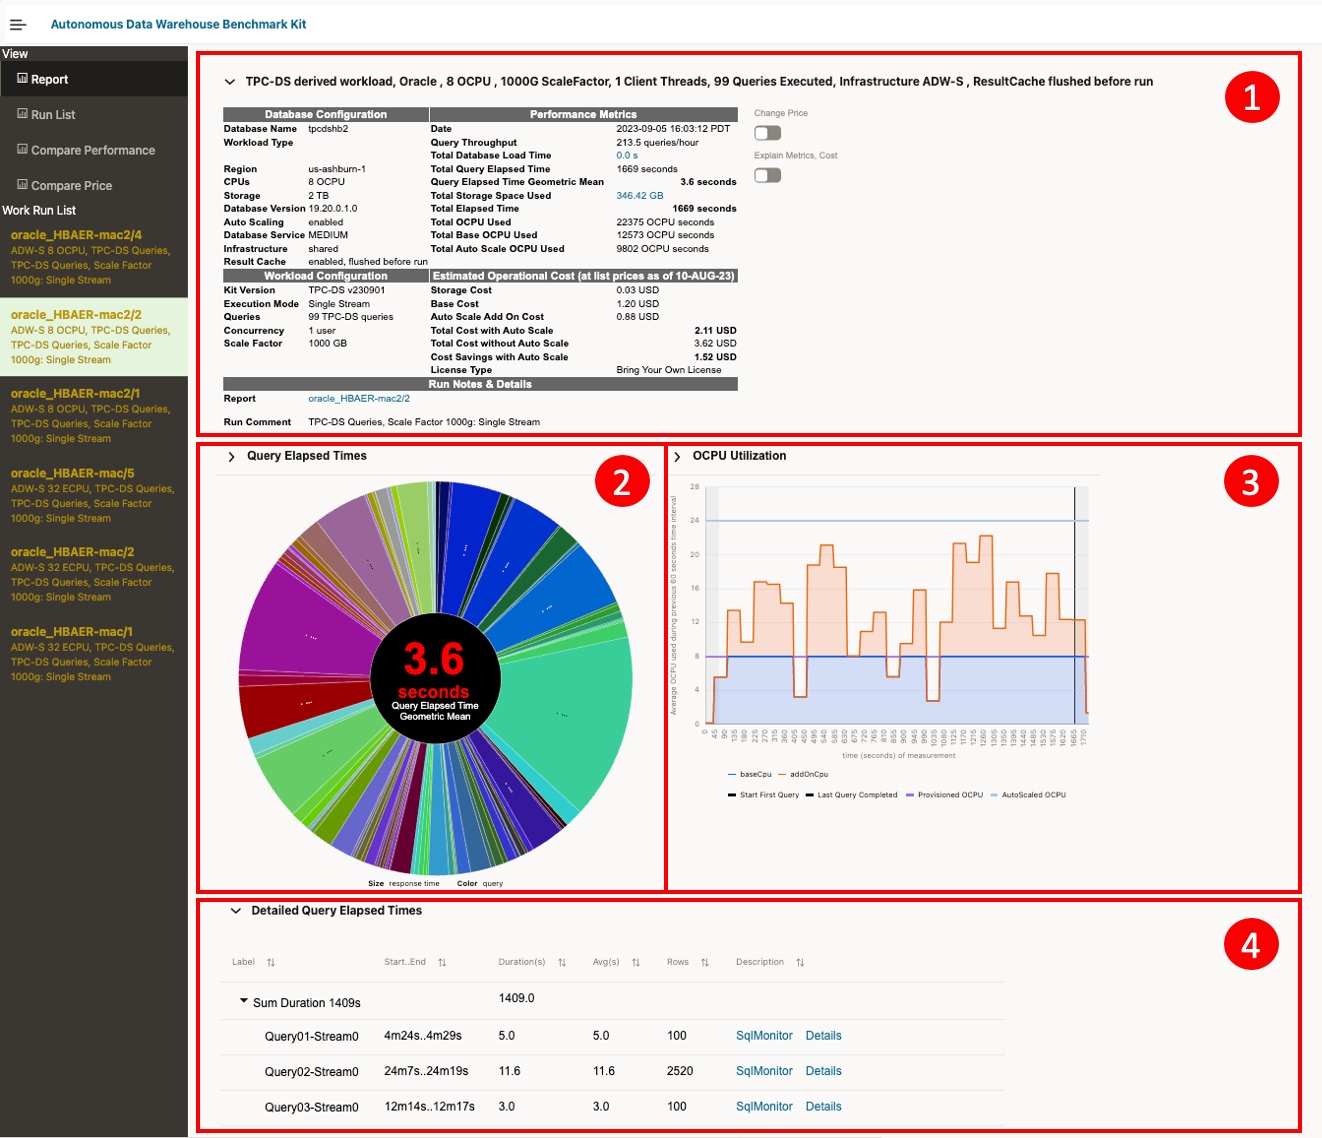
You can choose a report either from the Run list menu to drill into details in the detail screen, or just by clicking on one of your selected runs shown in the Work Run List left hand menu (in yellow). Selecting a run will show you the detailed information for a run. By default the last run of your selected work run list will be shown
The detail screen has multiple sections:
- Details about the configuration of the Autonomous Data Warehouse that was used
See the details of your Autonomous Database that was used for the benchmark run. In this section you'll also see a rough cost estimation of what it cost you to run the benchmark on your system. You have the capability to change the price base for the configuration and adjust whether your system ran with license included or BYOL.
- Pie chart representing all 99 queries and their contribution to the overall runtime,
incl.
the geometric mean of the run
See the aggregated time spent for the queries, with the capabilities to drill down into details of individual queries.
- CPU utilization of the run
See the timeline of the CPU utilization while running the 99 queries serially. You can hover over the time scale to see when individual queries were run.
-
Breakdown of the individual queries run
A tabular form of the individual queries, incl. when they were run and some additional information, such as the sql monitor plan or result set of a query.
The Run List
The run list gives you an overview of all executed benchmark runs. You can select or de-select all runs
for analysis and comparison. Selected runs will be shown in the Work Run List in the left hand side
menu.
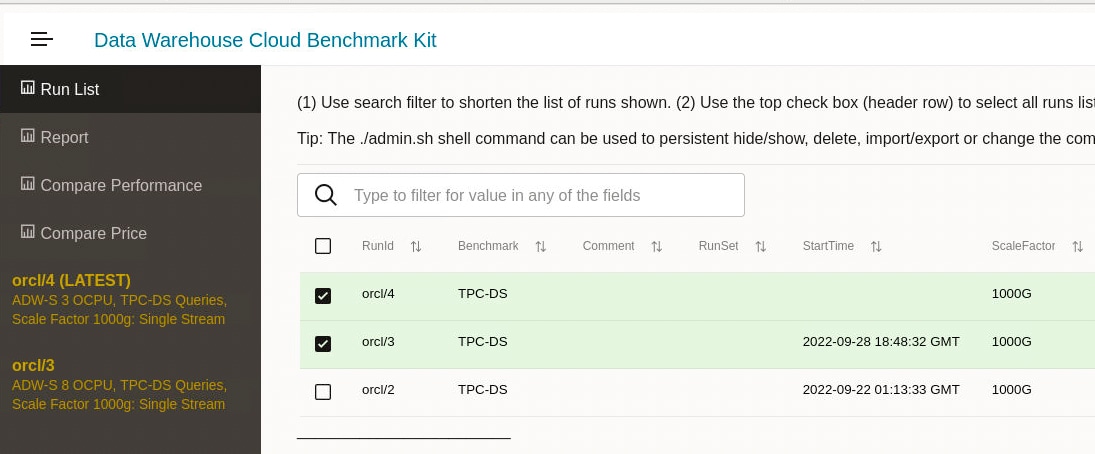
Compare prices
Select multiple runs on the left hand menu to see the comparative performance numbers of these runs, based on various criteria. The subset of your selected benchmark runs highlighted in the left hand menu is compared.
Compare performance
Select multiple runs on the left hand menu to see the comparative price numbers of these runs, based on various criteria. The subset of your selected benchmark runs highlighted in the left hand menu is compared.
Keyboard control of the Web UI
You can navigate the Web UI using your keyboard with Google Chrome Browser. The main navigation keystrokes are:
- TAB/Shift-TAB to navigate sequentially through all selectable items on a given screen. This includes menu items, individual runs in the work run list, and selectable elements in the context-driven detail screen of a menu option.
- Key arrows up/down/left/right to navigate within a block. For example, in the main menu option you use the arrow down/up to navigate between the various view selections
- RETURN will mark an individual selection. For example, in the main menu option you use RETURN to select your view selection and to change the context-driven detail screen.
- RETURN will expand or collapse sections with nested information, depending on the current status of a section. For example. in the context-driven detail screen of an individual run pressing RETURN on the selection 'Detailed Query Elapsed Times' will expand the details of the individual runs.
Administer
The Oracle Autonomous Data Warehouse Benchmark Kit provides various controls for your environment. You can:
- Run the benchmark kit
- Start, stop, or configure your ojet web server
- Administer your benchmark runs
- Change to the directory where you installed the benchmark kit.
cd /home/opc/bench_dss - Set the environment variables to administer your kit environment. It will change your working directory
to
./bin
source ./env.sh
Create a new configuration file for a different Autonomous Data Warehouse
You can create a new configuration file that will use a different Autonomous Data Warehouse. For example, you may want to run the benchmark against a new autonomous database in another region. To do so, you can create a new configuration file as follows:
- Go to the configuration file directory.
The configuration files are located in subdirectoryconfig/sut where you installed the benchmark kit, e.g.cd /home/opc/bench_dss/config/sut. - Copy an existing configuration file as your new configuration file.
The prefix of your file name will be the configName you have to specify when running a benchmark, e.g.myNewADW.config - Remove the autonomous database environment configuration parameters.
Remove the following two parameter entries from the config file. You will be prompted for the information when you use the new config file for the first time.
dss.config.wallet.dirdss.config.admin.password
Run a benchmark for a non-default setup
To run a benchmark, you simply specify the previously created name of your configuration file. The ojet web server does not have to run to execute a benchmark run.
- Start the run using a specific configuration file.
./run -n <configName>
where <configName> is the filename (without .config extension) you created manually. If you omit the filename, the kit will use the file name provided during the installation of the kit. The default names are: oracle_<hostName> .config
Start, stop, and configure the NodeJs OJET webserver
To review results, the ojet web server need to be started. This webserver (nodejs express, ojet) can be
managed with
the
'ojet_serve.sh' command in the ./bin subdirectory of your benchmark kit installation.
By default, the server is configured for local access only, disallowing remote access of the web UI. Local communication is done using http.
If remote client access of the Web UI is required, the webserver needs to be configured for remote access. Remote access requires you to set up a password for web access. Furthermore, remote access is only allowed using secure communication through https . Remote browsers will be asked for a password and the default for remote browsers before accessing any information about your benchmark runs.
Note:
The first time the server is brought up for remote access, the script will ask if key/cert file should be generated (using openssl). If you have a certificate, answer 'n' and the location of the files is asked for. If you do not have a certificate, it will be generated. If the files are generated, the files will be regarded as untrusted and the browser will give a message regarding this. In this case, accept the untrusted certificate to continue.
A full list of available commands for ojet_serve.sh is listed below:
./ojet_serve.sh -h

(re)start ojet webserver on port 8001

Usage : ./ojet_serve.sh <option>
options:
-h                                    this message
-stop                          stops the ojet webserver (process 20658 ); will not start new ; will not stop 'unknown' other ojet servers
-stopAll                       kills all ojet webserver processes
-port <p>                      start ojet on port <p> (default is 8002)
-remote                        rebuild webserver for use with remote access (not restricted to only localhost) and https protocol
Manage your runs
To manage your runs, you can use the admin.sh utility. A full list of all
available
options are listed below:
		./admin.sh -h
--------------------------------------------------------------

--------------------------------------------------------------------------------------
Manages the runs listed and preserved

Usage : ./admin.sh <option> [runId|tarball]*
 options:
  -h                        this message
  -list                       lists run(s) currently on the run list
  -hide   [runId]+            hides run(s) from the runs listed
  -show   [runId]+            shows run(s) back on the runs listed
  -export [runId]+            exports run results so it can be imported at another location
  -import [tarball]+          imports run and at to the list of runs
  -delete [runId]+            deletes selected run(s)
  -setComment [runId] <text>  replaces the comment for this run to <text> (if no text given will prompt for it)
  -setRunSet  [runId] <sets>  replaces the runSet for specified run to listed sets (comma-separated values if more than one) (if no text given will prompt for it)
  -undo                       undo the last hide/show action

Example:
            ./admin.sh -export oracle_mymac/45   oracle_mymac/46
            ./admin.sh -setComment oracle_mymac/46 need review
            ./admin.sh -setRunSet oracle_mymac/47 set1,set2

Note: hide/show/import recreate the run list and any run that is not valid (e.g. no data for it) will be removed during this process
--------------------------------------------------------------------------------------
Common Questions and Troubleshooting
Open all Close allThe following section lists a number of common questions and troubleshooting tips.
If you are still having trouble then you can use stackoverflow to post questions and to find answers or to help others answer their questions. When you post, tag your question with oracle-autonomous-db, as follows: Questions tagged [oracle-autonomous-db]
-
- Can I run the kit against any Oracle database?
No, this kit can only run against Oracle Autonomous Database Serverless at this point in time. The kit checks your environment to have enough computational resources to ensure it is not run against an environment that is not sized appropriately
- The kit cannot connect to the database. What do I do?
-
Ensure that you can connect to the database outside the kit using a standard SQL tool, e.g. sqlcl or sqlplus using the information provided in the wallet. Check whether your environment requires the connection going through a proxy, or whether the appropriate ports are open
If you are getting an invalid username/password error when the kit tries to run you need to ensure that neither the password for ADMIN nor TPCDS_1000G_TEXTC has changed.
- If you have changed the password of TPCDS_1000G_TEXTC, you need to drop the schema TPCDS_1000G_TEXTC
- If you have changed the ADMIN password, you need to delete the encrypted configuration entry of ADMIN in the directory where you installed the kit, e.g.
cd /home/opc/bench_dss/config/sut/myrun.config.The kit will ask you for the ADMIN password then again the next time the kit is run.
-
- I aborted a run and cannot start any run again. What do I do?
-
If you run the kit against an autonomous database it will first check whether a schema named TPCDS_1000G_TEXTC is existent in your environment. If the schema is existent, the kit will check whether the schema has the proper objects and row counts installed.
- If the schema is not installed completely, you need to drop the schema TPCDS_1000G_TEXTC
If you run a kit for the first time, the kit asks you for information about your environment, such as which database to run against and the ADMIN password. If you have changed any of these parameters, you need to delete the configuration file of your environment in the directory where you installed the kit, e.g.
rm /home/opc/bench_dss/config/sut/myrun.config
-