How-To Configure and Use Oracle Real Application Clusters (RAC) with Oracle WebLogic Server 10.3
Introduction
This demo shows how to configure Oracle WebLogic Server to work with Oracle Real Application Clusters (RAC) as well as how to test the connections to the backend Oracle RAC nodes using a web application.
Oracle WebLogic Server 10.3 integrates Oracle Real Application Clusters (RAC) features in Oracle Database 11g, minimizing database access time while allowing transparent access to rich pooling management functions that maximize both connection performance and availability.
There are multiple configuration options for Oracle RAC features within Oracle WebLogic Server. Oracle recommends using Oracle WebLogic Server JDBC multi data sources. This applies to scenarios with or without global transactions. Also you could configure Oracle WebLogic Server to use Oracle JDBC THIN driver’s connect-time failover as well as Fast Connection Failover from Oracle JDBC driver’s Implicit Connection Cache.
In this demo, we will configure and use Oracle WebLogic Server JDBC multi data sources for failover and load balancing.
What are the Prerequisites?
What you should know?
- You should be familiar with these technologies: DataSource and Servlets
- Oracle Real Application Clusters (RAC) 11g (PDF)
- Oracle WebLogic Server and RAC White Paper(PDF)
What are the Software Requirements?
How to Configure a Database Service, Test the Services and Create the Required Data Sources
Defining a Database Service
- Log into Oracle Enterprise Manager Database Control as SYS
- Click on the link " Availability" at the top of the page
- Click on the link " Cluster Managed Database Services"
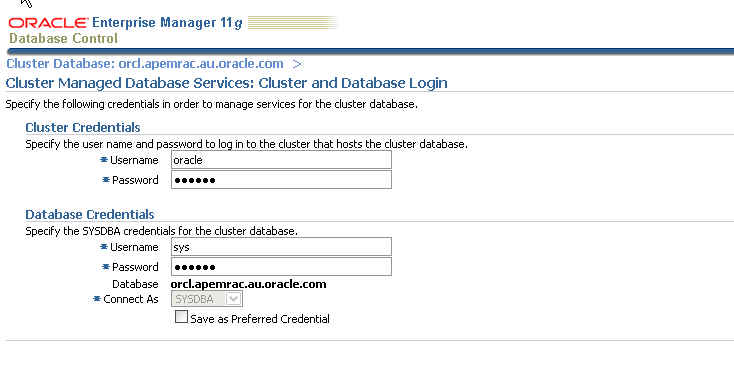
- Supply the cluster credentials as well as the database credentials as shown below.
- Press the " Continue" button.
- Press the button " Create Service".
- Define a service as shown in the diagram below, the settings selected are as follows.
- Press the " Ok" button to create the service
| Service Name |
MYHASERVICE |
| Enable Load Balancing Advisory |
SELECTED |
| Throughput Radio Option |
SELECTED |
| Connection Load Balancing Goal |
LONG |


Testing the Service from SQL*Plus
- With the service created we can verify that it exists by running "lsnrctl status" or "lsnrctl services"
- Now lets connect using SQL*Plus to verify we can connect to the service.
- We could use a UNIX shell script to connect to SQL*Plus and check that different instances are used. This will verify load balancing is working and our RAC database setup is correct. Create a file called " test.sh" as following.
- Now our test.sql shows various environment details and then exits, you will notice SQLPlus is started in silent mode to make the output more readable. Create a file called " test.sql" as follows
- Run and verify correct output.
- Log in Weblogic Administration Console
- Under the " Domain Structure" tree and expand the " Services" node
- Expand the " JDBC" node and click on " Data Sources".
- Click on the " New" button
- Enter in details as shown in the screen below.
- Press " Next"
- Press " Next" again.
- Enter in one of your database node details and the username/password for the database and click " Next"
- Enter in an URL as following example.
- Click " Test Configuration" to ensure you can connect successfully as shown below
- Target the data source to the managed server " lemon"
- Click Finish
- Click on the new created data source
- Click on the tab " Connection Pool"
- Expand the " Advanced" node at the bottom of the page to display all properties and set the following
- Set the following property driver property
- Press the "Save" button. The datasource in your domains config/jdbc directory will be as follows
- Log in Weblogic Administration Console http://<host>:<port>/console
- Under the " Domain Structure" tree and expand the " Services" node
- Expand the " JDBC" node and click on " Multi Data Sources".
- Click on the " New" button
- Enter details as shown below.
- Click " Next"
- Target the multi data source to the managed server " lemon" and click " Next"
- Select the radio option for option for " Non XA Driver" and click " Next"
- Shuttle across the previously created data sources as shown.
- Click " Next"
- Click Finish
- Click on the newly created multi data source
- Set " Test Frequency Seconds:" to " 5" seconds
- Press the Save button
- Download the file below onto your file system haweb.zip
- Extract the file so you end up with " haweb.war" file.
- Deploy that file to your managed server in our case that's " lemon".
- Once deployed verify you have the application up and running as shown below in the main " Deployments" page.
- Invoke the application as shown below
- Set the following and press the " Test Data Source" button
- sqlplus / as sysdba
- shutdown immediate;
…$ sqlplus juser/juser@HASERVICE

 SQL*Plus: Release 11.1.0.6.0 - Production on Tue Nov 18 14:29:46 2008

 Copyright (c) 1982, 2007, Oracle. All rights reserved.

 Connected to:

 Oracle Database 11g Enterprise Edition Release 11.1.0.6.0 - Production

 With the Partitioning, Real Application Clusters, OLAP, Data Mining

 and Real Application Testing options


 SQL>
The $ORACLE_HOME/network/admin/tnsnames.ora entry is defined as follows for the connect string " HASERVICE".
HASERVICE =

  (DESCRIPTION =

 (ADDRESS = (PROTOCOL = TCP)(HOST = apemrac1-vip)(PORT = 1521))

 (ADDRESS = (PROTOCOL = TCP)(HOST = apemrac2-vip)(PORT = 1521))

 (LOAD_BALANCE = yes)

 (CONNECT_DATA =

 (SERVER = DEDICATED)

 (SERVICE_NAME = MYHASERVICE.apemrac.au.oracle.com)

 )

 )
Note: Linux example
#!/bin/sh

 count=0

 while [ $count -lt 5 ]  # Set up a loop control

 do  # Begin the loop

 count=`expr $count + 1`  # Increment the counter

 sqlplus -s juser/juser@HASERVICE @test.sql

 done
col "Instance" format a20

 col "Host" format a20

 col "Service Name" format a20

 select sys_context('userenv', 'instance_name') "Instance",

  sys_context('userenv', 'server_host') "Host",

  sys_context('userenv', 'service_name') "Service Name"

 from dual

 exit;
Creating the required Data Sources
Multi data sources are used for Oracle RAC. The multi data source is a composite of individual data source, each of which is configured for one instance of the RAC back end. The application program discovers the RAC back end using the JNDI name of the Multi Pool data source.
Create Data Source #1 for first Node
Here let’s connect to the first instance in our RAC node that will be " orcl1" with an URL as following example.
jdbc:oracle:thin:@(DESCRIPTION = (ADDRESS =
(PROTOCOL = TCP)(HOST = apemrac1-vip)(PORT = 1521))
  (CONNECT_DATA = (SERVER = DEDICATED) (SERVICE_NAME =
  MYHASERVICE.apemrac.au.oracle.com)
          (INSTANCE_NAME = orcl1)))
http://<host>:<port>/console

jdbc:oracle:thin:@(DESCRIPTION = (ADDRESS =
(PROTOCOL = TCP)(HOST = apemrac1-vip)(PORT = 1521))

 (CONNECT_DATA = (SERVER = DEDICATED)
 (SERVICE_NAME = orcl.apemrac.au.oracle.com)

 (INSTANCE_NAME = orcl1)))


Now lets alter some of our pool settings, required for RAC integration
| Initial Capacity: | 0 |
| Test Connections On Reserve | CHECKED |
| Test Frequency: | 300 |
| Connection Creation Retry Frequency: | 30 |
| Seconds to Trust an Idle Pool Connection: | 10 |
oracle.net.CONNECT_TIMEOUT=10000
<?xml version='1.0' encoding='UTF-8'?>
 <jdbc-data-source xmlns="http://www.bea.com/ns/weblogic/jdbc-data-source"
 xmlns:sec="http://www.bea.com/ns/weblogic/90/security"
 xmlns:wls="http://www.bea.com/ns/weblogic/90/security/wls"
 xmlns:xsi="http://www.w3.org/2001/XMLSchema-instance"
 xsi:schemaLocation="http://www.bea.com/ns/weblogic/jdbc-data-source
 http://www.bea.com/ns/weblogic/jdbc-data-source/1.0/jdbc-data-source.xsd">
 <name>Node1DS</name>
 <jdbc-driver-params>
 <url>jdbc:oracle:thin:@(DESCRIPTION = (ADDRESS = (PROTOCOL = TCP)(HOST =
 apemrac1-vip)(PORT = 1521)) (CONNECT_DATA = (SERVER = DEDICATED) (SERVICE_NAME =
 MYHASERVICE.apemrac.au.oracle.com) (INSTANCE_NAME = orcl1)))</url>
  <driver-name>oracle.jdbc.OracleDriver</driver-name>
  <properties>
  <property>
  <name>user</name>
  <value>juser</value>
  </property>
  <property>
 <name>oracle.net.CONNECT_TIMEOUT</name>
 <value>10000</value>
 </property>
  </properties>
  <password-encrypted>{3DES}LXJ84DPGhe8=</password-encrypted>
  </jdbc-driver-params>
  <jdbc-connection-pool-params>
   <initial-capacity>0</initial-capacity>
  <max-capacity>15</max-capacity>
  <capacity-increment>1</capacity-increment>
  <shrink-frequency-seconds>900</shrink-frequency-seconds>
  <highest-num-waiters>2147483647</highest-num-waiters>
   <connection-creation-retry-frequency-seconds>10
	 </connection-creation-retry-frequency-seconds>
  <connection-reserve-timeout-seconds>10
</connection-reserve-timeout-seconds>
   <test-frequency-seconds>300</test-frequency-seconds>
 <test-connections-on-reserve>true</test-connections-on-reserve>
  <ignore-in-use-connections-enabled>true</ignore-in-use-connections-enabled>
  <inactive-connection-timeout-seconds>0</inactive-connection-timeout-seconds>
  <test-table-name>SQL SELECT 1 FROM DUAL</test-table-name>
  <login-delay-seconds>0</login-delay-seconds>
  <statement-cache-size>10</statement-cache-size>
  <statement-cache-type>LRU</statement-cache-type>
  <remove-infected-connections>true</remove-infected-connections>
   <seconds-to-trust-an-idle-pool-connection>0
	</seconds-to-trust-an-idle-pool-connection>
  <statement-timeout>-1</statement-timeout>
  <pinned-to-thread>false</pinned-to-thread>
  </jdbc-connection-pool-params>
  <jdbc-data-source-params>
  <jndi-name>jdbc/Node1DS</jndi-name>
  <global-transactions-protocol>
 OnePhaseCommit</global-transactions-protocol>
  </jdbc-data-source-params>
</jdbc-data-source>
Create data Source #2 for second Node Repeat the steps above but this time select the second node in the RAC cluster. This data source will be called " Node2DS" and once again be targeted to the managed server "lemon"
jdbc:oracle:thin:@(DESCRIPTION = (ADDRESS =
(PROTOCOL = TCP)(HOST = apemrac2-vip)(PORT = 1521))

 (CONNECT_DATA = (SERVER = DEDICATED)
 (SERVICE_NAME = orcl.apemrac.au.oracle.com)

 (INSTANCE_NAME = orcl2)))
Create the Multi Data Source
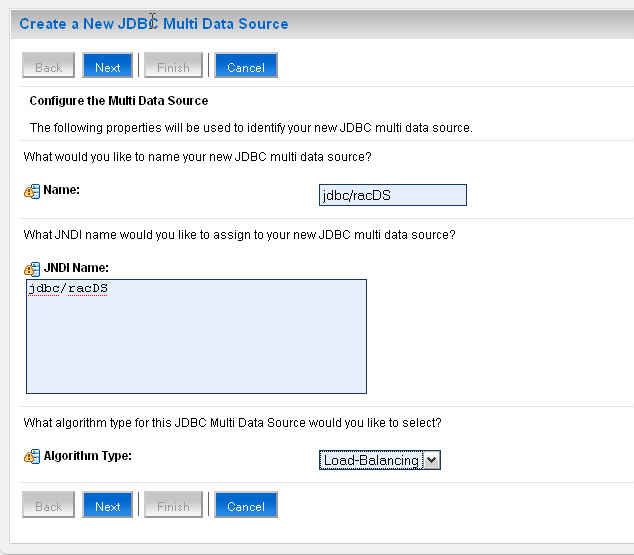

Your multi data source will be defined as follows in your domain's config/jdbc directory.
<?xml version='1.0' encoding='UTF-8'?>
 <jdbc-data-source xmlns="http://www.bea.com/ns/weblogic/jdbc-data-source"
 xmlns:sec="http://www.bea.com/ns/weblogic/90/security"
 xmlns:wls="http://www.bea.com/ns/weblogic/90/security/wls"
 xmlns:xsi="http://www.w3.org/2001/XMLSchema-instance"
 xsi:schemaLocation="http://www.bea.com/ns/weblogic/jdbc-data-source
 http://www.bea.com/ns/weblogic/jdbc-data-source/1.0/jdbc-data-source.xsd">
 <name>jdbc/racDS</name>
 <jdbc-connection-pool-params>
   <test-frequency-seconds>5</test-frequency-seconds>
 </jdbc-connection-pool-params>
 <jdbc-data-source-params>
   <jndi-name>jdbc/racDS</jndi-name>
 <algorithm-type>Load-Balancing</algorithm-type>
 <data-source-list>Node1DS,Node2DS</data-source-list>
 <failover-request-if-busy>false</failover-request-if-busy>
 </jdbc-data-source-params>
 </jdbc-data-source>
So our domain's config/jdbc directory will look as follows once this is complete, with our newly created data sources and multi data source as follows
[…/bea103/user_projects/domains/hadomain/config/jdbc]$ d
 total 56
 -rw-r--r-- 1 oracle oinstall 135 Nov 26 09:40 readme.txt
 drwxr-xr-x 11 oracle oinstall 4096 Nov 27 12:31 ../
 -rw-r--r-- 1 oracle oinstall 2259 Dec 3 07:48 jdbc2fscottDS-8614-jdbc.xml
 drwxr-xr-x 2 oracle oinstall 4096 Dec 4 11:14 ./
 -rw-r--r-- 1 oracle oinstall 857 Dec 4 11:15 jdbc2fracDS-4177-jdbc.xml
 -rw-r--r-- 1 oracle oinstall 2508 Dec 4 12:23 Node1DS-0882-jdbc.xml
 -rw-r--r-- 1 oracle oinstall 2508 Dec 4 12:27 Node2DS-9921-jdbc.xml
How to Test the Configuration
In order to test our configuration we will deploy a simple WAR file to our web logic server.

http://<server>:<port>/haweb/

This is the main web page which allows you to specify the data source location, how many connections to retrieve and the sleep time between connection request gets. For the first test we will just ensure that we are load balancing between our RAC nodes.
| Data Source Location | jdbc/racDS |
| Connections to Retrieve | 5 |
| Sleep Time between Connection Gets | 2 Seconds |
Verify you are able to connect to the 2 RAC nodes of the RAC cluster as shown below.
RAC Integration with Oracle WebLogic Server 10.3
| Managed Server Name | lemon |
| Data Source Location | jdbc/racDS |
| Number of Connections to Retrieve | 5 |
| Sleep Time Between Queries in seconds | 2 seconds |
Test number #1
| Instance | Server Host | Service Name |
| orcl2 | apemrac2 | orcl.apemrac.au.oracle.com |
Sleeping for 2 second(s)
Test number #2
| Instance | Server Host | Service Name |
| orcl1 | apemrac1 | orcl.apemrac.au.oracle.com |
Sleeping for 2 second(s)
Test number #3
| Instance | Server Host | Service Name |
| orcl2 | apemrac2 | orcl.apemrac.au.oracle.com |
Sleeping for 2 second(s)
Test number #4
| Instance | Server Host | Service Name |
| orcl1 | apemrac1 | orcl.apemrac.au.oracle.com |
Sleeping for 2 second(s)
Test number #5
| Instance | Server Host | Service Name |
| orcl2 | apemrac2 | orcl.apemrac.au.oracle.com |
Sleeping for 2 second(s)
All done...
7. Now in our next test run we will obtain 10 connections and actually sleep 30 seconds between the connection requests and while it's running we will then shutdown one of the RAC nodes in an ungraceful manner and verify if our application continues to run and connections are taken from the surviving RAC node in the cluster. Return to the main web page as follows
http://<server>:<port>/haweb/
8. Open up a session to the database RAC node you wish to shutdown ungracefully. The easiest way to do this is to use "shutdown abort" on one of the RAC nodes as "shutdown abort" is an example of an ungraceful instance shutdown. At this point simply connect to the database instance as we won't shut it down until we start the test run.

9. Now lets run our test page but this time we will make 10 connection gets and sleep 20 seconds between connection gets as shown below.
| Data Source Location | jdbc/racDS |
| Connections to Retrieve | 10 |
| Sleep Time between Connection Gets | 20 Seconds |
10. Press the "Test Data Source" button on the web page
Note: This will begin the web test, we will return to this window shortly.
11. Now return to your database session window and issue this command "shutdown abort" as shown below.

RAC Integration with Oracle WebLogic Server 10.3
| Managed Server Name | lemon |
| Data Source Location | jdbc/racDS |
| Number of Connections to Retrieve | 10 |
| Sleep Time Between Queries in seconds | 20 seconds |
Test number #1
| Instance | Server Host | Service Name |
| orcl2 | apemrac2 | orcl.apemrac.au.oracle.com |
Sleeping for 20 second(s)
Test number #2
| Instance | Server Host | Service Name |
| orcl1 | apemrac1 | orcl.apemrac.au.oracle.com |
ORCL1 aborted via "shutdown abort" at this part of the TEST
Sleeping for 20 second(s)
Test number #3
| Instance | Server Host | Service Name |
| orcl2 | apemrac2 | orcl.apemrac.au.oracle.com |
Sleeping for 20 second(s)
Test number #4
| Instance | Server Host | Service Name |
| orcl2 | apemrac2 | orcl.apemrac.au.oracle.com |
Sleeping for 20 second(s)
Test number #5
| Instance | Server Host | Service Name |
| orcl2 | apemrac2 | orcl.apemrac.au.oracle.com |
Sleeping for 20 second(s)
Test number #6
| Instance | Server Host | Service Name |
| orcl2 | apemrac2 | orcl.apemrac.au.oracle.com |
Sleeping for 20 second(s)
Test number #7
| Instance | Server Host | Service Name |
| orcl2 | apemrac2 | orcl.apemrac.au.oracle.com |
Sleeping for 20 second(s)
Test number #8
| Instance | Server Host | Service Name |
| orcl2 | apemrac2 | orcl.apemrac.au.oracle.com |
Sleeping for 20 second(s)
Test number #9
| Instance | Server Host | Service Name |
| orcl2 | apemrac2 | orcl.apemrac.au.oracle.com |
Sleeping for 20 second(s)
Test number #10
| Instance | Server Host | Service Name |
| orcl2 | apemrac2 | orcl.apemrac.au.oracle.com |
Sleeping for 20 second(s)
All done...
13. Now lets start the database instance once again as shown below.

RAC Integration with Oracle WebLogic Server 10.3
| Managed Server Name | lemon |
| Data Source Location | jdbc/racDS |
| Number of Connections to Retrieve | 4 |
| Sleep Time Between Queries in seconds | 2 seconds |
Test number #1
| Instance | Server Host | Service Name |
| orcl2 | apemrac2 | orcl.apemrac.au.oracle.com |
Sleeping for 2 second(s)
Test number #2
| Instance | Server Host | Service Name |
| orcl1 | apemrac1 | orcl.apemrac.au.oracle.com |
Sleeping for 2 second(s)
Test number #3
| Instance | Server Host | Service Name |
| orcl2 | apemrac2 | orcl.apemrac.au.oracle.com |
Sleeping for 2 second(s)
Test number #4
| Instance | Server Host | Service Name |
| orcl1 | apemrac1 | orcl.apemrac.au.oracle.com |
Sleeping for 2 second(s)
All done...
Troubleshooting
Q. I found that the "Web Test program" simply uses only one database node for all connection requests.
A. Ensure all database instances are up and running in the cluster, each instance has it's own listener running and your service is up and running on each nodes as "preferred" for the "Service Policy". Also make sure that the SQL*Plus test client is load balancing between the nodes before moving onto the middle tier.
Q. Do I need to go to the database server to test from SQL*Plus, is there another way to test this locally on my PC or the middle tier server perhaps?
A. You can install instant client on any of the supported platforms and test using that if you don't have access to the RAC nodes themselves. Ensure you download the instant client which matches your database server version for best results.
https://www.oracle.com/database/technologies/instant-client/downloads.html
Q. What are examples of a graceful shutdown of a RAC instance to test if that works correctly.
A. A graceful shutdown of a RAC instance can be performed as follows, using either of these 2 options for example.
Option 1
Option 2
1. srvctl stop instance -d R2D1 -i R2D11
Q. Can I get the source code for haweb.war?
A. You can download the JDeveloper 11g BOXER workspace from here -> WLS103JDBCDemos.zip
Q. Where can I get more information on RAC and Weblogic 10.3?
A. The documentation can be found here.