Making the Most of Oracle SQL Developer Reports
Make the best use of the reporting capabilities in Oracle's free database development tool.
by Lewis R. Cunningham Oracle ACE
Published July 2006
Oracle SQL Developer (formerly Project Raptor) is Oracle’s new multiplatform graphical user interface (GUI) for developers and DBAs. Like Oracle Database 10g Express Edition (XE) and Oracle JDeveloper, Oracle SQL Developer can be downloaded completely free. Oracle SQL Developer runs on the Windows, Macintosh, and Linux platforms.
Oracle SQL Developer offers many powerful features for developers, including graphical dialog boxes for database object manipulation, SQL worksheets, a PL/SQL editor, and a reporting facility. It’s based on the Oracle JDeveloper Java IDE and has an intuitive tree-based navigation structure.
The report facility allows reports to be created in two ways: You can choose from a large set of predefined standard data dictionary reports or create a user-defined report. Oracle SQL Developer reports also support bind variables and drill-down reporting.
Installing, configuring, and creating a connection to your database is beyond the scope of this article. For details on these topics, see the Oracle SQL Developer home page on OTN.
Download
To get to the reports, first launch Oracle SQL Developer for your platform. Connect to a database, and click the Reports tab. Click the plus sign ( + ) next to the Reports symbol and then the plus sign next to Data Dictionary Reports. Ignore the User Defined Reports item for now.
Tree-view navigation works here on the concept of folders and files. For example, the Data Dictionary Reports directory is a subfolder of the Reports folder, or in navigation syntax, Reports->Data Dictionary Reports.
Click on the plus sign next to any of the subfolders in the Data Dictionary folder.

Oracle-Supplied Reports
( Note: When you select a report to run, you may see the Select Connection dialog box. Choose your connection, and click OK. )

The Data Dictionary Reports folder lists the Oracle-supplied set of predefined reports. We’ll start by reviewing some of these standard reports. The reports I list below are ones I find useful in my job. Browse through all of them to see which might be useful to you.
The All Parameters report—Reports->Data Dictionary Reports->Database Administration->Database Parameters->All Parameters—lists all of the database initialization parameters.
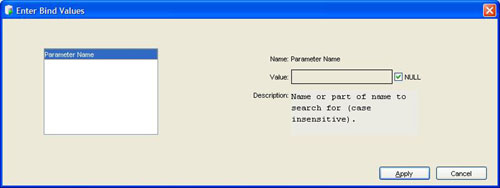
When you click a report, it automatically runs. Some reports have an Enter Bind Values dialog box that allows you to restrict your query to certain parameters. I’ll discuss bind variables in detail below. To run the report, select Apply.

Select the Free Space report—Reports->Data Dictionary Reports->Database Administration->Storage->Free Space—to see the available space in each tablespace.

The active sessions report—Reports->Data Dictionary Reports->Database Administration->Sessions->Active Sessions—shows all active sessions in the database. Use this report to see who is logged in and get details about their sessions.
I find all the reports under the Top SQL node—Reports->Data Dictionary Reports->Database Administration->Top SQL->*—to be valuable. I like to keep a general idea of what is going on in the system, and seeing the Top SQL by CPU or IO is a nice way to do so.
The User Tables report—Reports->Data Dictionary Reports->Table->User Tables—is a good one when I can’t remember an exact table or column name.
I find the Quality Assurance reports—Reports->Data Dictionary Reports->Table->Quality Assurance->*—to be valuable in development. I tend to code a lot of my DDL by hand, and it’s possible to miss an index or a key.
The PL/SQL search report—Reports->Data Dictionary Reports->PL/SQL Search Source Code—is a great time-saver. You can search by object name or source text string.
Let’s take a look at the SQL code behind this report. Run the report as you would any other. On the Reports pane, above the report data, there are three buttons: a red push pin, a green triangle, and the text SQL inside a square. The latter copies the SQL from the report and puts it into a SQL worksheet. Click the SQL button.
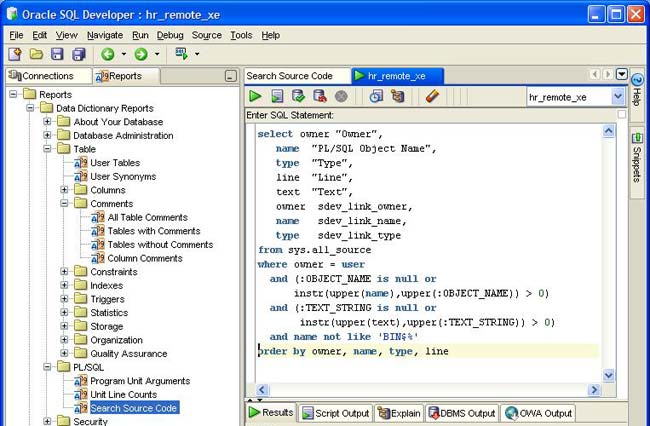
Viewing the supplied SQL is a good way to learn some SQL tricks. Some of these tricks will help you create your own user-defined reports.
Drill-Down Reports
An important feature of reports in Oracle SQL Developer is the drill-down capability. This is one of my favorite features of Oracle SQL Developer. I’ll show you how to code your own drill-down reports later in this article.
Open the Reports->Data Dictionary Reports->Table->User Tables report, which lists all of the tables in your schema. After the report has run, double-click any row in the result-set grid.
This opens a new tab containing the table description. If you’re following along, you should now see the column definitions of that table. In the data pane, you’ll have two tabs, one for the report you ran and another for the drill-down object. Open another report, and try double-clicking a row.
Drill-down works for all reports that have a corresponding node on the navigator (under the Connections tab). If you tried to double-click the All Parameters report, nothing would happen, because there is no Parameter node under Connections.
Because the drill-down functionality is limited to items on the Navigator node, it is somewhat limited for your own reports. When the Oracle developers who are writing Oracle SQL Developer add the ability to drill down to anything (that is, substitute a drill-down query), this will be a truly useful function.
Until then, it is useful for any dictionary reports you happen to write. If you want to add drill-down to a report you’re writing, it’s as easy as adding three columns to your query. I give several examples of this below.

In the figure, sdev_link_owner is the OBJECT_OWNER, sdev_link_name is the OBJECT_NAME, and sdev_link_type is the OBJECT_TYPE.
Add those three items, with the same aliases, and Oracle SQL Developer will automatically drill down on a double-click. Remember, only items that have a node in the navigator pane can drill down at this point.
Simple User Reports
Note: I use the SYSTEM and the HR accounts in an Oracle Database XE installation for most of the examples below. If you have an Oracle Database XE database, it will be easier to follow along. If you do not have an Oracle Database XE database, you can still follow along, but you may have to choose different tables in some cases. You can download Oracle Database XE (for free) from OTN.
Now you’ll create a simple report to get your feet wet. Log in as HR@XE. Click the last node in the navigator, User Defined Reports. Right-click the expanded node, and you’ll see a context menu with a list of options: Add Folder, Add Report, Delete, Copy, Cut, and Paste.
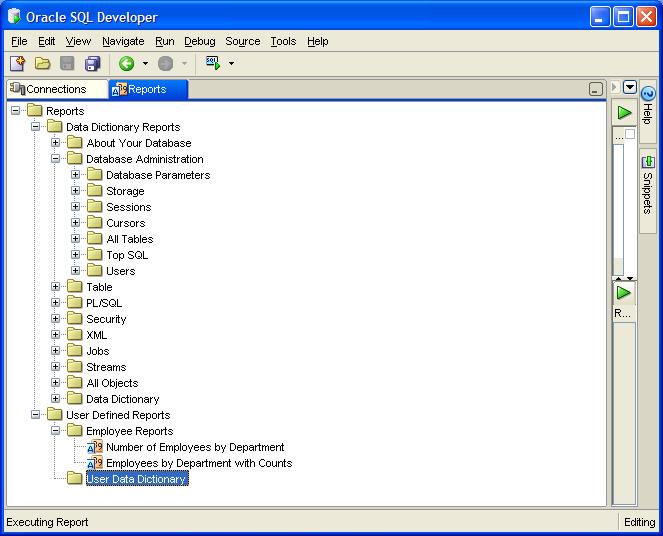
Oracle SQL Developer maintains a tree structure for navigation; I suggest that you do the same as a best practice. Use folders to logically group your reports. You may choose to group them by application, which is what I do with my reports under the Employee Reports and the User Data Dictionary applications shown in Figure 12 below. You might want to group your reports by some other criterion besides application name, but I would recommend against dumping everything under User Defined Reports.
Select Add Folder to create a new folder. For now, let’s call this folder Employee Reports. Enter anything you would like as a description. The ToolTip text will be displayed if you hover your mouse over that item in the navigator. Click Apply to save.
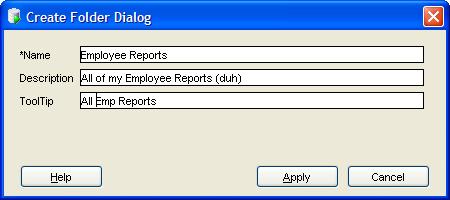
Right-click on Employee Reports. We now have the same context menu but with Edit as an additional item. Choose Edit. Make any changes you would like, and click Apply to save.
Right-click again, and select Add Report. Name your Report “Number of Employees by Department.” Enter whatever text you like for Description and ToolTip. Use the query below as the report SQL:
Select department_id, count(*)
  From Employees
  Group By department_id

Click Apply to save.
Click the plus sign next to the Employee Reports node, and then click on your new report. You may get the Select Connection dialog box. If so, choose the HR connection and click OK.
You are now the proud owner of your very first user-defined report. Although it’s useful, it would be more useful still if it listed the department names instead of the department IDs. To add these, first right-click on the report. You’ll notice that the report has several items on the context menu: Open, Open New Window, Edit, and Show Properties. Choose Edit.
Change your query so it will include the department name from Departments:
Select d.department_name, count(*)
  From Employees e
  Join Departments d On (e.department_id = d.department_id)
  Group By d.department_name
Click Apply to save and rerun your report.
Let’s make this report a little more interesting. Right-click on the report, and select Copy. If you right-click again, you’ll see that Paste is not an option. Right-click the Employee Reports node. Now you can paste your report. Right-click the new report (the one with the number in parentheses at the end), and choose Edit. Change your query to the test below:
Select e.Last_Name, e.First_name, d.department_name,
       count(*) over (partition by d.department_name) dept_count,
       count(*) over ()
  From Employees e
  Join Departments d On (e.department_id = d.department_id)

Run your report. Now this is useful. You have an employee, a department name, the number of employees in that department, and the number of employees in all departments.
A key to creating useful reports is the ability to create dynamic reports. If you use bind variables, a report will be able to dynamically change for each run. Oracle SQL Developer prior to 1.0 did not directly support user-defined reports with bind variables, although you could add bind variables in a workaround by modifying the file called UserReports.xml, which resides in the SQL Developer User Information Directory. Version 1.0 makes it simple to create reports with bind variables.
Now you make one final change to your report. You’re adding a bind variable that will allow users to either enter a department name or a partial name to select a specific department, or leave it null to select all departments. Modify your SQL as follows:
Select e.Last_Name, e.First_name, d.department_name,
       count(*) over (partition by d.department_name) dept_count,
       count(*) over ()
  From Employees e
  Join Departments d On (e.department_id = d.department_id)
  Where (:dept_name is null
         or d.department_name = :dept_name)

Run this report, and see your bind variable screen. Try entering some values.
And now let’s apply report making to skills and create a report that will be useful to all developers and DBAs.
Complex Reports
Because this is a new report category, let’s create a new folder under the User Defined Reports node. This folder will contain your own set of Data Dictionary reports, so let’s call it User Data Dictionary.
Your new report will list all the objects in the recycle bin and the amount of space they consume. This report is particularly handy in Oracle Database XE, where you are limited to 4GB of disk space for your objects.
The user running this report needs to have access to the SYS.DBA_OBJECTS, SYS.DBA_SEGMENTS, and SYS.DBA_RECYCLEBIN database objects. I normally run this as a SYSDBA user.
Create a new user-defined report, and call it Recycled Objects. Use anything you’d like for Description and ToolTip. Use this query:
select ao.owner,
      ao.object_type,
      ar.original_name,
      ao.object_name recycled_name,
      ar.droptime,
      ds.bytes/1024/1024 "Megabytes",
      ao.owner        sdev_link_owner,
      ao.object_name  sdev_link_name,
      ao.object_type     sdev_link_type
from sys.dba_objects ao,
     sys.dba_segments ds,
     sys.dba_recyclebin ar
where ao.object_name like 'BIN$%'
  and ao.owner = ds.owner
  and ao.object_name = ds.segment_name
  and ar.object_name = ao.object_name
  and ((ao.subobject_name is null AND ds.partition_name IS NULL)
       or ao.subobject_name = ds.partition_name)
  and ((:original_name is null or
        ar.original_name = :original_name)
      AND (:object_type is null or
          ao.object_type = :object_type))
This report includes the SDEV_LINK_OWNER, SDEV_LINK_NAME, and SDEV_LINK_TYPE aliases. This means you are allowed to drill down to see the structure of the item referenced. In the case of this query, it will drill down to the item in the RECYCLEBIN. If you changed the SDEV_LINK_NAME from ao.object_name to ar.original_name, you would drill down to the item that has since replaced it (if any has). You can modify this report to optionally allow a switch between modes.
Modify the SDEV_LINK_NAME line from
ao.object_name sdev_link_name,
to
decode( :original_or_recycle, 1, ar.original_name, ao.object_name) sdev_link_name,
Now when you run the report, if you want to drill down to the recycled object, do nothing, and it will. If, on the other hand, you would like to drill down to the original object (if it exists), change the original_or_recycle variable to a 1.
It’s techniques such as this that make the drill-down capability in Oracle SQL Developer so clever. When the Oracle developers modify this capability to allow drill-downs via custom-created queries, this will be insanely useful! Visit the Oracle SQL Developer forum on OTN ( https://community.oracle.com/community/database/developer-tools/sql_developer ), and let Oracle know that custom-query drill-downs is a feature you want!
In addition to changing the original_or_recycle variable, you can also restrict the return data set by object type, original object name, or both. The last four lines of the query create the bind variables. Bind variables were covered in detail above, so they don’t need to be covered again.
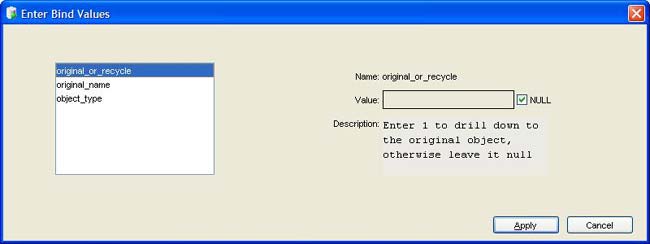
It would be helpful to provide additional descriptive information in the bind variable dialog box for end users of your report, though, wouldn’t it? The original_or_recycle variable really needs additional descriptive text if I want to share this report with others. There is a way to provide this.
I already mentioned editing the UserReports.xml file to add bind variables in pre-1.0 releases of Oracle SQL Developer. You can do the same to extend bind functionality in the current release. You can add descriptive text, change the prompt, and even assign default values. Here’s how to add descriptive text:
The OS directory to which you need to navigate is called the SQL Developer User Information Directory. In MS Windows, open your C:->Documents and Settings directory. Under this directory, choose the user you are logged in as. For example, if I am logged in as lcunning, I navigate to the C:->Documents and Settings->lcunning directory. In this directory, navigate to the .sqldeveloper directory. Keeping with my user, lcunning, I am now in the C:->Documents and Settings->lcunning->.sqldeveloper directory.
In Linux, this same directory will be found in a subdirectory under your home directory called .sqldeveloper. So, for a user whose $HOME is /home/lcunning, the UserReports.xml should be in /home/lcunning/.sqldeveloper.
In your .sqldeveloper directory, you should have at least two files. One of them, UserReports.xml, contain your user-defined reports. You can open it with your favorite XML editor.

Note: Before editing your UserReports.xml file, make a backup! If you mess up your XML syntax, you be able to replace the file with the backup and start over.
The XML document is in this format:
You can read this from the inside out, as a SQL query wrapped by a report that resides in a folder contained in the reports document or, from the outside in, as the reports document, which contains one or more folders (with a name and a description) that each contain one or more reports. Each report is defined by a name, description, ToolTip, and query. A query is made up of SQL statements.
The query node is where you make your modifications. You will add a <binds> node immediately following the <sql> node inside the <query> node.
The binds node should look like this:
The id attribute of the bind tag is the name of the bind variable. When creating bind variables this way, if you include one bind variable, you must include all the bind variables for this report.
If you want a bind variable to have a default value, you can put that value in the value element.
The ToolTip is where you put your extended description. For the three variables original_or_recycle, original_name, and object_type, you use the values below:
<binds>
<bind id="original_or_recycle">
<type><![CDATA[null]]></type>
<prompt><![CDATA[original_or_recycle]]></prompt>
<value><![CDATA[NULL_VALUE]]></value>
<tooltip><![CDATA[Enter 1 to drill down to the original object,
otherwise leave it null]]></tooltip>
</bind>
<bind id="original_name">
<type><![CDATA[null]]></type>
<prompt><![CDATA[original_name]]></prompt>
<value><![CDATA[NULL_VALUE]]></value>
<tooltip><![CDATA[Enter the original name]]></tooltip>
</bind>
<bind id="object_type">
<type><![CDATA[null]]></type>
<prompt><![CDATA[object_type]]></prompt>
<value><![CDATA[NULL_VALUE]]></value>
<tooltip><![CDATA[Enter an object typel]]></tooltip>
</bind>
</binds>
Modifying the descriptive text and default values is so valuable that this is another feature I’m willing to bet that Oracle’s SQL Developer team will be improving over time. The ability to customize is currently there; it’s only missing the interface.
After you’ve modified your UserReports.xml file, you’ll need to exit and restart Oracle SQL Developer. Once you’ve restarted, run your report. You should see a screen like the one below.
Sharing Your Reports
If you would like to share your user-defined reports with customers, coworkers, or other Oracle SQL Developer users, you can copy the UserReports.xml file and move it to the SQL Developer User Information Directory on their computers and share all of your reports.
If there are reports you don’t want to share, delete the text between <report> and </report> for that specific report. (Make sure again to keep a backup of your file!)
Exporting Report Data
Once you’ve run a report, you can right-click in the data grid and see a context menu. The only option should be Export. Choose Export,and you’ll get another menu that contains CSV, XML, Insert, Loader, and Text. These are export formats for your report data. Choosing any of these brings up the same dialog box.

- CSV is a comma-separated values file suitable for importing into a spreadsheet (or into Oracle Application Express).
- XML is an XML document of your data.
- Insert creates an insert statement for each record in your data set.
- Loader creates a SQL*Loader data control file.
- Text creates a tab-delimited text file.
The Columns tab in the dialog box enables you to choose which columns to include in your export file, and the Where tab enables you to add an optional where clause to restrict the records that go into your output file.
Move Over, SQL*Plus
Oracle SQL Developer is a tool that should be in every Oracle developer’s toolkit. In addition to allowing you to do SQL and PL/SQL development, Oracle SQL Developer provides a laundry list of useful reports and a facility for creating your own user-defined reports.
Move over, SQL*Plus, Oracle SQL Developer makes creating custom reports easier and provides additional functionality such as variable dialog boxes and drill-down reports. If you access an Oracle database on a regular basis, you owe it to yourself to download Oracle SQL Developer and try it out.
Lewis R. Cunningham ( lewisc@rocketmail.com) is a database architect, developer, and DBA in the transportation industry, and an Oracle ACE. He writes “An Expert’s Guide to Oracle” for ITtoolbox at http://blogs.ittoolbox.com/oracle/guide/ and has worked with Oracle technology for more than 13 years.